How to make rivets from nails
Making rivets with a knife lock is not that difficult. This will not take much time, and the only materials you will need are a couple of nails.
Such rivets will not need to be flattened; I will form a hat. They themselves will rivet from small blows, firmly holding the side pads of the knife.
We take nails
So, the steel nails themselves. You can buy them in any hardware store in all sizes; there is definitely no shortage of them now.
It is advisable to take one thicker and the other thinner, but you can also take the same type. But in this case, processing them will take a little longer - you will have to grind off one nail.
Making rivets from nails
First of all, let's form a beautiful hat. To do this, clamp the nail in the screwdriver chuck and process it with a metal file.
- First from the side.
- Then from above.
- The view is decent.
- It’s okay if the thickness of the cap is different - after the rivet nothing will be visible.
- Then we take the knife for which the rivets are made and measure their length. It should be more than half.
- Cut with a hacksaw for metal.
- We sharpen one, the thinnest rivet, to a cone at the end.
- The second, thick one, with a core at the end.
- We drill a blind hole with a drill whose diameter is approximately 0.1 mm smaller than the thin rivet.
- It turned out to be a couple.
- We check the depth so that the rivet that will go in does not rest and reliably compresses the knife pads.
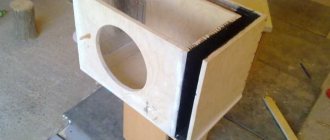
- Prepare the knife. Drill a hole the same size as the large rivet.
- We rivet with a hammer.
- Holds up great! The lock clicked inside. We rub the cracks with wood glue, use sandpaper to form a single surface of the handle and then rub it with impregnation.
- It turned out very beautiful.
Such a connection will not fall apart, will not fly out and will serve for many years.
How to install buttons on jeans and outerwear
The easiest way to install buttons is from four parts (pictured No. 2), which are slammed shut using a ring located at the top of the button. Using the same tool as for the blocks, it is easy to “flare” the button leg into petals, both the upper part and the lower part. However, for this type of buttons, special punches are often included with them. But from practice we know that using them is ineffective. It is much more convenient and easier to use a punch that “splits” the stem into petals. By the way, if you often have to install accessories on clothes, various types of buttons, especially tendril ones (pictured No. 1), then be sure to buy several types of dowels at a hardware store. This is a construction nail with a wide head that is impossible to bend. Ask your husband to “blunt” several dowels of different thicknesses. Surely he has something in his garage to do this with (emery). Next you will understand why you need such dowels.
Instructions for making metal rivets
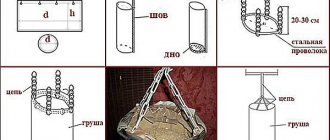
1. Several strips measuring about 30-50 centimeters are cut out of thick metal, at least one centimeter thick. On the wide side, the cut strips of metal are connected by welding with a hinge so that they can subsequently be folded together.
On the other hand, a piece of 6 mm metal wire (wire rod) is welded to the plates along the entire length. The wire is needed as a lever that could be used to clamp the device in a vice when making rivets.
2. After the wire is welded to the plates, you should clamp them in a vice and make a small hole at the junction of the strips using an electric drill. The depth of the finished hole should be no more than 15 mm and the diameter 4 millimeters.
Then a drill with a diameter of 7 mm is taken, and with the help of it, the resulting hole is countersunk to a depth of no more than 2 millimeters. This will create a conical hole in the metal strip to form the head of the aluminum rivet.
In order to make a rivet with your own hands using this homemade device, just take a small piece of aluminum wire and lower one end of it to the very bottom of the drilled hole.
Then, using wire cutters, the wire is bitten off above the edge of the metal strip with a margin of at least 3-4 millimeters. Using a hammer, a piece of wire inserted into the hole is carefully tapped until the wire finally sits in the hole.
At this point, the production of a homemade aluminum rivet is almost ready. All that remains is to release the vice and remove the finished rivet.
As you can see, making a rivet with your own hands is not so difficult, and you will need few materials for this. However, knowing the home process for making rivets, you don’t have to worry about not having a rivet at hand in an urgent need.
Manual riveter, how to use it and how it works
Unscrew the device from the vice and turn it upside down, remove the pin and use it to knock the workpiece down 3-4 mm (to the level of the second transverse hole). Then insert the pin into the second hole and repeat steps 1.
3. The head of the rivet is finally formed with the striker. Excess metal is removed with a file, while simultaneously grinding the plane of the head.
4. Repeat steps 2, knocking the rivet out of the bolt with a pin.
The entire operation is shown schematically in Fig. 2. Rivets are no worse in quality and appearance than factory ones.
Dmitry Mamichev Based on materials from the Toloka newspaper. We do it ourselves"
Device for making rivets
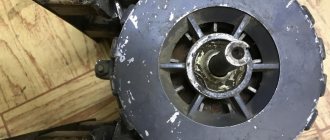
A simple machine for making rivets with your own hands will greatly speed up this difficult process. I suggest making a small device, like in the photo, which will be clamped in a vice.
It needs to be made from a piece of thick metal, the thickness of which would be equal to the length of the rivets being made.
- For these purposes, you need to drill 5-10 through holes in the center of a metal rectangle, and then cut the metal exactly in the middle of the resulting holes. Then, from one edge, you need to weld the metal plates, using for these purposes a piece of thin-bodied pipe cut lengthwise. Thus, to create something like a canopy.
- It will help the plates not to diverge too much to the sides and hold the wire for making rivets. After the wire is installed in the hole, the plates are clamped in a vice, and then the work of making rivets is carried out as in the previous time. Use a hammer to hit the end of the wire and cut it to the desired length. There are also factory-made devices for making rivets at home. They all have holes of different diameters.
- If you don’t have time to bother making rivets from wire, and you don’t need a large quantity of them, then you can simply drill a hole in the parts to be joined, then cut off a small piece of aluminum wire, insert the wire into the hole, and then flatten it on both sides with a hammer . In the same way, holes in dishes, for example, in aluminum cylinders, are sealed.
How to make rivets from a tin can
Such a rivet can be made not only from a tin can, but also from any thin metal. It can be made “in a hurry” and practically “on the knee”.
- To demonstrate the making of a rivet, the master took a tree branch. I drilled a hole in it and split it into two halves.
- A strip of metal is cut from the lid of a tin can.
- Using pliers, wrap the strip around the sewing needle. It turns out to be a metal tube. Cuts it off from the rest of the sheet.
- Connects the two halves of the branch and inserts a tube into the hole.
- Rivets the rivet on both sides.
- This is how you can quickly fasten two parts together.
Tools and materials
If a person needs a large amount of such fasteners, then it is more profitable to manufacture it yourself from aluminum or copper wire. Rivets are also made from brass wire, but it is rarely on hand.
For a large volume of fasteners, it is better to make a special device, which at a stretch can be called a machine for making rivets.
The tool is a thick steel bar in which holes of different diameters and depths are drilled (according to the size of the required fasteners). If a suitable metal bar of the required thickness is not available, then it can be made into composites - by fastening together several plates from steel blanks with a smaller thickness (2-5 mm).
The plates must have the same dimensions in length and width. They can be fastened by welding or bolts.
If you need several rivets, then you don’t need to make any equipment - it will be enough to have a hammer, a vice, a flat file and a chisel to chop the required number of wire blanks. Sometimes you may need an electric drill with a set of drills of different sizes and a center punch.
The wire is taken with such a cross-section as to reliably serve as fasteners as rivets. Most often, a section from 6 to 20 mm is used, but this parameter depends on the size of the structure that will need to be riveted. Electrical cable cores are best suited for rivets.
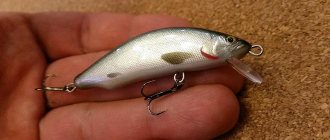
A good option is homemade rivets of thinner diameters made from construction nails.
To install the fittings you must first “punch” a hole
In our practice, in an atelier, to install fittings, we use a press and numerous attachments suitable for one or another type of button or block. With the help of such attachments, the edges of a button or block are carefully flared, acquiring a “factory” appearance. But since buying a press with attachments and other additional tools for home use is unjustified, we suggest that you use “improvised” tools. In your arsenal you should definitely have a small hammer and an anvil (you can use another hammer), an awl and several additional tools that you will have to buy at a sewing supply store. One of these tools should be a punch.
It is imperative to use a punch to ensure that the hole is perfectly straight and the edges of the fabric do not fray. You can have only one punch, the smallest size, or, in extreme cases, two (the second one is slightly larger). But it is best to buy a set of punches with removable attachments. It is not advisable to cut a hole with scissors, since from time to time the block or button will definitely “fall out” of it. The hole for the block or button should be minimal; it is advisable to even slightly stretch the fabric over the leg of the block, since the tighter the fabric is pressed against the leg, the more securely it will be fixed.
You need to punch a hole in fabric or leather on an anvil, not a metal one, but a wooden one. The tree should be very dense (not loose), for example the area where the knot is located. You can use other materials that are dense, but do not damage the tip of the punch. Tip: Areas where holes will be punched on knitted fabrics and other bulk materials can be glued with adhesive fabric.
Manufacturing
You should begin preparing workpieces after determining the true dimensions necessary for a high-quality result of subsequent riveting work. You should know exactly the thickness of the connection of the parts that need to be riveted in order to calculate the correct length of the workpiece, taking into account its processing for the embedded head and lock.
If the connection is complex and different lengths of rivet material are required, then it is better to make a drawing on which to mark all the places indicating the thickness of the finished connection, and then base the calculations on the length of the workpieces on this basis.
- The diagram will make it clear how many blanks are required for each length. Next, using a chisel and a hammer, cut wire blanks with a reserve quantity.
- The production of rivets consists of a number of operations. First, let’s talk about how to make a wire rivet using a machine.
- We select a hole on the machine that is suitable in diameter and length for the workpiece we need. The workpiece must have a sufficient length of protruding part from which the embedding head is to be formed.
- By tapping with a hammer on the protruding part of the wire, we form the head. First, we flatten the end of the wire with blows from above to form a head, like a nail, and then we process this head by tapping from the sides, giving it a spherical appearance.
- After forming the head, we will correct the result with a file, if this matters for the appearance of the structure being connected.
- We remove the workpiece from the hole and process the end opposite the head (straighten with a file or sharpener).
- When making a rivet without a machine, exactly the same actions are performed as with it, only the workpiece is clamped in any other device, for example, in a vice. All other operations are performed in the same order as on the machine.
- Sometimes it is necessary to make rivets with flat or countersunk heads. In the latter case, you can also use the device mentioned above.
To do this, you need to drill as many more holes in the bar as required - they are made deeper than the length of the countersunk rivets. These holes should then be widened from above to a cone using a drill with a diameter slightly larger than the holes themselves (for the head).
It is into these newly prepared holes that the blanks are inserted, the length of which is selected to match the depth of the hole plus a small protrusion on the head. All that remains is to tap the end of the wire with a hammer, filling the prepared bed for the head with flattening so that it does not protrude above the surface of the machine.
Rivets with flat heads can be made using the same technology as the previous version, but only the bed to form this part of the product is drilled cylindrical, not conical.
A homemade rivet of small diameter, consisting of two parts - a mortgage and a lock - can be conveniently made from a pair of nails. To do this, take one of the nails with a larger diameter - a hole is drilled in its rod 0.1 mm smaller than the diameter of the second nail.
It will serve as a lock for the future rivet.
The second nail, the shaft of which should have a shorter length than the depth of the lock hole, is sharpened at the end to a cone. The nail heads are ready-made heads; they just need to be sanded a little for appearance. The hole in the connection for which such a rivet was prepared is drilled to the size of the diameter of the locking part of the fastener.
Fluffy (chenille) wire for crafts
I continue to talk about interesting materials for children's creativity. Today we will talk about fluffy wire for crafts. This wire is also called chenille, shaggy, plush, and is sometimes called fuzzy sticks.
Chenille - (from the French chenille - caterpillar) - a fluffy cord with velvety pile, twisted from several threads, between which are caught a number of short ends of the threads sticking out in all directions (pile). Chenille is often called any fabric with short pile - velvet, corduroy.
Actually, this flexible fluffy wire is a pipe cleaner for cleaning smoking pipes. It has never been produced in our country, so until a few years ago many people had never heard of it. And foreigners quickly realized that this was a very useful thing for children's creativity. You can make cute fluffy crafts from it. In addition, these crafts can be disassembled and the next time you can make different ones (however, over time, the wire loses fluff and in some places ceases to be fluffy).
Foreigners liked this idea so much that many authors of pedagogical methods recommend fluffy wire among other mandatory aids for the development of fine motor skills in preschoolers. Therefore, in the USA, for example, children make crafts from chenille wire both in kindergartens and in schools during creativity lessons.
Fluffy wire comes in different lengths, different colors, including striped and shiny, has the same thickness along the entire length or its thin parts alternate with wide ones (“Feathers” shape). Shiny fluffy wire is tougher than regular plush wire, but it makes very beautiful crafts for the New Year and Christmas.
Crafts made from fluffy wire
You can make various crafts from fluffy wire: flat,
and voluminous.
Figures made of fluffy wire can be used to decorate various works, for example, this is how flowers made of fluffy wire look like (see this link for several more options).
When making crafts, it is very convenient to make paws for various animals from fluffy wire. For example,
In my other blog, I once showed a couple of crafts my daughter made from fluffy wire: turkeys and a sunflower.
Here is another video master class on how to make a butterfly from fluffy (chenille) wire.
Where to buy fluffy wire
Where to buy fluffy wire? In the creativity departments or order online.
For example, you can buy fluffy (chenille) wire at Ozone:
- ordinary one-color fluffy wire in Ozone,
- striped fluffy wire and fluffy wire “feathers” in “Ozone”.
I ordered fluffy wire from Aliexpress several times for my daughter and for gifts (the cost of goods and delivery is much lower than orders from Ozone or Labyrinth):
- ordinary fluffy wire (I ordered the color “Multicolor” or “Mix” - they received sets of one hundred wires 3 cm long, 10 different colors, 10 wires of each color).
- shiny fluffy wire (I ordered the color “Many” - a set of one hundred multi-colored wires also came).
Yulia Valerievna Sherstyuk, https://site
All the best! If the article was useful to you, please help the development of the site by sharing a link to it on social networks.
Posting site materials (images and text) on other resources without the written permission of the author is prohibited and punishable by law.
Many unusual materials are used in needlework. Sometimes they initially had some very primitive use, but over time they became materials for creativity. For example, chenille wire was originally invented as a means for cleaning smoking pipes, and its “great-grandfather” was an ordinary chimney sweep.
Recommendations
For better and more efficient production of homemade rivets, you need to listen to some recommendations.
- Spherical heads of finished products are always easy to convert into heads of the desired shape by grinding or mechanical action.
- Before drilling a hole in the shank of the locking part of the rivet, it is necessary to mark the center with a core for precise installation of the drill.
- To grind the heads and ends of products, you can use a drill, inserting the workpieces into the tool chuck, and when rotating, resting them on the sharpening device.
- If you plan to do a large amount of work on making rivets, the best decision would be to make a device for this and even buy a ready-made machine. Otherwise, the work will take a long time.
What to rivet from
Perhaps we shouldn’t talk separately and in detail about the fact that the quality of the wire will directly determine the quality of the rivets themselves. This fact is obvious.
It is most advisable to choose wire options from:
- Copper.
- Brass.
- Aluminum.
The diameter is preferably 20-30 mm, although there are sizes that are slightly smaller. Here it depends on the required dimensions of the product.
Note. An excellent option are wires made from electrical cables.
The process itself involves the formation of a rivet head, which is tapped with a hammer. To do this, they use clamping the wire in a vice, but there may be other options, it is not so important where exactly to clamp the wire, the more significant question is how to properly tap the cap and get the desired shape.
However, in essence, the process is incredibly simple:
- we fix the wire;
- we begin to tap the edges;
- we form a cap around the perimeter;
- we try to create a spherical shape;
- cut to the required length.
As you can see, there is absolutely nothing difficult. The remaining options are more delights and, as they say, rationalization proposals.
For example, it is possible to make a small machine from metal plates and insert blanks into it, which are then tapped on the protruding part, creating the desired shape.
In order to make the required batch for your home, no additional machines are required. If you need a larger scale, make a machine from scrap materials.
We will not give specific diagrams, since the materials at hand are different for everyone, but the principle here is clear.
Hidden hats
An interesting option is to create rivets with hidden heads; they have a concave shape and are sometimes used for special purposes when you need to leave a flat surface without a protruding part of the rivet.
It is absolutely clear that the matter cannot be solved by a simple method of tapping, but there are no difficulties observed here either. You just need to make a small machine.
- It is made from simple metal plates, in which you will need to drill a hole to the diameter of the wire and, accordingly, the rivet and select the desired length.
- Further from above, where the hole itself is located in front of the cavity, it is slightly countersunk with a drill of a slightly larger diameter to fit the size of the head. In this way, a small depression is made, which will allow the formation of a hidden cap.
- All that remains is to install the workpiece of the required length (a little longer with a margin for the head) and tap.
- To do this, it is possible to use, for example, a core of the required diameter or another rod, after which the workpiece is simply knocked out of the machine.
Installation Features
To install the rivet, you need to follow simple instructions. Let's take a closer look at the steps.
- The parts must have pre-drilled holes. They are connected to each other, and the body of the rivet in the form of a cylinder is placed there.
- The rod is located throughout the body; it needs to be grabbed with jaws (sometimes the rivet head of a rivet tool is suitable for this purpose). It is worth considering that the capture occurs near the base of the cylinder head.
- Next, you need to apply a little effort and pull the rod through the body of the rivet. The process is accompanied by expansion of the cap or head. By changing the end of the cylinder, it is possible to form the reverse wide part of the rivet (it is located on the surface of the previously connected parts).
- After we have managed to install the parts, the remains of the elongated rod should be broken off exactly at the moment when the force of the riveter is at its limit. It is advisable to immediately check whether the connection is strong enough.
After the action is completed, on one side of the connection you can find the head from the body of the rivet, and on the other there will be a flattened end from the cylinder, which should resemble petals in appearance.
Instructions for making rivets from metal strips
- Several strips measuring about 30-50 centimeters are cut out of thick metal, at least one centimeter thick. On the wide side, the cut strips of metal are connected by welding with a hinge so that they can subsequently be folded together.
- On the other hand, a piece of 6 mm metal wire (wire rod) is welded to the plates along the entire length. The wire is needed as a lever that could be used to clamp the device in a vice when making rivets.
- After the wire is welded to the plates, you should clamp them in a vice and make a small hole at the junction of the strips using an electric drill. The depth of the finished hole should be no more than 15 mm and the diameter 4 millimeters.
- Then a drill with a diameter of 7 mm is taken, and with the help of it, the resulting hole is countersunk to a depth of no more than 2 millimeters. This will create a conical hole in the metal strip to form the head of the aluminum rivet.
- In order to make a rivet with your own hands using this homemade device, just take a small piece of aluminum wire and lower one end of it to the very bottom of the drilled hole.
- Then, using wire cutters, the wire is bitten off above the edge of the metal strip with a margin of at least 3-4 millimeters. Using a hammer, a piece of wire inserted into the hole is carefully tapped until the wire finally sits in the hole.
- At this point, the production of a homemade aluminum rivet is almost ready. All that remains is to release the vice and remove the finished rivet.
As you can see, making a rivet with your own hands is not so difficult, and you will need few materials for this. However, knowing the home process for making rivets, you don’t have to worry about not having a rivet at hand in an urgent need.
Types of forged rivets: decorative, square and others
There are several types of forged staves. Familiarization with the assortment will allow you to choose the element you like and make it yourself:
The hat most often has a geometric shape: round, square, pentagonal and hexagonal. Often there are elements with caps, the texture and configuration of which imitate flowers, leaves and other plant-themed items. Non-standard configurations may include figurines of animals, birds and insects.
- Forged rivet with round head
- The size directly depends on the diameter of the element’s cap, which varies widely.
- Forged hex rivet, large, diameter 40 mm.
- Parts with and without legs.
Varieties
Clothes buttons differ in the material they are made of:
- metal;
- plastic.
According to the method of fastening they can be:
- installation - secured using special tools;
- sewn - to attach them you need a thread and a needle.
Depending on their form, purpose and application, they are divided into:
- simple;
- s-shaped;
- shirts;
- magnetic;
- clasp;
- holsters;
- straps;
- tablet
O-shaped
The most common type of buttons is o-shaped. They are called simple, ring or flight, because the fastener first appeared on jackets and overalls of pilots. The design is not complicated and consists of two metal parts that fit tightly into one another. The upper component has a spring fastening.
Simple buttons are used both on different types of everyday clothing and on specialized textiles.
S-shaped
This type is of the spring type. One of the parts resembles the letter “S”, which is why they are called s-shaped. Depending on the size they are divided into several types:
- uniform - the size of the top ranges from 27 to 40 mm;
- article - half the size of the uniform;
- anorak - compact size;
- mini anorak - the upper part is less than 8 mm.
The shape of the top is varied - from flat and round to diamond-shaped, square, drop-shaped. They are fixed by sewing or fastening. The large spring allows it to withstand heavy loads.
Shirt
Shirt-type buttons differ from regular ones in the way they are fastened - not with a single pin, but thanks to 6-8 spikes. The design allows fastening fasteners on fabrics of light density. They are suitable for children's clothes, knitwear and knitted clothes, light summer jackets.
The devices are convenient to use, but quite expensive to manufacture. During installation, the material is pierced with spikes located on the ring. Their diameter varies from 9.5 mm to 40 mm. The largest ones are used on jackets.
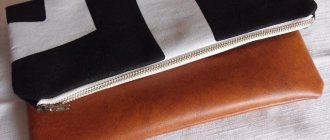
Magnetic
Self-fastening magnetic fasteners are most often used in household products - bags, outerwear, wallets. They are convenient to use, but they are expensive to produce. The connection strength thanks to the magnet is high, and it is very easy to unfasten even with one hand. The magnetic button device includes four parts - two bases and the same number of mounting flanges. The magnet allows you to automatically select the position and close. The larger the fastener size, the greater the connection force.
Koburnaya
This type has another name - tablet. They have been produced since the times of the USSR, when they were necessary for fastening military haberdashery. The lower part of the structure is very similar to the part of the s-shaped device. The top of the lock is hollow inside, petal-shaped. Its size is 12 mm. When the button is fastened, it expands and contracts. Most often, the fasteners are nickel-plated, but they can have two more color variations - black and brown.