What is a panic button
The panic button is a type of wireless alarm. Using this device, the user can transmit a signal to a specific central security point. It is called a certain button that is located on some surface or key fob.
Reference! Such a button is hidden from prying eyes, and the person’s goal is to quietly sound an alarm.
General principle
Buttons are a useful invention. They were first used in France in 1885 for leather goods: shoes, gloves, bags. Today, buttons are inserted into jackets, overalls, children's bodysuits, pockets and even underwear. They securely hold the edges of the fabric and at the same time can be completely invisible.
What you need to know about the buttons:
- "Mom and Dad". This is what people call the upper and lower parts of the button (which can also consist of several parts). The “male” has a protruding pin that fits into the “male” - a metal part with a recess and a beautiful “face”. They are located on opposite sides of the fabric. The “mother” is always installed on the upper part of the product, and the “father” is placed on the bottom. As planned, the pin should fit in and out of the recess.
- If the rivets are not sewn, they consist of several parts. Usually “mother” and “father” have 2 parts each. They are collected during the installation process. There is no need to do this in advance.
- Insert non-sew buttons into the holes. They should be narrow and the fabric should be dense. If there are already holes, but they are torn or frayed, they are strengthened with silicone glue, non-woven fabric or sewn with thread. If there are no holes, use a special punch or awl. As a last resort, you can punch a hole with a thin nail. You can’t cut it with scissors: sooner or later the fabric will come apart and the button will start to fall out.
- The button is assembled after installation on the fabric. The metal parts are inserted into the hole, checking for the correct location, and then pressed tightly against each other. Ideally, a press and special attachments are used to connect parts, which allow you to flare (flatten) the required parts of the button. After flattening, one piece fits tightly onto the other.
We recommend: How to whiten jeans using “Whiteness”?
Operating principles of the ringing alarm
The main task that such a button performs is maintaining wireless communication with the security point. When you press the button, the signal is transmitted to dispatchers who are located in the main control center. From this point, signals are transmitted to the nearest security group of the private security company. When a signal is received, the team arrives at the scene and works based on the circumstances.
Such models are considered the best choice due to the fact that they are the most effective way to ensure security. In addition, such models have a budget price, and you can send a signal unnoticed.
general description
Modern riveters appeared relatively recently; before that they were bulky and inconvenient for home use. But the constant work of engineers on this problem has yielded results: manual riveters have become compact, and most importantly, they reliably connect parts with each other with minimal physical effort. The device itself has become quite simple and easy to use.
It provides access to both sides for a more reliable connection. In this case, no outside help is required. The main thing you need when working with manual riveters is pre-drilled holes for rivets in the parts to be joined.
Almost anyone can cope with such work. At the same time, the price for manual riveters is low.
Types of radio button models
There are several main types of radio buttons. Depending on the type, the operating principle of the device will depend. What are the main types of radio buttons?
We recommend reading: How to make an adjustable power supply from a charger
Stationary
By design, the radio alarm button can be stationary or mobile. In any case, the market provides an assortment of manual designs in the form of keychains, as well as in the form of pedals for pressing with your foot. Additionally, specialized sensors are used to manually generate an alarm signal:
- The doll looks like a model in the form of bank notes folded into a bundle. It beeps when the programmed location changes.
- The clip looks like one bill, but works on a similar principle.
This is what applies to stationary button models.
Radio buttons
These models operate based on radio frequencies. Their range is presented in the form of discreet key fobs that can be configured via a mobile phone. Mobile key fobs are also divided into two main options.
GPS buttons have special functionality and can be configured more individually. Signal amplification function settings are available. Is it true. Such systems are completely inoperable during network failures. And with special equipment, the signal can be easily jammed.
Radio channel buttons operate on their own frequencies. Their action and operation do not depend on the availability and operation of the cellular network. It is precisely this signal that is difficult to block or drown out. However, such a device must be registered with a radio frequency center. There are also buttons that work from a Wi-Fi network.
Reference! Competent and correct operation is only possible with the correct location of network distribution points.
The best option is to install and use stationary and mobile systems. Even if one signal is blocked by an attacker, the second system will be able to work.
Fixed models
Such models require a long press of the button to confirm the signal. The operation of such a button can only be restored by using a special key. They are the best option in two cases:
- The moral one is to support workers by letting them know that the alarm is being sent correctly.
- If necessary, prove the fact of sending a signal in the event of the brigade arriving too late.
We recommend reading: Refinement of the Chinese super bright flashlight UltraFire XML-T6
This is what concerns the main varieties of the model.
Basic circuit of a piezo buzzer
The piezoelectric element itself can be with or without a feedback circuit. The addition of a feedback circuit allows it to be used in combination with an external transistor to create an oscillating circuit. The oscillating circuit generates a tone based on the resonant frequency of the piezo. But the piezo itself without a housing has a very low sound pressure level.
Useful: HEXFET power amplifier
By installing a piezoelectric element into the housing and then tuning it to a frequency that matches the piezoresonant frequency, a Helmholtz chamber, also called a resonating cavity, is formed. Inside the Helmholtz chamber, a larger volume of air becomes a piston, which moves the air more efficiently than the piezo disc on its own by more accurately matching the acoustic impedance of the air.
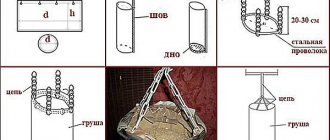
How to make a panic radio button with your own hands
You can build such a structure yourself. What will it take?
What you will need
The first step is to prepare all the necessary equipment. List of required materials:
- A key fob with a protruding button, the frequency of which must be at least 433 Hz. Three models are enough.
- Modules
- Receiver with one receiving channel.
- Frame.
Reference! The housing can be used used.
Panic button diagram
To assemble the structure, you can use the following diagram:
Step-by-step assembly instructions
In order to make an alarm radio button at home, you need to follow simple rules during assembly. Step-by-step instruction:
- Since the lithium-ion battery is used as a basis, it needs to be modified a little. The charging process will be carried out through a small USB connector. We need an MP911 module, the power supply of which will be 12W, converted to a power supply of 5W. To do this, replace the relay with a five-volt one.
- The receiver relay is connected to the input.
- The GSM module must respond to the opening of the relay contacts.
- If you are not satisfied with the standard buttons from the module, they can be replaced with brighter ones.
- Next, the internals are built into the module and the key fob is ready for use.
As you can see from the instructions, making a radio button is not difficult, it is only important to follow the connection diagram.
DIY panic button
Reference! You can make new buttons yourself using a special printer, or purchase ready-made ones.
Popular master classes by Valery.
DIY pendant made of wire and stone. Master Class.
How to make a cone for a Christmas tree out of paper with your own hands.
Paracord bracelet for beginners.
Connecting parts with a tool
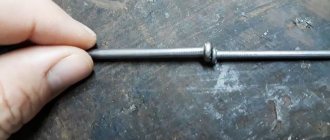
As mentioned above, the most popular in everyday life is a manual type riveter. This device includes a sleeve and a rod. Now let’s figure out how a manual pull-type riveter works.
First, the sleeve is inserted into a pre-prepared hole, after which we take a rivet gun, which draws the rod into itself. All that remains is to press the handle of the tool and the sleeve will flatten, forming a strong and reliable fastener. All this will take very little time and effort.
This device has its advantages. Firstly, you can work with it even when only one side of the workpiece is free. Also, a manual riveter can be used even while suspended, without using other additional elements.
Of course, you should not forget about the quality of the rivet itself; the reliability of the fastening also depends on this.
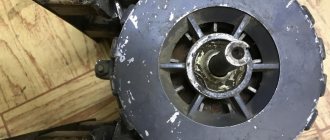
Metal riveting
The process of riveting metals consists of two stages: preparatory and the actual installation of hardware. Preparation - drilling holes, countersinking for countersunk heads if necessary. Please note that countersunk heads can be on one (either) side or on both.
The riveting process itself is as follows:
- insert the rivet;
- tighten the parts to be connected;
- form a closing head using a tool;
- check and clean the connection.
This is how blind rivets are installed
With a good tool, work goes quickly. For private use and one-time work, manual riveters are usually used. And even with them, the process itself (without drilling holes) takes a matter of seconds. If we talk about installing corrugated sheets or metal tiles, it is recommended to coat each hole made with paint to prevent corrosion. It is these processes - drilling and painting - that take a lot of time.
In general, there are two ways to install rivets: cold and hot. When hot, the joint is preheated to a certain temperature (determined by the metal and the thickness of the parts). In practice, it is used when installing rivets of large diameter - 12 mm or more.
The rivets are placed in rows. The minimum distance between adjacent ones is 4 diameters; from the edge of the sheet to the center of the hardware is no less than 1.5 times the diameter of the rivet. When attaching a profiled sheet, place it in a recess, not in a wave.
What material should the rivet be made of?
Rivets are usually taken from the same material as the parts being connected - this avoids electrochemical corrosion. Pay attention to strength characteristics. But, as a rule, when connecting aluminum parts, the strength of aluminum hardware is sufficient.
In general, rivets are made from the following metals:
- steel:
- regular - brands St2, St3, St10;
- corrosion-resistant X18N9T;
- galvanized;
When connecting copper parts, it is permissible to install brass and copper. Aluminum is joined with aluminum alloys. Steel sheets - corresponding grades of steel rivets. There are also mixed hardware - from two different metals (chemically non-conflicting). The most common are aluminum-steel.
To install facade elements, slopes, ebbs, metal tiles and corrugated sheets, rivets made of galvanized painted steel are usually used. Painting - matching with details.
The rivet is an excellent and durable type of fastener. But unlike bolts, nuts, studs and screws, it cannot be removed without damaging it. The bolt can be unscrewed with keys or a screwdriver, after which it can be reused. The broken rivet will have to be thrown away. The question also arises: “How to rivet rivets if there is no riveter in your arsenal?”
What is it used for?
A threaded rivet is similar to a blind rivet only with some nuances of fixation. Otherwise, its purpose is somewhat different. In some cases, it is necessary to install a product on metal. But its thickness is not enough to cut a thread or there is no way to crawl from the back side in order to substitute the nut. In this case, threaded rivets come to the rescue. Structurally, they are a small hollow cylinder, which already has a thread. The rivet is installed in such a way that it is securely fixed to a metal or other workpiece and provides the ability to install a bolt to fix any module.