4/5 — (12 votes)
Hello to all my subscribers and guests of this blog! Ekaterina is in touch with you. As I promised in one of my articles, today I will share with you patterns for felt toys. The selection will not be too large, I offer you only what I liked most, what I found on the Internet.
Remember my previous note, from it you can also take some ideas and ideas on how you can sew these wonderful, and most importantly beautiful, unique felt toys on different themes. If you are not into needlework, then perhaps you like to crochet such a beauty in the amigurumi style, then follow this link and knit the most important symbol of the coming New Year.
DIY felt toys
Well, for those who see for the first time and think about what kind of material this is, I will say right away that this is the most unpretentious and easy-to-work material. With it you will definitely not know grief, it does not crumble and the parts are cut out very carefully and beautifully the first time.
Nowadays the world does not stand still so much that innovation is on the rise, and in this direction too, for the little ones you can even make a carousel over the crib.
And for larger children, there are ideas and options for work from various animated series; just imagine how happy a child will be if you give him, for example, a set from the cartoon Super Wings.
Or, for example, cute little ones.
Little penguin Pororo.
When my kids were a little younger, they really loved watching Peppa Pig, within reason, of course).
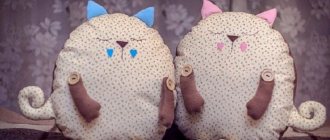
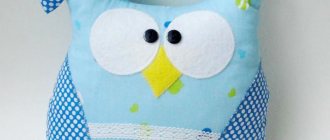
Kitty, you can even make it soft, just fill it with padding polyester.
Did you recognize these beauties? Yes, yes, PAW Patrol.
Malyshariki or Smeshariki are perfect for the tiniest kids. I can send the diagrams and master class to anyone who needs them, write a comment at the bottom of this article (I will be happy to share what I have in my piggy bank with you).
We have a felt alphabet at home with animals and animals. Isn't it brilliant? How do you think?
Let's start work. Basic preparation
Having looked through various sites about creating felt products, it may seem that it is labor-intensive and requires special skills. Having delved into the topic, it’s easy to understand that you don’t need any special skills to make an original craft.
To work with felt you need to prepare a suitable place. A desk or any other flat surface free of unnecessary things will do.
It is necessary to ensure good lighting of the workplace. The light will help the craftsman to better see small details of the work and do it more accurately.
The third important factor for a good result is the preliminary preparation of the temporary storage box for the product. There is a high probability that the work will not be completed in one go. It is not recommended to leave an unfinished product in a place accessible to children.
Master class on how to sew felt souvenirs
Nowadays it has become very fashionable to sew toys for children who have just been born or when they are one year old. Usually they do this in the form of a name and some kind of plot. I suggest you watch this video, just for those who don’t know how to properly sew together the parts of felt toys, this video will help you figure it out, watch all the stages of work:
Well, and of course, if you dream of sewing any fairy-tale hero or cartoon characters, then be sure to use this video instruction, based on it you can subsequently make absolutely any animals or people, the main thing is to find and print the template of the one you plan to sew:
Preparation of materials
Before preparing the material itself, a beginner is recommended to figure out what exactly he would like to do first and look on the Internet for diagrams of the proposed product. Thus, the author of the needlework will get an idea of approximately how much material he will need, and will also be able to estimate the colors.
Then you will need to prepare the following tools:
- scissors.
- threads of the same and different felt colors depending on the chosen color.
- needles of various thicknesses.
- multi-colored pieces of felt.
- 4 pencils (2 light shades, 2 dark shades).
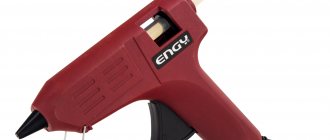
- glue gun
- holofiber or other material for stuffing, in the case of voluminous crafts.
- decorative components.
As for the last item on the list, everything depends on the ideas of the needleworker and can be selected according to the template of a specific work. As a rule, buttons, rhinestones, decorative stones, coins, etc. are chosen for decoration.
Having prepared the necessary atmosphere and materials, you can begin to create a pattern.
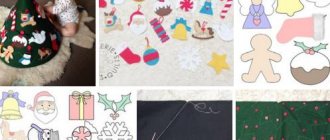
Christmas felt toys for the New Year 2022
When the time comes for the New Year's Eve, everyone will immediately start creating, so here are some small ideas for you.
Craft in the form of a deer.
House with a white snow cover.
Beautiful Christmas tree.
Gingerbread men.
Heart.
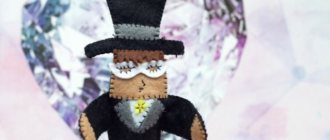
The symbol of this year is a dog, so you can make one for the Christmas tree; below I will present you with even more patterns with different breeds of puppies.
Brooches
A bright brooch draws attention to your outfit, so many women carefully select this accessory for a particular look. Make a felt brooch using the step-by-step instructions below, and you will see that it is quite possible to create them yourself using scrap materials.
Snail patterns (click on the picture, it will enlarge and then download it):
Patterns of New Year's toys made of felt
Of course, the symbol of any year is mittens, mittens, Christmas trees, horses, since all these accessories always decorate the spruce.
You can even make a keychain and give it as a souvenir.
Or this table set.
Christmas bell.
Tips for making crafts
- Care must be taken when processing pattern seams. Even when cutting out blanks, it is important to do this carefully and clearly along the line, since the seams of the toys will be outward. An unevenly cut edge or a poorly finished seam will draw attention to itself and give the work a sloppy appearance.
- Glue should also be used with caution; too much glue can spread and spoil the overall appearance.
- If you plan to sew additional parts to the toy, a tail, wings, ears and other parts of the body or decor, it is better to do this before stuffing and completely stitching the part, so that all unnecessary seams are hidden inside.
Working with felt is interesting not only for adults, but also for children. And although making a toy will be a difficult task for kids, they can still do an interesting job, and the process itself will captivate the child.
Felt crafts for children are limited to using only felt, glue and scissors. You can make appliques or postcards from this set.
Algorithm for sewing a fashion accessory
For sewing, you will need not only felt, but also prepare cotton fabric, it will be used to create an applique and handle.
Cut out a long rectangle from felt of a color that suits you and on one side round off both edges; this will be the flap of the future handbag.
We fold the bottom side to the top, like a regular envelope, and chop off the side sections and grind them to a width of about 5 mm from the edge.
Along the edges of the flap, sew a decorative stitch 3 mm from the edge. The thread for sewing buttonholes on the front side can be contrasting with the color of the felt.
Cut out an applique from the fabric and sew it along the contour to the top of the bag.
If you have special pliers, install two blocks to fix the handles of the handbag; for this you will need to step back one centimeter at a time. If you don’t have this tool, then you can cut a hole to attach the handle and trim the edge with thread.
Cut the handle of the future handbag out of fabric; it should be a strip about four centimeters wide. Fold it in half and sew along the length of the strip.
Pull the ends of the handle into the pre-made holes in the bag flap and secure it with knots. A beautiful handbag for a fashionista is ready.
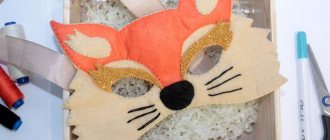
Hairpin assembly sequence
By following the algorithm below, you can easily and quickly make a hairpin:
- Find a pattern on the Internet or draw it yourself and transfer it to felt.
- Cut out two halves of the flower.
- Sew it, first stuffing it with padding polyester.
- Now all that remains is to glue the resulting product onto a hairpin that you previously bought in the store.
All that remains is to decorate the decoration with rhinestones or beads.
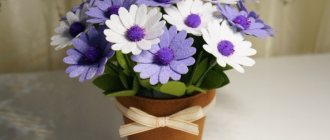
Felt roses
Let's make the base first. To do this, you need to cut out a circle measuring 10 centimeters. We make rounded petals along the edge, moving in a spiral towards the center of the circle. When twisting, starting from the center, you can get the middle of the future rose. To secure, you need to apply glue using a heat gun. After the glue has completely hardened, we wrap the remaining part of the felt strip onto the resulting center of the flower, so that the bottom of the flower is completely covered with felt. The rose is ready.
Such a rose can be made part of a picture, used as a hair clip or as a brooch for a dress. To do this, just sew or glue a pin or hairpin to the bottom side.
Painting with a horse
The proposed painting of a horse is perfect for children. They will be able to do most of the work on their own; adult help will only be required when sewing on the parts.
Related article: Crochet baby pillows. Scheme
Necessary materials:
- felt;
- scissors;
- beads;
- sequins;
- pencil;
- needle and thread;
- photo frame with glass.
The work process consists of the following stages. First stage. Let's disassemble the photo frame; it's better to put the glass aside for now. According to the size of the cardboard base included in the frame, we cut out the main background of the future painting from yellow felt. Using PVA glue or a glue gun, glue the felt and cardboard.
Second phase. We make templates from paper for all elements of the composition. Using the template from red felt, we cut out the body of the horse. Next, we cut out the mane and tail from blue felt. From orange - horseshoes, harness, and from white - a dove, a circle and the eye of a horse. Then make a cloud out of blue. We make several more circles of different colors for the Olympic rings.
The final stage. Now all the parts need to be sewn together, using yellow beads for fastening and decoration. All received parts must be glued to the main background.
The finished painting just needs to be placed in a frame under glass.
Tulip
Roll the tulip strip evenly into a tube. On the last 8 cm, make tucks (glue, sew up) every 2 cm and twist. Plant on wire, add leaves.
Make several copies of each flower (optional).
Collect all the flowers in a bouquet. Wrap the legs with fabric. Decorate with a ribbon bow.
The finished bouquet can be placed in a vase.