4/5 — (12 votes)
Hello to all my subscribers and guests of this blog! Ekaterina is in touch with you. As I promised in one of my articles, today I will share with you patterns for felt toys. The selection will not be too large, I offer you only what I liked most, what I found on the Internet.
Remember my previous note, from it you can also take some ideas and ideas on how you can sew these wonderful, and most importantly beautiful, unique felt toys on different themes. If you are not into needlework, then perhaps you like to crochet such a beauty in the amigurumi style, then follow this link and knit the most important symbol of the coming New Year.
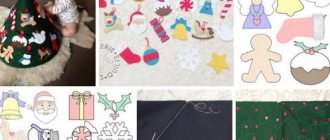
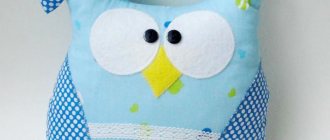
DIY felt toys
Well, for those who see for the first time and think about what kind of material this is, I will say right away that this is the most unpretentious and easy-to-work material. With it you will definitely not know grief, it does not crumble and the parts are cut out very carefully and beautifully the first time.
Nowadays the world does not stand still so much that innovation is on the rise, and in this direction too, for the little ones you can even make a carousel over the crib.
And for larger children, there are ideas and options for work from various animated series; just imagine how happy a child will be if you give him, for example, a set from the cartoon Super Wings.
Or, for example, cute little ones.
Little penguin Pororo.
When my kids were a little younger, they really loved watching Peppa Pig, within reason, of course).
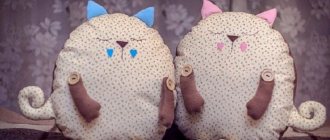
Kitty, you can even make it soft, just fill it with padding polyester.
Did you recognize these beauties? Yes, yes, PAW Patrol.
Malyshariki or Smeshariki are perfect for the tiniest kids. I can send the diagrams and master class to anyone who needs them, write a comment at the bottom of this article (I will be happy to share what I have in my piggy bank with you).
We have a felt alphabet at home with animals and animals. Isn't it brilliant? How do you think?
MK. EYES FOR DOLLS. TWO OPTIONS
There are now a lot of tutorials on the Internet for making eyes for dolls. I decided to add my own version of the eyes.
- We will need:
- 1. Colored plastic
- 2. Sharp knife or scalpel
- 3. Sandpaper
- 4. Acrylic paints
- 5. Clear nail polish
First we will need cyan and blue plastic to make the iris.
Roll out a flat cake from blue plastic, and roll a “sausage” from blue plastic,
which we will wrap in a flatbread...
... and roll it well on the table to get a cylinder.
Bake the workpiece in the oven, but set the temperature a little lower than indicated in the instructions, since the plastic is thin and can burn quite quickly. I set the temperature to 120°, because... The diameter of my workpiece was 12mm.
Master class on how to sew felt souvenirs
Nowadays it has become very fashionable to sew toys for children who have just been born or when they are one year old. Usually they do this in the form of a name and some kind of plot. I suggest you watch this video, just for those who don’t know how to properly sew together the parts of felt toys, this video will help you figure it out, watch all the stages of work:
Well, and of course, if you dream of sewing any fairy-tale hero or cartoon characters, then be sure to use this video instruction, based on it you can subsequently make absolutely any animals or people, the main thing is to find and print the template of the one you plan to sew:
What you need to create an outfit
Depending on what kind of New Year's parrot costume you are going to make with your own hands, you will need:
- any feathers;
- brightly colored food colors;
- old clothes;
- cardboard;
- acrylic paints;
- boa for decorating bouquets;
- translucent organza in yellow, red and blue (for the option with a fluffy dress);
- wire;
- glue;
- paper;
- pencil;
- ruler;
- scissors;
- threads
It's good if you have the opportunity to use a sewing machine. However, if this is not available, you can choose an option that is made entirely by hand.
Christmas felt toys for the New Year 2022
When the time comes for the New Year's Eve, everyone will immediately start creating, so here are some small ideas for you.
Craft in the form of a deer.
House with a white snow cover.
Beautiful Christmas tree.
Gingerbread men.
Heart.
The symbol of this year is a dog, so you can make one for the Christmas tree; below I will present you with even more patterns with different breeds of puppies.
Wings
If you have chosen a chic parrot costume, in addition to the dress, you will have to make accessories for it with your own hands. The main one is the wings. To make them, a frame is formed from wire, which is then covered with fabric. You can then choose one of the following options:
1. Cut one strip 15 cm wide from two colors of fabric. Place it along the bottom edge like the hem of a dress. Sew in two rows along the edge of the “wings” with a margin of 5 cm.
2. Completely hide the surface of the fabric chosen for covering under a layer of feathers, using several multi-colored bouquet boas.
Patterns of New Year's toys made of felt
Of course, the symbol of any year is mittens, mittens, Christmas trees, horses, since all these accessories always decorate the spruce.
You can even make a keychain and give it as a souvenir.
Or this table set.
Christmas bell.
Volumetric owls
From wood cuts
For the base we will use tree trunk cuts. If you take a large branch, the owl will turn out to be large. But size is not the main thing in such a craft, so you can also use saw cuts of small diameter.
From a log
You can make a large owl from a log. A piece of the trunk will turn into a body, a cone into a beak, and saw cuts into eyes. Such owls will be a good decoration for a summer house.
From the bark
You will need a large piece of tree bark. Cut it to an oval. You need to leave two triangular protrusions on top - these will be the ears. Use scissors carefully so as not to accidentally cut them.
Original eyes are obtained from acorn caps, dried pieces of apples, large autumn flowers (bush chrysanthemums or asters), small saw cuts, buttons and even large bagels. The wings are made of cardboard or fabric, give them the shape of a sheet. An interesting option is autumn leaves.
From the cones
To make the craft large, use a pine cone as a base. But if you don’t have one at hand, pine or spruce will do. The first will become the head, the second - the body of the bird.
We will fasten the elements using plasticine. You can use glue, but it is more convenient for a child to work with plasticine.
You can use one cone for the owl, rather than two - this craft is simpler. Eyes made of cardboard or paper are glued onto the “body”, wings and nose are made from dried orange peel, cut into pieces, ears are made from leaves. Place the owl on the moss and the composition is ready. Try attaching another piece of moss to your head, it looks funny.
You can not use the whole cone, but only the scales. Carefully remove them and place the owl competition on a sheet of plywood. Glue the scales. Fill the remaining part of the plywood with twigs, autumn leaves and any other available material.
A simple but original composition can be made from a glass jar. Throw small cones, chestnuts, acorns, spruce branches inside and decorate the outside of the jar as an owl: with eyes, ears, beak and paws.
From twine
From the bottle
Even a simple plastic bottle is great for making an owl out of. The bottom should be cut off from it (it will turn into the upper part of the head) and the top without a neck (it will become the body). We put the parts on top of each other and paint them “like an owl” with paints. Please note that after drying, the gouache must also be treated with hairspray on top - otherwise it will get dirty.
conclusions
The most universal options are eyes and spouts on a secure mount. They are easy to use, do not require any hassle, and there is no need to tighten the head of the toy.
There is a fan for every type of eye and nose. You can only understand what is right for you through practice. Choose several options for yourself and experiment!
But it is necessary to take into account the safety of the toy. If amigurumi are intended for a child under three years old, you can safely use:
- Do-it-yourself knitted eyes and noses (they must be firmly sewn on)
- Eyes and noses on a secure mount (make sure the washer is the right size and fits snugly)
- Embroidered eyes and noses (do not forget to carefully secure the thread so that the embroidery does not unravel)
If the knitted toy is intended for older children, then in addition to the above you can also use:
- Half beads
- Beads
Paper and glass stones
Volumetric eyes for handmade crafts are made of paper and glass stones.
A paper blank of the iris is made. The desired color is selected. Before you print out eye irises for crafts, you need to make sure that the diameter of the workpiece will not be larger than the glass stone.
Decoupage glue is applied to the flat part of the stone. The iris blank is applied with the front side to the surface of the stone with glue. Leave until dry.
A thin layer of glue is again applied to the dried surface. Threads of yarn are laid out on it, everything is covered with a white sheet.
You need to press it onto the paper with your finger so that everything sticks well. It takes some time to dry.
Excess paper and threads are cut off along the contour of the stone. You can use the eye blank for crafts.
Lively eyes for animals: we paint them ourselves
So I’m ready for my first master class. Please do not judge strictly; I will be glad and grateful for constructive criticism.
I came to painting peepholes after a long search, trial and error. At first I used ready-made German glass eyes, but I didn’t like many things - limited color range, in addition, they are very bright, monotonous and expensive. I read about sticking printouts on glass, about painting plastic blanks, but I found the best way for myself - I paint glass cabochons by hand. Transparent glass cabochons are easy to find, they are inexpensive, they come in different sizes, they are an ideal hemisphere in height, and you can use round or oval blanks in shape.
So let's get started. To make eyes, we will need: an idea or a blank animal (I never do it for future use; I paint the eyes individually for each little animal) and the following materials and tools:
Acrylic paints for glass and ceramics, pearlescent acrylic paints, and you can also use regular acrylic, but under no circumstances paint the pupils of your eyes with it! I tried, when further painting, the pupils painted with ordinary acrylic “led”, like this:
That’s why I always paint pupils only with glass and ceramic paint, and I recommend it to you.
Everything is extremely simple and ascetic - cabochons for painting, brushes (I like a miniature flat synthetic brush and a thin one, No. 1) and toothpicks. Toothpicks are a truly versatile tool that is used in many crafts, techniques and products.