What it is
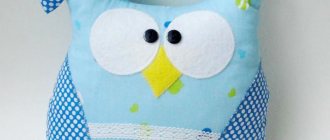
A toy pillow is an interior item most often found in a children's room. It gives the room a unique style and becomes its decor. More often, pillows have the shape of an animal, a bear, a unicorn, a cat, a car, or a doll. The toy is suitable for people of any age.
Pillow toy
Note! It is recommended to make the product from modern, high-quality, environmentally friendly materials.
To realize the idea, the craftswoman will need a little creativity, creativity and imagination. Toys can be located not only in the nursery, but also in other rooms, having different shapes.
Stores selling children's toys and interior items have been offering for sale various options for pillow toys for a long time. However, even a novice seamstress can easily sew an original, beautiful product that will be better than a store-bought one.
DIY pillow toy
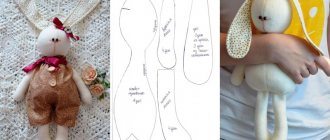
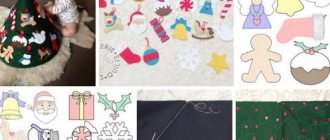
Splyushkin. MK. Pattern.
I'll show you how to make this or a similar Scops Owl animal.
You need to draw an approximate carcass, then fold the sheet in half and cut it out. Or you can just cut it out, symmetry is not necessary. It will be a bunny)
But maybe a cat. A bear, a dog, a fish, etc. Who do you want to sleep with? 
Then we trace the pattern on the fabric. The fabric should be natural, not synthetic. Calico, linen, cotton and the like.
Stitch according to the drawing. If you sew by hand, you need to baste along the contour, cut with an allowance and sew with a comfortable seam.
Cut with allowances. Make notches at the corners.
Using a wooden stick, unscrew the parts.
Sweep the ears along the edge and iron them. We will fill the carcass with padding polyester or other material suitable for stuffing.
When the legs are full, move on to the arms. They do not need to be filled, except in the areas of the hand. Of course, there are no arms or legs, but I don’t want to list them by numbers)
To prevent the stuffing from slipping, we fasten a couple of stitches. Both paws.
And we separate it from the body with a line.
Bend the ears slightly at the base. They will need to be inserted into the open edge and closed with stitches, thereby sewing on the ears.
Stitch like this, first from the front side. One, and then the second ear.
This is such a smooth edge.
Turn over to the other side and attach the ears using the same stitches, sewing and closing the hole.
My new bunny with a birthmark on the back of his head) Looks like a star!
That's how cute he is! Let it be a girl, I already have a boy)
You need to draw a face to try on the pad. I don’t want her to cover half her face.
She's lying there, looking like an angel)
Making a pillow. Rectangular patch. If you need to decorate, it's better now.
Fold the right side inward and stitch.
Fill not tightly, but not too little. You can add herbs, let it be a sachet.
Tuck the edges and sew in a herringbone pattern.
Looks like it's ready, but needs a couple more touches.
Fold the edges and stitch all the way through.
This is such a voluminous and soft pillow!)
Now we will tint Zaya. I have brewed chicory with cinnamon.
Apply the sponge very carefully so as to wet the stuffing as little as possible, or better not to wet it at all. Therefore, do not dip the sponge into the solution too much. And when you tint, iron the fabric rather than saturate it with point movements.
Here you go! Zaya has become tanned)
You need to create volume, so you need to mix a drop of red and half a drop of black paint. You can apply it on a piece of paper and then apply it to a sponge with a brush.
And with this sponge and paint, stamp the convex edges on the Bunny. You need to do it wet. And if there is a mistake in painting (too much color), rub it out with your fingers.
Using a brush and water-blurred paint, draw the outline of a face over the wet one. You should get blurry outlines.
When the Scops owl dries, you need to draw a face along the outlined lines with black paint. How sweet it is to sleep)))))))))
There is also a white highlight on the nose. More and less. Such a wet nose)
The pad needs to be sewn on the edges and on the inside of the foot. Beyond the edges diagonally.
This is such a sleepy kingdom)
Here is the pattern. If you get Scops Owls hares similar to mine, don’t forget to show off)
stranamasterov.ru
Necessary tools for creation
Before implementing the idea, you need to determine the necessary tools and materials that will be durable and strong.
Tools:
- textile;
- regular and zigzag scissors;
- synthetic filler;
- sewing machine;
- iron or steamer;
- marker for applying a pattern to fabric;
- lace, buttons for decoration;
- hook;
- threads
Sintepon for filling pillows
Preparing materials for work
Before sewing the product, you need to choose the color and type of fabric. When talking about colors, it is impossible to accurately recommend a shade, since it depends on the personal tastes of the household and the interior of the room.
Additional Information! To decide on a pillow design, it is important to determine its function. To decorate a room, you must match the pillow with the color of the furniture. However, if the main function of the pillow is a toy for a child, then the most fun, unexpected options will do.
You may be interested in this: Construction of patterns and instructions for sewing a wedding dress
Types of fabrics for pillow toys:
- fleece;
- jeans;
- drape;
- linen;
- silk
Listed above are the types of fabrics that will not lose their shape or appearance after several washes.
You can also choose various fillers:
- feathers;
- fluff;
- foam;
- synthetic fluff;
- padding polyester
The padding material must have hypoallergenic properties.
Recommendations for preparing materials:
- choose the appropriate content;
- sharpen scissors;
- wash the fabric, check for deformation;
- set up your sewing machine.
Fleece fabric
Making baby scops owls using the amigurumi technique with your own hands
The amigurumi technique is a crocheted toy. If you didn’t need any special skills to create a cotton toy, then to create an amigurumi scops owl you need to know how to crochet.
It is very important to choose the right yarn and hook. Classic miniature amigurumi are crocheted no larger than No. 1.15. A wide variety of threads are suitable for this technique: acrylic, mohair, cotton, wool, it all depends on the idea. Beginners can take hook number 2. For stuffing toys, padding polyester or holofiber is used, so they do not lose their shape over time. All parts of the product are knitted separately.
They need to be sewn together with the thread from which the toy itself is knitted. When creating amigurumi, single crochets (sc) and chain stitches (ch) are used. It is important to be able to make increases and decreases.
There are several common mistakes that the following tips will help you avoid:
- Having knitted one row, check the number of loops with the diagram. Unraveling one row and correcting a mistake is much easier than an almost finished product;
- start small. Simpler toys will help you improve your skills and improve your skills;
- and knitting, on the contrary, needs to start with the most complex part;
- we knit loops on both walls, unless otherwise indicated in the pattern;
- Correctly knitted decreases/increases will give the toy a finished and neat look;
- a well-chosen hook and thread will eliminate holes in the fabric from the product;
- You should not use ordinary cotton wool as a filler. A toy stuffed with cotton will be heavy and shapeless. Sintepon or silicone is ideal for this role;
- If, as planned, the toy should sit, then beads are perfect as a weighting agent. It must be sewn into a fabric bag in advance. This way, it won’t scatter all over the toy and will do its job perfectly.
Tilda Bunny toy pattern
To create a pattern, you need to transfer the diagram presented below onto the fabric.
Important! If you are unsure, you can first try to redraw the diagram on a sheet.
When creating a pattern, you need to pay attention to the position of the grain thread and the fabric pattern, if there is one. It is recommended to transfer the diagram onto the material using a special marker. To create a symmetrical pattern, you can fold the fabric in half along the grain.
The life-size scops owl bunny pattern depends on the size needed.
Bunny backfill pattern
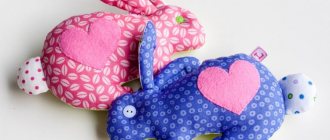
How to sew a tilde toy yourself, the Scops Owls hare with a heart
Instructions:
- Transfer the pattern diagram onto the fabric folded in half.
- Redraw all the details.
- Add seam allowances of 7-8 mm.
- Cut the product from fabric.
- Iron the parts
- Sweep the ears, head, body, paws, and heart by hand with the outer side inward.
- Turn out the parts.
- Fill with filler.
- Sew the head to the body.
- Add other details.
- If you wish, you can sew clothes for the hare.
- Dress the toy in tights, a dress, etc.
- Sew a heart into the bunny's hands.
- Decorate the pillow with lace and decorative buttons.
- Add a nose and eyes using threads.
DIY bunny pattern
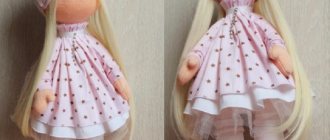
Master class: sewing the “Splyusha” bunny in the Tilda style. Part 1: bunny body
I would like to invite you to sew a cute and charming “Splyusha” bunny in the Tilda style. Today, a textile toy can become not only a faithful friend for children and adults, but also an exclusive and wonderful gift for your family and friends, which will emphasize your individuality and good taste. This is how handsome it should turn out
For work we will need:
- cotton fabric 100% beige (Lenda) 58 x 50 cm - for the body, fabric for the inside of the ears measuring 28 x 16 cm;
- 100% cotton fabric - for clothing;
- filler (holofiber);
- decorative ribbon and butterfly for decoration;
- buttons and thin elastic band;
- floss for embroidering a nose;
- fabric paints for eyes.
We start with the pattern. The pattern is given for printing on A4 sheet. My bunny is 40 cm tall.
Print out the pattern and cut out the details.
Fold the cotton in half, right side inward, and trace the pattern pieces. The product must be cut along the grain (that is, on the side where the fabric does not stretch). Body 2 parts, arms and legs 4 parts each, ears 2 parts made of fabric for the body and 2 made in any color you like.
We sew all the details of the pattern on a machine, leaving unstitched places in order to turn our parts inside out. Afterwards we cut out all the details.
We do not stitch the ear parts, but cut them out and connect them with two other colored ear parts.
Our next step is to make cuts in the recesses, not reaching the line 1 - 2 mm. This is done so that when turning, the seam is even and does not pull.
Now turn all the parts right side out, I use a roll stick.
When all the parts have been turned out, it is necessary to correct from the inside where parts of the body are rounded so that everything is beautiful.
This is what happens.
After this, we begin to slowly stuff all parts of the body. For stuffing I use ball holofiber.
Today, holofiber is practically the most popular material, characterized by springiness and softness; this filler is also hypoallergenic.
You can stuff all parts of the body with chopsticks, tweezers and any available items. I have handy tools - these are scissors and an indispensable stick for rolls
First, I stuff the bunny’s legs and arms - this is the easiest, the legs don’t need to be stuffed too tightly at the very end (in the place where they will be sewn to the body), you need to leave them unstuffed so that they can bend and our Tilda- the bunny could sit.
Then we proceed to stuffing the body of our bunny; it is worth considering that each textile toy has its own “problem” places for stuffing. I’ll tell you a little secret of stuffing the neck, as well as the waist and other places similar in shape to an hourglass (elongated, narrow and long): very often when stuffing these places, folds or “cellulite” are formed, since the stuffing is always trying to slip out of the narrow places are wide, and these folds spoil the appearance of the toy.
Personally, through trial and error when stuffing the body, I came to the conclusion that the most effective and quick way to stuff the “problem” areas of my little bunny is as follows: I stuff the neck tightly, then, holding it tightly with my fingers just below, we pierce the stuffed part with needles, as if fixing the filler so that it does not slip out of the neck. Then we continue to stuff the rest of the body, but I would like to note that from time to time you can also pierce the stuffed part with needles, which will allow the filler to be evenly distributed. At the bottom of the body, where we sew in the legs of the tilde bunny, there is no need to stuff it too tightly, otherwise the doll will not be able to sit.
With this method of stuffing, the holofiber or padding polyester bodies lie very tightly and without wrinkles.
This is what it looks like.
Now carefully sew up the sections of the legs and arms with a hidden seam.
Now let's move on to assembly. We turn the lower edge of the body inward by 5 - 8 mm. We connect and split the middle seams to avoid unevenness. We insert the legs into the resulting holes, deepening them by 5 mm, and pin them together with pins, making sure that their lengths match.
We begin to sew the legs to the body with a hidden seam. Take a longer thread. From one leg we immediately move to the second, sewing the distance between them with the same hidden seam.
After the legs have been sewn, we secure the last seam with a knot.
Next, we insert the needle into the place where this knot is located, and bring the needle through the body, pull it a little and cut it off. Unfortunately, I didn’t capture this moment.
Now let's move on to the paws: take the paws, fix them with needles to the body and sew them with the same hidden seam.
After the legs and arms are sewn on, we move on to the ears. I already wrote earlier that the details of the ears consist of two different fabrics. We stitch them and turn them inside out, then take the eyelet and turn the cut inward by 5 mm and sew it up with a hidden seam. It turns out very neat.
Then we secure the ears with needles on the bunny’s head as you like and begin sewing the ears on with a hidden seam. First we go along the upper tier, and then along the lower one.
Since our ears are already ready, now we paint the eyes with acrylic paints (I paint with a regular synthetic brush, the color I use is black), embroider a nose with a mouth and apply the usual blush that you use in everyday life to the cheeks. Sometimes I use oil pastels as blush.
The sweetest creature, it pleases my eyes
Well, this completes the process of creating the body of our Tilda-bunny “Splushya”. It's time to dress him up. As you can already see from the photo, this will be night pajamas, consisting of panties, a blouse and a cap... Continued in the second part of our master class.
I hope that I described the process of creating a bunny in a very accessible and understandable way. Enjoy your viewing and creative success!
www.livemaster.ru
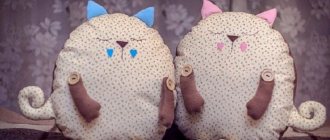
Pillow kitten "Splyushka" for Valentine's Day
Comfort is also a great gift for a loved one on Valentine's Day.
To create a product, a novice craftswoman will need from 1.5 to 2 hours.
Instructions:
- Transfer the pillow pattern onto the fabric.
- Add seam allowances of 8-9 mm to the parts.
- Cut 2 similar pieces from cotton or fleece.
Arrangement of parts on the fabric
- Transfer the pattern of the paws, ears, and tail onto the fabric.
- Cut, adding seam allowances.
You might be interested in Simple patterns for women's and men's T-shirts
Finished parts
- Combine cotton with interlining, gluing the wrong side of the fabric to the interlining using an iron.
Combination of cotton with non-woven fabric
- Connect the other parts together using machine stitching.
- Turn out the parts.
- Fill with padding polyester.
- Connect the parts together.
Ready product
Scops owl pillow “Sleeping kitten”
Instructions:
- Redraw the sketch onto cardboard.
- Cut out the template.
- Pin the cliche to the fabric with pins and trim it with extra space for seams.
- Sew the seams using a sewing machine, leaving an opening.
- Fill with padding polyester.
- Sew the details.
- Add decor.
Scops owl toy pattern “sleeping rabbit”