Textile dolls Snowballs (Bigfoot)
Hello!
Here I collect examples of dolls for inspiration, palettes, master classes and other useful information. The group was created for my personal use and was initially closed. But I thought it might be useful to someone else. PS Girls! The dolls and master classes that are collected in this group are NOT MINE. I don’t claim authorship, but I don’t know the authors either. I just collect useful materials in a pile to study. Therefore, if I suddenly posted your doll, and it offended you, then just write me a private message.
- All entries
- Community Posts
- Search
Textile dolls Snowballs (Bigfoot) post pinned
***Elehandmade*** Cutting and sewing
#to_note@sewing_school
Working with allowances:
Textile dolls Snowballs (Bigfoot) post pinned
And I have a soul.
Textile dolls Snowballs (Bigfoot) post pinned
Toy workshop. Handmade, needlework.
Beret for a doll Author: Yulia Gorelova
Show in full… Yarn Alize bella, composition 100% cotton.
I knitted the rib knitting needles #2, everything else #3.5
I cast on 64 loops + 2 edge loops, because... the hair is made from yarn and the head is still “not under the hat” getting bigger.
We knit an elastic band 6 rows,
We knit the next row with knit stitches with “invisible” increases (otherwise the holes from the increases will be visible) 3 knit stitches, increase. If you want it to hang down more, increase it more often.
Next, we knit the 8th row with the pattern: we alternate 1 knit, 1 purl 9 row: according to the pattern 10 row: where the knits were we knit with the purls, where we knit the purls with the knits 11 row: according to the pattern 12 row: by analogy with the 10th And so on until you reach the desired height . I got 38 rows (including the elastic) Then sew at the back and tighten the top. If necessary, decorate with a flower.
Tactile dolls are very popular among children and collectors. Tilde dolls are considered especially fashionable. Big-legged dolls provide healthy competition to tildes. Often such dolls are also called conventionally “Tatyana”. Externally, these types of toys are similar, but the significant distinguishing feature is the size and length of the legs. Making a centipede is quite simple if you know a few nuances regarding the work.
How to make Snowball yourself: step-by-step master class
Sewing a textile doll Snowball is not difficult. The main thing is to follow the entire sequence of actions.
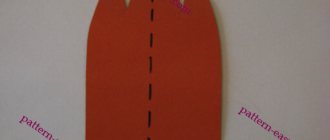
Transferring pattern elements to fabric
The pattern of the doll's parts needs to be transferred to paper and printed. After this, the parts are cut out with sharp scissors directly along the contour; there is no need to leave allowances.
The parts need to be laid out on the fabric. If you need two parts, you can immediately fold the fabric in half. The paper pattern needs to be pinned to the canvas using pins and carefully traced with a pencil.
Uncover
Cutting out the parts is quite simple. You need to carefully cut out all the circled parts, leaving at least half a centimeter for allowances so that you can then carefully sew them together.
Sweeping body parts
After all the parts are cut out and prepared, they need to be carefully swept away with a needle and thread. The process is carried out strictly along the contour of the part.
Basting garment parts
Depending on what kind of doll you want to make, you need to immediately select the fabric and decor for the clothes. There are patterns on the Internet, you can choose any one.
The most important thing is that it fits the doll in size. Therefore, it is recommended to first find out the length and width of the doll itself (this is usually indicated in master classes), and then select the necessary clothing options.
The details are also transferred first to paper, then to fabric and carefully cut out. Then they are swept away in the same way.
Beginners should start with simple dolls
Sewing
After all the parts are sour cream, you can start sewing them together. For this purpose, use a sewing machine or do it carefully by hand.
Initially, the body, arms and legs are sewn together, leaving small holes through which the stuffing will be carried out. After this, you need to carefully turn them right side out. The legs are sewn together as follows:
- First you need to sew two pieces of fabric.
- You need to cut out feet from thick cardboard, the size of which exactly matches the size of the shoes.
- The cardboard blank is placed in the center of the fabric base, and then glued with a glue gun or simply carefully sewn.
- The finished sole must be connected to the legs using a thread and a needle.
The head is sewn together in stages - first the back parts are connected to the front, and then to each other. This leaves a small hole through which you will need to stuff the part. The workpiece must be turned right side out.
Stuffing parts
After all the parts are sewn and turned right side out, you can start stuffing them with filler.
Particular attention should be paid to the legs; the doll should stand well on them, so they need to be stuffed tightly. After this, all holes need to be sewn up with neat hidden stitches.
Necessary materials
To make a high-quality and neat toy, you need to prepare the following tools and materials:
- Needle and thread for basting.
- Safety pins for securing parts.
- Measuring tape, chalk, pencil.
- Paper and scissors for creating a pattern.
- Textiles for sewing the body.
- Fabric for making clothes.
- Raw materials for creating hair.
- An awl for working on difficult places.
- Filler. It is better to choose synthetic winterizer.
- Felt pen or marker for drawing on textiles.
A set of necessary materials
It is worth preparing materials for decoration. Such details will make the toy more attractive and impressive.
Fabric for a centipede doll
Initially, you should choose a fabric of beige, cream or solid color. Next, the texture and texture, as well as the type of fabric, are selected. What textiles can be used:
- Linen with a medium weave density.
- Thin cotton for upholstery.
- Knitwear.
- Fleece.
Note! To make the body, you should choose exclusively natural fabric, so cotton would be the ideal option.
The pattern of the centipede doll will turn out neat if you choose fabric that practically does not stretch or deform. The threads should be placed tightly so that the filler does not come out through the weaving.
From papier mache
Making papier mache dolls is not just a hobby. This is a passion that is born in school and does not let go throughout your life. They are based on paper, glue and primer. If the doll is created solely for decorative purposes, then old newspapers will do. If it is assumed that they may fall into the hands of children, it is better to replace it with clean paper or toilet paper.
The essence of production: the paper is soaked in water and then kneaded to the state of porridge, after which the excess moisture is squeezed out, glue is added and a kind of “dough” is kneaded, from which the doll is created, after the model hardens, it is covered with a primer. Even a small child can do all this work, so mothers can safely take children as their assistants, both boys and girls.
In the huge world of handicrafts, it’s quite easy to find an interior doll that you like.
To get carried away with creating dolls means dooming yourself to many interesting evenings, new acquaintances, creative meetings, pleasant gifts. Small or big, boys or girls, animals, birds, angels - the imagination of doll authors is not limited by absolutely anything, you just have to try it once.
Appearance modeling
There are several options regarding the appearance of the toy. Much depends on the chosen type of cut of the body and body parts, as well as the functionality originally intended. You can choose a one-piece version of the body or a multi-element one. You can choose a pattern and slightly change the dimensions, for example, the head or the thickness of the body.
General form
But basically, modeling your appearance depends on the chosen image. You can sew a doll in the image of your favorite cartoon character, fairy tale, or make an ordinary French girl. Clothes and accessories will help complete the look.
Bigfoot doll sewing kit
What do you need to buy to make a big-legged doll? Actually not much, it all depends on your imagination. There are basic materials that are required for the job. First of all, this is fabric, preferably natural cotton. The fabric should not fray. To make the body, flesh-colored knitwear is used.
Hair is also necessary; it can be either artificial or natural. Wool for felting. For the head - a foam ball. For the eyes, either beads or acrylic fabric paint.
To sew shoes, you can use felt or artificial leather; such shoes will look just like real ones. You can't do without filler. You can use padding polyester or holofiber. To make it easier to stuff the doll and turn out the parts, use a special stick and tongs. There must be patterns. Flesh-colored needle and thread for body stitching, as well as colored threads to match clothing fabrics.
You can complement this set with accessories to suit your taste. Beads, handbags, flowers, soft toys, etc.
Making a pattern and cutting fabric
There are a lot of model options, each of which is distinguished by its unique image construction. To sew a beautiful toy, you can use the following pattern:
First option
A pattern of a centipede doll with a height of 25 cm, larger or smaller can be formed - it all depends on the basic parameter of the blanks. You can choose the following type of model for sewing:
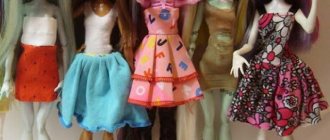
Cloth
It is not difficult to sew clothes for the Big Legs doll; patterns are often included with the main doll pattern. These cute toys are true fashionistas. Their clothes are in many ways similar to human ones, only the cut is changed to suit their figure. If you know how to sew, proceed as usual. Take measurements from the small model and get to work.
Dresses, sundresses, trousers, trousers, coats, a doll can be dressed in anything. Don't forget to pay attention to the little details. Cute lace for the trim of a sundress is perfect. Scarves, stockings and other little things are also important. There is a huge variety of hats.
Delightful dolls are obtained in historical outfits, or beauties from the outback. Vintage style really suits big legs. They look amazing in lace dresses in pastel shades.
Stitching methods
The big leg pattern can be sewn in different ways, there are 2 main ways:
- The body parts are first sewn together in one plane. It turns out two flat people, which are then connected to each other and stuffed with padding polyester.
- First, the parts are sewn together separately, then the figure is assembled.
Methods of stitching parts
The second option is considered the best option for making a doll. The parts are sewn from the wrong side. This leaves a few centimeters of gap through which the parts are turned out and stuffed with filler.
How to sew hands for a doll: patterns with descriptions and photos
To sew hands on a textile doll, you will need a lot of patience. You can sew a version for advanced people: with fingers, palms, even nails. Or you can get by with a simpler option (as in the diagram), which even beginners can do.
The description of the execution of the hand for a textile doll coincides exactly with the description of the execution of the leg:
- A stencil is cut out.
- The stencil is attached to the fabric with pins or outlined with chalk, and the blank is cut out.
- The arm blank (and the arm consists of two parts) is sewn along the edges, leaving only the upper part for attachment to the body.
- Then the future hand is filled with filler.
- After this, short stitches can be used to make the fingers. A total of 4 stitches are needed.
Diagram of a hand Hands of a textile doll
Hair
Instructions for choosing hair for a doll:
- Hair-threads. Hair made from threads is functional. The threads can be put into any hairstyle, they will not fall out and are easy to install.
- Hair-embroidery. Embroidery is a more complex option. You need to skillfully lay satin stitches around the entire perimeter of the surface. It looks primitive.
- Artificial chignon. The most plausible option. It is inexpensive, easy to care for and can easily be placed on the toy’s head.
The choice is made in accordance with personal preferences.
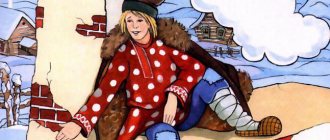
How to sew a beautiful New Year's interior doll: patterns with descriptions and photos
A New Year's doll can be a wonderful holiday gift. Including New Year's. But not everyone can appreciate this gift, so before giving someone such a thing, try to make sure in advance that the new owner will like it.
How does a New Year's interior doll differ from other dolls? Unless it's just an outfit. Therefore, you can take as a basis any of the previously described step-by-step instructions for sewing textile dolls. Dress her up in a beautiful New Year's dress, and the toy is ready!
Beautiful standard New Year's doll New Year's doll with a big head No. 1 New Year's doll with a big head No. 2 New Year's doll with a big head No. 3
Sewing hair by hand
Step-by-step master class on sewing hair:
- You need to use chalk to designate places for sewing threads. You should first think through the layout of each element.
- Cut 300 threads of yarn and sew each one by hand to the head. Fix in the marked places.
- Use scissors to even out the length of the “hairs”.
Making hair
If it is a hairpiece, then you need to coat the head with a glue gun and glue the parts prepared in advance.
Constructing a dress pattern
A beautiful but basic dress that looks like an a-line. The construction of things is done as follows:
- Take measurements - chest width, back, determine the length of the product.
- We build a trapezoid: the width of the back is the upper base, the width of the hem is arbitrary, the height = the height of the perpendicular, lowered from the upper base down.
- The lower points are connected in a semicircle. A sundress blank for the doll is formed. You need 2 of them. In the front you need to make a semicircular cutout.
- When cutting, an allowance of 0.5 cm is made on the seams.
Dress
A trapeze dress can become the main clothing for a doll with these parameters.
The main thing in making such a toy is that the size of the foot is disproportionately large in relation to the entire product. The peculiarity of making the legs of this version of the doll is the following: all parts of the leg except the foot are sewn together. Then the stuffing is done, and at the end the flat foot is sewn on.
Leg modeling option
Progress:
- Initially, you need to transfer all the patterns (except for the head and feet) onto the fabric of the future torso of the doll and sew all the elements except one side.
- Fill the inside of the body with your chosen material and sew up its last side.
- Transfer the patterns of the head and feet onto the fabric with a margin of 5 mm.
- Using the foot pattern, make cardboard feet.
- We lay the cardboard feet on top of the fabric ones, fold the 5 mm allowances of the fabric feet onto the cardboard ones and attach them to each other with a heat gun or sew them on.
- We sew the feet to the legs, preferably with a hidden seam.
- We sew together the details of the head, leaving the side of the neck. We fill it with filler, and attaching it to the neck, we sew the body to the head with a hidden seam.
- We dress our doll in any clothes using patterns. These can be knitted items from hats to shoes, or even sewn ones. There are no general principles here.
- The last detail is the hair and headdress or hairstyle. For the first time, you can use a notebook on which you can stretch the yarn so that your hair straightens. Then, by cutting the wound yarn in half, you will get two identical strands.
- We sew the hair along each of the semicircles of the head and collect it either in ponytails (ponytail), or in a braid, or tie it with a ribbon.
- We draw the eyes (should be close together) with black acrylic paint and blush on the cheeks with regular blush.
- Clothes for the Snowball doll can be sewn directly on it. Of course, you can sew it on the doll, but most likely you or the person to whom you give it will someday want to change it for the season or for variety.
- It is not advisable to draw a mouth, nose, or far-set eyes, since the image of the Snowball doll will be disrupted in this way.
- A possible option for creating a nose is to attach a small stick with cotton wool or something like that wrapped inside the head to make the nose appear natural.
→ The presented material contains an interesting option for creating a body for a Snowflake or Snowy Girl doll. The author of this master class and the idea itself is Elena Makeeva. A special feature of creating a doll using the proposed method is that the shape of the head of the toy is given by a creative blank made of foam plastic. This doll will also have a neat nose. In general, let's watch and learn!
So, to create such a Snow Girl you will need patterns. The size of the patterns is commensurate with the A4 paper size. The author uses the following patterns for the body, arms and legs (two options, each for different shoes). The body pattern is sewn from below (leaving a small hole) and from above:
We use this pattern for sewing outerwear: vests, jackets and coats. This pattern allows you to sew outerwear for toys either from a single cut (then we apply the pattern to the bend of the fabric) or from two parts - this is a more economical cutting option.
Boot pattern, which includes parts: heel and toe
Let's return to sewing the legs, as already mentioned there are two options. One with a wedge, and the second without it. So, when sewing a version with a wedge, the leg immediately comes with a flat sole. First we sew the wedges on each part, and then we sew the leg parts along the contour. When using the second version of the pattern, you will also need to sew on the oval-shaped sole separately. Cut out the details of the doll’s body:
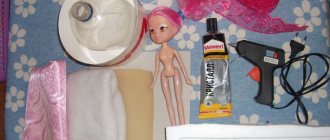
For sewing we use special knitwear for the body. It is better to cut along the grain thread. We wrap the ball with padding polyester and insert it all the way into the neck from above. The length of the fabric into which the head is inserted should be no more than 1.5-2 cm higher than the ball with padding polyester, otherwise you will not achieve a beautiful and even fit to the head. You need to wrap the ball with padding polyester 2-3 times, depending on the thickness of the padding polyester. We fix the synthetic winterizer using overstitching.
Now let's make the nose. You need to take a pin with a round tip, drop some glue on it, the author uses the moment, and wrap it with padding polyester several times.
We insert the blank ball into the head.
We mark an approximate location for the nose, pull back the head fabric and insert a pin into the ball.
We assemble from above:
Now we stuff the neck, to do this we roll the padding polyester into a tight tube and from the lower part of the body insert it into the neck until it stops.
This is what you should get. To prevent the padding polyester from moving out of place, you can and should secure it with pins in a circle.
We think you have more than once come across dolls on the Internet made based on Tatyana Konne’s master classes.
Face and body shaping
The exterior is designed according to the usual template. To make the torso functional, it is worth making the limbs mobile. To do this, arms and legs can be sewn on buttons. This improves mobility.
Face painting
Decorating a face is as easy as shelling pears, because all parts of the face are the eyes. At a close distance, 2 points are set with a black marker.
Face painting
Additionally, you can apply blush. Small facial features like these make the toy unique.
Sewing and decorating dresses
The costume for the little fat leg, the pattern of which is quite complex, can easily be replaced with a dress. Sewing and finishing parts of the doll's wardrobe:
- The blank is sewn on the sides, then put on the doll in an inverted state and hand-stitched along the shoulder line.
- Lace, satin ribbons, and guipure are used for decoration.
- Such materials are used to decorate the hem, sleeves, and necklines.
Additionally, you can sew on beads and glue rhinestones. A tulle petticoat looks very beautiful and will make the dress more festive and airy.
DIY Tilda doll step by step instructions
So let's start creating miracles. What do we need to create the cutest doll:
- cardboard, pencil, scissors (for creating patterns);
- a piece of fabric (linen, cotton, knitwear);
- filler (sintepon, holofiber);
- foam ball;
- threads (reinforced, silk);
- any yarn or floss (for hair);
- cardboard;
- needles, pins;
- buttons;
- glue-gel Moment;
- stick or skewer (for stuffing and turning).
- Of course, our start is patterns. We can download ready-made ones to our computer and print them or create them ourselves with our own small additions.
- Then we transfer our patterns onto the fabric, initially by folding the fabric in half. To outline, you can use a disappearing marker, chalk, or a small piece of soap.
- The next step is to stitch our outline, not forgetting to leave some space unstitched for stuffing the product. Of course, the easiest and fastest way to do this is with a sewing machine. But you can do it in a simple way on your hands.
- Next, we cut out the resulting patterns, leaving a little fabric along the contour in advance and turning them inside out. For convenience, you can use a tube, a skewer, or a regular pencil and pen.
- So let's start stuffing our main parts: torso, arms, legs.
- And we complete the creation of our parts with the following action - beautifully sew up the holes that were left for stuffing.
- The only thing left to do is to put our beauty together. We sew the arms and legs to the body. For convenience, we secure the arms and legs with pins.
Our beautiful body is ready for the best doll! Further flight of fancy...
Pumpkinheads
The pupae got their name due to the shape of the head, which is made from individual petals. These petals are sewn together, and one seam is located directly in the center of the face, forming an axis of symmetry. You can do it differently. Sew the head in the shape of a ball, but with a protrusion for the nose. In this case, there is no longer an axis of symmetry. In order for the doll to stand, a frame is used. Look at what wonderful Pumpkinhead dolls are sewn by both experienced craftswomen and beginner needlewomen.
These pupae are typical representatives of pumpkin heads. The seam goes right down the middle of the face. Look what expressive eyes these dolls have. Pay attention to the hairstyles. We’ll tell you how to sew such a doll with your own hands using ready-made patterns a little later.
Padding
The Tilda Big Leg doll is stuffed in several stages, each part separately, there are very thin, hard-to-reach places. It is very important to choose the right material so that the padding lies evenly. All materials can be divided into natural and artificial. Now is the period of craze for environmental friendliness, so many people stuff dolls with wool. The product turns out to be very soft; if you tear the fiber into small pieces, you can achieve uniformity.
Wool is wonderful, but it has its downsides. Monitor your child closely for several days; an allergy may occur to the wool. In this case, you will have to replace the filler with holofiber. Although this is a synthetic material, it is hypoallergenic. It is very convenient to stuff with it, because it already consists of small particles.
To make the doll more stable, many people prefer to fill the stacks with something heavy. This could be silica gel, cereal or small sea pebbles.
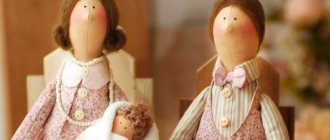
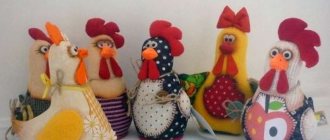
Snowballs
Dolls with disproportionately large legs are called Big Legs or Snowballs. The Snowballs got their name from their legs, which look like big Bigfoot feet. This is the main difference from other dolls. All other parts of the body are proportional. Only the eyes are depicted on the face - beads. Shoes are varied and required. These could be shoes, boots, even flip-flops. The sole is made from cardboard. The doll must stand on its own. And the last characteristic detail is long beautiful hair. These dolls are so adorable that they are successfully conquering the doll toy market.
Look at how lovingly the clothes are sewn, knitted, and the shoes are made. And what gorgeous hairstyles! Can you buy such beauty in a store? We will tell you further how to sew such dolls using a standard pattern. For now, just admire these masterpieces.
And it’s just done by amateurs, not professionals. Is it true that you want to quickly pick up a needle and create the same miracle yourself? But many of these dolls are made by the hands of inexperienced, novice craftswomen.
Finishing
The Big Legs doll loves to dress smartly. You can't do without additional accessories here. A distinctive feature of the doll is that she never walks barefoot. You can sew the simplest shoes yourself. She often wears baby shoes or boot-style booties. Beautiful shoes are sold in specialized stores for doll makers.
Depending on the project, the doll may need a hat or crown, or cute little headphones. A handbag slung over your shoulder will add additional charm. Ruffles and lace will help create a cute girly look. If the doll is intended for a small girl, try to avoid too small parts. Do not use beads or sequins, and beads are only suitable for the eyes.
Despite the same patterns, no two dolls are ever alike. Each craftswoman brings something of her own, and the doll acquires individuality.
The question of how to sew a Bigfoot doll has been resolved. This wonderful handmade toy will delight anyone who receives it as a gift. Many people, having made their first doll, can no longer stop, and doll making becomes the work of their whole life. The toy is soft, so little ladies can carry it with them even in their sleep. She will forever be your daughter's best friend.
Material selection
It is good to use calico for sewing Pumpkin Heads and Snowballs. It is a thick cotton fabric, but denser than cambric and without shine. The most inexpensive material. For Snowballs it is better to take thick fabric, but for Pumpkinheads you can use thin fabric.
So we come directly to the question of how to sew a doll with your own hands. Patterns can be downloaded from our website and printed on a printer.
We sew a Pumpkin Head.
Prepare for work:
- pattern paper;
- fabric for sewing a doll;
- hair yarn;
- acrylic paints for painting the face and eyes;
- padding polyester for stuffing;
- scissors;
- pins with colored heads;
- pencil, chalk;
- material for clothing.
No. 3 Doll with bent legs
Here you can see how important posture and surroundings are.
In essence, this is the same textile doll as above, only cut and sewn differently. Plus interesting details. And the result is a completely different product. It turns out that the body of a fabric doll is just a blank. The basis for playing with imagination and demonstrating sewing skills)) Add lace frills, knitted socks, bows, frills... And our standard tilde blank turns into a little princess