I would like to devote today’s article to a very broad and popular topic – master classes on kanzashi leaves. In almost every flower arrangement we use leaves, sometimes very small, barely noticeable, sometimes large, to add volume to the work, sometimes to hide any imperfections. In any case, you need different leaves, large and small, simple and intricate. I have put together this selection so that you have a choice of which leaves to diversify your flower arrangement.
We will make leaves from ribbons 5 cm and 2.5 cm wide.
Simple kanzashi leaves
In the first tutorial we will make simple and universal leaves from 2.5 cm ribbons that will suit almost any kanzashi flowers. Let's take a green satin ribbon, I won't cut it into pieces to show that the petals can be made of any size. Turn the ribbon inside out towards you, bend the left edge at an angle of 90 degrees and place the right edge of the ribbon over it. The result is an angular petal.
Let's cut the ribbon and make two folds at the base, fix them by melting them over the fire.
yalyubasha
We make a composition of satin roses.
Paintings made from satin roses are very beautiful, vibrant and voluminous. Having gone through the material on the Internet, I suggest you familiarize yourself with the craftsmanship of creating this beauty.
I really liked the idea of creating a picture of roses, let's look at the main elements of the work.
Materials and tools: Frame-hoop, fabric for the base of our picture, silk ribbons, thread, needle, PVA glue, cardboard, scissors, about 7 cm of beautiful ribbon and gold cord for finishing the vase, pins, small pillow (optional).
Work progress: First make seven roses. Secure the base fabric to the frame. The photo below shows what the frame looks like from the back. Place the frame on the pillow and use pins to attach the leaves and roses to the fabric.
Let's look at how to make a satin rose
Wide ribbon 50mm, cut into pieces 10.5 cm-8 pcs. 11.5-9 pcs (you can have more or less, it all depends on what kind of flower you want to make). It is better to singe the cut edges of the tape with a lighter or matches. We begin to fold the bud.
MANUFACTURING A BUD.
MAKING PETALS
Sew leaves from green ribbon. ROSE IS READY.
Leaves for kanzashi flowers
From a piece of 2.5x10 cm we will make two types of leaves. To do this, fold the segment in half (with the front side facing you). Apply a metal ruler diagonally and cut the tape into 2 parts. We will get 2 different leaves.
Let's make thin long leaves from the part we made in the previous tutorial.
Master class of Kanzashi leaves
In this master class I will look at the most popular ways to create leaves for Kanzashi flowers. All examples can be seen in my works.
I took two types of tapes: width 5 cm and 2.5 cm. We will also need tools, a soldering iron or burner, and a needle and thread.
First I will show leaves from a 5 cm wide ribbon.
A. Cut the ribbon 5-6 cm long (how long do you need the leaf).
Fold the ribbon in half and cut out the leaf.
Carefully singe the outline of the leaf.
We received a simple piece of paper. You can leave it like this, and we will move on.
Again, fold it in half and scorch the bend with a lighter or candle, carefully so as not to burn the tape, and squeeze the bend with your fingers.
Next, we also make veins from the middle of the sheet to the center - according to the drawing. We clamp it with tweezers (if you don’t have tweezers, you can make a fold with your fingers, singe it and press it).
Turn the front side towards you, pinch the sheet in the bottom center and scorch it a little, press (not too hard.)
Now we have received the first piece of paper.
B. _ We will make the second leaf using a knife (preferably with a blunt end). We also cut out and singe the outline.
Take a terry towel and place the sheet inside out. We heat the knife over gas or a candle and begin to draw veins.
First the central vein, then according to the pattern from the middle to the edges.
We turn the leaf over and draw two more along the central vein along the edges (you can see it in the photo).
Then again, using a dull hot knife, draw stripes according to the pattern.
We get another leaf. It’s not very visible, the photos are reflected, but this is my favorite leaf, it turns out very beautiful.
B. You can simply draw veins randomly with a hot knife. Fantasize.
G . The third method: cut out the leaf, and do not singe the entire outline at once. 1-2 cm were singed, the edge was carefully stretched to make a wave. And so, along the entire contour of the sheet.
You can leave it like this, or you can make a central vein, and you can decorate the entire leaf with veins. But I like this type of leaf without any veins.
And remember, there are no identical leaves in nature. Therefore, there is no need for templates.
Also, a lot of craftswomen cut out the outline of a leaf in a zigzag and singe the cut. It also turns out to be an original leaf!
We take and make a leaf according to the MK “ Kanzashi master class of a sharp petal from a 2.5 cm wide ribbon .” We make such a leaf (also don’t forget) from 2.5 wide ribbon.
If you collect the bottom of the leaf with a thread, you will get this look.
E. Cut a ribbon approximately 10 cm long (width* 2 times, for example: a ribbon is 3 cm wide, which means the length of the piece will be 6 cm).
Fold in half. We singe the cut or cut it off with a soldering iron, shown in the photo.
Turn it right side out.
We sew along the bottom of the corner with thread and collect it, making a knot.
We got another type of leaf. I mainly use this leaf to create potted flowers or to create fans.
AND . Also suitable for leaves are sharp petals and inverted sharp petals “Kanzashi”.
Tape 2.5 cm.
A. Take a piece of 8-10 cm (it all depends on the length of the leaf).
Fold in half. And cut it off with a soldering iron or burner as in the photo (you can use scissors and scorch the cut with a lighter).
Turn the left side right side out. This is the leaf we use for the buds.
If we straighten the leaf relative to the center, we get another type of leaf. This petal can be used individually and when creating the flowers themselves.
The corner that remains can also be used as a leaf for flowers.
B. _ Now I will show how such a leaf can be decorated. We take identical pieces of different shades of ribbon.
Place one piece on top of the other and fold it in half so that one edge comes out.
We cut it, as in the first method, turn it right side out, our leaf is ready.
B. We cut the ribbon -7 cm and fold it as in the photographs (here is more detailed MK “ Master class of the lush Kanzashi flower” ). At first I wanted to fold and show the finished leaf, then I decided to do it step by step, so the ribbon is crumpled...
We received another piece of paper.
All the leaves at once.
That's all for now.
Narrow ribbon leaves 2.5 cm
Let's take the leaf we made earlier by the base, so that the edges rise, now we lower them down, making a fold on both sides and fold the rest of the tape up again.
Let's melt the base.
Now we will make leaves from ribbons 5 cm wide.
Materials and tools for creating satin crafts
Experienced needlewomen prepare in advance the materials and tools that will be needed for the job. For any technology the list is the same:
- sharp scissors;
- tweezers, long with curved ends;
- threads;
- thin and thick needle;
- ruler;
- chalk or soap;
- candle or lighter;
- satin ribbons of various widths.
Having been well prepared, you can safely begin to create.
Important! Many craftswomen use a special soldering iron instead of scissors, which simultaneously cuts and melts the edge.
Kanzashi leaves from a wide ribbon
Fold a 5x10 cm piece in half (with the front side facing you), apply a metal ruler from the bottom edge of the tape to the center of the top part and cut it with a soldering iron or burner.
We also cut the leaf from the other edge, so we get two leaves “with a pocket.” We don’t throw away the blank that remains from the leaves; we will also make a leaf from it.
Let's make a leaf from the blank that was left over from the previous master class.
We use old scraps of fabric. Home ideas
Patchwork is an English type of needlework that uses scraps or small scraps of fabric. Small pieces of linen are used to sew and mosaic various things: from oven mitts to bedding. This technique does not require special skills, only creativity and inspiration.
First, when starting to work in the patchwork technique, you need to prepare even square or pentagonal fabric blanks (coupons). Then they are sewn into long strips and assembled into a full-fledged item. Let's look at the example of a master class on creating a patchwork bedspread.
To work you will need:
- prepared figured coupons (no more than 25 cm wide);
- scissors;
- threads;
- padding polyester (if you want to insulate the product);
- sewing machine;
- cutting chalk.
First, work out large pieces of canvas and lay them out exactly along the perimeter you want (ideally 220x240 cm). The layout should be vertical and horizontal, even and harmonious. For example, distribute identical coupons to different parts of the future product, and single-color scraps - one after another.
Divide the mosaic into 6 sections and sew each block separately, starting with small coupons and ending with larger ones. Combine the finished blocks into a whole fabric, sewing a strip of fabric between the sections. On the scar of the future bedspread, sew the edging and iron the seams.
For a warm bedspread: on the reverse side, take any fabric (preferably satin) equal to the perimeter of the product. Sew top, bottom and any side seams. Through the hole, evenly stuff 100 grams of synthetic padding into the blanket and sew it completely. Iron the product.
Beginner crafters will love the ease of creating an oven mitt, which will always be needed around the house.
You will need:
- prepared pieces of fabric (in the form of equal triangles);
- a part of any suitable fabric equal to the perimeter of the future product;
- interlining;
- scissors;
- ribbon or braid for decoration;
- sewing machine, thread.
From the prepared plain fabric, cut a circle on which to lay the coupons tightly together. Glue interlining to each flap, then sew 2 coupons together and iron the seam.
Cut a circle from non-woven fabric, iron it to the triangle blank, and stitch it. Sew decorative tape to the edges and make a small loop. Combine the resulting material with a prepared circle of plain fabric. Iron the finished product.
Kanzashi leaf with folds
Cut off one melted edge of the workpiece and cut the base to create an open part.
We process the edges with a lighter and pull them out a little, resulting in a slight waviness. At the base we also melt the tape with fire.
We make several folds, first on one side, then on the other. We melt the bottom of the leaf and “flatten it” with our fingers so that the base is flat. These leaves look great with strawberries.
The next master class is dedicated to rose leaves, I will make them double using glue and wire.
Leaves for rose
Cut the satin ribbon into 5x7 cm pieces; 1 sheet will require 2 pieces. We apply glue to the wrong side, I use “Titanium”. Lay the wire diagonally and cover it with a second piece of satin ribbon on top. Smooth out the sheet, carefully highlight the wire, it serves as the central vein. When the glue dries, cut out the shape of a leaf from the workpiece and make notches.
Carefully process the edges of the sheet over the fire and while it is still hot, give it a slightly curved shape. Leaves can be of different sizes, shapes and textures. You can see how to use such leaves in a composition in MK on roses made from satin ribbons.
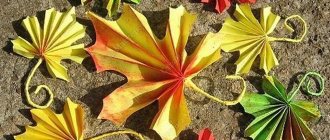
Kanzashi maple leaf. Master class with photos
Such a leaf will help create a good mood on gloomy autumn days. This maple leaf can be a wonderful interior decoration, an attribute for autumn dancing, a decoration for a hat or a brooch. For this we will need: Satin ribbon (yellow / red / orange) (width – 5 cm, length – 85 cm);
Brocade ribbon (gold) (width – 5 cm, length – 30 cm) Decorative cord (7 cm) Scissors Pin (for brooch) Ruler Glue (hot gun and glue for it) Bead (for the middle of the leaf) Candle Tweezers Step-by- step process making a maple leaf from satin ribbon
We cut the satin ribbon into squares (5x5), singe the edges over a candle so that they do not crumble
We fold a triangle from a square, 2 corners adjacent to the long side, fold them together... And scorch the folded corner over the candle. In total, you should get 17 satin petals We make the same petals from a brocade ribbon (6 pieces) Take a satin petal and “put” a brocade petal into it. Thus, we get a double petal. For our maple leaf, you need to make 6 double petals. Now 6 double petals need to be glued together in a circle. You will get a flower that will be the basis of our leaf. From the remaining satin petals we make 3 “branches”. To do this, glue two petals and glue a third one between them. We proceed to the final assembly of the leaf: glue 3 “branches” into adjacent spaces between the petals of the base flower
On both sides of the glued “branches”, between the petals of the flower, we glue one satin leaf into the remaining unused space between the petals of the base flower we glue a decorative cord that imitates the stalk of a leaf
If the maple leaf is to be a brooch, then glue a pin on the back side and cover the gluing area with a piece of satin ribbon. Glue a bead into the center of the base flower.
Our maple leaf is ready!!!
Corrugated leaves
Unusual textured leaves from satin ribbons are obtained if it is pre-corrugated. To do this, we use a satin ribbon measuring 5x7 cm, moisten it with water. Fold it diagonally with the front side facing you.
We need thin synthetic fabric, I use a piece of organza. I wrap the piece of tape in it and put an iron on top, heated on the second level. I take the edge of the organza and, pressing on the iron with one hand, I scroll the organza under the iron. As a result of such manipulations, an interesting relief is obtained.
We cut out the shape of a sheet from the blank, make small notches and process the edges with a lighter. The result is leaves that can be used for any kanzashi flowers.
Another option for making leaves for flower arrangements.
How to make an autumn bouquet of leaves
How to make an autumn bouquet of leaves
To create a beautiful bright bouquet of roses you will need small and large maple leaves of different colors. Sequence of making a rose:
- Take a small leaf, fold it in half and roll it tightly into a tube.
- Place the rolled leaf into a large sheet, turned backwards.
- Roll the workpiece so that large petals are formed around the center.
- Secure the flower with thread or tape.
If you want to attach a stem to the rose, you can use a twig or make it yourself from thick paper or wire rolled into a tube.
A bouquet of such flowers, placed in a large low vase or small vase, as well as in a plate, basket, bowl or just a cup, looks very beautiful.
A container for a bouquet can also be made from foliage using the papier-mâché principle.
Large sheet with folds
We use 2.5 cm tape, 12 cm long; 1 sheet will require 2 pieces. Place the pieces together with the right sides facing inward. Cut the corner and melt the cut.
We will make 5 folds on both sides and secure them with pins. From the wrong side we sew both ribbons.
Fold the sheet at the base and melt it with fire. Iron the leaf so that the folds lie evenly and do not puff up. These leaves are more suitable for voluminous flowers such as chrysanthemums, asters or dahlias.
LiveInternetLiveInternet
Quote from pawy
Read in full In your quotation book or community!
source
This MK, in principle, is a continuation MK , made a year and a half ago. So to speak, another option for making leaves from textiles.
And if the first version of the leaves is quite suitable for simple primitives, then according to this MK the leaves turn out to be more elegant and realistic, they are suitable as accessories or decoration for more complex and sophisticated dolls and toys, for example, made using the technique of sculptural textiles, felted or molded...
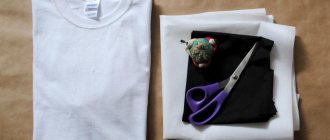
For work we need the following materials:
- thin cotton fabric. I used an old, one might say vintage, pillowcase, washed many times, and therefore thinned almost to the point of disrepair, a kind of artificially created cambric. ;))) Leaves from such fabric turn out to be the most realistic, thanks to its thinness and softness. By the way, the fabric doesn’t have to be white. Fabrics of a yellowish tint, pale beige, pale green are quite suitable... I do not recommend taking fabrics with a pattern or an admixture of synthetics.
- acrylic paints in brown, green, yellow, and orange colors. These can be either fabric paints (not to be confused with batik paints), or glossy paints, or simple artistic acrylic.
- flat brushes (synthetic).
- tinting solution (coffee + cinnamon + water + PVA) or just PVA glue diluted with water 1:1. The tinting solution, due to its brownish-beige color, will slightly mute the colors with which we will paint the leaves.
You can see how to prepare such a solution in the MK “Three coffee-based tints” (or in any of my other MKs on coffee toys).
- and also: a simple pencil, a hoop (optional), scissors, a jar of water, cling film to protect the work surface from paints, paper towels or napkins.
Let's start creating.
We take the fabric and draw the outlines of the leaves on it with a pencil. You can trace ready-made leaf stencils, or, like me, you can draw a leaf yourself, remembering school drawing lessons. In general, let's draw... Please note that I draw the leaf stalk quite wide, this is how it should be, then you will understand why.
Since the fabric is thin and soft, to make it easier to draw on it, I tucked it into a hoop. Then I turned the hoop upside down so that the fabric lay on a hard surface, otherwise when drawing there is a risk of tearing through the thin fabric with a pencil.
Drew. Now let's start priming and painting.
In order not to stain the surface of the table with paints and primers, you can take any board or, for example, a mat for creativity, and wrap it in a couple of layers of cling film. After work, we simply cut the film from the board and throw it away, thereby minimizing the cleaning time after the work process!
We take a coffee solution with PVA (or PVA glue diluted with water), and begin to prime the leaves, going beyond their contours. We prime on both sides.
Excess moisture should be removed with a paper towel (blot dry). Then dry the fabric in the oven (at a temperature of approximately 75-80 degrees) or with a hairdryer. We need this in order to fix the primer: when heated, the PVA glue polymerizes, forming a thin film on the surface of the fabric.
If during priming the outline of the sheet becomes barely noticeable, after drying you can trace it again with a pencil.
Now let’s dilute the yellow paint a little with water (the paint should not be viscous, like ordinary acrylic, but more like watercolor, that is, lay down in a translucent layer through which the leaf pattern is visible). The paint layer should be thin, and the painted surface should not have sagging or streaking.
Immediately, onto the undried yellow paint, add an orange color (also slightly diluted with water) or green, depending on the desired color of the sheet.
On damp fabric, the colors softly combine, smoothly flowing from one color to another, which corresponds to the natural color of the leaves.
After we have drawn the base of the sheet on one side, gently blot the fabric with a towel to remove moisture and turn the fabric over to the other side.
And there we get such a “cacophony” of color! Using a wet brush with yellow paint, we “disperse” the spots from the center of the leaves to the edges, achieving a beautiful color transition. If necessary, additionally tint the edges with orange or green. Carefully remove excess moisture and dry the leaves again in the oven or with a hairdryer until completely dry.
After drying, cut out the leaves along the contours. The fabric, thanks to the primer and initial coloring, does not crumble and gives an even, beautiful cut.
Again, we moisten the leaves a little (you can just use a brush with water) and finally paint them to your liking.
If you need to add orange, apply strokes from the edge to the center; if there is not enough yellow, add it, applying paint from the center to the edges. We paint almost along the very outline of the leaves with brown paint, imitating the dry edges of autumn leaves. In general, we feel like artists and fantasize to the fullest! Nature gives us the opportunity to use any colors and unexpected combinations, because in color she has no equal!
While the fabric is still damp, lightly mark the veins in green. You can apply the central vein thinly (with the edge of the brush) brown... Don't forget to tint the back side of the leaves!!! Before turning over, be sure to blot excess moisture from the fabric and wipe off the film underneath.
Let me remind you: the layers of paint should be very thin, translucent, without streaks of thick paint, so we smear and shade the acrylic well.
And for the third time we subject the leaves to heat treatment. This time we don’t dry it completely, fold it slightly damp and hot along the main veins and smooth the folds thoroughly using our nails. Let it dry and fix the bend of the vein again. Just don't overdo it and tear the leaves! Although they are reinforced with layers of primer and paint, they can be damaged from excessive effort.
We make a soft backing for the leaf - I folded three paper towels in half - and with a dull knife (I think everyone has such a knife in their household, like a butter knife) or with the narrow blunt side of any knife, press out the thin veins from the underside of the leaf. Be careful: if you get carried away, you can cut through the body of the leaf, although this will not be a big defect for a “dried up” autumn leaf, we know how fragile they are in nature!
Once again we will give relief to the main vein of the leaf, and tightly twist the stalk with our fingers, just do not tear it off the leaf!!! Thus, the sheet will acquire an additional natural convexity. The cutting can be slightly coated with glue before twisting, very thinly, just so as not to unwind.
If, according to the idea, the sheet should be more “dry” in appearance, you can additionally walk along the very edge with a brush wiped almost dry with brown paint.
To make it more natural, you can slightly curl the edges of the leaves (using bamboo kebab sticks or the handle of a brush), or even slightly crush the leaf with your hands. You can also apply “raindrops” to the leaves using transparent pearl gel.
Leaves made in this way have a pleasant silky-glossy texture, they are elastic and perfectly imitate real autumn leaves. Another advantage is that these leaves can be made of any shape, color and size, individually for a specific doll or toy.
Thank you for your attention!
Have a good creative mood everyone!
When copying or quoting MK, please provide a link to the original source, preferably an active one.
Thanks for understanding!
PS Autumn leaves template
(taken from Alena Semenova, website “Country of Masters”)
Posted by bomba May 20, 2015