Bird feathers are an absolutely beautiful and special material for crafts. Firstly, its shape and coloring ensure that you will never repeat yourself if you work with it. The drawings are unique, the bends of the pen are often unpredictable, and every time you implement what seems to be the same idea, you will get new and new results. Of course, at first glance it may seem that nothing sensible or worthwhile can be made from feathers, however, we remember that humanity learned to use this gift of nature thousands of years ago, and having remembered, we cast aside doubts and simply decide, what to make from feathers what you want today, and what you want, put it off until tomorrow, what you decide to implement right away, when you get excited about the idea, and what - a little later, when the idea has matured and acquired your personal details. Feather crafts diverse and many-sided. The working material lends itself well to painting, it is quite plastic, it can be opened with varnish. Don't neglect feathers for crafts, they're fun!
What to make from feathers - 5 master classes:
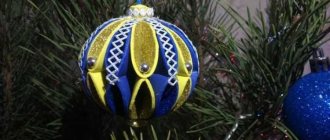
Feather Christmas trees
Feathers are a unique material from the point of view of nature. It protects its owner from water (a healthy bird does not get wet), from heat (thermal insulation is our everything), from cold (the down that is under the feathers keeps the bird warm even at very low temperatures). Not long ago, scientists proved that feathers also protect from ultraviolet rays. And feather Christmas trees will protect your home from a bad mood!
How to make Christmas trees from feathers - master class from Thethingsshemakes
LiveInternetLiveInternet
https://mebelsam.com/plugins/content/content.php?content.320
The Arkhangelsk region is considered the birthplace of this wooden toy. One of the original names of the toy is “Pomeranian Dove”. In the 60s of the 20th century, the art of manufacturing was practically lost. The bearer and promoter of the tradition of making birds was master Martyn Filippovich Fatyanov from the village of Selishche (Leshukonsky district, Arkhangelsk region).
According to the description of the famous researcher of Russian ethnography Sergei Maksimov, in the 19th century, a chip bird suspended from the ceiling was an indispensable attribute of a Pomeranian house. He mentions that such doves were made by Pomeranian Old Believers in their monasteries, as well as by Murmansk industrialists.
The bird was hung from the ceiling in the front, “red” corner of the village room, where there was a table with benches. When a boiling samovar was placed on it, the carved bird, obeying the currents of hot air, slowly and solemnly rotated around its axis. The bird of happiness was hung in the house as a talisman, guardian of the hearth and well-being.
In the manufacture of these wonderful birds, the property of wood to split along the grain under the influence of a wedge is used. It is this property that we use when we chop wood and split a splinter. From ancient times until the invention of the saw, boards for construction and other household needs were obtained exclusively by splitting logs along the grain.
Wall panels, lamps, pencil holders, newspaper holders and screens - this is not a complete list of what can be made from a splinter. But before you try to make even the simplest thing, learn how to split wood correctly. To work, it is enough to have only two tools: an ordinary table knife with a wide blade and an ax that fits your hand. Any log can be split in two ways - in the tangential direction and in the radial direction.
To obtain splinters with the desired chip, the annual layers in the blank bar must also have a certain direction. Thus, splinters with tangential splitting planes can be obtained from a bar whose annual layers are parallel to its narrow edge. If the annual layers in the bar at the end are parallel to its largest face, then the splinters will be obtained with radial chips.
Keep in mind that not all trees split equally in all directions. For example, oak wood splits well only in the radial direction. The core rays, diverging in all directions from the core, coincide with the plane of the radial split and thereby facilitate splitting.
Due to poorly developed core rays, aspen and poplar wood splits well in all directions, so it is the main material for the production of matches.
Pine and spruce also split well in all directions, although in the radial direction it is better than in the tangential direction.
The width of the growth rings also matters. Cleaner and more even chips occur in fine-grained wood.
In all chipped products, individual splinters must be tied together with twine made from hemp, flax, bast or pine, spruce and cedar roots. It is undesirable to use twines made of synthetic materials: they do not combine well with wood. For flexible connections, for example, a newspaper rack, you need flax, bast and hemp twines, and for hard ones, spruce and pine roots.
Having prepared the necessary materials, get to work. Before splitting the workpiece into thin splinters, moisten it by placing it in some container and pouring hot water over it. After half an hour, make a test. If the workpiece does not split well, then keep it in the water a little longer. If, on the contrary, it is too swollen, then dry it a little. The knife you use to split the workpieces should not be very sharp. Otherwise, it will cut rather than split the wood, violating the integrity of the fibers. By splitting a simple block, you will get splinters in the form of rectangular strips, which are mainly used for weaving. From the strips you can weave a basket, a mat for a vase or a stand for hot items.
To simplify the work, you can make a simple device from two bars in a matter of minutes. At the ends of the bars, at about a millimeter height, make two cuts and insert a knife into them. Nail the bars to the edge of the table or workbench. Between the bars on the back of the knife, make a shallow groove on the workbench to ensure the free passage of the splinter. By feeding the workpiece onto the edge of a knife, you will quickly split the workpiece into splinters of equal thickness.
The best chip birds are made from fine-grained pine. It easily splits into thin plates and bends well. Old masters noticed that thin-grained wood is most often found in pine that grew in a swampy place. This pine has golden wood with a beautiful shimmering shine. But instead of traditional pine, you can successfully use straight-grained and easily split wood from spruce, aspen, linden and other trees. And one more condition: the tree prepared for the chip toy must be sufficiently plastic. The degree of plasticity of wood is determined as follows. Separate a small sliver from the workpiece with a knife and cut it from the sides along the corner. Rotate one part of the wood chip relative to the other by approximately 90°. If the sliver does not break, the tree is ready for use. Well, if it breaks, you will have to increase the moisture content of the wood. Immerse the workpiece in water for several hours, and then test it again for flexibility. If the wood is still brittle, soak it again. It is necessary that the moisture is evenly distributed in the wood. This time, keep the workpiece in water for a short time: the wood oversaturated with moisture will become too viscous and will not split easily. Therefore, experimentally, try to determine the optimal moisture content of the tree in time.
To make an original chipped bird, you will need two even bars, 200 mm long and with a cross-section of 28 x 14 mm each. When processing the workpiece, try to trim the wood so that the annual layers are parallel to one of the sides of the block.
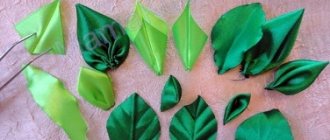
First, the body and head of the bird are cut out of one block. Do not try to convey them with naturalistic accuracy - such a condition will contradict the conventional decorative pattern of the plumage. The feathers of the right and left wings, as well as the tail, should be the same in pattern, so they need to be made according to a template cut out of thin cardboard or thick paper. Alternately placing a template on each of the two blanks, trace the outlines of the feather with a pencil. Then cut the workpieces with a knife along the outlined contours and saw grooves to connect the bars to each other. Now start splitting the bars into thin plates. This operation is the most important. It requires patience and accuracy. Remember: the thickness of each plate should be no more than 1–1.5 mm. The thinner the plates, the more openwork and airy the bird will be.
Northerners figuratively call the next stage in making a bird “unfurling the feathers.” Lift the top wing feather slightly and carefully bend it to the left. Carefully place the right edge of the bent feather behind the feather lying below. Then bend the second feather to the left along with the first and bring its right edge under the third feather. The remaining wing feathers unfold in the same way as the first two. Please note that with each subsequent feather the angle at which you bend it increases, so try to spread the last feathers of the wing especially carefully. When spreading the feathers of the other wing, do not forget that the feathers of the left wing should be spread from right to left, and the feathers of the right wing should be spread from left to right.
The tail feathers need to be spread in a different order. All feathers bend alternately to the right - left, right - left... only the top feather remains motionless. When the tail is completely spread out, the top feather will be in the middle, and to the right and left of it there will be an equal number of feathers.
All that remains is to attach the wings to the body by driving in a thin hook for string, and the strange firebird is ready.
Mirror frame
Do you know what color a soap bubble is? That's right, it has no color, everything we see is the result of light interference - a phenomenon in which light is refracted through light waves and thereby produces colorful shades and colors. The same effect applies to bird feathers. The peacock feather, by the way, is brown, but thanks to an optical illusion we see and admire the rainbow. What will you see in the frame, which will be decorated with bird feathers?
How to make a frame for a mirror with your own hands - master class from Kraftandcarat
Chick
Dyed half eggshells can be used to make cute chickens. By gluing red paper beaks and putting black dots instead of eyes, we get a whole brood of birds.
Then you need to put the little yellow chicks in the second, unpainted half of the shell, arrange the whole composition on a bunch of dry grass and get a touching picture of chicks hatching in a nest.
It is possible to make a bird out of paper. A toilet paper roll is used for this.
The sleeve should be painted yellow, then cut into two parts and glued together. All that remains is to glue buttons or beads instead of eyes, glue pink legs on the bottom and decorate the beak.
The last step in decorating the cute bird is gluing on the small wings. Chicken is ready!
Feather bookmark
Surprisingly, the feathers of owls (and a number of other nocturnal bird predators) are designed in such a way that they provide their owners with silent flight. Thanks to this fact, owls can hunt at night and not scare away their prey, fly and remain virtually unnoticed. A bookmark made of bird feathers will also be silent and unnoticeable - with it, reading will be a joy and pleasure. Intellectual and aesthetic.
How to make a bookmark with your own hands - master class from Elsarblog
Other ideas
The question of what a bird can be made from cannot bypass the technology of appliqués and mosaics. Any contour drawing taken as a basis can be filled with beads, grain or textile or felt parts.
Modular origami from colored paper is another technology that allows you to create three-dimensional decorative figures from hundreds of identical elements.
Soft toys in the shape of birds can be made using different patterns. The simplest of them are trapezoids or trefoils, from which a stylized base is sewn.
With the help of textile parts, the soft lump turns into a funny chick with a miniature beak, oval wings and a trapezoid-shaped tail.
A colorful group of these small and fun crafts can be made from bright or pastel fleece.
Interior wreath
Feathers can age. Unfortunately, they wear out and fall out. But in their place new ones grow - which then fall out again, thereby providing us with an inexhaustible source of material for creativity. And only birds have feathers! No other living organism can boast of beautiful plumage. Perhaps, except for a person? We have them, feathers, that can be used in needlework, right?
How to make a feather wreath - master class from kreativk
Materials for making poultry
First of all, you need to decide on the basis for creating the craft. Today the most interesting materials are:
- Salty dough.
- The shell of a chicken (or goose) egg.
- Small loose cereals.
- Fir cones.
- Plastic bottles.
- Plasticine.
Even compressed cotton pads are often used. Any of these models can be made together with your child as an extracurricular creative activity. To work, you need to prepare an organized workplace: a wide table, a bright light source, stands for brushes, scissors, a needle bed. You may also need in the process of creating crafts:
- Glue.
- Threads.
- Regular watercolor paints.
- Hair fixation spray.
- Decorative elements (beads, rhinestones, feathers of different shapes and sizes, buttons).
Further in the process of activity, the master can improvise in any direction, using other materials.
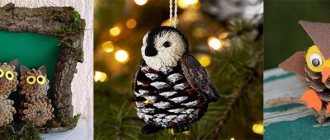
Small bird
One of the most beloved birds for people is the titmouse. According to popular belief, if a bird flies into a house, it is a bad omen. However, this does not apply to tits. Maybe it is precisely because of this popular love that tit bird crafts are one of the favorite activities of both children and adults.
Flamingo
Children love colorful things, so they will be happy to take on the task of making an exotic flamingo. For this you will need:
- chenille wire, i.e. fluffy cord twisted from several threads;
- pieces of cardboard of different colors;
- glue;
- unnecessary CD.
The disc will perform the function of the bird's body; the legs are made of pink chenille wire. The neck and head can be cut out of cardboard. The entire composition is glued onto cardboard. For greater effect, you can glue a few feathers, but you can do without them.
A figurine like this would be an excellent New Year’s bird craft for a Christmas tree.
Stages of working on a figurine
You need to start by cutting out a circle of blue paper with a diameter of 9-10 cm.
Step two. The circle is folded in half.
Step No. 3. A rectangle (9.5x4 cm) is cut out of black paper. The part of the rectangle that protrudes beyond the semicircle should be folded upward. This is how the titmouse's tail will be shaped.
Fourth step. 2 circles with a diameter of about 4 cm are cut out of white paper and glued onto the bird’s head. Use a black felt-tip pen to mark the pupils of the bird.
Fifth step. A small triangle is cut out of black paper and glued to the head - this will be the bird’s beak.
Step No. 6. Cut out 2 pieces of black paper, which should act as wings. Glue the titmouse to the body.
Seventh step. Cut out the legs and glue them to the bird.
Everyone's favorite little bird is ready!