A homemade minitratcore with a Zhiguli engine is another popular type of mechanical assistant designed with your own hands.
The reasons for creating such a homemade product are obvious. These are the low cost and availability of the starting material, the reliability and ergonomics of the structure assembled with your own hands, and the ability to mechanize most of the work on your own plot. With the help of a mini tractor from Zhiguli, you can perform soil cultivation and cargo transportation operations. You will also have the opportunity to work with a wide range of attachments - from a sprayer on a mini tractor to rakes.
You can make a mini tractor with a VAZ engine from virtually all well-known brands. The models most often susceptible to fracture are VAZ-2101, VAZ-2102, VAZ-2104, VAZ-2106, VAZ-2107, VAZ-2108, VAZ-2109. Let's focus on the VAZ-2106 model, which is distinguished by its efficiency and endurance.
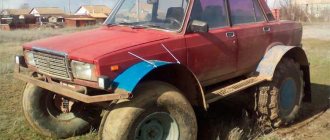
Buggy from VAZ 2109
This all-terrain vehicle, unlike other similar vehicles, was not made from scratch, but had the standard VAZ 2109 model as its basis. However, despite this, the author managed to achieve the necessary qualities and created an excellent buggy.
Materials and units used in the construction of the all-terrain vehicle:
1) Body and most parts from VAZ 2109 2) metal profile 3) muffler from Cherry Amulet 4) Hubs from Niva 5) brake discs from Niva 6) wheel bearings 7) Two external grenades from Niva, anthers from VAZ 2109 9) thick iron sheet 5 mm 10) reinforced ball 11) Niva wheels 12) org sheet. glass 13) transfer case from a Niva 14) factory levers from a Niva
Let's take a closer look at the stages of building an all-terrain vehicle.
Initially, the author received an ordinary nine, with which he began to experiment. To begin with, the standard VAZ 2109 was turned into a convertible:
And the author drove it for the whole summer in exactly this form, but since the car was quite shabby, it could not withstand such use and the rear beam was torn off along with part of the spar.
However, this did not upset the author and he decided to build something more unusual and interesting out of it. To do this, he dragged the car to the garage and began to modernize it.
First of all, the author decided to work on the body of the car, since the whole thing is too heavy. Therefore, taking the grinder in his hands, he separated the unnecessary parts from the car.
Then, due to insufficient experience in welding, the author encountered a problem when welding a standard muffler from a VAZ 2109, in the end the author abandoned this idea and installed the middle part of the muffler from a Cherry Amulet.
Which only took half an hour:
Then the author began work on the bridges, installing a transfer case from the Niva, modifying the gearbox, as well as minor repairs to the VAZ 2109 engine.
All this is attached to a reinforced frame, which stands on an independent suspension, on four steering knuckles of the field. The levers were taken from the factory and underwent minor processing.
According to the author’s calculations, the suspension travel should be 40 centimeters.
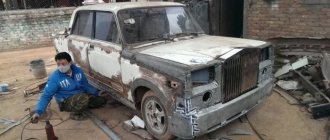
After assembling and installing the main structural elements, the all-terrain vehicle was tested on forest roads, where the all-terrain vehicle showed excellent handling, maneuverability and speed characteristics.
After driving on a wet road after rain, the author came to the conclusion that the car needs to install rear mudguards. For these purposes, plastic fender liners from the same VAZ 2109 were used:
In this form, the all-terrain vehicle was tested for one season, after which the author made the following conclusions: Road handling after rain left much to be desired, the reason for this was the fact that the front part of the all-terrain vehicle dug in very quickly. It is also necessary to make a normal gas tank instead of the used canister, since the fuel does not last long and, moreover, there is no tightness, which is why the canister leaked on uneven surfaces.
Also, for installation on the all-terrain vehicle, the hubs from the Niva were machined to the size of the nine bearings. Disc brakes and boots were installed, and brake adapters were made from a five-millimeter sheet of iron. The author also began installing reinforced ball joints on the all-terrain vehicle. Wheels from the Niva were also installed on the all-terrain vehicle:
Here are photos of the all-terrain vehicle after all the major modifications:
As you may have noticed, due to the not entirely identical mounting design, the wheels from the field had to be installed with the reverse side. Although at first the author thought about installing stands, it turned out to be too long, and it also affected the budget of the car.
In the future, the author wants to solve the problem by radically changing the stance of the vehicle and reworking the entire suspension of the all-terrain vehicle.
It is also planned to install four-point seat belts for safety.
Despite the fact that the hubs were weakened after turning, they can cope with the loads, both lateral and the weight that falls on two bearings.
This is what the front suspension looks like, which has undergone minimal changes:
In the future, it is planned to create a homemade upper arm using an A-shaped wide model, and place a shock-absorbing strut from a VAZ 2108 in the center.
The author is also studying documentation and forums regarding the installation of CV joints on off-road buggies. The possibility of abandoning the independent suspension in favor of UAZ axles, or creating a Mazurkevich-type suspension, is being considered.
Receive a selection of new homemade products by email. No spam, only useful ideas!
*By filling out the form you agree to the processing of personal data
Features of installation work
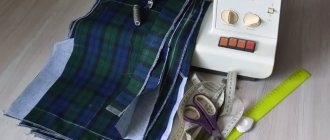
The process of upgrading your dashboard is quite simple. For this:
1. First you need to dismantle the factory instrument panel, for which you can use a screwdriver. During dismantling, you should remember the direction of the arrows, since in the future, at the time of installation, significant problems may arise.2. After dismantling the panel, the standard insert located on the light guide is peeled off. During peeling, there is a high probability of damage to structural elements. Therefore, it is recommended to use a utility knife.3. Next, you can bend the factory insert and erase the old filter. 4. The inside of the insert is treated with glue. Therefore, you should work with tweezers, which will eliminate the possibility of damage to the layer.5. Using tweezers, the previously prepared blue film is laid. It should be located immediately behind the white scale sector.6. After placing the captivity, a lighting check is carried out. Next, we install the LEDs in the top row. They are ground off and filled with glue.
The final stage is to install the instrument panel in place. After this, you should check the correct operation of the instrument panel, for which you should drive a little
It is quite important to check that the information is clearly readable from any driving position
The backlight should also have a high brightness level, otherwise the information will be difficult to read.
4WHEELS
Sometimes there is not enough money for a car, especially during a crisis, but you really want to have your own vehicle. Some craftsmen with golden hands get out of this situation quite simply: car enthusiasts build new ones from old cars. Just take a look at these projects:
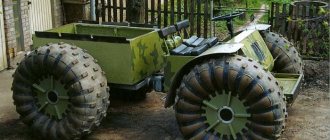
Quad 4x4 "Scoop"
Apparently, the author of this VAZ 2109 ATV was not satisfied with how public utility workers remove snow. Taking all his hands, he built this unit. The engine is from a VAZ 21081, the axles are from a Moskvich 412, the lower suspension arms are figure-eight, the upper arms are homemade, the front rear shock absorbers are from a VAZ 2108, the rear rear shock absorbers are from ZAZ, the frame is made from profile pipes.
Diggati
Meet Diggati with a 1.7-liter engine from a VAZ 2103. Its owner first wanted to build a buggy, and then a compact SUV. But due to a lack of money, we got this little car called Diggati.
Baby 4x4
“Baby”, this is what the author of this project calls his all-terrain vehicle. Volga with huge wheels on civilian bridges from UAZ, engine and gearbox from VAZ 2109, transfer case from Niva. Niva.
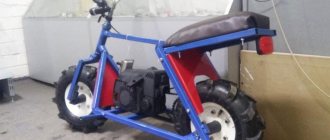
Bar stool with motor
It took exactly two months to build this vehicle. The motorized bar stool accelerates to 80 km/h. The device is equipped with hydraulic brakes from an ATV and some parts from a go-kart.
Triton-1
The Triton-1 all-terrain vehicle was built to make it possible to less carefully plan the route of a fishing trip in the part that concerns roads. The engine here is a 1.5-liter with a capacity of 68 hp. from VAZ 21083. The maximum speed of the 950-kilogram unit is 35 km/h.
Replacing the cabin filter and oil
Mazda CX-5 -2.5l-192hp-4×4 Logbook Means for car dashboard care matte instrument panel
To dismantle and replace the cabin filter on Kalina, you will need a set of screwdrivers and a TORX wrench. First, pry off the plug, then unscrew the bolts. The hood is opened and the grille is removed. The cabin filter is located under the grille. The lid slides to the right and the filter is removed.
If necessary, clean the seat with a vacuum cleaner. Install the new filter by performing the steps in reverse order. It will take no more than 20 minutes to dismantle and replace this part. Upon completion of the repair work, turn on the heating unit. Foreign odors should disappear.
An equally important process is changing the oil in the Lada Kalina engine yourself. This process is carried out using a 17 key. For engines of 1.6 and 1.4 volume, about 3.5 liters of new oil will be required. First, open the hood of the vehicle. Then unscrew the filler cap. This is necessary to depressurize the corresponding system. Under the car body there is a drain plug, which must be unscrewed using a 17 key. A container is installed under the car into which the waste substance will drain.
Oil level control
The next step involves removing the oil filter. It must be removed carefully, placing some container under it. Then enough oil is poured into the new unit to keep it full. If the waste liquid leaves the system, you can tighten the drain plug. Install a new filter. After pouring oil into the system, check the fluid level. A probe is used for this. If necessary, add liquid. The process of changing the oil and the corresponding filter on Kalina takes 30 minutes. Upon completion, you need to start the engine and wait until the oil sensor lamp goes out.
Do-it-yourself repair of a Lada Kalina car is also required due to the uncomfortable interior. In this case, the trim is replaced and the vehicle is tuned. To eliminate creaking and engine noise in the cabin, you will need to lubricate the doors and check the engine's performance. The suspension on the Lada Kalina is a rigid structure, so to improve or replace it you will need a car repair manual.
Crazy “Nivas”: tuning projects of Lada 4×4, which are sold in Russia
There is a feeling that tuning has found a second wind in Russia. With the widespread spread of social networks and all kinds of car blogs and vlogs, car owners with money and opportunities have become engrossed in building unique car projects and displaying them on the Internet. Just look at blogger Konstantin Zarutsky’s tracked Bentley, which seems to have appeared on all screens, including the BBC. Well, the most interesting thing is that the authors do not shy away from domestic cars, sometimes investing crazy amounts of money in them.
Why do the authors get rid of their creations, into which they invested so much effort and money? Actually, owners of tuning cars most often do not hide the fact that they were building a unique car for the sake of the process itself. The life cycle of such cars often consists of party rides, participation in auto shows and festivals, sometimes even victories in auto competitions and, of course, online hype. After this, the owner often loses interest in the “toy,” putting it up for sale in order to invest money in a new project, a new stage of viral videos and photos on Instagram.
Maintenance
All maintenance issues are discussed, from tightening bolts and connections to work such as replacing consumables yourself.
The materials provided on the site are supplemented as much as possible with photographs to show the entire process of performing a particular procedure. This car, produced by AvtoVAZ, has gained great popularity in Russia. She has a significant number of fans, there is a club, and any news is actively discussed on the forums. But certain faults are typical for a vehicle, so the main topic is the repair of this car.
Our answer Gelandewagen 6×6 for 300,000 rubles
The craftsmen from the Tolyatti car service center took the issue very seriously and from a 1994 Niva pickup truck, they made our answer to the “Gelika 6x6” in six months. The car was even featured in a story on local television. At first, the Niva was built as a vehicle for a motocross team.
Essentially only one cabin remained from the original source. The engine was replaced with a forced ZMZ-406 unit with a volume of 2.3 and a power of 170 hp, a gearbox from a Gazelle. Axle locks and electronic transfer case control are installed. The rear axle is lazy. Externally, the vehicle is equipped with a ton of off-road equipment.
The main problem is that technical changes have not been made to the title, which means that, in fact, the SUV is not allowed on public roads. That is why the price for such a project is, one might say, cheap.
"Niva" on 22 "skating rinks"
Maximum effect for minimum money. Not a very complicated tuning project for an almost new 2022 Niva. The main wow effect is achieved through the complex paint job and, of course, the introduction of huge 22-inch wheels with low-profile tires.
All the optics on the car have been replaced with LED ones, wheel arch extensions have been installed, and the body has been wrapped in film. There are good acoustics inside with podiums in the doors. The owner Sergei from Moscow assures that the original mileage on the car does not exceed 6000 km. The price for a spectacular Niva is not very high - 555,555 rubles.
"Niva" on tracks
For 580,000 rubles you can become the owner of a domestic SUV on tracks.
Actually, half the price of a 2008 Niva with a mileage of 90 thousand km is made up of caterpillar mechanisms. The car is equipped with a factory VOP 1500 kit from Wheeltracks, which anyone can buy for any SUV.
In addition, the Niva is equipped with an expeditionary trunk, improved music and an alarm system with auto start. Alloy wheels with winter tires are also available, but it is not very clear from the advertisement whether they are included or not.
Alteration and replacement of dashboard
Not so often, but still among Niv owners there are those who do not ignore such “noticeable parts of the interior” - such as the instrument panel, dashboard and the instruments themselves. Which, in turn, can either be slightly modified (for example, changing the color of the scales or the backlight of standard sensors), or completely replaced with others, both from domestic cars and parts from foreign cars.
How to make a dashboard with your own hands?
The process of making a homemade dashboard from plywood is literally “on the knee”.
This instrument panel can be purchased from sellers of tuning parts and accessories. It seems that the choice of alternative plastic dashboards for the VAZ-21214 in online and online stores is relatively large. And if you search, you can find some pretty decent panels.
Often, fans of tuning a domestic SUV decide to completely replace the dashboard or instrument panel with appropriately sized panels from foreign cars. And more often than not, such a replacement is completely justified. Since, in addition to a clear improvement in the visual perception of the interior, comfort and ergonomics are significantly improved.
Additional devices
Usually, when it comes to tuning the dashboard and dashboard, it is quite common to install additional auxiliary sensors and instruments. Moreover, these can be not only purchased tuning devices, but also instrument indicators from other car models. And not necessarily foreign cars. Spare parts from domestic cars are often used.
You can read about what to choose and how to install it yourself correctly in articles on the topic Additional equipment.
"Niva" for the trophy
A car enthusiast from sunny Krasnodar decided to turn his 2015 Niva Urban into an off-road conqueror. The project turned out to be spectacular, however, the car itself looks more like a walking exhibition of off-road equipment than a real trophy-raid tool. For example, among other things, the car is equipped with a subwoofer, two amplifiers and podiums for speakers, as well as an awning - obviously, irreplaceable things when conquering off-road terrain.
One way or another, the list of improvements exceeds 40 items. Among the most serious are a 5-centimeter lift with the installation of Cooper off-road wheels, a 10-ton winch, pneumatic preparation for purging and pumping, tuning of the suspension, axles, strengthening of the body and other elements. The vehicle comes with all the necessary off-road equipment, including a hi-jack.
Unfortunately, the owner did not write anything about boosting the engine. Since the Niva with its original 83-horsepower engine moves with great effort in stock condition, one can only guess what kind of load the frail engine will experience after installing all of the above. The cost of the project is 750,000 rubles.
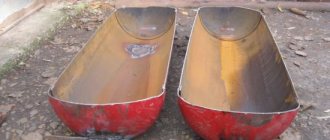
"Niva" swamp vehicle
A Ural car enthusiast has put up for sale a rare Niva, an all-terrain vehicle on huge low-pressure wheels. There is no description or history of the car, except that the SUV is a 2009 model with a mileage of 7,000 km.
The presented specimen is most likely the brainchild of the Tolyatti company, which was engaged in mass production of special vehicles based on VAZ technology. The Niva body was mounted on the frame through elastic rubber pads. Unique cross-country ability was ensured by the design of elastic thin-walled ultra-low pressure tires.
The cost of the unsinkable Niva is 800,000 rubles.
"TurboNiva" with a 200 hp engine.
One of the largest tuning projects based on the Niva. A car enthusiast from Tambov has done a tremendous job, turning a domestic SUV into a sports car.
Actually, the technical part underwent the main alteration. The engine received turbocharging, new control unit, camshafts, exhaust system, power system, air system and other modifications. According to the owner, the engine, now powered by “100th” gasoline, showed an output of 200 horsepower on the stand. (What is the resource of the forced engine is left behind the scenes).
The TurboNiva has a completely redesigned suspension and braking system. The interior received a lot of improvements, including redesigning the front panel for a multimedia system. The trunk is almost completely devoted to the installation of an acoustic system.
The total cost of the exclusive project is 1,000,000 rubles.
"Niva" - a racing legend for $100,000
Smirnov Design Bureau, famous among restorers, has put up for sale a historical rally car based on the Niva. Multiple winner of world rally raids from 1983 to 1988, including under the control of Formula 1 vice-champion, six-time Le Mans winner and Dakar champion Jacqui Ickx.
One of 8 built and 4 surviving examples. The 1983 car has a 1.8-liter engine producing 180 horsepower. The cost of the legend is 7,900,000 rubles.
Did you like the article? Subscribe to the channel to stay up to date with the most interesting materials
Modernization and refurbishment
Modification, that is, complete or partial alteration. This is especially familiar to those who build crazy sports cars based on old Zhiguli cars - standard VAZ seats and steering wheels lack comfort, grace, or tenacity. Therefore, they often give way to analogues from foreign cars or sports “steering wheels” and “buckets”.
Not only domestic cars experience such “implantations”: owners of foreign cars are also not averse to treating themselves to the benefits of civilization. Heated and electric seat lifts, beautiful toggle switches for turning on anything, more convenient and informative dashboards can be purchased and installed gradually, without overpaying to the dealer for equipment when purchasing a car.
Tuning a car's interior is not only about giving it sportiness or additional comfort. Nowadays, when you have to stand in traffic jams for a long time, and every minute is worth its weight in gold, “offices on wheels” have become very popular. The essence is this: a small movable table (for signing documents, a laptop, etc.), a 12/220 volt current converter, a wi-fi router and other equipment necessary for work are installed in the interior of a car (usually a minibus). The convenience of a minibus for converting into a mobile office is that the seats are located facing each other - you can conduct negotiations and see the reaction of the interlocutor.
What can be made from a VAZ-2108: 5 cars you didn’t know about
The most unusual cars based on the G8
AvtoVAZ began developing front-wheel drive cars in 1971. In 1977, the project was fleshed out and the development of the VAZ-2108 car began; a year later the plant had a concept for the future car. By the end of 1978, the first prototype was assembled, and in 1984, finished cars rolled off the assembly line. The model was assembled until 2003 and during its existence received a lot of very unusual modifications.
VAZ-2108 EVA
A sports car based on the G8, built in the 1980s in Estonia. Developed by Soviet racing driver and director of the Experimental Vilnius Automobile Plant (EVA) Stasys Brundza. The car is designed for rallying, prepared according to group B. In fact, very little remains of the original design - optics, windshield and doors, the rest of the body is made of fiberglass. The engine was installed from a VAZ-2106, with the help of a number of modifications and turbocharging on this car it produced about 300 horsepower. The motor is located at the rear, the drive also goes to the rear axle. On the basis of this car, an all-wheel drive project, S-PROTO, was created, but group B was closed and there was no need to work on such a car.
VAZ-2108 "Tarzan"
An SUV with the appearance of the G8 was assembled in 1997 at the Lada-Consul enterprise. In essence, the car was a “Niva”, onto which a body from 2108 was “stretched”. The engine, transmission, and steering from the “Niva” were installed on the frame, then the body was mounted through rubber cushions. The joints of the frame and body are covered with plastic covers. The interior was retained from the G8; only the lining of the central tunnel had to be modified in order to install the transfer case control levers there. Cars were manufactured in small batches, to order. In total, about 2,500 copies were produced.
VAZ-2108 “Targa” Experienced
The first Soviet car with a “targa” body appeared in 1988, becoming the fruit of the creativity of AvtoVAZ designers from the Style Center. The car received a rear end similar to the future 21099 and an open roof with a removable panel. Door reinforcements and two-piece glass appeared. But the 2108 Targa was not destined to go into production. They produced only one finished sample and one body, neither of which has survived.
VAZ-2108 IKS Experienced
This is a special modification of the G8, released in 1986 by order of Aeroflot. The machine is designed to measure the coefficient of runway friction. The data obtained made it possible to predict what distance the aircraft would need to brake.
Lada Natasha
A convertible based on the G8 was released in 1990 by the Belgian company, which imported Lada cars. Tolyatti designer Vladimir Yartsev was involved in the development of the exterior, and the open bodies were made at factories in Belgium and Germany, as part of small-scale production. “Natasha” did not receive any differences from the usual “Eight”, except for an open body and bumpers with moldings. The weight of the car has been increased by 70 kilograms due to body reinforcements and a folding mechanism. About 450 of these machines were produced.
Useful video
Instrument panel supervision in Hyundai Solaris
We recommend watching the video:
The above is not a complete list of activities that can be carried out to improve your car, but they are enough to turn an ordinary factory UAZ Patriot into a modern, comfortable SUV with high cross-country ability.
This SUV, produced since 2005 by the Ulyanovsk Automobile Plant, is almost ideal for bold experiments on its exterior and interior, as well as for optimizing performance in general. Being a comfortable all-wheel drive vehicle with spacious interior space and high load capacity, the design of the UAZ Patriot offers many tuning options designed specifically for the interior.
It should be remembered that it is better to entrust complex work on re-equipping a car to professionals, since this can critically affect and disrupt the functioning of many standard systems.
Homemade ATV based on Oka and VAZ units
We present the ATV of our regular author S. Pletnev from the city of Ocher, Perm Territory. The next machine he built testifies to the increased design level and professional skills of its creator. However, judge for yourself.
A year of work of 3-4 hours after work and on weekends - and the new car was ready for testing, only minor (and I would say pleasant) modifications remained: connecting lighting equipment, installing an ignition switch, rear-view mirrors and other little things.
Additional brake light
Quite spontaneously today I came to install an additional brake light. I’ve been wanting to realize this idea for a long time, but I still couldn’t find a suitable stop, and today at work we went to the metal receiving area, and when we stopped there, a nine caught my eye. Well, naturally, I went to examine it, walking around I saw a stop that was exactly what I wanted. I asked if I could pick it up and, having received a positive answer, I tore it off, although I didn’t break much, but the superglue did its job. The fog lamps are halogen w5w, but LEDs can also be installed if desired.
After work I went to the store and bought 5 new w5w lamps. and 2m wires. Half an hour of fussing and it now shines on the back window.
DIY Oka ATV
The power unit for my homemade ATV was the engine from the Oka car - 32-horsepower, two-cylinder, four-stroke, liquid cooled. And if its power was often not enough for a car, then for an ATV it should have been more than enough.
The machine frame is spatial, welded. Its main elements (two pairs of side members: upper and lower) are made of round pipes of the VGP-25 type (water and gas pipes with a diameter of 25 mm and a wall thickness of 3.2 mm), auxiliary (struts, cross members, etc.) - from VGT-20. The spars are bent: the lower ones are in the horizontal plane, the upper ones are in the vertical plane. I bent the pipes on a pipe bender, “cold”. Eyes (pairs of ears) for attaching suspension arms and shock absorbers were welded to the frame immediately, and various brackets were welded as components and assemblies were installed (in “place”).
The transmission of the all-terrain vehicle is unique. Although the car is all-wheel drive, it does not have a transfer case. As you know, in the Oka the engine is located transversely, while on an ATV it is installed lengthwise. This made it possible to direct the output shafts from the gearbox (Gearbox) not to the right and left wheels (as in a car), but to the front and rear axles. It’s just that the power unit itself, interlocked with the clutch “basket” and gearbox, had to be shifted slightly to the left relative to the longitudinal plane of symmetry in order to reduce the horizontal angle of the longitudinal articulated shafts of the transmission. Well, their vertical angles turned out to be insignificant.
The transmission is assembled from units of various domestic cars, mainly VAZ models. But ready-made industrial units also had to be modified. For example, from the gearbox (from Oka), to ensure optimal (reduced) speed and increase torque, I removed the main gear pair and replaced it with a chain drive. The gearshift rod was also made different - elongated, with outlets on both sides of the gearbox. The rod can be locked in three positions: to engage 1st and 2nd gears, 3rd and 4th and reverse. The lever for selecting these positions is on the right side, and the gear shift lever is on the left.
The inter-wheel gearboxes are from the rear axles of the VAZ “classics”, only their axle shafts along with the “stockings” were removed and replaced with shafts with CV joints from front-wheel drive models. CV joints are also used as hinges in the remaining intermediate shafts of the transmission.
There are no low gears or differential locks.
The steering is motorcycle type (lever and shaft) at the top and automobile type (with tie rods) at the bottom, only simplified, without a steering mechanism, with one bipod. At first I used the steering wheel from a Minsk motorcycle, with a pipe diameter of 22 mm, but it turned out to be a little thin. Later I found and installed it from a Ural motorcycle. The steering shaft is made of a pipe with a diameter of 20 mm and a wall thickness of 2.8 mm. It has a travel stop at the lower end. At the bottom, the shaft rests on a thrust bearing, and in the middle part it rotates in a detachable nylon bracket-sleeve.
The bipod is made of 8 mm thick steel sheet in a shape resembling the letter “T”. At the edge of the “rack” there is a hole with a diameter of 20 mm - the steering shaft is inserted and welded into it, and in the ears there are conical holes for the ball ends of the tie rods. These holes are reinforced with suitable welded washers. The bipod ears are bent down slightly so that they are almost parallel to the rods.
DIY ATV body kit
Do-it-yourself ATV body kit - fiberglass. I glued it in for the first time, and therefore first studied the recommendations for performing the relevant work. But as it turned out, this process is painstaking, although the result is worth it.
First, I made the required contours of the body kit from a square steel pipe with a cross-section of 10x10x1 mm. Fortunately, this pipe bends easily even with your hands over your knee. The contour was welded to the frame using jumpers from the same pipe, in places where later (after gluing the body kit) the “tacks” could be easily cut off. Then I bent “wings” from hardboard (fibreboard) and fixed them with self-tapping screws to the contour and jumpers. Where the bend turned out to be steep, I attached separate strips of the same hardboard. The front end was made with polystyrene foam purchased at a hardware store. It was possible to use polystyrene foam or the same polystyrene foam, but polystyrene foam turned out to be a more suitable material - it cuts well with a sharp thin knife. I glued individual elements from it into the overall structure on polyurethane foam.
Steering wheel
- this is exactly the control that the driver touches with his hands throughout the entire driving time. In this regard, car owners most often have complaints about the appearance of the steering wheel, and then the painful process of choosing the type of tuning and its implementation begins.
What can be done? Of course, the most expensive and radical type of tuning that you can imagine is the complete replacement of the standard steering wheel with a new one. In this case, most of the questions related to the choice of braid or base for reupholstering disappear, but you should understand that a ready-made steering wheel, especially for expensive cars, is expensive and can really cost a pretty penny. For example, steering wheels for sports modifications of Volkswagen cars, which owners of cars of this brand often install on their cars, will cost no less than 20–30 thousand rubles.
Here we can note the possibility of an infinitely wide choice of color, texture and quality of the upholstery with which the upholstery is made. You can choose inexpensive leatherette, genuine leather and Alcantara, whose texture resembles suede. In addition, the base can be smooth, embossed or perforated - depending on the brand and manufacturer of the leather.
The seam can be quite complex, but in this case it is quite problematic to do it yourself: to carry out such tuning of the interior, it is best to contact a specialist who has certain experience and skills.
There is an even more budget option, which is easy to implement with your own hands and requires very minimal effort and money. This option means braiding, which can also be made from natural materials and more inexpensive substitutes. Putting it on the steering wheel with your own hands is not difficult, and the effect with the naked eye is difficult to distinguish from a full-fledged upholstery.
DIY ATV frame drawings
The false tank has a complex shape. It was not possible to bend it out of hardboard. Therefore, having wrapped the engine with plastic film, I began to fill the space intended for it with layers of polyurethane foam. After each layer, drying is mandatory, otherwise the thick volume of foam may not dry out inside. Filled until the layers went beyond the contour. Finally, after the foam had completely dried, I began to draw out the desired shape with a knife. The edges were smoothed with coarse sandpaper.
Part of the Oka dashboard was used under the instrument panel. I secured it to the blank also using polyurethane foam. Since the foam is large-porous, the pores were filled with gypsum and then processed. When the shape of the blank began to correspond to the intended design and its surface became more or less smooth, I coated the blank with PF-115 paint. Since I was not going to make a matrix for gluing the body kit on the block, but immediately glued the body kit on it, followed by finishing the surface to an ideal state, putting plaster and painting the block could be neglected.
So, the blockhead is ready and to glue a high-quality product, it was required: 10 kg of epoxy resin, 1 kg of plasticizer for it and 1 kg of hardener, 15 linear meters of thin fiberglass fabric, 5 m of glass mat, brushes, gloves. It is highly advisable to wear breathing protection. And the more expensive they are, the more reliable they are. But, as you know, you can’t buy experience, so I gained it in the process of work.
I used transparent tape as a separating layer between the block and the product. The whole idiot covered it with stripes carefully, without any omissions. It only took 1.5 rolls of wide tape.
I diluted the resin in 200 - 300 grams with a hardener and plasticizer. I used measuring cups and syringes, which is not very convenient. Before this, I cut strips of fiberglass in such sizes that large canvases would lie on flat surfaces, and on uneven surfaces, pieces of fabric could repeat them without making folds. By the way, fiberglass stretches moderately along the diagonal of the weaves, “flowing around” the desired shape.
First, I thickly coated one area of the blockhead with epoxy resin, placed fiberglass on it and impregnated the top with resin again. The adjacent piece of fabric was glued using the same technology with an overlap of 3 - 5 cm. We had to work quickly - the resin sets quite quickly, and the higher its temperature, the faster. Yes, I also heated the resin a little near a powerful lighting lamp for better fluidity.
After covering the blockhead with fiberglass in one layer, I began to cover it with glass mat. The fiberglass mat I got was quite thick, and it turned out to be good for gaining the thickness of the product. But it does not hug uneven surfaces, so I used it only on flat (or slightly sloping) surfaces and without overlap. Impregnation with resin was carried out in the same way as when working with fiberglass. Just keep in mind that it takes a lot of resin to impregnate glass mat, so you need to dilute it more. After gluing the glass mat, uneven surfaces were glued in several layers with cloth. Each subsequent layer was applied after the previous one had set a little, so that the resin would not leak. And since the process of gluing the body kit took more than one day, after a day of break it was necessary to “roughen” the surface with coarse sandpaper and degrease it - after all, the resin cures completely during this time. The final layers on top of the mat were again covered with fiberglass, and not even just one layer.
Since I needed the surface, as they say, the smoother the better, and I didn’t have enough experience, dips and holes still remained - I filled them with resin alone, and with pieces of fiberglass applied there. There wasn't enough resin. I already bought more at the hardware store, in boxes. I liked working with it more because it was already packaged, and all I had to do was mix the ingredients. And it dried faster than the one purchased from the company.
After the glued body kit had completely dried, I made cuts in it, dividing the product into three parts: rear fenders and rear, false tank with seat, front fenders and front end. Carefully, slightly prying and pulling with his hands while picking, he separated the product piece by piece without much effort from the blockhead.
Now, having removed the parts, I began to process them separately, bringing them to the desired result. In general, ordinary preparatory and painting work using “all” technology: first, rough grinding with the removal of large bulges of resin and fiberglass; then painstakingly filling the recesses with putty and fiberglass; then grinding the outer surface and priming with a plasticizer. Finally - metallic painting and varnish with a plasticizer.
The blockhead also carefully cut it off and put it in the far corner - just in case. The body kit was attached to specially made and welded “in place” mounts on the frame.
Finally, I welded front and rear luggage racks from thin-walled steel pipes with an outer diameter of 20 mm, and in addition to them, “kangaroo bars” that replaced the bumpers.