Recently, making interior items using unusual methods has become very fashionable and popular. The creative hobby of creating paintings, inscriptions, and thread patterns, although not new, is becoming increasingly popular. Even a child can make a painting from threads with their own hands. With the right choice of color and thread thickness, you can get a voluminous and expressive panel. Below we will look at the most popular ways to use threads to create your own masterpieces.
What threads are used to create paintings?
Any thread will find its application when creating thread paintings, but each technique has its own preferences. For embroidery, silk and floss are most often used; knitted patterns are created from the remains of wool and synthetic yarn. For thread printing, thick textured threads are preferred; woolen yarn will be simply ideal; with its help you can not only “color” the drawing, but also give the picture volume.
Such works will definitely be unique and inimitable.
String-art does not require special threads - you can use any, depending on the idea. It will be easier for a beginner to work with thick threads. Thin threads require skill and craftsmanship, but with them you can create more complex and detailed designs and even achieve smooth color transitions. If you decide to work using the filumik technique, any thread will suit you, just use your imagination.
String Art is a fairly popular and unusual art that allows you to combine seemingly incompatible things: soft threads and hard nails.
Knitted panel “Jug”
The jug is knitted using the fillet technique, which should result in a knitted mesh. Empty cells are knitted with single crochets and two chain stitches.
The crochet pattern is like this:
- I row: 10 empty cells, filled;
- Row II: 8 empty, 4 filled;
- III row: 6 empty, 6 filled;
- IV row: 4 empty, 8 filled.
The beginning of the row (first column) should be replaced with 3 air loops.
The jug is knitted with white threads; it is better to use cotton yarn. In order to make the panel brighter, the outline of the jug should be tied, for example, with red threads. You can decorate the product with flowers, leaves, beads, beads.
Tools needed to create paintings
Creating paintings from threads is a very democratic form of needlework; you probably already have everything you need in your home.
- The basis. For string-art, you can use wood, cork board or foam. In other techniques, the base can be cardboard, plastic, hardboard or glass.
- Drawing - this can be any printout, stencil, or your sketch made in pencil or paint.
At the moment, the popularity of unusual paintings made using the string art method is only growing.
The necessary tools and consumables vary somewhat depending on the technique used to create the painting.
For thread printing or flocking you will need:
- cardboard, glass or other rigid support;
- PVA glue, preferably thick;
- wooden skewer, toothpick or large needle for laying threads; It is convenient to use a brush for flocking;
- scissors and thread.
Nitcography in our country is popular, first of all, because of its low cost.
String-art:
- wooden or cork board, you can also use foam;
- small carnations (no more than 10-20 mm long) or pins with beads at the end (the beads will become an additional decoration);
- a small hammer for hammering nails and, of course, scissors and thread.
Works of art using the string art technique fit seamlessly into a modern interior.
Filumika is the most affordable way to create paintings from threads:
- the basis will be a photo frame with glass;
- fabric for the background and glue for fixing it to the base;
- scissors
- to “paint” a picture, we use everything that is left from your “big” needlework - trimmings of any threads, the smallest shreds, ribbons, remnants of lace, crystals, sequins, beads - your possibilities are limited only by your imagination.
The subjects of the paintings are made with threads and shreds, so the minimum cost and the result is an exclusive painting.
Learn to draw
For this technique of creating panels, you need to very finely cut the threads that will be used in the work. It should be remembered that the smaller the pieces of thread, the more beautiful and uniform the result will be. The creation principle is the same as described above. A drawing is applied to the cardboard, the main contours are made in contrasting colors, and the rest of the space, using threads and glue, is filled with pieces of threads. Of course, creating a panel will require patience and perseverance, but the result will be very similar to the real picture.
To create, you can attract little helpers; children will happily help adults and be proud of the results of their labors. A fluffy picture framed will be a good decorative element for a child's room.
Related article: Embossing on paper at home: technology and equipment
Where to find a drawing or diagram for a painting
For some techniques, for example, embroidery or string-art, you can buy ready-made kits for creating a picture from threads; you just need to select the proposed designs. If you have your own idea, you can find a suitable drawing on the Internet or make a sketch yourself. To work in the philumics technique, you don’t need a drawing for the base - you only need an idea and imagination, which can be fueled by a picture you like.
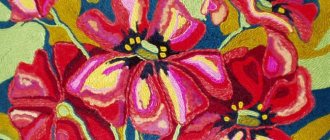
Paintings made from threads - threadography - is a type of fine art that uses lines and strokes as the main means of representation.
Knitted panel "Teeper"
Another knitted panel is perfect for the kitchen. It depicts a tureen. The entire manufacturing technology is identical to the panel depicting a jug.
How to make a thread painting with your own hands
Here are simple step-by-step algorithms for creating a picture from threads.
Nitography:
- Place your chosen design under glass (if you used it as a basis) or transfer the contours of the image onto the base.
- The first step is to glue the outline with threads. Do not apply glue to the entire contour at once - work in small fragments. Press the threads firmly against the adhesive base and, if necessary, correct the outline with a stick.
- The second step is to fill the space between the laid contours with threads. The threads can be laid in a spiral or in strips. Try to pack them tighter.
- We fill in the background at the very end. The finished painting can be framed.
To create paintings from threads you need to prepare very few materials and tools.
String-art:
- Transfer the outlines of the drawing onto the base with a simple pencil
- Carefully hammer in the nails along the entire contour in small increments (about 10 mm or more often if the design requires it).
- Select a starting point and secure the thread to the nail. Wind the stretched thread around the hammered nails to create a pattern.
- When finished, secure the tip. If necessary, the nails can be driven deeper.
Such paintings are now in great demand.
Flocking:
- Transfer the image onto the base.
- Prepare the “paints” - finely chop the threads of the desired colors and place them in containers (plastic containers, cups or saucers).
- Coat the selected fragment of the pattern with glue and glue the thread crumbs. Move through the colors - move on to another color after you have done all the pieces of the first color. The background in this technique is done last.
Flocking is a method of applying very short (2-6 mm) fibers, called flocks, onto some kind of substrate such as fiberboard. fabric, cardboard, paper.
Philumica:
- In this technique, you do not need to transfer the drawing to the base; you can simply put an inspiring picture in front of your eyes or create directly “on the canvas”.
- Let's disassemble the selected frame and glue the fabric background onto the base (back wall of the frame).
- We lay out the prepared threads and shreds according to plan. The advantage of this technique is that you can experiment directly from the base without fear of ruining something. The best option will be the one you like.
- Cover the finished picture with glass and place it in a frame.
Scraps of various fabrics, threads, ribbons, lace, in general, everything that is necessary in sewing are used.
Browser not supported
Knitted patterns»»»
Crochet painting Symbol “Fertility tree”
Knitted patterns»»»
Knitted patterns»»»
☝️ If a thought has crept into your head, I want it too - an interest in a more serious type of knitting awakens in you.
And now, I’m ready to tell you about the course
The name itself speaks for itself - Think like a hook
This course consists of 3 modules of varying difficulty in crocheting
1.Technical and practical (from September 25 to October 25)
2. Fantasy and practitioner (from October 25 to November 25)
3. Creator and implementer (from November 25 to December 25)
[ ] First module - entry level - technical
• Homework with symbols • Application of special techniques • Development of knitting patterns • Homework • Practice
The result is that you will learn how to not just repeat actions for... More
I use two techniques for knitting patterns.
I came up with the first knitting technique myself. The picture is knitted with multi-colored floss threads according to the cross stitch pattern using single crochets.
One cross = one column. Photo 1 Crocheted pattern “Calendar” When crocheting patterns there is no division into front and back, and the result is a completely normal pattern. In principle, up close (very close) you can see that the knitting differs (see photo 1), but already from a normal distance (30 cm, as when reading) it is completely impossible to distinguish the difference. The pattern turns out to be slightly elongated upward, but I only noticed this on one very special project - this is also my idea, I don’t know if anyone else knits like this. I called this technique “silhouette” (see photo 2). I have such things with both threads and beads. In other works, vertical stretching is practically invisible.
Since then I have been knitting those pictures according to cross stitch patterns that I like.
I take the whole floss, that is, a thread in six folds, as it is sold. In principle, you can take it in three or two, as you want, but you’re just too lazy to unwind it. I don’t cut the thread to length, as happens with embroidery, when it is threaded into a needle, I take it whole and knit it, as if from a ball. Because of the 6 threads, the fabric turns out to be quite dense, but I am consoled by the fact that embroiderers usually have a canvas, and Photo 2 Crochet pattern on it with threads in 2 or 4 folds - it also turns out quite thick. Honestly, I would knit with something thinner, but with what? Unwind the floss into 3 threads? You'll be tormented, I tried. If I have 40 colors in my work, and unwind each thread. if only there was something subtler, like iris at least. But the iris has few colors, and for paintings the shades are the most unusual. Although if you knit something simple and of little color, you can use iris. And the foreign iris is generally thin, that would be wonderful. But we practically don’t have it.
I use a 1.6 mm hook for standard floss. You can use less for iris.
When I need to switch from a thread of one color to another in a row, I pull a thread of a new color into the “old” color and tie it in a knot, and then knit further. If several crosses are of the same color, and then another, and then (after 3-4-5 crosses) the previous one is repeated again, then I simply pull the first thread and knit with it. In principle, as far as I know, jacquard patterns on sweaters are knitted on knitting needles in approximately the same way - colored pictures and ornaments, and there, too, the threads are pulled through and not cut each time.
I cut off the threads when this color runs out, and in general I try to make fewer knots. If the picture is complex and one color is repeated at different ends of the picture or at a sufficiently large distance, I take two or three or as many skeins of floss as needed, I don’t want there to be continuous broaches on the reverse side. And when the thread runs out or is cut, I carefully tuck it behind the broaches or under the lower loops. Since the knitting is dense, it is absolutely not noticeable from the front side. Photo 3 Crocheted pattern in clothes
Generally speaking, it’s easier to take a simple miniature yourself and knit it for the first time - so many things become clear right away.
By the way, I knit not only pictures, for example, a jacket with roses
The jacket is knitted with lurex threads in double crochets, and the roses are knitted with floss threads at the same time in single crochets. That is, it is not embroidered on top and not sewn after separate knitting - everything was done at the same time.
"Girls with Sleds"
- this is one of the first works (maybe it is 10 years old), the magazine then wrote that this is one of the favorite pictures of the Germans, it was embroidered back in the 19th century. This was my first complex painting.
By the way, the only negative is that the photo shows that the edges are uneven. But if you make the edges larger and insert the paintings into a frame, this will not be noticeable.
Good afternoon, dear needlewomen and all blog guests!
Congratulations on the beginning of the long-awaited summer!
Probably, at this time it doesn’t fit very well, but still, I will offer you a selection of crocheted panels for the wall for comfort in the house with diagrams and descriptions for your collection of ideas.
I somehow came across this photo on the Internet, which depicts a very cute panel with a jug. It gave me no rest. Have you ever seen a jug decorated with crocheted flowers? Let's knit with our own hands and decorate our kitchen!
Interesting examples of yarn paintings
All techniques are original and interesting. With their help, you can create real masterpieces worthy of exhibition halls. Create abstract paintings using string-art technique. Cartoon characters and stylized cats can be drawn well using threadography; fantasy flowers and landscapes can be laid out using the philumics technique. In all cases, thread paintings look very decorative and unusual.
Pictures made from yarn and threads are not just a picture in a frame on the wall. These techniques are used to create covers for notebooks, decorative vases and bottles, pillows, decorate box lids, and make postcards and gift boxes.
String art is not a new direction in needlework, but a very popular type of weaving from nails and threads.
Create, try, dare!
Drawing with threads is the same as drawing with a felt-tip pen, only the line needs to be glued to the base.
Crochet Owl panel
Crocheted panels not only with patterns, but also with animals and birds look original and beautiful.
To create a wall painting “Owl” you will need:
- 200 g of white thread;
- Hook;
- Rings that are used to assemble curtains.
The ring is tied with single crochets, three rows are knitted according to the existing pattern. The second ring should be treated in a similar way. The first 12 double crochets are sewn together. The rest remain free. The first row of the owl's plumage is made of 4 chain stitches, and is knitted in forward and reverse directions. Next, the body of the bird is knitted, and two wings are finished, but separately. Ears are tied to the head, connected with single crochets.
The large ring is tightly tied with single crochets; the owl is attached to the frame by the tips of its wings, ears and the middle part of its body.
This crocheted panel can be used to decorate a hallway, children's room, or even a living room.
Nuances
People have been creating crafts from threads with their own hands for a long time. This type of creativity is very practical and therefore in demand all over the world.
Despite the widest range of goods in stores, priority will always be given to original works, because they are unique and contain a piece of the master’s soul.
The yarn is suitable not only for making dolls and animal figurines. Today paintings, vases, and decor for lighting fixtures are made from it. And if you involve a child in the process, the time spent in a creative activity will give the child warm memories for life.
Toys
From leftover yarn you can make original New Year's toys in the form of Christmas trees.
Christmas trees
Dimensions of miniature Christmas trees: width 9 cm and height 15 cm. Yarn of any texture and color is suitable, you will need knitting needles No. 4.5 and beads, stars, beads and other decorations.
Knitting:
- Knit 5 rows of 4 LP each.
- In the next two rows add 7 stitches.
- Knit in the 1st row. LP, in the 2nd and all even ones - IP.
- In the 3rd row: 1 LP, knit a broach (1 p. remove as a front one, 1 LP, pull it through the removed one). Afterwards, you need to knit all the LPs, the last 3 - 2 LPs together, 1 LP.
- Repeat knitting repeat in 1-4 rows until there are 4 stitches on the knitting needles.
- After a series of purl loops, knit a broach and 2 LPs together.
- In the next row - 2 IPs together.
Knit two identical parts, crochet or sew and decorate with beads. Make a loop from the remaining thread, for example, by tying the chain with air loops.
Pompoms
There are three methods for making pom poms:
- Using a cardboard base. Plus – pomp. The downside is that it requires cardboard for the base.
- On the fork. The advantage is that there is no need to spend time creating the foundation. The downside is the modest size of the balls.
- Without cardboard base. Pros: simplicity, the ability to get a lot of blanks at once. The downside is a little splendor.
Each method has its own advantages and disadvantages. Therefore, you should choose based on your own needs and preferences.
Cases
The remains of knitting threads are used to make furniture covers and other items.
Cover for stool
To crochet a stool cover, you need:
- Knit several strips from 1 row of VP and 2 rows of double stitch according to the size of the stool.
- On the narrow side of the strips, connect them with single crochets into 2 groups of the same number of strips.
- Assemble the resulting parts into one weave product.
Mobile phone case “Cat”
Crochet a chain of 20 chain stitches. 1 – 4th row: 19 st.b/n, 1 PP, turn. Then knit in the round in st.b/n. to the required size. Ears: 1 treble s/n., 3 treble s/2 n. in one loop, in the next loop 1 dc/3 n., 2 – 4 dc/n. in the arc, st.s./3 n.
Paws: close a chain of 3 VPs into a ring; knit 7 tbsp in the center of the ring; *st.b/n., 2 st.b/n in one loop*; knit in the circle with double stitches. Eyes: knit a chain of 18 chain stitches, knit double stitches, increase on the sides (2 double stitches in one loop), then decrease again (out of 2- uh st.b/n do 1).
Bullfinches
Birds made from yarn will perfectly decorate any room and are suitable for participation in a school competition. To create a toy you will need:
- Threads of three colors (gray, black, red);
- A piece of cardboard;
- Scissors;
- Toothpick;
- Almonds.
Work algorithm:
- Cut out a small rectangle from cardboard. Wind gray (30 turns), black (50) and red (60) yarn around it.
- In the center, tie all the turns together.
- Throw the black threads to one side and knit together with the red yarn.
- Place gray threads under red ones.
- Tuck the remaining red yarn to the tail of the bird, and tie the gray one behind it. Tie everything with one thread.
- Glue a piece of almond nut onto a toothpick and place it in the center of the bird's head. This will be the beak. The bullfinch craft made from threads is complete!
If you wish, you can have a whole flock of birds, and if you choose material of a different color, you can get an exotic bird from the tropics.
Blankets
Knitting a blanket pattern from leftover yarn will not be difficult, since a variety of patterns are suitable for a blanket: squares, zigzags, satin stitch, braids. An original patchwork plaid in patchwork style can be created by crocheting or knitting colored squares and joining or knitting them in a single fabric.
Plaid in squares
Description of the pattern for knitting a square with a side of 16 loops:
- Cast on 33 stitches (16 + 1 + 16).
- All loops are knit stitches.
- In the 2nd row and subsequent rows, knit 1 LP from the 3 central loops.
To knit another square, cast on 16 stitches and another 17 along the edge of the finished square. Knit similarly. Knit a row of squares to the desired width and proceed to the 2nd and subsequent rows of the blanket.
Fluffy balls
Large pompoms are made on a cardboard base, the size depends on the diameter of the circle. Small ones are more convenient to make on a fork.
What can be made from thread pompoms? There are many options for using them:
- gather into an original scarf;
- make a funny toy;
- use for decorating hats, bags, clothes, pillows, curtains.
Children will love collecting animals from fluffy balls with their own hands:
- If you glue eyes, a beak and a comb to a ball, you get a hen or chick.
- An added twig and leaf will turn the ball into an apple or orange.
- Wrap 4 pieces of wire with threads, glue them to the ball, make a muzzle out of fabric or threads - you get a sheep.
- String several balls on a thread, don’t forget the eyes - there will be a cheerful caterpillar.
Collected on a wreath base, the balls will become New Year's decor.
Pompoms attached to a thin long branch will turn into original flowers.
You can assemble an unusual topiary from fluffy balls.
Sweatshirts and other clothing
The leftover threads can be used to make a striped scarf or hat, socks or leg warmers and other creative clothing. For example, a summer sweater, for knitting which a wavy pattern is suitable. Every few rows you can use threads of different colors.
Knitted wavy pattern
According to the number of loops, the multiple of 16 + 1 + 2 edge loops must be observed:
- 1 r.: at the beginning, remove 1 cr.p., rapport *RS, sc., RS, sc., RS, sc., 2 broaches, remove 1 st as a front stitch, knit 2 RS together and pull it through the removed loop. , 2 LPs together, 2 LPs together, nac., LP, nac., LP, nac.* repeat, 1 LP.
- 3 p.: completely knit the LP.
- From the reverse side of the product, all loops and yarn overs must be knitted IP.
- The broaches are knitted like this: remove 1 st as a knit stitch, knit 1 LP, pull it through the removed one.
Motley circles
If you crochet several circles of different sizes and colors from the leftover yarn and then connect them according to the pattern, you will get an original pullover or vest.
For a circle: tie a chain of 5 VPs and close them into a ring. Knit 3 VP rises at the beginning of the row and a connecting stitch at the end. 1st row: 15 st.s.n.; 2nd – 5th row: double the number of dc. previous row.
Variegated knitting patterns
Lay out large circles on a life-size paper pattern, and fill the space between them with small ones. Sew the circles together at the points of contact. In addition to regular clothes, you can knit clothes for dolls from leftover yarn.
Knitting according to the pattern of any product from leftover yarn, due to its design solutions and beauty, is sometimes much more interesting than traditional knitting with yarn of the same color and texture. All you need is desire and a little imagination.
Article design: Natalie Podolskaya