A stand for a drill allows you to significantly expand the functionality of hand tools, which is not difficult to make with your own hands. Placing a drill on such a stand (it can also be made rotary) allows you to turn an ordinary hand tool into an effective drilling machine that can be successfully used to perform various technological operations.
Homemade drill stand made from wooden elements
What should a drill stand be like?
The machine should be easy to use and not limit the capabilities of the drill, but rather expand them.
The right stand allows you to not only drill holes in walls, but also mill parts. Also, a drill stand for a drill, made by yourself, must be stable and correctly guide the drill. It should not move during operation, otherwise the holes will be made at an angle. But using a high-quality bed, it is possible to drill holes at an angle. Some commercial models allow you to create holes with an inclination of up to 65 degrees.
Other qualities that a drill stand should have include:
- Possibility of adjusting the tool height
- Ability to absorb vibrations and vibrations emanating from the drill
- Solid base for stability
- Fixed hole depth
Not all tools presented in stores can combine power and reliability. And those that are capable of this will be very expensive. You can combine several functions at once by making a drill stand with your own hands.
Conclusion
Do-it-yourself drill stands have a number of advantages over purchased ones. Not only do they cost much less, but they are loaded with features. Making such a device will not be difficult even for inexperienced craftsmen. And if you have questions, you can always use the detailed instructions for creating a drilling machine with your own hands.
Summary
Article Name
DIY stand for drill - detailed instructions, drawings, video
Description
✅Article on how to make a stand for a drill yourself ➜—✅ Homemade drill stand made of wood for a drill with your own hands ➜—✅ Drawings ➜— ✅ Video
Author
Sarychev Alexander Viktorovich - forensic construction and technical expert, candidate of technical sciences
Publisher Name
Wikipedia of construction tools
Publisher Logo
- Related Posts
- Do-it-yourself drilling machine from a drill - detailed instructions, drawings
- Wood cutter for drill - review, instructions for use
- Drill: design, types, how to choose, repair and use? The best electric drills of 2022
« Previous entry
Why do you need a drill stand?
The stand allows you to easily perform various tasks such as angle or perpendicular drilling with a hand drill. It is also adjustable so you can drill holes at precise points in gradual increments.
They can hold tools horizontally so you can sand different shaped workpieces, sand different sized pieces of metal, or polish metal objects with different shapes and aspects. They offer telescopic adjustment to provide different drilling heights and allow you to work with a variety of power tools. You can change the angle of the tool holder clamp, turning it easily while still locking firmly when needed to ensure accuracy. You must have one if you want your workstation to have a good maximum height to accommodate a variety of tools.
Top 3. WolfCraft 5027000
The model is made of durable cast iron that can withstand significant loads. The high-alloy steel support makes the stand even more reliable and durable. The manufacturer does not use silumin and other brittle alloys.
- Characteristics Average price: 12,700 rub.
- Country: Germany
- Height (mm): 305
- Drill socket diameter (mm): 45
- Working stroke (mm): 130
- Base size (mm): 203×307
- Weight (kg): 8.07
This drill stand belongs to the professional category. This is evidenced not only by its price, but also by some design features. In particular, there is a completely closed carriage, which prevents chips from getting into the pressing mechanism. For more precise work, there is a ruler, as well as a limiter that prevents the drill from falling below the set level. There are also very comfortable handles, consisting of three modules, and not one, as is most often the case. Of course, you won’t be able to wrap the steering wheel completely; the travel depth is only 130 millimeters, but it is very convenient when working. And of course, only durable materials are used - cast iron and alloy steel. No silumin or cheap plastic.
The stand is made of durable materials: cast iron, aluminum and alloy steel. The design does not use low-quality silumin, and plastic is used only on the handle pad. The price remains at an acceptable level.
- Characteristics Average price: 2,000 rub.
- Country Russia
- Height (mm): 435
- Drill socket diameter (mm): 43
- Working stroke (mm): 80
- Base size (mm): 215×215
- Weight (kg): 2.04
The drill stand is often subject to stress, especially when working with hard materials. In order for the tool to last a long time, only the highest quality materials must be used in its manufacture. As in this model. The base, shaped like a square 215x215 millimeters, is made of cast iron. As well as the carriage into which the drill is fixed. Vertical steel pipe with stainless steel coating. The base has diagonal slots that allow you to install the vise, as well as rotate it at almost any angle. The design does not use silumin, which makes it as durable and reliable as possible. At the same time, the price is not shocking and remains at an acceptable level.
Advantages and disadvantages
- Diagonal slots for vice
- No silumin parts
- Handle with lock
- Reasonable price
- Thin wire spring
The rotating carriage allows you to work at an angle of 90 degrees, which makes it possible to place not only a hand drill on the stand, but also a grinder with a direct disk arrangement.
- Characteristics Average price: 4,400 rub.
- Country: Latvia (manufactured in China)
- Height (mm): 425
- Drill socket diameter (mm): 43
- Working stroke (mm): 60
- Base size (mm): 156×156
- Weight (kg): 3.4
The manufacturer decided to outperform its competitors in terms of originality. In essence, we have before us an ordinary vertical drill stand, however, judging by the description, you can install not only a drill, but also a grinder in it. Of course, only with a straight disk arrangement, since angular placement simply does not make sense. In addition, the stand allows you to drill holes at an angle. The solution is frankly strange, since this function is most often performed by an ordinary vice. Be that as it may, the carriage of the tool is movable, capable of rotating 90 degrees. If you have tasks suitable for it, then finding an alternative on the market will be quite difficult.
Advantages and disadvantages
- Rotary carriage
- Possibility of installing a grinding machine
- Small stroke
- Duralumin carriage
Advantages and disadvantages of a homemade stand
The following advantages of homemade devices are highlighted:
- A homemade machine is very cheap.
- When constructing the device, you can use parts left over from old equipment.
- All drawings and detailed manufacturing algorithms can be found in the public domain.
- You can make a very high-quality and technologically advanced model. You have the opportunity to make a truly high-quality device.
However, there are also disadvantages:
- To manufacture parts, special equipment will be required.
- If the guide is of poor quality, this will greatly affect the drilling accuracy.
- It is very difficult to make a mechanism superior in quality and functionality to the factory one.
Guide bed
The bed is one of the most important parts of a drill machine. It can be constructed of metal or wood. The thickness and dimensions of the frame depend on the weight of the structure and the tool. The size of the bed also depends on the type of operations performed on the machine:
- Dimensions 50 by 50 millimeters are used for drilling.
- 100 to 50 for more complex operations.
A stand is attached to the frame, which can be attached using screws; it is important to understand that it must be strong enough
Guide post
The stand can also be made of wood or metal. It consists of guides (a rail for tool movement) and a clamp for fixing the tool at the same level. Its production proceeds as follows:
- Secure the stand to the frame.
- Attaching the guide to the rack.
- Install the carriage, which should be located on the guides.
The tool can be mounted on a stand using clamps or a special block
Top 1. Enkor 20090
The stand that has received the largest number of reviews from customers on such well-known trading platforms as Yandex.Market and All Tools. The overwhelming majority of comments are written in a positive manner.
- Characteristics Average price: 3,800 rub.
- Country Russia
- Height (mm): 550
- Drill socket diameter (mm): 43
- Working stroke (mm): 65
- Base size (mm): 160×160
- Weight (kg): 6.8
Before us is a drill stand that has collected more than one, among which there is practically no negative. The tool is praised for its quality and reliability. The platform and carriage into which the drill is mounted are made of durable cast iron. The vertical pipe is stainless, with thick walls. There is also a fairly powerful hardened spring that does not sag after prolonged use. The tool definitely deserves attention and takes pride of place in our rating. The only disadvantages include the absence of a vice and the holes for attaching them directed only in one direction. If you have a non-standard vice, you will have to do some magic with their placement on the base.
Advantages and disadvantages
- Cast iron carriage
- Long lever
- Thick wall vertical pipe
- Powerful spring
- Vise slots in one direction
Making a device yourself
You can build a drill stand yourself. First you need to decide on the main parts of the device:
- table top;
- vertical guide part;
- tool mount;
- mechanism for raising or lowering;
- lever.
The stand is made in two possible versions - wooden or metal. For the first version of the device you will need the following materials:
- sheet of wood 20 mm thick;
- a rod for installing a structure for raising and lowering the drill;
- 20 short screws;
- 30 long screws;
- glue for gluing wood;
- hacksaw;
- clamp;
- screwdriver;
- drill;
- sandpaper for sanding the product.
A wooden drill stand is only suitable if you just need to drill holes in objects. Otherwise, it is recommended to construct a metal device. To do this you should prepare:
- bed;
- stand;
- handle;
- additional parts of the device to increase its functionality.
The size of the drill mount depends on the diameter of its neck.
This drill stand is quite easy to make. And if you expand it, it will perform many more functions. Before you begin manufacturing the structure, you need to study the drawings and understand the technological nuances.
How to choose material
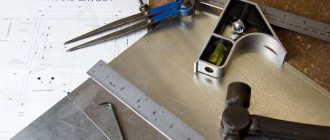
Before making a homemade product to attach a drill, select the required material. For this you will need:
- thick pine wood board;
- plywood 15 mm thick;
- furniture guides;
- metal profile sheet;
- automotive bushing;
- metal pipe;
- wing nut;
- bolts and screws for fastening parts.
All of the above materials must be prepared in advance so that they are at hand.
What parts will the device consist of?
Drill holders must have the following components:
- Stanin. This is the main supporting element of the future machine.
- Stand. It is necessary for fastening the carriage with the drill and its movement.
- Movement mechanism. The most common option is a special handle. With its help, you can move the drill to the part to be drilled.
- Additional nodes. With their help you can expand the capabilities of the rack.
How to make a bed?
Homemade holders for drills must be installed on stable frames. To make this unit, you can use a steel plate 1 cm thick or a durable wooden board, the thickness of which should be at least 2 cm. A thick piece of chipboard, plywood or textolite is also suitable for this purpose.
The massiveness of the bed depends on the power of the power tool. The higher it is, the thicker the base should be. It is desirable that the width of the frame be 200 mm and the length 500-750 mm. The main vertical stand and support should be attached to the horizontal frame using screws or screws.
It is recommended to screw these machine parts from below through the frame.
Holders for drills will be stronger if their racks are additionally connected to supports with metal corners.
How is the stand made?
Drill holders must be equipped with stands. The quality of drilling work will depend on the quality of manufacturing of this unit in the future.
To prevent the drill from deflecting, and, therefore, from damaging the workpiece and breaking, it is important for the craftsman to maintain a strict vertical line in relation to the bed when making the stand.
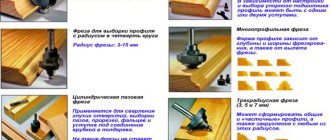
You can make a vertical guide post from a block, plywood plate, pipe or metal profile. It all depends on imagination and the availability of the necessary material.
DIY drill holder
Drill holder. This is a simple device for those who do not have sandpaper. It will be useful for any master.
Travel mechanism
The drill holder for vertical drilling must be equipped with a special mechanism with which you can move the tool. This mechanism consists of two elements:
- Handles. With its use, the drill is brought to the surface of the workpiece.
- Springs. With its help, the drill returns to its original position after drilling. It is important that lifting the bracket with the drill is smooth and that drilling does not become tiring.
Arrangement of additional nodes
If you add additional attachments to your homemade machine, you can use it to perform simple turning and milling technological operations, as well as drill holes at an angle. In order for these works to be accessible, the master should provide the ability to move the workpiece in a horizontal plane.
This is possible using a movable horizontal barrel on which a vice is installed to hold the workpiece. The barrel is driven by rotating the handle. In order to drill holes at an angle, homemade machines are additionally equipped with special rotary plates containing holes in an arc. With their help, the workpieces are fixed.
To cope with this work, the master should perform the following steps:
- Drill an axial hole on the additional rotary plate and machine stand.
- Using a protractor, drill the pivot plate at angles of 30, 45 and 60 degrees.
- Equip the rack with three holes into which the pivot plate pins will be inserted. With their help, the rotating and stationary parts of the machine will be fixed in the future.
To make a hole at the required angle, just turn the electric drill attached to the additional plate to the desired angle and fix the tool in this position using pins.
Equipment for additional functions
To use a drill stand as a milling machine, you need to use the horizontal version of the bed presented in the previous paragraph. To such a machine you need to add a rotating plate. This is where the tool will be located. Then a hole is made in the stand stand into which the carriage with drill will be inserted.
Next, holes are drilled on the rotating plate at the most popular angles. Connect the rotating plate and the stand exactly along the holes. Bolts are used for connection. You also need to make three holes on the stand post into which pins will be inserted to install the rotating plate.
To use such a machine, you need to rotate the plate into the desired position, secure it with pins and start working.
TOP - 5 diagrams and drawings of a stand for a drill
The most popular drawings and diagrams of drill stands on the Internet:
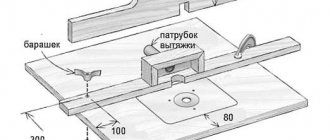
Horizontal drilling machine
Typically, machines involve drilling holes with a drill in a vertical position. But sometimes it is necessary to make holes in a long part. Even with expensive store-bought stands, you won’t be able to drill vertically efficiently; there will always be errors. To avoid this, you can make a machine for horizontal drilling.
horizontal drilling machine
First you need to prepare a circular saw, a screwdriver or drill and a standard set of tools, including screwdrivers, a hammer, a chisel, etc. You can use ordinary chipboard panels as the material for manufacturing. Supplies you will need:
- Impeller nut;
- self-tapping screws;
- guides;
- lever;
- sleeve;
- bolts.
First you need a frame. Chipboard is used as the base, and the edging is made from wooden blocks. From the same plywood it is necessary to assemble a table that can change its height using screws. The table needs to be thoroughly polished. By rotating the handle, you can raise the table to the desired height. Next, draw a bright line running in the direction of the drill. This will help you drill holes more accurately. The guides are installed in such a way that they can be moved apart depending on the size of the tool, and then secured with screws. For the drill you need to make a support to which the structure is attached. To make the part move better in the machine, you can attach pieces of laminate at the points of contact with the structure.
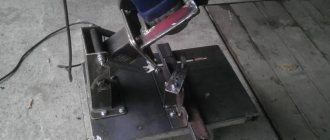
Do-it-yourself vertical stand for a screwdriver
In this case, it is quite compact, since it is designed for use in conjunction with a screwdriver.
However, you can adapt it for an electric drill by slightly increasing its size. And then you will get a homemade drill stand.
The advantage of this design is that its manufacture requires a small amount of materials. You don’t even have to buy many parts - you can find them in the garage.
We will make the drill stand stand from 20 mm thick plywood. You can also take a piece of board.
First of all, we saw off a blank of the required size from the plywood. Then we mark and drill two holes in it. Using epoxy glue, glue the guides.
We round the sharp corners of the base on a grinding machine. We make a movable platform from wood or plywood.
In the moving part we drill holes with a diameter of 19 mm for the bearings. Lubricate the outer part of the bearings with epoxy glue and insert the bearings into the holes.
We screw an adapter into the drill chuck, onto which we put a round tube. It must not only be put on, but firmly fixed with epoxy glue.
In the moving part we drill seats with a diameter of 29 mm for round bearings.
We put the first bearing on the tube and press it into place from the bottom of the platform. Then we put the second bearing on the pipe and also press it into the seat. For reliability we use epoxy glue.
We put springs and washers on the guides. Then we install a movable platform with a drill chuck.
It will be necessary to press wooden “plugs” onto the upper part of the guides to limit the stroke.
We clamp the shank of the drill chuck in the screwdriver chuck, and then use a crown of a suitable diameter to drill a hole in the base.
At this point, the process of making a homemade product can be considered complete. Then all that remains is to paint everything or coat it with mineral oil. Of all the racks, this option is the simplest and most cost-effective.
You can watch the author's video for details on how to make this device.
Top 4. Sparky SP 43
The stand is designed in such a way that a drill of any brand and size can be installed in it. The compact design, quick to install on the surface, is equipped with all the necessary parts, including a repelling spring.
- Characteristics Average price: 5,400 rub.
- Country: Germany
- Height (mm): 550
- Drill socket diameter (mm): 43
- Working stroke (mm): 70
- Base size (mm): 160×160
- Weight (kg): 6
Drill manufacturers do not have a uniform standard. Tools can have different sizes and shapes, and if you have the simplest stand, but an unusual drill, it’s not a fact that you can connect them. It is versatility that is the main advantage of the product. Despite the classic size of the mounting socket, it has a non-standard clamp shape, so you can install almost any drill in the rack. The quality of construction is also at the highest level. If the brand is unfamiliar to you, then most likely you are mistaken. This is a popular German manufacturer AEG, whose quality is well known throughout the world.
Advantages and disadvantages
- Universal mounting socket
- Molded stand
- Popular brand
- There are restrictions on the power of the drill used
Making a mobile drill stand for a drill with your own hands
The drill stand has been known to home craftsmen and professionals since the times of the USSR. The mobile design of the rack is very convenient to use, so recently such a device has been made independently. Making a drill holder with your own hands is not at all difficult. It is enough to purchase inexpensive materials, as well as prepare the basic tools.
Materials and tools
For self-assembly, different types of materials can be used. Depending on the type of material used, the tool is selected:
- hardwood or metal plates;
- homemade or factory-made handle;
- furniture guides;
- steel squares;
- electric drill;
- hammer and file;
- screwdriver or screwdriver;
- tape measure and protractor;
- marker.
Making a stand for a drill
To make a part, it is best to use a thick metal or wooden plate:
- the dimensions of the steel plate are 500 x 500 x 150 mm;
- The dimensions of the wood plate should be 600 x 600 x 30 mm.
These types of beds are used in the manufacture of machines exclusively for drilling work. To manufacture a multifunctional unit, the dimensions need to be increased to 1000 x 500-600 x 20-30 mm. The main stand with supports is attached to the wooden frame. Screws are used to connect parts.
Mechanism for moving the drill in the vertical direction
The design is based on a handle and springs, and the design of the mechanism can be represented by:
- return mechanism fixed in close proximity to the handle;
- a pair of springs fixed in the grooves of the carriage.
The first option involves placing the handle axis between two plates screwed to the post. The spring device moves a few millimeters. Moving the handle down causes the spring to return to its original position and move the carriage to the starting point.
The second design is based on securing the pin and side plates at an angle of 90° to the carriage. The springs are fixed in the grooves of standard furniture guides. As a result of pressing the lever, the drill moves down and the springs are compressed. Once the handle is released, the carriage assembly is thrown upward. The spring elements are fixed with metal squares.
Return mechanism
The main control mechanism of the machine is called the return mechanism. It regulates the operation of the carriage and is responsible for returning it to its original position. It consists of two parts: a spring and a handle. There are two ways to create such a mechanism.
The first method involves using a pair of springs under the carriage. These springs are fixed in the grooves, and the handle is mounted to the end side of the stand.
do-it-yourself drill stand drawings
In the second case, the spring is attached near the handle. Metal plates are installed on both end sides of the machine (two per side). Holes are made in the two front plates into which an axle with a diameter of 1 centimeter is inserted. It can be made from a regular bolt. The spring is placed between the second pair of plates and secured with pins on the handle. In order for the design to work correctly, a slot is made at the junction of the pin and the spring.
In both cases the system works the same. After pressing the control handle, the springs are compressed and the tool tilts. After the handle is released, the springs tighten and return the drill to its place.
Equipment rack
The stand where the guides for the drill will be located can also be made from a metal or wooden plate. In addition to guides for moving the drill in a vertical plane, a clamp is mounted on the stand, with which the tool is fixed to it. The procedure for assembling the rack can be seen in the training video, and you must adhere to the following sequence of actions:
- a support is fixed on the stand-frame;
- the machine stand is secured to the base using screw connections, which is then connected to the support;
- guides are fixed on the rack, which can be used as telescopic furniture devices;
- a carriage is mounted on the moving part of the guides, where a fastener is placed for fixing the drill.
You can select suitable profile pipes for the rack
When choosing guides for your homemade machine, you should pay attention to ensuring that there is no lateral play in them. The length of the carriage, also made of metal or wood, depends on the size of the drill that you will use to equip your machine
This structural unit, which is equipped with a mobile drill stand, can be made in the following two options
The length of the carriage, also made of metal or wood, depends on the size of the drill that you will use to equip your machine. This structural unit, which is equipped with a mobile drill stand, can be made in the following two options.
With the drill secured using clamps. The clamps used in this design are threaded into holes pre-drilled in the carriage. Clamping of the drill and its reliable fixation on the carriage is ensured by tightening the clamps.
Steel pipe stand
A special block is used to attach the drill. This block is a bracket where the drill is secured. The bracket is made from a wooden plate, which is attached to the carriage at an angle of 90 degrees, for which metal corners are used. To fix the drill, a hole is drilled in the block, the diameter of which is 0.5 mm smaller than the diameter of the tool itself, and a slot is made to allow the tool to be inserted into the mounting hole.
The hole in the block on the machine, intended for installing a drill, is made according to the following algorithm:
- a circle is drawn on the surface of the block, the diameter of which corresponds to the diameter of the drill being installed;
- in the inner part of the circle, trying to adhere to the line that limits it, drill a series of holes of small diameter;
- the partitions that have formed between the drilled holes are cut using a hacksaw or any other tool;
- Using a file or needle file with a semicircular shape of the working surface, the edges of the resulting hole for the drill are processed, making them smooth.
Wooden stand with carriage on furniture rails
Main parts of the frame
The main part of the drill stand is the supporting frame. It is the basis of the entire device on which other parts are attached. Its size depends on the power of the tool. So, for vertical drilling, a stand measuring 0.5 * 0.5 meters is suitable, but for other operations it is better to choose a design with dimensions of 1 * 0.5 meters.
DIY drilling machine from a steering rack
Next, you should pay attention to the guide for the drill itself. Thanks to this part, the drill is mounted on the machine and can move in a vertical direction. The clamp located on the stand is also responsible for securing the tool.
The carriage can be of two types. In the first case, the drill is secured to the machine using clamps that are threaded into special holes in the carriage. The second option is to fix the tool using a block. It is attached to the carriage at a right angle. To ensure that the drill holds firmly, a hole with a smaller diameter than the diameter of the drill is created in the block. Next, a slot is made where the tool is installed.
Plywood drill stand
We'll tell you how to make a drill stand from durable plywood.
Drilling attachments are very convenient. Consider taking them with you every time you need to use your drill presses. Be sure to fine-tune the height of the workpiece. Use a pencil as a marker and line it up. This way you will know your starting point.
The router attachment turns your rotary tool into an efficient router for small jobs such as shaping decorative edges and cutting straight slots. This dedicated app is great for crafters who use it frequently.
In this post I'll show you how to make a simple router bit attachment for your drill or dremel using plywood and bolts. This milling application is fast and simple.
Parts used:
- Plywood thickness 6 "* 5" 19 mm (2 pcs.)
- 2 x #10mm bolts with nuts and washer (6” long)
- 2 springs (length 2.5 inches)
- 2 pieces of 12mm steel pipe (length 19mm)
- 5/16 Bolt with Nut and Washer (2.5" Length)
- 2 x #3/16 screws with nuts (5" long)
- 1.5" diameter round plywood pieces (2 pieces)
- Laminate
- 10mm electric drill
How to do:
First of all I cut 2 pieces of 19mm plywood to 6*5 inches. For a smooth finish and better appearance I also used Sunmica laminate.
Sand the corner of the plywood pieces and cut one piece of plywood into the shape as shown in the picture.
Drill a 1.5-inch hole on both pieces of plywood using a router bit and make a groove on one piece of plywood for the drill bit holder.
Drill a 10mm hole on both sides of the base plywood and run 10mm bolts through these holes and secure them into these holes with glue. Make sure both of these bolts are perfectly perpendicular to the plywood base.
And on another sheet of plywood, drill 12mm holes on both sides and attach a 12mm steel pipe (19mm long) to both of these holes using glue. Make sure the base plywood bolts fit through these steel pipes easily and there is no gap between them.
Place two springs (2.5 inches long) on the base of the plywood, away from the bolts as shown.
Attach 10mm nuts to two 1.5" round pieces of plywood as shown. This is used to move the drill bit up and down.
Attach two 3/16 bolts (5 inches long) to the plywood portion of the drill bit holder with nuts as shown, which are used to secure the position of the drill press.
Attach a 10mm drill press to the post through the 1.5” hole and secure it with a bolt and nut. Now this drill press app is ready to use.
For better understanding, watch the video below.
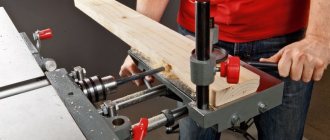
Making a wooden machine: instructions with step-by-step photos
The easiest machine to manufacture is considered to be made of wood. The disadvantage of the design is the weak strength of the material. Wood becomes deformed due to changes in humidity. Over time, play appears on the rack. It is advisable to use a wooden machine only for vertical drilling of holes.
The procedure for assembling a wooden structure is as follows:
- A plate will be required for the bed. It is made from edged boards 20 mm thick. You can sew plywood on top to get a perfectly flat area. The size of the plate is selected individually. If the machine is intended only for vertical drilling, then a frame with dimensions of 50x50 cm will be sufficient. To perform milling work and drilling at an angle, the dimensions of the plate are increased to 100x50 cm.
- A 20 cm wide stand is installed vertically on the bed. Its height depends on the dimensions of the drill. Usually, boards 50–70 cm long are enough for a stand. The part is fixed to the side of the bed or on the plate itself. In the second case, the rack is reinforced with a support.
- The carriage is made from a board. The length of the workpiece varies from 50 to 70 cm, but usually the dimensions are selected to match the drill model. On the back side of the carriage and the front side of the stand, telescopic furniture guides are fixed, serving as a movement mechanism.
- The drill can be secured to the front side of the carriage with clamps, which is not very reliable.
- To firmly fix the drill, it is better to make a block. The unit consists of a piece of plate, perpendicularly fixed to the carriage with steel corners.
- For the block, take a square piece of board. A circle is drawn in the center. Its diameter should be 0.5 mm less than the thickness of the front part of the drill.
- The circle is cut out with a jigsaw. The socket is given ideal smoothness using a round file. The finished block is fixed to the carriage. A cut is made in the front and a screw clamp is installed.
The carriage with the block is installed on the rack, connecting with elements of furniture guides. All that remains is to make the control handle.
Making a steel machine: instructions with step-by-step photos
A metal machine consists of similar units, but they are more difficult to make due to the complexity of processing the material. The advantage of the design is its reliability and lack of play, which is ideal for installing additional components that expand the functionality of the machine.
The general structure of the metal machine is shown in the drawing, and the procedure for manufacturing the structure is as follows:
- For the frame you will need a steel plate 1 cm thick. The dimensions can be taken similar to those of the wooden model.
- The stand is welded from a square or round pipe with a cross section of 32–40 mm. You can weld a sleeve of a larger diameter onto the plate, and insert a pipe into it and tighten it with a bolt.
- The carriage is made from a larger diameter pipe. It should fit freely onto the stand. A steel clamp for a drill is fixed to the carriage.
Now all that remains is to put all the units into one structure and try to secure the drill with clamps.
Drilling machine installation
The drilling machine must be assembled in accordance with the drawing documentation. The mobile version of the drill stand, with high versatility, consists of the following elements and structural parts:
- supporting frame for fastening all the necessary elements of the machine;
- a guide that allows you to secure and move the tool with the carriage in the vertical direction;
- a special handle that controls the vertical movement of the tool.
To improve functionality and performance, additional components and special elements are used. Assembly and installation of the device must be carried out in accordance with the following instructions:
- fastening to the frame is strengthened by supports;
- screwing the vertical stand to the support;
- vertical fastening of a pair of guides;
- mounting on the moving part of the carriage with an electric drill.
For correct operation of the machine, it is necessary to check the guides for any play. The tool can be secured using special clamps or using a block.
Video: homemade drill stand
Top 7. DIOLD SMS-43
Included with the stand you also receive spare bolts, a set of wrenches for repairs and adjustments, as well as a cast iron vice. This is the richest package at a low total cost of the product.
- Characteristics Average price: 1,800 rub.
- Country: Russia (manufactured in China)
- Height (mm): 550
- Drill socket diameter (mm): 43
- Working stroke (mm): 65
- Base size (mm): 245×245
- Weight (kg): 2.37
Studying the reviews left under this product by real customers, you can find a lot of negativity. It concerns not the most durable structure, but also balancing. Apparently, the heavy carriage is a little overweight, and the stand must be firmly screwed to the workbench. But all these shortcomings are covered by the product package. In addition to the rack itself, you also receive a set of keys with different tips, three spare bolts for each module and a vice. The biggest rarity on the market. And all this costs less than 2 thousand rubles. Otherwise, it’s an ordinary vertical stand, hardly suitable for professional use.
Advantages and disadvantages
- Maximum configuration
- Own vice
- Failed balancing
- There are brittle metals in the structure
Important nuances
When deciding to create such a device with your own hands, you need to consider the following important points:
- moving elements must be tightened extremely tightly. For effective operation of a self-made drill attachment, it must have the ability to select a suitable reach and stroke. Moreover, if the guide post has quite a significant weight, then this only simplifies the process of creating holes.
- In some cases, the stand can be used in combination with a vice, thanks to which you can fix the workpiece. In this case, such a design can easily be converted into a full-fledged drilling machine. Moreover, it is not necessary to purchase such a vice in order to expand the functionality of the equipment. If you have enough experience, you can also make them yourself.
Top 9. SPARTA 934055
- Characteristics Average price: 2,000 rub.
- Country: China
- Height (mm): 470
- Drill socket diameter (mm): 43
- Working stroke (mm): 72
- Base size (mm): 226×226
- Weight (kg): 2.55
At first glance at this tool, you may get the impression that it has a professional purpose. Confidence-inspiring large closed carriage, high platform with diagonal slots. Even a vice is included, which is quite rare. At the same time, the price is only 2 thousand rubles, and the thought of some kind of catch involuntarily creeps in. He really is. Silumin is used in almost all parts. Metal is fragile and short-lived. It should not be subjected to high loads. It turns out that what we have in front of us is a very ordinary household counter. But already with a vice and ready to work. A good option for your money if you only use it occasionally.
Advantages and disadvantages
- The set includes a vice
- Wide platform
- Quite fragile design
Practice working with a homemade stand
Some people think that working with homemade machines is very difficult, but this is not so. Such devices, on the contrary, simplify the use of a drill at home.
To use the design, you need to attach the drill to the stand and connect it to a power source. Then you need to lock the power button so that the electric drill starts working. After this, you just need to operate the lifting mechanism and place the parts that need to be drilled on the base. After completion of work, the tool must be disconnected from the rack.
Electric drill stands are often used to make drilling parts easier. People who want to make such structures should familiarize themselves in advance with how to make a drill stand themselves and what will be needed for this.
Security questions
It is clear that the drill must be secured securely. But this does not exhaust the safe use.
The main source of injury is the switch. If your shirt sleeve starts to wrap around the drill, you won’t have time to look for the trigger release button with your other hand. But a key that can be pressed in a split second is just right.
Unfortunately, only magnetic stands are equipped with standard starters. In such designs, it is impossible to start the drill motor until the electromagnet turns on.
Magnetic beds are interesting in the way they are attached to the surface; you can work horizontally and even upside down. However, the system only works on magnetic metals.