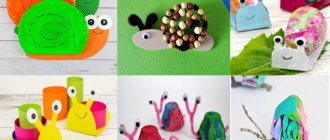
Even in ancient times, the technique of mosaics using seeds, shells and various pebbles appeared. And today, children receive their first knowledge of this art. Paper mosaics are a creative way to have fun for the whole family. This activity will bring parents and children closer together and will develop the child’s motor skills and color perception. Standard paper mosaic applications are not all the possibilities of art. There are more complex techniques for making fakes, for example, quilling - paintings made from rolled napkins.
Crafts made from torn paper
The “torn paper” technique is simple and easy to implement. Even the smallest creator can make a mosaic out of paper. This method of creativity develops artistic taste, imagination and allows you to look at things differently. For mosaics, regular paper (colored) is suitable, on which you can draw chaotic stripes to create a break. But you can do without this and randomly tear the paper into various pieces.
During a break, the fingers should be as close to each other as possible. After small manipulations, together with your baby, stick the pieces of paper onto the stencil or drawn applique. Funny and cheerful entertainment begins with the first actions (cutting paper strips) and ends with a masterpiece. This method does not use scissors, so it is safe for children.
Types of applications
Paper is a material that is very easy to process, so working with it is extremely simple. For children's applications, colored paper is used; it can be single-sided or double-sided. There are several types of paper, each of which has its own characteristics.
- Volume applique
- Flat application
- Geometric and object crafts
- Tear-off and plastic craft
Instructions for creating a mosaic
Colored paper is a multifunctional tool for creating masterpieces, developing and just having fun. The complexity of the picture depends on the number and size of the elements, as well as on the picture itself. Mosaic templates made from colored paper can be found on the Internet and printed.
Technique:
- Multi-colored paper is taken and cut into elements of different shapes and lengths.
- To work, you will need multi-colored pieces of paper, a template and glue (preferably a pencil). The child is asked to place the pieces on the picture so that the pieces of paper do not extend beyond the contours. At first it will be difficult to do, but with each training the baby will get better and better.
- For an aesthetic appearance, after each piece, wipe the surface with a dry cloth.
It is necessary to start work with the largest pieces and finish with the smallest. Lay out the pieces of paper first along the contour, and then fill the entire space.
You don’t have to worry that there are gaps between the details - this will give a fascinating look to the picture.
To make a mosaic applique made of colored paper three-dimensional, the prepared pieces of paper are not completely glued. They are smeared with glue only in the middle, and the ends are twisted with a pen or a special stick.
A flight of fancy when creating a mosaic will only be beneficial. You can use corrugated or velvet paper. As a basis, take sheets that were decorated by a child or were cut out in an unusual way. You can also attach a stick, paper clip or magnet to the craft for further use in the interior. Such decor, made by the hands of a child, will delight and touch.
General rules for performing work
Work begins with the outline of large parts and filling them. Then smaller elements of the design are made. The background design also works from the edges to the center. The color between the joints of the pieces of paper after gluing depends on the chosen cardboard.
Paper glue for work should not leave any traces after drying. Have a not too liquid consistency so that it is convenient to use and does not accidentally spill onto the surface of the base. The application of glue is carried out in small portions, exactly as much as is needed for one fragment.
Excess can soak the cardboard, causing it to warp. This will seriously and irrevocably damage the appearance of the product. To make the craft more attractive, after laying and smoothing the element, wipe the working surface with a dry cloth.
Drawing on a sheet of cardboard
Creating various compositions with children is fun and interesting. Their unusual approach to art will surprise and delight at the same time. First, you need to decide on the theme of the drawing, then draw a sketch or find a paper mosaic applique template on the Internet. But you can also take a picture from a coloring book - this will reduce preparation time.
All materials are available and freely sold in stores. For the first time, you need to select a simple and large image. For example, a fungus would be ideal.
To work you will need:
- cardboard;
- a simple pencil;
- a set of multi-colored paper;
- glue stick (PVA is possible);
- template for redrawing.
The mushroom is transferred to the cardboard with a pencil. Then take 5 small containers for paper elements. Each color used should be in its own bowl for convenience and so that they do not get mixed up with each other.
The color scheme can be completely varied, for example:
- the surface of the cap is brown, and its bottom is beige;
- mushroom stem - yellow;
- the sky is blue and the grass is green.
After preparing the elements, the gluing process itself begins. After completion, you need to put something heavy on the composition.
Master class: Ladybugs
This is a bright applique that consists of simple details.
- Blue cardboard is used for the base.
- Colored paper: red, black, yellow, green.
- White paper.
- Pencil, felt-tip pen, glue.
- Hole puncher.
Progress:
- You need to glue yellow paper onto the blue cardboard; it should occupy half of the background, representing a wheat field.
- Grass is cut out from green paper and glued onto a yellow background.
- To create a ladybug you need two red circles, a black oval, and small black circles.
- The eyes are made of white and black paper; they are glued to the tip of the oval.
- Red wings are glued to the edges of the oval, and black circles are glued on top of them.
- Insects stick to the grass and sky. Clouds are cut out of white paper and glued onto a blue background.
- You can further decorate the applique by gluing many small bright flowers onto it; the paper flower applique is simple to make and comes in different shapes.
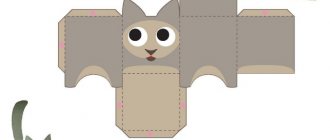
Palms
It’s easier for kids to work using ready-made stencils. At the same time, even accurately tracing a cardboard template causes difficulties for many. To make work easier, children are given three-dimensional shapes - cubes, cups. Your own palms will also do, especially since you can make a lot of original crafts from the latter.
Principle of operation:
- On paper, the child traces his own palm, trying to carefully outline all the fingers.
- Independently or with the help of a teacher, the child cuts out the paper according to the shape.
- A craft is glued together from ready-made parts, the diagram of which was suggested by the teacher. Options can be given to choose from.
To glue the palms, you can use a glue stick or plasticine. The proposal to create one Christmas tree or a snowman from the palms of the whole class will also be an educational moment - a clear demonstration of what children can do together.
Herringbone
The simplest Christmas tree, which even children of the younger group can handle, is a pyramid glued together from triangles. After fixing the main shape on a cardboard base, you can invite children to decorate the Christmas tree with buttons or confetti that will imitate balls. Older children can cope with more complex options - an embossed and voluminous Christmas tree.
To make a Christmas tree from cut ribbons, you need to prepare 5-6 strips of paper. In this case, long ribbons will be required for the lower tier, and short ones for the upper tier. You can cut the workpieces to length in advance or during assembly. The basis of the craft is a cone glued together from cardboard or thick paper. The Christmas tree can be made traditional green and then decorated, or creative.
Simple small Christmas trees can be assembled into a garland or placed in a frame. In the first case, the paper must be double-sided. You can corrugate a cut out isosceles triangle manually, pressing the folds with a ruler or pencil. Children from 5 years old can handle making such an accordion.
Other ideas for creating a Christmas tree out of paper:
Choosing a mosaic design
First of all, you need to decide what exactly and what size you plan to make from the mosaic - to cover the base with it without creating any images, or to perform artistic mosaic finishing with laying out panels.
The pattern for mosaic execution is selected from finished images made in color, or from so-called coloring pages, which can be designed taking into account the lighting of the room and personal color preferences.
Important! For rooms with windows facing north, you should not choose a mosaic of dark colors - such cladding will not be effective and will only emphasize the insufficient illumination of the room.
When the design is chosen, it is already clear what colors the mosaic will be needed, but you also need to know in what quantity. To do this, the image must be enlarged to the size in which it will be mosaiced. The easiest way to do this is with a printer, setting the desired dimensions in the settings and printing the image in parts. The drawing can also be enlarged manually by transferring it to a sheet of the appropriate format by dividing the original and final images into cells.
After enlarging the image, calculate the areas of the multi-colored figures that make it up, simplifying them to geometric ones - this will allow you to stock up on the required amount of material of each color.
Making flower parts
It is necessary to cut out 3-5 stems and 6-10 leaves. We cut out droplet-shaped petals from multi-colored paper (there can be any number of them). Cut out 3-5 cores. If the child is already independent, you can offer him to cut out all the elements, the main thing is to draw an outline with a pencil.
First, glue the stems with leaves; one stem can have from 1 to 3 leaves. The flower arrangement can be decorated with a beautiful vase or basket; in this case, the leaf on the stem is glued last.
Then petals are glued on top of the stem in a circle (it will look beautiful if the first row has large petals, and with each circle there are fewer and fewer). At the end, the core of the flower is glued.
Inside the card, lines are marked with a pencil and the child is asked to write a wish.
The postcard is ready! You can safely give and enjoy the joy of your loved ones.
Benefits of the application
Applique is one of the most famous types of applied art. It has a great effect on children's development - it develops fine motor skills, helps them learn to work carefully with materials, sort out colors and geometric shapes, and work with scissors and glue.
Using the tips from the master classes, you can create amazing compositions, helping your child learn a new type of creativity. You can change each application and add something of your own to it, as this perfectly develops imagination and creative thinking.
Hippopotamus
The hippopotamus, adored by all children, is made from rough paper. That's why he's such a delight. Plus the water is almost like “real”, transparent. The body is visible through it. For the craft, white paper is painted in a light blue tint, which is produced by diluted blue gouache.
Using a thick soft brush, the sheet is quickly covered with the solution. If it bends due to such a procedure, then you need to go through it again. In five minutes you can actually prepare up to 27 leaves for all the children in the garden.
The silhouettes of the head with the nose and nostrils and the tummy are cut out. For the water element, bluish toilet paper or napkins are used. The main thing is to explain that there is no need to put glue on them, otherwise the paper will tear. Correctly apply water to the already applied glue and blot with a dry piece.
Paintings using the cutting technique
Preparatory group students can make simple drawings with their own hands. For work, it is important to choose the right drawing model. It should not be overloaded with small details and have complex outlines.
An image of a butterfly and the sun, a sunflower, a dolphin on a wave or a bear on the lawn in a mosaic version will look original. Templates for such images can be easily drawn yourself or copied from the Internet.
Rainbow
The rainbow mosaic, assembled from small parts, looks original. Its creation will require attention and accuracy from the young master.
Operating procedure.
- You need to draw a rainbow on the base.
- Tear the seven-color sheets into pieces.
- Constantly attack them at the base.
First option
For work you will need the following tools and materials:
- Simple black pencil;
- Sheet of cardboard;
- Set of colored paper;
- PVA glue;
- The finished drawing template in our case is a mushroom.
How to get the job done? From the finished template, draw a mushroom onto cardboard.
Now let's move on to the preparatory process before the work itself. To do this, take 6 small containers and start tearing the paper into pieces with your hands. We will use the following colors:
- For the mushroom cap - brown;
- For under the hat place - beige color;
- For the mushroom stem - yellow;
- The sky is blue;
- For grass - green.
Each color should have its own bowl.
One by one, we begin to stick small pieces onto the necessary details of the drawing. After the main element has been completely completed, the remains must be glued and imitated earth. And as an addition, glue small brown pieces to the ground. Let them be small fallen leaves.
Now let's move on to the design of the sky.
The finished product must be placed under a small press, this is required so that when drying the finished application does not change its appearance.
In this torn mosaic style you can make a postcard for any holiday. This technique is very necessary for children. After all, it is precisely this that allows you to develop fine motor skills of your hands. Also, in addition to fine motor skills, in this lesson you can teach your child to distinguish colors and tear paper into small pieces. And see how he will independently cope with the task assigned to him.
Second lesson
For work you will need the following tools and materials:
- A sheet of white cardboard;
- Scissors for paper cutting;
- PVA glue;
- Set of felt-tip pens;
- Paints;
- Set of brushes.
Step-by-step work process.
At the very beginning, you need to prepare all the above materials. For work we will use ready-made pictures.
Using scissors, cut them out. And glue the blanks onto cardboard.
Afterwards we move on directly to the application itself. To do this, we will cut colored paper into strips half a centimeter wide, and then cut each of them into small squares. This is how it should work out for you:
We lay the finished parts one by one and glue them with glue. This can be done not quite close to each other. You can keep a short distance, as shown in the photo.
Now we move on to the design of the stalk; for this we will use green paper.
That’s it, we’ll divide the picture in a horizontal position into two parts. Let's paint the top one. After which we will begin to simulate that our vegetable will lie on the table. In this case, you can use a lighter paint.
We take a black felt-tip pen in our hands and carefully trace the outline of the vegetable.
Now we give a small shadow to the tomato; for this, again, you will need a black felt-tip pen.
We make brick markings on the painted background. That's all, the craft is completely ready.
We do other vegetables in exactly the same way.
This lesson allows you to develop children's attention and correctness when working with sharp cutting objects. Of course, before you start working, be sure to carry out safety precautions and explain to the children what scissors are needed for. Also, this type of activity allows you to reveal knowledge of colors, as well as train perseverance.
And in general, children really like work done using the paper mosaic technique; they are ready to spend a long time doing this activity. After all, it is very interesting and entertaining. For beginning needlewomen, it is better to use simple drawings, and only then after a while you can try to do large-scale work.