Snails are very interesting creatures that can cause incredible delight in young children. After all, you can touch them, you can observe their behavior and even keep them at home as a pet.
In this article, we have prepared for you several simple master classes that will allow you and your child to make these cute creatures from scrap materials.
So let's get creative!
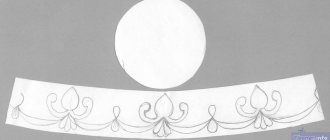
Craft Snail from a disposable plate
To make this adorable snail, you will need the following materials: a disposable plate, a piece of colored cardboard, paint, glue, black marker, eyes, white paper.
Cut out the body of the future snail from colored cardboard. As you can see, it has a shape somewhat reminiscent of a boomerang.
Cut out two circles from white paper, and draw pupils inside each of them with a black marker.
Decorate the plate in any bright color. Cut off the bottom of the plate a little.
Using a black marker, draw a spiral inside the plate.
Glue the plate to the snail's cardboard body.
Glue on the eyes and add a charming smile.
If you don’t have a disposable plate, you can safely replace it with absolutely any paper: colored cardboard, magazines, newspapers, album sheets.
How to make a snail fan with your own hands - Metals, equipment, instructions
Creating high-density airflow is possible in several ways. One of the effective ones is a radial type fan or “snail”. It differs from others not only in shape, but also in its operating principle.
Fan device and design
Radial fan operation diagram
Sometimes an impeller and a power unit are not enough to move air. In conditions of limited space, a special type of exhaust equipment design should be used. It has a spiral-shaped body that acts as an air channel. You can make it yourself or purchase a ready-made model.
To form the flow, the design includes a radial impeller. It connects to the power unit. The wheel blades have a curved shape and create a discharged area when moving. Air (or gas) enters it from the inlet pipe. When moving along the spiral body, the speed at the outlet increases.
Depending on the application, the centrifugal fan volute can be general purpose, heat-resistant or corrosion-resistant. It is also necessary to take into account the amount of air flow created:
- low pressure. Area of application: production workshops, household appliances. The air temperature should not exceed +80°C. Mandatory absence of aggressive environments;
- average pressure value. It is part of exhaust equipment for removing or transporting small fraction materials, sawdust, grain;
- high pressure. Forms an air flow into the fuel combustion zone. Installed in many types of boilers.
The direction of movement of the blades is determined by the design, and, in particular, by the location of the outlet pipe. If it is located on the left side, the rotor should rotate clockwise. The number of blades and their curvature are also taken into account.
For powerful models, you need to make a reliable base with your own hands to secure the body. The industrial installation will vibrate strongly, which may lead to its gradual destruction.
Review and comparison of production ready models
When considering a radial volute fan, you need to take into account the material of manufacture: cast aluminum housing, sheet or stainless steel. A model is selected based on specific needs; consider an example of serial models in a cast case.
| Series | Power consumption, kW | Productivity, m3/min | Pressure, Pa |
| ND (low pressure) | from 0.03 to 7.5 | from 3.2 to 95 | from 330 to 1900 |
| RD (average pressure) | from 0.04 to 22 | from 2.7 to 125 | from 650 to 9600 |
| HRD (high pressure) | from 0.55 to 22 | from 7.8 to 96 | from 2600 to 16400 |
| HRD-FU/FUK (frequency converter) | from 0.75 to 20 | from 7.7 to 97 | from 4900 to 20000 |
| FD RDF (conveyor) | from 0.25 to 11 | from 10.5 to 64 | from 1100 to 6800 |
| SVD (special) | from 0.6 to 4 | from 23 to 71 | from 1200 to 2600 |
ND Series RD Series HRD Series HRD-FU/FUK Series FD RDF Series SVD Series
How to make a snail fan with your own hands?
- Drawing
- Low pressure radial fans BP 80-75
Paper snail craft
A very simple and quick craft. To make it you will need the following materials: craft paper, paints, wooden twig.
Roll the paper into a tube. Scrunch it up a little. Roll into a neat roll.
Now decorate the paper roll with paints.
Pierce the paper roll at the bottom with a wooden twig with a forked end.
Craft snail from beads
To make such a beautiful snail, you will need the following materials: chenille wire, a wooden ice cream stick, beads, glue and eyes.
String the beads onto the chenille wire. Twist the workpiece into a spiral.
Glue the finished spiral to a wooden stick.
Also make horns for the snail from chenille wire.
Glue on the eyes or draw with a black marker.
Making a simple part on a machine
The strip steel workpiece is cut to the required size. This size is usually clarified by drawing the finished product and its component elements.
The free end is placed in the center of the spiral. The workpiece is secured using an internal screw.
The “Snail” rotation is performed. The workpiece is pressed tightly against the guides. This requires some effort to obtain the desired product profile.
By turning the device further, a curl is made. If necessary, insert the other end of the workpiece and make a closed or open curl.
Usually the other end does not stay straight. It is also bent. Therefore, a distinction is made between internal and external reverse curls. Marks are made on the device itself using a marker or chalk. They are used as a guide when making curls with the required parameters.
As you can see from the step-by-step guide, using a simple set of tools, a homemade curl maker is easy to make. How much does it cost? Its price is determined by the cost of the blanks. Often the price is minimal.
Monolithic non-demountable snail
It is made like this:
- First, a diagram of the future template with the required dimensions is drawn on a sheet of paper (sometimes the template diagram is applied directly to the base of the conductor). This must be approached responsibly, because after welding the finished form, it will not be possible to correct errors. The thickness of the outline of the form in the drawing should be the same as the thickness of the metal strip used for its manufacture. It should be at least 3mm. The coils must be placed at a distance of 12–13 mm from each other, so that a 10 mm deformable rod fits into the groove between them.
- The base of the snail (preferably round) is cut out of a steel sheet with a thickness of at least 4 mm, the diameter of which is determined in proportion to the size of the template spiral and be larger than the size of the snail. Typically the diameter of the base is within 70 cm.
- In accordance with the drawing, the desired curl shape is made from a 3mm thick metal strip. To do this, it is better to calcinate the workpiece so that it is easier to machine. After making the mold, the excess end of the strip is cut off, and the edges of the snail are cut into a cone and cleaned.
- The finished form is welded to the base, which is mounted on the frame. Sometimes a template welded to the base is fixed to the frame using yews installed on it. To do this, a piece of timber is welded to the back side of the base of the form for gripping with a yew.
With the option of fixing the conductor in a yew clamp, you can easily change the templates and obtain different shapes of curls if you make several types, monolithically welded to the base of the devices.
Removable design
- On the working base, first draw the contour of the snail with a mark along the contour of the holes for attaching the template.
- Based on the sketch, a template is made from a thick steel strip and holes are drilled in it. It is attached to the base with bolts.
Forging a twisted shape should begin from the central curl. The end of the workpiece is inserted into the groove of the first curl of the form and pressed tightly against it. You can use a small clamping tool to secure the fixation. With force, the free part of the rod is screwed onto the template using a device - a lever. Advanced designs use a lever driven by a moving bearing mounted on it. The lever is made of a rod with a diameter of 20 mm.
You can watch the making of such a device in the video:
Collapsible snails with rotation
The snail template can consist of several parts, and the deformation of the rod occurs by rotating the conductor. This machine consists of the following elements:
- thick metal base in the form of a disk or square;
- a collapsible template fixed to the base area;
- rotation shaft;
- lever to drive the shaft.
The working base is made of metal, with a thickness of 4 to 10 mm.
The prefabricated template may consist of several parts that are connected to each other by hinge pins inserted into the holes of the lugs welded to the ends of the elements. Together they make up the outline of the cochlea.
To attach such a snail to the working base, you need to drill holes in it to fix it to the surface in a certain position. By changing the position of the prefabricated parts on the base, you can obtain different curvature of the curls and their shape. The size of the arc of the shape is regulated by special screws attached to the connecting hinges.
It is quite difficult to make a composite volute with hinged joints yourself. Typically, craftsmen purchase a stamp made in an industrial environment and attach it to the bed.
You can make a simpler collapsible template device yourself without using hinges. To do this, you need to make a sketch of the prefabricated parts of the snail with the locations of the holes. If you prepare several sketches and, in accordance with their contours, drill holes in the base in different places, then you can attach templates with different radii to one base. To do this, you will need to bolt the contour segments where the holes of the template and the base align.
For example, you can do this:
Craft Snail made of cardboard and stone
An original snail craft can be made from the most ordinary stone and a piece of cardboard.
The first step is to paint the stone. The stone will be a shell for the future snail.
Cut out the snail's body from cardboard. Decorate it with paints.
Using a hot glue gun, attach the decorated rock to the cardboard piece.
Bend the snail's cardboard body.
Draw a smile and glue on the eyes.
Cold forging equipment
To begin mass production of things without hot forging, you will need six basic tools: bender, snail, wave, twister, flashlight and globe. What are these tools for and what can you do with them?
Gnutik
This device serves as the main tool for bending parts. The special thing is that you can choose any angle.
Unlike hot working, which requires a template and experience working with a special forge, manual bending makes this operation much easier.
The design consists of a bending die and an eccentric drive. In turn, the bending template consists of hardened rollers, which are mounted on a durable frame. Such a manual machine can be additionally equipped with various devices. Gnutik can process rolled products in the form of a square with dimensions of 12×12 mm or a strip up to 3 mm thick.
Snail
This hand-held device is used to create spirals and curls. The device received the name snail because of its main component - the conductor, which has a twisted shape. This machine can produce curls from rolled metal of the appropriate size in one go.
Like bending, the snail quite freely processes the main types of rolled products used in cold forging - square and rod, with a cross-section of 10-12 mm, and strip, 3-6 mm thick.
The main working part (conductor) consists of a cam located in the center and two arcs (small and large).
When creating small-sized curls, the arcs are dismantled by bending on the cam. The photo shows one of the versions of such a manual machine.
Wave
A device used to create twisted, repeating patterns (quite often seen on window grilles). The basis of the device is two steel disks with a diameter of 140-150 mm, bolted to the desktop. You can often find a “controlled wave” - a device with adjustable gaps between the disks. This function is possible due to the presence of mounting holes at different distances from one another. By rearranging the disk you can create a different wave bend. What a bending machine of this class looks like is shown in the photo below.
Twister
A twister twists a rod or square around its axis. The principle of the device is similar to a knob for hot working.
The design consists of a base on which the rotating head is placed, and a slider that regulates the length of the product. The workpiece is fixed between these two parts and, using handles, is twisted to the required limit.
Flashlight
One of the most complex products made from cold forging is the so-called basket. At first glance, it is a complex interweaving of bent metal rods or squares. To produce such a part, forging equipment for cold processing of workpieces, such as a flashlight, is used.
The operating technique of the equipment is similar to a twister: a rotating head and a slider are attached to the base. However, the workpiece is “wound” in a spiral onto the insert—the shaft.
In principle, a basket can be made using a special insert for a twister, but a defect is possible, which can only be corrected by heating the metal in a forge. Therefore, it is better to use a flashlight that will not allow distortions to form.
Paper snail toy craft
A wonderful Snail craft that can be used to develop your child’s logical thinking.
From yellow cardboard, cut out the body of the snail - an oblong oval.
Now roll a piece of soft cardboard into a tube, make cuts along the edge and glue it to the snail’s body (see photo).
Using the same principle, make several more cardboard tubes of different sizes and colors, but there is no need to glue them to the snail’s body. Check that the cardboard tubes fit well into each other.
Glue the snail's horns and eyes. Bend the snail's cardboard body.
Now your little one can insert the cardboard tubes into each other from the largest and widest to the tallest and narrowest.
Maybe you need a punch? Main concepts
Blacksmithing products are an exclusive and expensive business. And, in general, it is already exotic, if we exclude stamping, which is done automatically and in huge volumes.
Stamping is the extrusion or deformation of metal using a stamping press with a special matrix - a nozzle at the end. This is what it is - a punch that is made from the highest strength steel. Stamping can be hot, with heating of metals to forging temperature, and cold, without any heating. You don’t have to look far for an example of cold stamping - these are all metal drink cans.
Types of forging machines.
We are finally approaching working with metals in a cold way - without heating. Question: is it possible to deform metal without heating? Answer: yes, you can. The only way is mechanical. It is called a not very serious word - riveting or cold hardening. To do this, you will have to hit the metal with a hammer until you are stupefied until its structure begins to change significantly.
This process is precisely cold forging - mechanical deformation of metal blanks using mechanical blows with a hammer. If you decide to take up peening forging, then we say hello to your family and neighbors in advance - they will face serious challenges.
But seriously, there are fans of cold forging using the riveting method, we wish them success and move on to pseudo-cold forging, as they used to call it.
Mechanical deformation of metals using various machines without heating is more correctly called metal bending, because in this method of metal processing, craftsmen bend metal rods. They don't do anything else - they just bend. Another question is how and where they bend, along what axis, but all these are artistic aspects of metal bending, which we will also dwell on, but later.
The most important thing is that in the future we will call this process cold forging - as it is done in all sources, so that there is no confusion. It’s just that now we understand the methods and understand what the essence of the so-called “cold forging” is.
By the way, do you need a punch? It's a beautiful word. You won't be involved in industrial stamping of metal blanks, will you? But artistic forging with your own hands is a very real possibility at home. There is even light stamping along with punches... Let's look into it further.