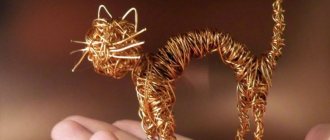
Simple, beautiful and fun crafts made from chenille wire. A selection of master classes for children. A growing collection of ideas.
Since a sufficient number of different works made of fluffy wire have already been collected, you can collect them in a separate top, so that you can quickly and conveniently find an acceptable option for yourself. As always, all works are located exclusively on the site, links do not lead to other resources.
Features of working with fluffy wire
Recommendations when working with fluffy wire:
- before work it is necessary to check the material for integrity;
- during operation, the wire must be bent with smooth movements: chenille is an easily damaged material;
You need to work with chenille or fluffy wire carefully so as not to break it when bending
- Before creating a craft, for safety reasons it is necessary to bend the ends of the wire into loops;
- individual parts can be glued together; regular PVA glue is suitable for this;
- To give the craft the desired shape, it is recommended to use cylindrical objects, such as pencils, during the work process.
Advantages of material selection
Working with wire is quite a fascinating activity, which also contributes to the development of fine motor skills of the fingers. For toddlers and school-age children, the plasticity of the material and the ability to create the most striking figures, unique images and ornaments are of genuine interest.
Wire goes well with other types of materials, and the variety of metal bases (chenille, brass, copper) amazes the imagination and gives space to the craftsman’s imagination.
Experienced craftsmen on the forums will tell you where you can buy wire for crafts and share tips on its use.
Fluffy wire daisy
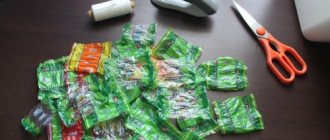
To create one chamomile flower you will need:
- chenille wire of 3 colors: white, yellow, green;
- scissors;
- glue.
Crafts from fluffy wire: master class on making chamomile
Making a flower:
- The white wire is bent in a zigzag pattern along its entire length, forming petals. As you work, it is important to ensure that the petals are the same size.
- Close the wire into a circle (there should be a small hole in the middle), twist the ends together, and form a flower.
- Cut 1/3 of the yellow wire, twist one end into a flat spiral, the other should remain straight.
- Wind the straight end of the yellow piece onto the green wire.
- Pull the formed white element through the lower end of the stem to the yellow element.
- Glue the yellow and white elements together in the inner area.
- Form a plant leaf from green wire as follows: twist a piece of working material in a zigzag manner, with the middle loop being larger than the rest, and connect the ends of the wire.
- Glue the leaf to the stem.
Beautiful flower
Beautiful works are not always difficult to make; for example, a flower is an ideal compromise of simplicity and an attractive image. There can be a lot of design options, and almost all of them relate to the design of the petals.
The stem is made of three parts - the base, on top of which there may be a bead, and leaves. For the petals, cut small pieces of metal thread and secure them at the base to give the future flower a colorful look.
Soft wire crowns
| Type of decoration | Materials and tools for manufacturing | Mounting accessories |
| Small crown | Several pieces of silver chenille wire, scissors | Elastic bands, barrettes or hair clips |
| Big crown | Soft wire with multi-colored shiny pile, scissors, glue | Not required |
| Crown on the rim | White or silver fluffy wire, scissors, rhinestones or beads | Headband |
Crafts from fluffy wire in the form of crowns are made in several ways.
Method 1. Making a small crown:
- Twist one fluffy wire into a ring, which will be the base.
- From the following 5 equal pieces of wire, the upper part of the crown is formed: each piece of material is bent in half and screwed to the base of the crown (the ends should be a few cm from each other), and loops are formed on the bends.
- For better fixation in the lower part, wrap the rays of the crown several times with chenille wire of the same color.
Method 2. Making a large crown:
- Twist 2 wires together. Form a ring based on the circumference of your head.
- Also connect the next 2 wires of a different color. Bend in a zigzag and attach to the base with glue.
Crafts made from fluffy wire: step-by-step making of a large crown
- Tighten the upper part of the craft with a ring made of the main working material to secure the craft.
Method 3. Making a crown on a bezel:
- Wrap the visible central part of the rim with artistic wire.
- The main and largest figure of the decoration in the form of a star or triangle is created in the center.
- Smaller elements in the form of curls or geometric shapes will be located symmetrically relative to the central figure.
- Decorate the crown elements with beads and rhinestones.
Toy soldiers
To entertain your child, you can try making a soldier with him. Having understood the principle of work, he will subsequently be able to independently engage in creativity.
For this craft you will need plastic wire of various shades. Using white, prepare the frame by sketching out the arms, legs and head.
There is no need to achieve an exact match to the original. Think about what position your soldier will be in; he may be on the move, in combat readiness, or drawing a weapon from a holster.
Use different colors to indicate items of clothing - pants, jacket, helmet and boots. The final touch will be the manufacture of weapons, which must also be done schematically.
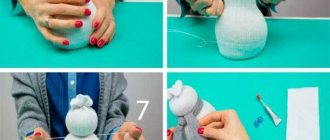
Bunny
To make a bunny craft made from fluffy wire you will need:
- chenille wire of the same color - 2 stripes;
- 2 pom-poms to form the nose and tail;
- glue;
- cylindrical pencil;
- plastic eyes.
Making crafts:
- Wrap the first strip of working material around a pencil, forming a spiral.
- Bend the second wire in half. Then bend the edges down so that 2 equal semi-ovals (animal ears) are formed in the upper part.
- Connect the ends of the second workpiece, put an element in the form of a spiral on them (the part should cover the bend point of the second wire). The lower ends of the second element should remain outside.
- Form loops from the protruding ends of the second part. In relation to the first element, bend at an angle of 90°.
- Glue the eyes to the top turn of the spiral of the first part.
- Form a nose from a pompom and glue it in the central area immediately under the eyes.
- At the back, to the lower part of the animal’s body, glue another pompom, forming a tail. The craft is ready!
Spider
To make a spider from chenille wire, you will need the following materials and tools:
- 2 pcs. fluffy wire of the same color;
- 2 small pom-poms matching the wire;
- glue;
- scissors;
- plastic eyes;
- colored beads (the size of the hole should correspond to the diameter of the wire).
Work process:
- Both pieces of wire are folded together and cut in half.
- The 4 resulting segments are twisted together in the middle. The ends of the wire will be the legs of the spider, they are placed symmetrically.
- String 3-4 beads on each foot. Bend the end and give each paw a semicircle shape.
- Glue the pompoms together, the resulting figure will represent the head and body of the spider.
- Glue the head and torso to the center of the first element. Glue the eyes to the head.
Making a bracelet
A simple weaving that does not involve soldering each individual link and involves working with a large piece of wire can be called Viking Knit. In this technique, each subsequent link in the chain must be artificially increased until the entire chain is closed. It’s not difficult to make a beautiful wire bracelet with your own hands. To do this you will need to acquire:
- Thin copper wire.
- Scissors.
- Metal ruler.
- With a simple pencil.
Owl
To make an owl craft from soft wire with pile you will need:
- chenille wire in 3 colors: dark brown, light brown and orange;
- scissors;
- cylindrical pencil;
- glue;
- plastic eyes.
Procedure:
- Prepare 3 equal pieces (about 5 cm long) of light brown wire.
- Wind a 30-centimeter piece of the darkest wire onto a pencil and remove it. Retreat 2 top turns. Between the 2nd and 3rd turns, stretch the spiral a little. Insert pieces of light-colored wire, bend the upper and lower ends inside the spiral.
- From a strip of dark-colored base material, form the ears and wings of a bird according to the following scheme: bend the wire in half, bend the ends down (the shape should resemble the letter M), place the element inside the spiral so that the bird’s ears are in the upper part of the workpiece, free sections at this is passed into the widened gap between the 2nd and 3rd turns of the spiral on the sides, forming wings.
- Use orange wire to form the beak and legs of the bird. Secure the beak under the 2nd turn of the spiral element. Attach the paws to the bottom of the craft.
- Glue the eyes; they should be located on the top 2 turns of the spiral part.
Butterfly
Butterfly is also a simple work, which can be complicated with experience using beads, seed beads and more ornate shapes. The wings can be either hollow or contain elements of the ganutel technique.
First, make the body of a butterfly, onto which you already string a head with antennae and wings, or prepare two identical halves, subsequently fastening them with a piece of wire.
Squirrel made from nuts and wire
Crafts made from fluffy wire can be made using other materials, such as nuts.
So, to make a squirrel you will need:
- hazelnuts;
- dark brown fluffy wire;
- glue;
- scissors;
- dark brown or black felt-tip pen.
Manufacturing procedure:
- Glue the hazelnuts together.
- Bend the chenille wire in half so that a semi-oval is formed at the bend. Bend the ends of the workpiece at a right angle.
- Lubricate the hazelnut blank with glue at the bottom and back, and glue it to the wire element. The semi-oval should be located on top.
- From the second piece of fluffy wire, cut 4 pieces about 2 cm long. Glue the first 2 pieces on each side of the junction of the nuts. Bend the second 2 pieces into a semicircle and glue them to the top nut, forming the animal’s ears.
- Using a felt-tip pen, draw the eyes, mouth and nose of the animal.
Tree
Crafting a tree from wire is extremely easy to make, but it will require a considerable amount of material and time from you. The base can be placed in a decorative vase or in any other place. The trunk is made by twisting a large number of metal threads into a single whole, into which branches are subsequently woven.
Instead of leaves, use beads or decorative stones. Although this work does not seem difficult, practice on simpler things before making it.
Ladybug
In order to make a ladybug from fluffy wire, you need to prepare:
- chenille wire in black and red colors;
- glue;
- scissors.
Description of work:
- The end of the black chenille wire is twisted into a tight flat spiral (no more than 3 turns) to form the insect's head.
- The remaining piece of working material is visually divided in half. On each of the resulting halves, 2 folds are formed, each of which will be the legs of an insect.
- The unused end of the wire is fixed from the inside.
- A 30 cm long piece of red chenille wire is twisted tightly into a flat spiral. The central part of the resulting circle is raised from the inside.
- Glue the red part to the black piece.
- Cut a small piece of black chenille wire equal to the diameter of the red element. Glue it to the red element on top, dividing the circle into 2 equal parts (insect wings).
- Cut several small pieces of black wire and stick them on the wings of the insect.
Octopus
In order to make an octopus craft from fluffy wire, you need the following tools and materials:
- fluffy wire of 2 matching colors;
- small foam ball;
- stationery erasers;
- cylindrical pencil;
- scissors;
- glue;
- plastic eyes.
Step-by-step production of crafts:
- Select 8 pieces of chenille wire of each color. The length of all segments must be the same.
- Lay out the pieces of wire in front of you, alternating colors. Secure on top with a rubber band.
- Place a foam ball inside the workpiece, cover it tightly with wire, and tie it at the bottom with an elastic band.
- Twist the pieces of wire in pairs to form octopus tentacles.
- Screw each octopus limb onto a pencil, giving it a spiral shape.
- Finally, glue on the eyes.
Puppet doll
To make an ostrich puppet from fluffy wire, you will need:
- chenille wire;
- pom-poms;
- 2 cylindrical pencils;
- feathers for crafts;
- scissors;
- sewing threads;
- beads;
- plastic eyes;
- glue.
Manufacturing process:
- Wind one piece of fluffy wire onto a pencil and remove the resulting spiral. Apply glue to one end and glue a pompom, which will be the bird's head. Glue the eyes to the top of the pompom.
- Cut half of the second piece of fluffy wire and twist it into a flat spiral. Form a triangle (bird's beak) from the resulting circle and glue it to the pompom. Glue feathers to the back of the head.
- Glue another pompom to the other end of the spiral-twisted wire, which will be the body of the bird.
- Wind 2 identical pieces of chenille wire onto a pencil, remove them, and glue them to the bottom of the second pom-pom (the lower limbs of the bird). String beads onto the lower ends and bend the ends of the wire.
- Twist 2 small pieces of fluffy wire in a circle (bird wings), glue them to the sides of the bird’s body along with the feathers.
- Form a tail from feathers and glue to the back of the body.
- Tie the ends of 2 sewing threads at least 20 cm long to the ends of a pencil. Next, glue the end of one thread to the back of the head, the second to the back of the body. The marionette doll is ready!
Carnival mask decorated with chenille wire
To make a carnival mask decorated with chenille wire, you will need:
- fluffy wire of 2 colors;
- carnival mask made of thick paper;
- glue;
- scissors.
Manufacturing process:
- Between two wires of the same color, place a wire of a different color, make 2 similar blanks and place them opposite each other.
- Stepping back a few cm from the end, form a loop on the left piece, which should be on top of the right piece. Then the bottom of the right bundle of chenille wire is placed over the bottom of the left bundle, then passes under the top of the left bundle of wire.
- It is placed on top of the loop turns, but passes under the top of the right bundle of wire, which was originally under the loop. Carefully tighten the knot. It is recommended to make a knot in the middle of the wire pieces.
- Turn the workpiece towards you so that the free ends of the wire are located on the sides, and the knot is shaped like the number 8. The knot will be located on the bridge of the nose. The free ends are bent into ovals. When making decor from wire for a mask, you need to check the wire blank with the template.
- Twist the ends of the wires of each bundle together. Connect the ends of the wire of the upper and lower bundles.
- Cut 4 small pieces of chenille wire in 2 colors, bend each piece in half. At the central point, twist with the ends of the wires along the edges of the workpiece. Direct the decorative elements upward and bend the ends.
- Apply glue to the inside of the chenille wire piece. Place on top of the carnival mask template.
Pendant
Any stone wrapped in an ornate wire frame turns into a beautiful handmade pendant. Just look at the photo below and understand how beautiful it can be with the right approach.
New Year's crafts made from chenille wire
New Year themed crafts made from fluffy wire: snowflake, star, Christmas tree.
In order to make a snowflake craft from chenille wire, you must first create a life-size sketch of the future craft. The snowflake craft should consist of 6 identical elements arranged in a circle. In some cases, each element is created separately, then all the parts are attached to a central circle of small diameter.
Another option for creating a snowflake: from 3 pieces of chenille wire of the same length, a circle is formed, where the intersection point of all 3 parts is the central point of the circle; each of the 6 rays of the snowflake is decorated using small pieces of wire; To fix the craft, a common circular piece is glued to the rays of the snowflakes.
To make a star from fluffy wire, you must first make a life-size sketch of the craft. The work begins with creating a ring of fluffy wire, from which the rays of the craft will diverge. Next, the working material is bent according to the contours of the sketch.
At the points of contact with the base ring, the wire of the rays wraps around the wire of the ring. It is recommended to tighten the base ring inside with several diametrical pieces of wire to secure the craft.
To make a Christmas tree from fluffy wire, you will need:
- green chenille wire;
- glue;
- scissors;
- wooden skewer;
- beads of different sizes.
Procedure for creating crafts:
- Cut 3 pieces of fluffy wire, each 10 cm long. Attach 2 small pieces of wire to each end to imitate a coniferous plant. Glue all 3 pieces of wire together to form a snowflake.
- Place the first tier of tree branches on a skewer.
- The next tiers of plant branches are made in a similar way, only the diameter after each level must be reduced.
- Carefully straighten the craft. Attach the largest bead to the top of the tree. Glue the remaining beads to the tree branches.
Heart on a stand
Take children's wooden cubes for the base of our future craft, and then think about what shape will stand on it - it could be a heart or letters that form one word.
Make a long base with a simple curve at the top. Drill a small hole and insert our work there.
Easter crafts made from chenille wire
The following crafts can be made from fluffy wire for Easter: a basket with a chicken, an Easter egg, an Easter bunny.
All parts of the Easter basket are made separately and then fastened together. First, you need to twist a small piece of yellow chenille wire into a flat spiral (this is how the chicken’s head is formed) and glue the spiral in a vertical position to the pom-pom (chick’s body).
Twist a small piece of yellow wire to form the number 3, bend it in half, and glue it to the pompom (chicken wings). Wrap a small cup tightly horizontally with chenille wire. Twist 3 chenille wires into a bundle, attach the ends of the bundle to the basket. Place Easter eggs and a chicken figure in the basket. The craft is ready.
To make an Easter egg you will need: a plastic dummy egg, chenille wire, scissors and glue. The dummy egg is opened and the lower half is first wrapped with wire. The winding rows should be horizontal and close to each other.
Before work, the plastic mold must be lubricated with glue. When the lower part of the craft is finished, connect the halves of the plastic blank and continue wrapping it with wire. The finished craft can be decorated as you wish.
To make an Easter bunny from fluffy wire and pompoms, you first need to glue 2 pompoms, the third smaller pompom is glued to the bottom pom-pom (animal's tail).
4 semi-ovals are formed from fluffy wire, 2 of which will represent the ears of the animal, and the remaining 2 will be the lower limbs of the rabbit. Glue the blanks to the animal figure. For the mouth, nose and eyes, use small pieces of chenille wire.
Fluffy wire is a material for limitless imagination. Crafts made from such material are not only beautiful and easy to make, but also help develop fine motor skills, which is important for the development of children of any age.
Author: Doroshenko E. N.
Article design: Natalie Podolskaya