Without familiarity with the works of Alexander Sergeevich Pushkin, it is difficult to imagine a child’s childhood. Starting from kindergarten, children learn this poet's poems by heart, act them out in mini-plays, draw thematic illustrations and watch cartoons.
An important stage in understanding poetic works is creating crafts based on Pushkin’s fairy tales with your own hands.
By the way, kindergartens and schools often hold creative work competitions based on Pushkin’s fairy-tale poetry; you can prepare for them in advance using a variety of natural and stationery materials.
“...Golden chain on that oak tree...”
Instructions on how to make crafts based on fairy tales may consist of several general recommendations:
- use available materials;
- fantasize;
- For compositions, choose bright, voluminous scenes.
One of the most striking compositions is a learned cat on an oak tree with a gold chain.
Step by step guide:
- Prepare a sheet of thin plywood (base).
- Glue a thick straight branch, 15 cm high, vertically onto the base. Make the crown from dry oak leaves (just attach them with glue to the top of the branch).
- Cover the base with moss, dry blades of grass and small twigs.
- You will have to buy a cat (you can look for the right size and fluffiness among decorations for keychains). We plant it next to a tree.
- The final touch is to wrap a chain around the oak tree (look at your place or buy it in the jewelry department).
If an exhibition of crafts based on fairy tales is held in a kindergarten or school, this composition will definitely not go unnoticed.
Puppet show
In preparation for the competition, children can go to school, having previously prepared a real puppet theater.
The theme could be one of the poetic fairy tales of A. S. Pushkin.
The characters of the show, in which the main characters will be 7 heroes and the princess, will be made using the cotton papier-mâché technique. To work you will need:
- cotton wool;
- felt, fabric;
- wire;
- foil;
- cardboard;
- acrylic paints;
- wool;
- glue (PVA, hot melt glue, Moment);
- ruler, scissors.
Stages of work:
- Twist a frame of men out of wire and wrap it in foil.
- Give volume to the figures using cotton wool, which is glued to the frame with PVA glue.
- When the figures are dry, draw faces and glue on hair.
- Sew clothes from felt or fabric.
- The stage and backstage are formed from a cardboard box. You can paint a backdrop with decorations or make three-dimensional trees using the same technique.
With the help of a video master class, creating a puppet theater based on Pushkin’s fairy tales will turn into an exciting game:
gold fish
The craft is interesting because it uses several types of activities: sewing, beading and a little wood applique.
Cut out the body of a fish (2 pieces) from shiny material, sew them together, and stuff them a little. Cover part of the body with sequins and make an eye out of a black bead. At the places of the fins and tail, sew threads of different lengths and string beads on them.
To make it more beautiful, use several colors of beads. Make the tail 4 times longer than the body, it will turn out beautifully.
Stick a stiff wire into a thin piece of wood, string beads on it, and fasten the fish on top so that the wire is masked by the tail.
Note!
- DIY military crafts step by step: 150 photos of the best craft ideas for children for school or kindergarten
- DIY crafts for May 9 step by step: 150 photos of the best crafts for Victory Day
- DIY crafts for February 23rd step by step: master class with photos and descriptions of how to make crafts for Defender of the Fatherland Day
Paint the saw cut blue, pour plenty of glue on it and place shells and small pebbles on top.
Making the craft “Green Oak Near Lukomorye”: step-by-step description
Stage 1. Making green oak for Lukomorye
Step 1. Cover living leaves with acrylic varnish in two layers (or colorless varnish in an aerosol) and dry. It is advisable to place the leaves vertically so that the leaves look natural and not perfectly even.
Step 2. Glue the acorns with a hot glue gun to their caps.
Step 3. We twist the green oak frame from wire. At the base of the frame we leave several wires – “roots” – untwisted. With their help we will attach the tree to the base.
Step 5. Make the roots of the oak tree and its branches from a paper bag.
If you use a paper bag from coal to make an oak trunk, then its base must be torn into 6 strips approximately 6 cm long. Each strip must be twisted so that it looks like an oak root.
We tear the top part of the bag into about 8 strips (the number of strips should be equal to the number of branches on the oak wire frame you made). We wrap strips of wire oak branches, crumpling and twisting the paper onto them.
We fix the paper on the wire frame using a glue gun. We also glue leaf cuttings and acorns using hot glue. We mask the attachment points with paper folds.
This is what your oak from Lukomorye will look like in our craft!
Swan Princess
Secure a plasticine barrel on a blue base (this can be a sheet of thick paper or plasticine). Cover it entirely with white bird down.
The neck and head are also sculpted from plasticine. Wrap a white napkin coated with glue and let dry.
Make a crown and attach it to your head. Connect all the parts.
To make the composition look complete, decorate the base along the edges with small black boulders (pieces of plasticine), and draw waves with paint.
Pasta
Cinderella's carriage is recreated with pasta, placed around a jar or cup covered with adhesive film. After drying, the frame is removed and painted with silver or gold for a spectacular look.
By the way, this transport looks believable from a pumpkin without pulp with cut out windows, and orange slices will serve as its wheels.
The product, thanks to its diverse configuration, can create virtually any character; forest wilds with strange trees and spruce trees are no exception.
Mermaid
On a sheet of thick paper, draw an outline of a girl in profile to the waist. Cut out the workpiece. Make hair from yellow silk or satin threads and glue it on. Fashion a tail from plasticine.
Prepare a medium-sized, beautiful stone. Attach the tail to it so that it hangs almost to the very edge of the stone, then carefully stick the upper part of the craft into the tail.
Small sequins attached to the tail will add naturalness to the character and further decorate the craft.
Styrofoam
The pliable material becomes the basis of toys and houses. The white color reflects the winter theme. Cutting out the required parts with a knife, they are glued together with silicone glue.
Against the background of cotton wool, the house of Father Frost and the Snow Maiden or a deer pulling a sleigh will come to life. Decorative elements will be required for decoration. If desired, large objects can be made that can be photographed next to.
Thumbelina
In every girl's playroom there is a play that the child has already played with. What if you give the toy a second life? Let's come up with a craft!
From any bright fabric, cut out ovals with one pointed tip, 3 sets of five pieces. Let the blanks in each set be 2-3 cm smaller than the previous one. These are petals.
Note!
- DIY airplane craft: the best options for creating an airplane from paper, cardboard and plastic. 120 photo ideas
- DIY crafts for March 8 step by step - a review of the most beautiful crafts for International Women's Day (120 photo ideas)
Diaper cake for a girl - 180 photos of ideas for original diaper cakes + DIY instructions with examples of finished products
Sew the base of the flower in the form of a round pillow, sew the petals to it so that the small ones are on top.
Sew a new dress for the doll and place it in the center of the flower. The craft is ready!
Baba Yaga
Sew a famous witch in a mortar. The hardest part here is the head. Take flesh-colored nylon tights, cut out the tube part and pull it off one side.
Fill with padding polyester, draw or sew button eyes. Embroider the mouth with red thread. Form a nose and tighten the thread around it.
You can also tighten the corners of the mouth and eyes to give the face a lively look, and define the fingers.
For a dress and a scarf, take old rags, torn shreds - the old woman is far from fashionable. Embroider the gray hair that escapes from under the scarf with white thread. Hand her a broom made of twigs.
Princess on the Pea
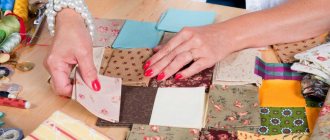
A multi-layer applique made from pieces of fabric looks best. In this case, it is not necessary to conduct a master class on creating crafts, everything is quite simple.
On a colored sheet of paper, draw a bed (railings and base) with a simple pencil. Glue twine to the outline. Glue the pea. Cut several elongated ovals (mattresses) along the length of the bed. Use pieces of different fabric. Glue them on top of each other.
Paint a princess on top.
Stage 3. Assembling the craft “Near Lukomorye there is a green oak tree” from the prepared parts
— Using a glue gun, we glue the element prepared in the second stage with a sandy shore and sea onto the cardboard—the basis of the entire craft—in the right corner.
— Glue on a rug with grass. Using scissors, we adjust its edge to the curves of the sandy shore.
— We attach the oak (see the first stage) to the base with grass. To do this, we pierce it through and insert a wire into the hole. We secure the wire by bending it from the bottom.
— We wrap the chain around the oak tree. We place a mermaid and a scientist cat on the oak tree. We fix everything with hot glue using a glue gun.
— We mask the shortcomings with pebbles, if there are any. The shortcomings include sloppy places and places where the joints do not match exactly. We also mask the junction of the shore line with the grass with stones.
- The ends of the cardboard - the bases of the craft - are tinted with paints.
This is what you will get at this stage (see photo - top view of the craft).
Three piglets
The plot of this craft provides wide scope for imagination. The composition will, of course, be based on three little pigs. They can be made from completely different materials. Plasticine, foam balls and even chicken eggs will do.
Idea No. 10. Christmas toys made of cotton wool
Cotton wool toys require skill, but the results are definitely worth it.
There are many manufacturing options, but we suggest using PVA glue, egg white and wire.
- The toy is assembled according to the snowman principle, that is, first the balls and rollers are twisted and then glued together.
- To make the ball dense, you must first roll it, and then apply glue or egg white - this will make the surface harder and denser. The balls are glued together with glue.
- For small parts, such as arms or paws, you can use wire as a base.
- The outlines of the face, folds of clothing and other irregularities are drawn with a small wooden stick (like a sushi stick).
- Next, the toy dries and can be painted.
To begin with, it is better to follow the video lessons, for example, here.
DIY Christmas tree toys made from cotton wool
Then it will be possible to create such beauty.
DIY crafts based on Bazhov's fairy tales
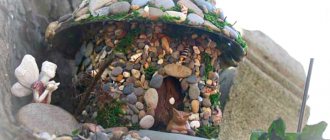
The cartoon “Silver Hoof” fascinates not only children, but also adults with its beauty.
Let's make a three-dimensional composition. Glue small pieces of cotton wool in places onto a square of cardboard sheet painted with white acrylic paint. Use small branches to build the walls and roof of the house. You can also fasten them together with glue.
Cut out the outline of the deer from silver “velvet” paper. Install it on the roof. Scatter small multi-colored glass beads along the roof and next to the house, on one side.
Crafts based on Bazhov's fairy tales, the pure embodiment of magic. If the craft is made large enough, you can use a Christmas tree garland as precious stones.
Idea No. 9. Christmas tree made of cones and nuts
Remember the squirrel from the fairy tale about Tsar Saltan, who “sings songs and gnaws all the nuts, but the nuts are not easy - all the shells are golden...”?
We suggest decorating a small Christmas tree in the style of a fairy tale. To do this, we need the Christmas tree itself - the most ordinary and simple one, as well as nuts, cones, gold paint and glue.
- Lightly paint the pine cones and nuts with gold paint - it is not necessary to completely cover them.
- We attach them to the branches of the Christmas tree. You can add cotton wool to represent snow.
- We plant a cute squirrel nearby.
Cat's ears
A little-known fairy tale. This is good. A craft is a great opportunity to get acquainted with the original creativity of a storyteller. Photos of crafts based on fairy tales can be found on the Internet. While looking through them, you will definitely come across “cat ears”.
The composition can be implemented in the form of an application.
Paint the base sheet with dark blue paint. Stick silver stars and a month in the upper half. Cut and paste Christmas trees and hills.
Place two triangles – ears – in the center of the sheet. To make the craft look impressive, the ears should be made of bright red silk. They can be cut into sharp corners along the edges to make them look more like lights.
Stage 2. Making the sea and the coast in Lukomorye
Step 1. Take a large box - the basis for the craft “Green oak at Lukomorye”. We cover its end with strips of paper towel using PVA glue.
Step 2. Cut out a quadrangle from white cardboard, shaped like a trapezoid. This is a preparation for the sea and the sandy shore of Lukomorye.
Approximate dimensions of this part for a box measuring 35 x 24 cm:
Step 3. Draw the sea in Lukomorye.
We paint the part of the trapezoid that will represent the sea with blue or turquoise paints.
Step 4. Making a sandy beach for Lukomorye.
Note: we take more semolina (it makes up most of the mixture). Add a little glue to the mixture to make it thick.
We apply the resulting mixture to the part of the part where we have planned the shore. We press shells and small stones into it. We dry the workpiece in the oven with the door ajar at 50-70 degrees (probably, you can dry the workpiece on a radiator - you need to try this).
Step 5. Make the sea in Lukomorye three-dimensional (with a 3D effect).
The next step is to create the sea for our craft. I discovered the technique for making it on forums among modeling enthusiasts, creators of dioramas and miniatures.
How to make a volumetric sea for Lukomorye:
- on that part of the part where we have planned the sea and have already applied blue paint, we squeeze out silicone sealant. For relief, I applied silicone in two layers.
- using a teaspoon soaked in water, we form waves running onto the shore.
- to imitate white foam, you can place pieces of cotton wool under the silicone wave using a toothpick.
Kolobok
Crafts based on the fairy tale Kolobok, a mandatory activity in any kindergarten. The kolobok theme can be played with so many materials that it’s simply dizzying.
The largest kolobok can be made from a pumpkin and placed outside (our answer to Halloween).
Find a stump of suitable size. Place a pumpkin on top of it. Glue the chestnut nose, paint the eyes and mouth.
Two long potatoes will serve as legs. You can put an old hat on the top of your head.
If you need a smaller craft, you can make a bun out of plasticine, it’s not at all difficult, and place it on a cardboard base decorated in a forest theme, with moss, dry blades of grass, acorns, and rowan berries.
Applications
The simplest version is to cover the outlines of a selected character or picture, for example, with dried leaves, which are painted and added to the decor. This is how the image of a peacock, a cockerel, and a Tortilla turtle are obtained.
Unnecessary buttons are used, which looks very picturesque and non-trivial. No less in demand are cereal products, beans and seeds, from which the humpbacked horse, pike in a bucket and Emelya himself on the stove are reproduced.
This could be a voluminous craft on the theme of folk tales. The Ryaba chicken is magnificent and realistic in a straw nest, covered with beans or pumpkin seeds, and the wonderful egg is an oval made of shiny foil.
Princess Frog
For this craft you will need a set of colored paper, scissors, glue and a few pearl beads.
Cut a circle from a sheet of green paper, then cut out a narrow triangle to the middle. We will get a water lily leaf. As a decoration, place beads placed on it with glue.
Roll up several narrow long bags and place them in a circle, with the sharp base on top. Make each next layer of bags smaller in size.
To make the last few pieces, use yellow paper. Use them to cover the middle of the resulting water lily. Glue it to the side of the sheet. Place a frog nearby. There are also plenty of options and frogs. Our frog princess can be made of plasticine, paper, basically, anything.
Materials for work
The set of materials depends on what kind of craft will be made, because they have their own characteristics. The main materials will be plasticine, glue, colored paper, paints and brushes. Materials for crafts can also be natural materials: acorns, dried flowers and leaves.
Chicken Ryaba
The main composition is a nest with a golden egg and a chicken.
Make a nest out of straw so that it does not fall apart, fasten it in several places with thin wire.
Wrap a regular chicken egg in gold foil and place it in the nest. A chicken can be easily made from plasticine or cut out of cardboard. 5 minutes, and the craft on the theme of the Russian fairy tale itself is ready!
Creating crafts develops not only attention and motor skills. During the lesson, the child learns to create, gets acquainted with the world around him, reflects, and fills his inner world.
By the way, making crafts is actually an exciting activity not only for children. Try it! Join your child and go to the world of fairy tales and magic.
Photo report on the exhibition of handicrafts dedicated to the work of A. S. Pushkin
Oksana Khaleeva
Photo report on the exhibition of handicrafts dedicated to the work of A. S. Pushkin
Goal: creating conditions for the creative realization of the potential of parents and pupils through the means of decorative and applied arts.
1. Continue to develop interest in the work of the great Russian poet Alexander Sergeevich Pushkin .
2. Improve creative imagination , fantasy, promote, promote the development of artistic taste, creative abilities .
3. Cultivate patience, perseverance, hard work, accuracy.
Alexander Sergeevich Pushkin wrote many fairy tales that children loved. an exhibition dedicated to his work in our garden .
Children and adults put a lot of work into making crafts and showed their imagination . The work was done in different techniques: quilling, plasticine, paper-plastic, trimming, applique. A variety of decorations were used: yarn, beads, sequins, pebbles, toothpicks, sponges. The children made their own chain of wire.
Photo report about the festival of readers “Tales remain forever”, dedicated to the work of A. S. Pushkin Photo report from the festival of readers “Tales remain forever”, dedicated to the work of A. S. Pushkin I love Pushkin’s creation And this is not at all. Photo report on the exhibition of children's creativity dedicated to the 75th anniversary of the Great Victory Photo report on the exhibition of children's creativity dedicated to the 75th anniversary of the Great Victory The holiday, sacred for every resident of our country, has come. Photo report on the exhibition dedicated to the 60th anniversary of the first manned space flight “He said: Let's go!” Exhibition of children's and parent's creativity entitled "He said:" LET'S GO! "" was opened within the walls of our kindergarten on the eve.
Source