My mother has a very small kitchen, we knew this for a long time, but when we once again could not fit in it, a reasonable question arose - how to save space in the kitchen.
Anything was offered, for example, my brother suggested changing the apartment, this is of course an ideal option, but my grandmother is against it. I had to look for a simpler option so that I could not only save space, but also how to fit it in the kitchen.
Well, sometimes it’s very useful to sit on different forums, that’s how I found a wonderful idea - a do-it-yourself retractable shelf behind the refrigerator. My brother grimaced a little, but agreed to assist in my endeavor.
First, we measure the space behind the refrigerator so that our pull-out shelf can not only fit inside, but also move back and forth.
Then we assemble the shelf frame from chipboard. Here you can already play with color to make the shelf more invisible.
We complete our film across the boards with stands, making sure to insert a small strip into the set with the boards so that our supplies do not fall on the floor.
Attach the wheels to the bottom of the pull-out shelf; try to find small and silent wheels in a specialty store. They are not that expensive, but new small wheels will last longer than already used ones.
We insert our wonderful shelf behind the refrigerator, do not forget to attach a handle that will be convenient for pulling the pull-out shelf.
We arrange our supplies that do not fit in the main cabinets. By the way, if you don’t limit your imagination, then such a shelf will turn out to be quite a decent bar. Such convenient storage spaces in the kitchen will never be empty, so when mom got such a shelf, almost half of the work surface was immediately freed up.
It’s another February, which means it’s time to prepare gifts for your loved ones for February 23rd. We asked the men we know (relatives and colleagues), found out what exactly they want as a gift, and are ready to present you with another selection of interesting and not trivial gifts for Defender of the Fatherland Day. Read, study offers in stores and make a choice!
One of the biggest problems of small apartments is equally small kitchens. But it has long been known that a person spends a quarter of the time spent at home. The kitchen is the place in the house where you need to place a lot of useful little things, and also in such a way that they do not interfere, and at the same time are always at hand. We suggest equipping a mini-pantry behind the refrigerator.
Consider getting some space for that much-needed pantry without cluttering the space. Even an approximately 12-centimeter gap, empty between the wall and the refrigerator, will do. Having equipped a mini-pantry there, you can easily pull out the cabinet and take everything you need, and then just as easily push it back.
The advantage of pull-out shelves
The main idea of this approach is to make the most efficient use of literally all the space that is at our disposal.
Such systems make it possible to greatly increase the capacity of a conventional kitchen unit, while still being located in the same area.
A lot of space is freed up, which can be used in various ways and, most importantly, you can easily move around the kitchen.
The most common option is built-in shelves in floor or wall cabinets. Their advantage is that they are easy and convenient to use.
As usual, the door opens, only we see not the usual 2-3 shelves, but a whole multi-level system that can be filled to capacity with the necessary items.
Such “boxes” can be completely removed from the closet, which means you don’t have to reach deep for the right thing. Everything can be laid out evenly and you can get to the right thing whenever necessary.
In addition, the pull-out shelves are equipped with a reliable mechanism. The shelves do not need to be supported so that they do not collapse under the weight on the floor.
Wine cabinet
See also
Magic corner for the kitchen: which manufacturer to choose
This is a bottle cabinet. For lovers of wine and other similar drinks.
You can organize a hanging wine cabinet of an open or closed type.
When storing wine, certain temperature conditions must be observed. Therefore, an open wine rack looks beautiful, but can lead to rapid spoilage of the product.
The wine shelves themselves can be very diverse. Choose what suits your kitchen.
The space above the refrigerator can be adapted for wine storage
Of course, you don’t have to build a cabinet above the refrigerator, but simply install a TV on top. But objectively this is already the last century.
It is not recommended to install heavy TVs on the lid of the refrigerator. This may cause damage to your household appliances.
More and more people are abandoning this idea. In addition, they are now producing modern, flat TVs, which are much more convenient and also more practical to install on a special bracket with a sliding and rotating mechanism.
Types of retractable structures
There are several options that can be implemented in your kitchen, depending on the needs of the room.
Drawers
Such simple designs can have different configurations of depth and width. Often they can be equipped with additional partitions or sections designed to store small items.
Drawers are equipped with the ability to pull out the entire structure at once. This way you can view all the contents of the cabinet at once.
It is very convenient if you need to carry out an “audit” on the shelves or quickly look at what you need to buy before going to the store.
It will be convenient to arrange such boxes depending on the purpose of their contents. For example, it is best to place a cabinet with pots and pans near the stove, and dishes near the sink.
Cargo
In essence, this is the same drawer, but it is designed to be used for bottles and tall cans. It is quite narrow, its width does not exceed 20 cm.
The small dimensions allow such a cabinet to be placed in various openings where it can be handy. You can place spices in them, which will be convenient next to the stove.
It often happens that there is a free corner or some space left in the kitchen. This is where a cargo box fits perfectly.
Baskets for kitchen sets
Retractable baskets built into furniture look very beautiful and significantly unload the space due to their “light” appearance.
Depending on the size, they can be built into a cabinet or cabinet of any size. In this case, the guides will be installed in such a way that the basket slides out completely, which will ensure comfort when using it.
This product can perfectly complement the interior. Let's say, it would be perfect for Provence or country.
Classic wall cabinet
You will need to make or order a small cabinet box. Preferably with closing doors.
If you plan to store a lot of things in the locker, it is better to make it a closed type. This will get rid of the effect of chaos and mess.
The most popular option.
The main thing is that the furniture itself above the refrigerator matches the interior design of the kitchen and also blends beautifully with it.
Photos of examples of retractable shelves in the kitchen
Guys, we put our soul into the site. Thank you for revealing this beauty. Thanks for the inspiration and goosebumps. Join us on Facebook
and
VKontakte
You don’t have to spend a lot of money to make your apartment look stylish and cozy. All you need are simple materials at hand, a little imagination and a desire for change. And of course, you can look at interesting ideas for the home that the site
.
So, what can you do to decorate your interior inexpensively and tastefully?
Use ribbons instead of rings and clips
Update your curtains with edging
Hand paint flower pots
Draw a pattern on the lamp with a marker
A little patience and a marker that writes on different surfaces - and the modern lamp is ready. How to draw a picture on a lampshade is shown in this blog.
Decorate the lamp with improvised materials
Make a handmade watch
An original wall clock in the best traditions of expensive decor stores can be made at home in a few hours. It's not as difficult as it might seem. instructions for creating a clock in the style of a school board. And it shows how to make a pin-up style watch.
Organize a real minibar from an old sideboard
The era of sideboards with tons of crystal is irrevocably a thing of the past. But many still have the sideboards themselves. So why not turn your old furniture into a modern home minibar (not necessarily alcoholic). It turned out very well.
Use corner shelves
Create an extra spice rack
Use cabinet doors
Attach a magazine holder
Paste fabric “wallpaper” on the door
Using patterned fabric and cornstarch glue, you can decorate a boring door in an original way. Such “wallpaper” is easy to remove, so when the picture gets tired, it can be easily removed or replaced with a new one. You can look at the process of decorating a door in this blog.
Paint the front door rug in unusual colors
A doormat can be fun too. To do this, it is enough to paint it in bright, non-standard colors. How to turn an ordinary rug into an original thing, see this blog.
Make a bath mat from natural materials
Cork is an excellent natural material that dries quickly and retains heat well. It is pleasant to step on such a rug with bare feet. And its creation from wine corks will certainly make you remember many good moments. You can see how to make such a rug.
Hang a wall panel
Arrange a photo exhibition
Add a color accent to the door
This idea is ideal for cases when you want to liven up the interior a little, but there is no way to change anything radically. This trick can be done even in a rented apartment; in the end, you can always return it to how it was. How it's done is shown.
Paint old linoleum
Convert a table shelf into a wall shelf
Often there is not enough space on the table to store various small items. In this case, the table shelf can be easily turned into a wall shelf, and a folding one at that. It will not only allow you to organize the space, but also decorate it. Simple instructions can be found.
Decorate clothes hangers
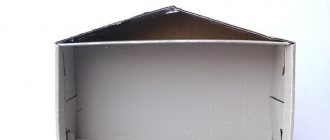
This master class will be especially useful for those who live in small one-room apartments. I'll show you how to make a retractable shelf in the gap between the wall and the refrigerator. It would seem that the width is only a few centimeters, but you will definitely be surprised when you see how many items can be stored in this gap. Initially, the shelf-rack is not visible at all. In fact, after its manufacture, nothing will change in your kitchen, except that a new and convenient space will be created for storing various jars, bottles, etc.
The rack can be pulled out with a simple movement. Now look how much is stored there. The gap distance is only 11.5 cm (in the photo the tape measure is in inches), and what a huge number of different items can be stored.
Assembly sequence.
Step 1
. The boards were cut to size in accordance with the previously developed project.
Step 2
. The cabinet frame was being assembled.
Step 3
. The middle shelf was secured with self-tapping screws and additional nails. The remaining shelves are removable and placed on support bars. The distance between shelves was determined depending on the height of standard containers containing food products. The bottom shelf is for the tallest items.
Step 4
. The back wall of the cabinet was cut out of a sheet of hardboard. Then, through a stencil, a pattern was applied to the white surface of the hardboard using a swab with black paint. Later, the swab had to be replaced with a more effective tool - a paint roller.
Step 5
. Just above the front edge of the shelves, dowels were inserted through drilled through holes in the side walls of the cabinet.
Step 6
. Furniture wheels were screwed to the base of the cabinet.
Step 7
. All holes from nails and screws were sealed with putty.
Step 8
. The surface was sanded, primed and covered with two layers of paint.
Step 9
. The final assembly of the cabinet was done in the kitchen. The back wall was attached here. Then the pull-out cabinet took its rightful place in the narrow niche between the kitchen wall and the refrigerator.
As for the stability of the cabinet, it is securely held in the niche. But still, you should not completely roll it out of the refrigerator. If you intend to make a sliding cabinet for your own kitchen, then you should consider installing a limiter that prevents the cabinet from completely rolling out.
Post Views: 2,401
This master class will be especially useful for those who live in small one-room apartments. I'll show you how to make a retractable shelf in the gap between the wall and the refrigerator. It would seem that the width is only a few centimeters, but you will definitely be surprised when you see how many items can be stored in this gap. Initially, the shelf-rack is not visible at all. In fact, after its manufacture, nothing will change in your kitchen, except that a new and convenient space will be created for storing various jars, bottles, etc.
The rack can be pulled out with a simple movement. Now look how much is stored there. The gap distance is only 11.5 cm (in the photo the tape measure is in inches), and what a huge number of different items can be stored.
Materials
Required materials I used for this project:
- Back board for the back. Mine measures 61 cm in depth and 121 cm in height - essentially these are the dimensions of the entire rack without thickness. The width of the entire rack is slightly less than the width of the gap.
- Boards for shelves - 6 pieces.
- Two boards for the top and base.
- Two boards on the sides of the shelf.
- Two wheels for moving the entire structure.
- Round wooden slats.
- Wood screws
- Wood glue.
- Cabinet handle for pulling out the rack.
I don’t see the point in indicating the exact dimensions of all the boards, since everything will be your own. If something happens, it won’t be difficult to calculate them yourself. But to do this, first measure the width of your gap between the refrigerator and the wall, the depth of this gap. Decide on the desired height of the future shelf. All this can be done in about 15 minutes by drawing a sketch on paper with a pencil.
Conclusion
I tried to convey to you the step-by-step principle of assembling a movable shelf. The sizes of tubes and support boards can be selected individually, plus no one forbids you to take a different model of wheels, the main thing is not to change the order of actions and you will succeed.
Did you like the article? Subscribe to our Yandex.Zen channel
February 26, 2022
Accessories,Kitchen design,Kitchen
If you want to express gratitude, add a clarification or objection, or ask the author something, add a comment or say thank you!
Making a kitchen rack
The entire structure can be assembled using just self-tapping screws, but in addition I glued everything with wood glue. I laid out the shelves and estimated the number needed. I started assembling the box. I installed the joints with glue. I left it to dry, pressing it with whatever I had. The result was a glued shelving box. Additionally secured with self-tapping screws. If you use thin boards, drill a hole before screwing in the screw to prevent the board from cracking. In the end I got to the shelves, placed them and screwed them on with self-tapping screws. Since the rack is very narrow and bottles and cans can fly off when pulled out, you need to make a kind of side. At first I thought about stringing a fishing line or rope, but in the end I settled on round slats. I drilled holes on the sides, cut the strip to length, inserted it and secured everything with glue. At the end, we measure the thickness so that there are no excesses. In my case there shouldn’t be any, since I don’t have the opportunity to move the refrigerator a little further.
Making a roll-out box under the bed with your own hands
We will consider in detail the option without a lid with sides made of laminate plates. We offer step-by-step instructions for making it.
Let's make the bottom. We mark cutting lines on the laminated chipboard sheet. We cut out the workpiece with a jigsaw. We do this carefully so that chips do not appear on the edges. If possible, use a ready-made part of suitable dimensions, for example, a tabletop from an old table. We are preparing laminate blanks for the sides. If necessary, we connect two lamellas, having previously coated the lock with glue. Let it dry. Using the dimensions taken from the drawing, we outline the cutting lines. Carefully saw off the excess with a jigsaw. Cut off the locking part from the part. We also do this with a jigsaw. We assemble the sides. For this we need steel furniture corners. We take two sides, put a corner between them, fix them with fasteners
It is important that the elements are connected exactly at right angles; there should be no distortions. Tighten the screws carefully
So that they do not go right through the laminate. When working with power tools, you need to be careful so that the self-tapping screw does not turn several extra times. In this case, the walls of the hole are destroyed and the fasteners do not fit tightly. We collect the entire flange in the same way. We fix the sides to the bottom. We install corners on the lower edge of the flange from the inside along the perimeter. The fastening pitch is 120-150 mm. We fix them with self-tapping screws. We lay the bottom on a flat surface, put the sides on top, and align the edges. We screw the bottom to the corners with self-tapping screws. When properly fixed, it fits snugly to the sides. There should be no gaps or distortions. We install the rollers. We place them in the corners of the bottom, then the box will be stable. We mark the location of each wheel. We apply the installation plate to the basting and fix it with self-tapping screws. We tighten them so that the part stands tightly, without gaps. We fasten the remaining rollers in the same way. We put the container on the floor and try to move it. The wheels should spin freely. If movement is difficult, we look for the reason and correct the shortcomings. We install the handle on the facade. Some people prefer to place two elements closer to the edges to make it easier to roll out the structure. In any case, first they outline where the part needs to be placed. In the first option this will be the center of the facade, in the second - closer to its edges. Holes are drilled at the designated points. Handle elements are inserted into them and secured with fasteners.
Instagram bosch_go
Instagram rugg_ws
Instagram dobramebel.ru
Instagram dobramebel.ru
Instagram master.stardub
Instagram br_lukin
The storage system is ready. You can conduct “tests”: roll it under the bed and roll it back out. A correctly calculated and assembled box rolls smoothly and does not touch furniture elements. To protect things from dust, instead of a lid, use a plastic cover with a zipper or just a plastic sheet.
We found out how to make a box under the bed with our own hands. The instructions will help novice craftsmen assemble a practical storage system and make good use of the free space under the bed. Several boxes are made for a double bed. Thus, the room will be freed from unnecessary furniture and will become more spacious and comfortable.
Installation of guides
First of all, you will need to make the correct calculation and mark the necessary points where the profiles will be located. This is done by measuring a 30mm distance from the bottom, this is marked with a longitudinal line.
If a certain number of boxes are located in several rows above each other, you need to make calculations based on the facades. It must be taken into account that the facades of the structures should not touch.
It is necessary to leave a small gap (2-3 mm) in the middle of the facades. Therefore, the outer part of the box is made 3.5-4 cm larger than the size of its walls.
Guide mounting diagram.
After making an accurate calculation, marking the required locations and placing the guides, you need to attach them in the required position. But before that, you need to choose the desired type of facade: internal or overhead. Each type has its own installation features.
When installing an overhead type of facade, you will need to fix the removable element of the mechanism using self-tapping screws flush with the edge opening. In the case of installing an internal type of facade, it is necessary to fix the guides 2 cm inward from the end part of the side opening.
During the installation process, it is necessary to maintain a uniform distribution of profiles; they must be on the marked line. After installation, you can try on the removable elements with the fixed ones and fix them. If all parts of the mechanism fit into each other without much effort, it means that the calculation and installation of the profiles was carried out correctly. The mechanisms will need to be secured with a slight movement of the hand. Successful fastening will be confirmed by a characteristic click of the latch.
If difficulties arise when fixing the guides, there is a possibility that some stage of the work was performed incorrectly. Accordingly, you will have to disassemble the structure and do everything again, strictly following this manual.
How to remove a drawer from a kitchen unit
To answer this question, it is important to have a general understanding of the types of furniture guides and their design features. The most common types of extension devices are:
- roller skids;
- telescopic with a sliding carriage or ball;
- telescopic multi-section;
- telescopic with closer and push-to-open system.
Roller guides are the cheapest and simplest. Such devices have 2 paired sets consisting of profile runners. The outer one has a flange that holds the roller when the box moves, and is attached to the furniture wall.
The internal one is equipped with a rolling roller at the far end of the profile and is attached directly to the box. When extended to its maximum stroke length, the roller is held by a projection on the outer profile to prevent the drawer from falling out.
To get it out, you need to grab it in the middle with both hands and slightly lift the front part first, then, pulling the back part towards you until it stops, removing the entire box from the niche.
As for telescopic systems, the procedure is somewhat different. Some of them are officially listed as non-separable. However, if absolutely necessary, any model can be disassembled.
The design of the telescopic guide vaguely resembles a slide rule. An internal one with a sliding system is inserted into the outer profile, which sometimes consists of ordinary balls in the gap between the profiles. If another one is inserted into the inner one in the same way, this is already a multi-section guide.
Plastic clamps serve as travel limiters in such systems. To remove the drawer, both latches must be released simultaneously. They are located on the front end of the main profile. To turn it off, press the “flag” or “tongue” of the right and left latches, after which the box is smoothly removed.
Multi-section guides are distinguished by a greater permissible load and the ability to extend the drawer to its entire length. The procedure for separating the retractable element is similar to that described above.
Multi-section guides are most often not disassembled. The reason is simple: when dismantling the end clamps, the sliding balls will fall out, making them difficult to assemble and return to their place.
There is no point in disassembling the guides to remove the drawer. Given the possibility of full extension, it will not be difficult to separate it from the supporting section, since the fastening screws are freely accessible.
How to remove a drawer from a kitchen unit with a closer
The push-to-open system, when you lightly press the front panel of the drawer, automatically pulls it out to a distance of up to 15 cm. The finishing mechanism, on the contrary, pushes it all the way. To do this, it is enough to set the initial movement to the middle.
The presence of such options in the process of removing the box obliges one to take into account the design features. Regardless of the operating principle of the fittings (mechanical, compression), first of all it is necessary to disconnect their fastenings.
When reassembling the system, the closers will have to be adjusted again taking into account the free play to activate the push-to-open latch. This is done using a screw on the pusher rod or by moving the mating part of the latch within the longitudinal groove.
For owners of the Grass guide system, such problems will not arise in principle. The design is so perfect that the box with the supporting part simply fits into the guide groove and slides in until it clicks. The location of the clamps at the bottom causes some difficulties when removing the box, but nothing needs to be adjusted.
What does temperature distribution depend on?
Warm and cold places are located depending on the design of the refrigerator and the type of freezing.
There are two types of models with different temperature distributions:
- Single-chamber ones, in which the freezer is located inside on top. Cold air comes from it and falls down.
- In two-chamber models, the compartments are not connected, the location of the cold place does not depend on the freezer. It can be at the top or bottom. And it will be colder near the back wall, near the evaporator and ventilation holes. And in different models they are located differently.
Temperature conditions in single-chamber refrigerators
Single-chamber refrigerators have a simple design. They have one compartment, with a freezer on top and shelves and drawers underneath. The freezer compartment in such models is the coldest place.
On its walls there are tubes through which freon circulates. It cools the freezer and maintains the required temperature in the remaining compartments. Some models have a latch at the bottom of the freezer. By moving it away, you can increase the flow of cold air.
The coldest place in the refrigerator other than the freezer is the top shelf. After all, the air cooled by freon falls down. In a device of small size or with metal grilles instead of shelves, the temperature difference in the compartments is small. If under the freezer it is from 0˚ to +1˚С, below - no more than 2-3˚С.
The large dimensions of the refrigerator, as well as solid glass shelves, create obstacles for the movement of cold air. The temperature difference in such models reaches 9˚С. Therefore, at the bottom there are drawers for vegetables and other products that require this mode.
Temperature conditions in two-chamber refrigerators
The design feature of this type of appliance is that it consists of two chambers: a freezer and a refrigerator compartment. The freezer can be located at the top or bottom, but the distribution of cold does not depend on this. Which models have freon tubes running along the rear wall? It is from this that the cold air comes.
There are two types of such refrigerators: with a drip system and No Frost. For devices of the first type, it is coldest in the area of the evaporator; it is located behind the rear wall. Therefore, moisture condenses on it and on the wall.
Periodically it freezes and thaws, flowing into the drainage hole. The coldest place in a refrigerator with a drip system is all the shelves in the back near the wall.
In refrigerators with the No Frost system, cold air additionally circulates throughout the entire interior space. It is driven by fans located behind the rear wall. It is believed that in such models the temperature is the same everywhere, but this is not the case.
Apart from the areas near the wall where the fan outlets are located, the coldest shelf in the No Frost refrigerator will be at the bottom. After all, warm air rises and cold air sinks. Therefore, there are compartments for meat and fish at the bottom, and a vegetable drawer at the top.
People who first purchased such a model are often interested in which shelf is colder if the freezer is below. They are used to the cold coming from the freezer compartment. But in two-chamber refrigerators, both compartments are separated from each other by a double partition and do not communicate.
Therefore, it makes no difference where the freezer is located - the coldest place will still be at the back wall and at the bottom.
Types of repairs
Chest restoration operations are divided into three classes:
- adjustment;
- redecorating;
- complete renovation.
Products need adjustment after purchase and after complete restoration of the old one. And here we mean adjusting mechanisms, hinges, setting levels, securing loose handles. It happens that you want to repair a chest of drawers, simply updating a boring design or one that has lost its freshness. Then they resort to cosmetic restoration, based on the current condition and the desired result. A complete renovation implies the return of functionality to furniture parts and the replacement of elements that cannot be restored.
Useful tips
I strongly suggest that if you are using softwood for this project, make a few pilot holes with a drill before driving the screws into the wood as you may split the wood. This is not advisable, otherwise you will have to start all over again.
You can also make a small indentation with a large drill bit so that the screws are flush with the wood frame (the screw will not stick out of the wood). In this master class, as you can see from the photographs, I work with fairly simple and inexpensive equipment. But you can buy tools that will do a lot for you. This will not only help save time, but also prevent various types of errors.