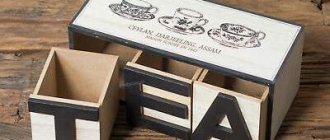
You always want tea drinking to bring not only taste pleasure, but also aesthetic pleasure. A box of tea bags doesn't look very nice, especially on a holiday table. To somehow decorate the serving of tea, tea houses were invented. You can buy them ready-made, or you can make them yourself. You can use plywood or a more affordable material – cardboard – as the basis of the house. Let's consider making a tea house from thick cardboard. To make a house you will need the following materials: 1. Cardboard. 2. Pencil and ruler. 3. Scissors. 4. PVA glue. 5. Acrylic paints. 6. File. 7. Napkins for decoupage. 8. Eggshells. 9. Sponge, brushes. 10. Twine. 11. Varnish.
The process of making a tea house. 1.To make a house, you need to make a sketch and think over the dimensions. We will make the base of the house according to scheme No. 1.
Master class “Tea house made of cardboard”
Treat yourself and your guests with a pleasant home accessory - a tea house . Similar houses can often be found in stores for handicrafts. But this house can also be made at home, it will be much more economical and interesting. A master class on how to make a tea house with your own hands was prepared by Anna Gribanova.
Materials:
- Thick cardboard (cardboard from a mailing box is used in this master class);
- Glue gun;
- Scissors;
- Simple pencil;
- Ruler;
- Twine;
- Two types of napkins (for the house and for the base);
- Acrylic white paint;
- Brush;
- A piece of fabric;
- Stationery knife;
- Acrylic lacquer;
- PVA glue.
Additional accessories for work
Spare devices. Additional tools include: sticks, cotton pads, toothpicks, hair dryer, sandpaper. These items work to create special results and to make work quicker and easier. For example, with the help of a hairdryer you can quickly dry varnish and paint, and tape will protect the house when applying paint to the base of the object.
It is better to take acrylic paints. They have a rich range, are easily mixed with each other and are well applied to the surface. Such paints have excellent contact with water, which makes it possible to wash them off during work without much difficulty. To obtain a transparent effect, a thinner composition for acrylic is used. It is used to paint internal or external surfaces and is also used to create other effects. For example, we will need brown paints for the roof when we decoupage the tea houses. The master class is presented below.
How to make a tea house out of cardboard
First you need to make blanks for the walls, roof and base of the house. For the roof you will need two parts measuring 7*12 cm.
The base will measure 12*11 cm.
The walls of the house will be of two types. Two of the four walls will measure 16.5*8.6 cm.
The other two will have a different shape. To the first shape of the walls (16.5 * 8.6) you need to draw a triangle with a height of 4.3 cm on top. Draw a window on one of two such parts (you can use something round and suitable in size as a stencil), or you can use a compass. We also draw the “door” of our house through which tea bags will be taken.
Cut out the door and window. The door can be cut with ordinary scissors, but we carefully cut out the window with a stationery knife.
To make the design on the napkin look brighter when decorating (decoupage), we cover the details of the house and the base with white acrylic paint in two layers.
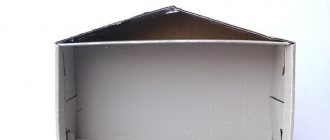
After the paint has completely dried, we begin to connect the parts, as shown in photo No. 10.
Glue the roof parts together by applying glue to the long sides of the parts.
We try the napkin on the house and make a “pattern”. Separate unnecessary layers from the napkin.
We apply glue to each side of the house in turn and carefully apply a napkin. We smooth the napkin with the same brush that we applied the glue to the house, you can help with your fingers. In this way we glue three sides of the house, since there is not enough napkin for the fourth turn.
On the fourth side we make a “pattern” from the remnants of the napkin. What’s good about the decoupage technique is that when you connect several pieces of napkin, the joints are almost invisible and the picture looks complete.
We bend and glue the allowances left on top.
Cut out the door and window. We make small cuts to make it easier to fold and glue the napkin.
We process the edge of the window and door with twine and glue it with a glue gun.
For the base we use a napkin with a different pattern. We cut out the “pattern” and separate the unnecessary layers, glue it with PVA glue, and smooth it with a brush.
We process all the edges of the roof with twine.
We randomly cut out “tiles” for the roof from cardboard in the same shape as in photo No. 29.
We begin gluing the “tiles” from the very bottom edge, slightly going beyond the border of the cardboard.
We glue subsequent layers as shown in photo No. 31.
We glue the house to the base, applying glue not to the base, but to the house itself. There is no need to glue the roof, since by removing it, new tea will “populate” the house.
Schemes for tea houses
This kitchen accessory can be made according to your own design. You just need to think through in advance all the details of the future house, its size and appearance. Then you should draw a model of the product on paper and indicate its parameters.
It is also possible to use ready-made diagrams, which will save time on making crafts.
The following scheme is suitable for making both one-story and two-story houses. The parameters of the base, roof and wall length are the same for both options. The height depends on the number of floors.
The presented sketches can be adjusted: the designs can be simplified or complicated. The next photo shows a finished craft with a simple structure.
More complex structures consist of several buildings and include windows, balconies, and chimneys. Such houses are convenient for storing different types of tea.
The house can accommodate not only tea bags, but also sweets. The candy dish will serve as a fenced yard, which is attached to the wall of the house.
In addition to choosing the design of the product, you need to decide on the material. The most suitable materials for kitchen crafts are cardboard and wood.
Cardboard house
This option is the simplest. For work, you can use either sheets of cardboard or a box of food or household appliances. The main thing is that the material has a density of at least 200 g, since the product must hold its shape well.
For work you will need materials and tools:
- thick cardboard;
- pencil;
- ruler;
- stationery knife;
- PVA glue or “Moment”.
- Using a pencil and ruler, draw all the details of the diagram on cardboard, strictly adhering to the indicated dimensions.
- Using a utility knife, cut out the parts along the drawn lines: base, front and back walls, 2 side walls and 2 roof parts. In the front wall of the future house it is necessary to make a round window and a semicircular door from which tea bags will be taken out.
- Additionally, cut 4 strips of cardboard 3 cm wide. Their length should be equal to the height of the walls, that is, 16.5 cm. Make a cut along each strip so that they can be easily bent.
- Glue 4 walls of the house using folded strips. Each strip should be attached to the edges of two walls according to their height. This will strengthen the structure at the corners. Let the glue dry.
- Cut out 3 more strips of cardboard, 3 cm wide. But their length should be the same as that of the walls - 9 cm. Make cuts along the strips and bend them.
- Glue the connected walls to the base using bent strips. Cardboard strips should be attached to the base and bottom of the walls, with the exception of the facade.
- Make a removable roof. Glue the 2 parts at an angle so that the roof fits exactly on the box of the house. There is no need to glue the roof to the walls. It should be removable for easy placement of tea bags into the house.
Ambient technique
Three-dimensional images are in demand not only in cinema. Designers all over the world successfully apply the laws of perspective in interior decoration.
Ambiente is a technique for “deceiving the eyes,” that is, creating a composition that has optical depth. This is a purely visual technique that provides the effect of a three-dimensional image in the painting. Of course, such images look more interesting because they look “alive.”
3D drawings will transform your product
The image created using the ambient technique looks amazing
Ambient decoupage is available to more experienced craftsmen, since creating a three-dimensional image is much more difficult and will require some effort and special materials.
The creation process follows the same pattern as in previous master classes. The main difference is the creation of a three-dimensional image, for which relief paste is applied using a palette knife under the edges of the picture. It turns out that one drawing is in different planes: the center is slightly removed, and the edges move forward, beyond the surface of the house.
Some details in the drawings, for example, a street lamp or flowers, are processed with 3D gel. Using the paste, you can not only make a tiled roof, but also draw brickwork on the house using a regular toothpick.
Tea drinking should bring not only taste pleasure, but also aesthetic pleasure. Therefore, a box with tea bags should be replaced with a beautiful home accessory - a tea house. You can make it yourself. To make it yourself, you will need simple materials, a couple of hours and a little imagination. And the result will be an original product that will harmoniously combine with the design of the kitchen and decorate the tea ceremony.
Tea drinking should bring not only taste pleasure, but also aesthetic pleasure. Therefore, a box with tea bags should be replaced with a beautiful home accessory - a tea house. You can make it yourself. To make it yourself, you will need simple materials, a couple of hours and a little imagination. And the result will be an original product that will harmoniously combine with the design of the kitchen and decorate the tea ceremony.
Wooden house
Working on a wooden house is a more labor-intensive process. Cutting out the structural parts takes the most time. This can be done with a hand or electric jigsaw, as well as a special computer-controlled tool.
As a material for the house, you can use a board made of natural wood or a sheet of high-grade plywood. The second option is more common. The optimal thickness of the walls and roof is 6 mm, the base is 10 mm.
To make a wooden house you will need:
- pieces of plywood;
- paper;
- pencil;
- ruler;
- jigsaw;
- file;
- fine grain sandpaper;
- PVA glue or carpentry glue “Moment”.
- Draw on paper drawings of product parts according to the specified dimensions. Transfer the image onto plywood. To do this, you can use a carbon copy.
- Cut out each detail along the contour, but do not bring the blade to it by 0.5-1 mm. The remaining material will be removed later with a file. The house consists of 7 parts: a base, 4 walls and 2 roof parts.
- File the parts and sand the inner and outer surfaces with sandpaper.
- Assemble all parts of the product using PVA glue. Apply glue to the ends of the connecting parts. Then press all the parts together and secure them for 3 hours with rubber bands or masking tape. Excess glue is removed with a napkin. Without adhesive fastening, it is necessary to leave the roof or base of the house in order to lay tea through the hole.
- After complete drying, the house should be freed from rubber bands or tape. If there are glue residues or unevenness on the product, it must be carefully sanded.
How to make tiles?
In order for the tea house to have a beautiful finished look, you need to improve its roof. Houses with tiled roofs look original. There are several types of material for its manufacture, each of which has a specific effect.
From putty
To work you will need:
- construction putty or structural paste;
- palette knife;
- toothpick;
- fine-grained sandpaper;
- soft brush;
- brown acrylic paint.
- Using a palette knife, apply a thin, even layer of putty to the roof surface.
- Using a toothpick, draw “scales” of the tiles over the wet mass.
- Leave until the putty is completely dry.
- Sand the dry surface with fine sandpaper, carefully removing any irregularities. Remove dust from the grooves with a brush.
- Paint the roof brown.
Made from corkboard
Required materials and tools:
- sheet cork;
- breadboard knife;
- pencil;
- ruler;
- board;
- wood glue “Moment”;
- brush;
- black and red terracotta paints.
- Mark the rows on the roof where the tiles will lie.
- Cut the tiles from cork using a breadboard knife, having first made markings on the cork sheet. Before starting work, you need to place a board under the corkboard. The size of the tiles can be different, depending on the size of the roof, the method of placement (protruding beyond the edges or flush with the roof) and your own preferences. Approximate parameters: width - 1.5 cm, length - 2.5 cm.
- Round the edges of the cork rectangles using a breadboard or collet knife.
- Glue the tiles to the roof. Apply adhesive to the bottom edge of the roof and lay out the first row of shingles. Continue laying with an overlap, rising to the top. Glue should be applied to the horizontal marking line and the top edge of the underlying row. In this way, attach the tiles to another part of the roof. Give time to dry.
- Paint the roof. First, carefully paint the tiles black, not forgetting the ends and gaps. After drying, lightly apply red terracotta paint to the tiles, only so that the black color is visible in the pores. If desired, the roof can be aged a little and covered with moss. To do this, use a semi-dry brush to mark the green areas on the tiles. Dry the product.
Tiles can also be made from ordinary cardboard, for example, from pieces that were left over after working on a tea house. But a cork roof is very similar to real tiles.
From eggshell
To make a roof you will need:
- eggshell;
- PVA glue;
- brush;
- acrylic paints.
- Break the shell into small pieces.
- Using PVA glue, fill the entire roof space with egg fragments. The shell must be glued with the concave side inward. The size of the fragments and the distance between them may vary.
- After the glue has completely dried, cover the roof with brown paint. It must be applied in a thin layer so as not to fill the gaps between the egg fragments. After drying, apply another thin layer of paint. You can add other shades to the roof: beige, orange, red, green.
Basic materials for creativity
The set of tools needed for decoupage includes:
- Scissors. They must be sharp so as not to spoil the ornament. It is better to have several pieces of various lengths and shapes in stock.
- Various brushes. Brushes are necessary in this technology. They are used to apply paints and adhesives. You need to choose brushes depending on what they are intended for. A flat artificial brush of medium hardness No. 8 or No. 10 is selected for the glue. For varnishes and paints, it is necessary to use medium-soft brushes made from pony hair. To create special results, you will also need a regular toothbrush. In addition to brushes, medium sponges and rollers are also useful for applying paint, glue and varnish. Foam sponges are needed to cover large surfaces with paint when developing the background layer. Rollers are convenient for gluing illustrations of huge volumes and dense pictures.
Glue. It can be different: a special glue composition or ordinary PVA, and for fabrics we use glue that is intended for this material.
Protective varnish is applied to the product against external damage. It is used at the beginning of work and at the end, usually two layers are done. There are acrylic varnishes, alkyd varnishes and a special varnish for creating craquelure. Having prepared the basic raw materials, you can begin to create tea houses. Decoupage (photos will be presented below) is an interesting and exciting activity.
Decoupage of the product
Decorating a tea house using the decoupage technique allows you to apply any image to the product without having any drawing skills. To decorate the workpiece, you will need simple materials, the main one of which is a paper napkin with a pattern.
Decoupage of a product can be done in two ways.
Simple
This version of decoupage is considered simple. It does not require any special technical skills, so even beginners in this matter can handle it.
Necessary materials and tools for simple decoupage:
- house preparation;
- decoupage napkin or decoupage card;
- PVA glue;
- water;
- primer;
- acrylic paints;
- sponge;
- stationery polyethylene file;
- brush;
- decoupage varnish.
- Remove unevenness from the workpiece using sandpaper. Cover the product with primer or white acrylic paint using a sponge. Using a brush cannot achieve such an even application of primer.
- Prepare a napkin with an image. Do not cut, but carefully tear out the necessary elements from it. A napkin with torn edges will better “merge” with the surface of the house, the transitions from paper to workpiece will not be visible. Remove the lower white layers from the fragment, leaving only the upper colorful part.
- Apply the image to the workpiece. Place the napkin face down on the file. Moisten the picture with water and carefully straighten it with your fingers or a wet brush. Then take the file and attach it with the front side of the picture to the wall of the house. Smooth the file over the surface with your hand and remove it, leaving the napkin evenly glued to the wall. Using a brush, cover the image with PVA glue diluted with water and leave to dry. Continue working with other elements.
- Cover the walls of the house with decoupage varnish.
If desired, the image applied to the house can be completed with acrylic paints: make the picture of the napkin brighter or add your own strokes to the walls. After drying, the product must be coated again with finishing varnish.
Candle with coffee beans
For this craft you will need: paraffin, wick, grains, candle mold.
Melt the paraffin and add coffee beans to it. Hold the wick by the tip and place it in the middle of the candle mold. Pour paraffin into it. Hold the wick in a vertical position until the paraffin hardens.
If desired, remove the paraffin blank from the mold or leave it inside.