- November 21, 2018
- Crafts
- Natalia Penchkovskaya
The “Eternal Flame” craft is made all over the country in kindergartens and schools, decorating festive corners dedicated to May 9th. This great holiday has been celebrated for many years. During the Great Patriotic War, many people died who sought the liberation of their native land from the fascist scourge. After the victory over a cruel enemy, monuments to fallen soldiers were erected in many countries and cities, in front of whom the Eternal Flame burns.
The crafts that children give to veterans of long-standing events can be different. These are postcards with images of doves of peace and holiday fireworks, military equipment and flowers. You can make voluminous stars with fire from paper. Or you can use a different material inside. In this article we will look at several options for making the “Eternal Flame” craft from paper. You will learn how to make a three-dimensional star in three ways, and how to make a beautiful multi-colored “flame” yourself. Making such crafts is not difficult, and the photographs and detailed instructions given in the article will help you quickly complete such an important task.
Star for work
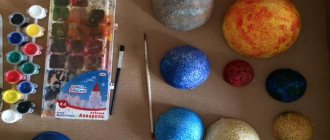
For the “Eternal Flame” craft, by May 9, you can make a three-dimensional star, from the center of which a flame will burst out. You can do it in several ways. Let's consider the first option, a step-by-step photo of its production is located below in the article. Each star ray is made separately. You will need five blanks from thick A4 sheet. You can immediately take colored double-sided printer paper, choosing the appropriate color, or after making the figure, you can paint it with gouache paints.
To create a star ray you need a square. It can be easily made from A4 sheet by folding the adjacent sides of the rectangle together. The excess paper is cut off with scissors and work begins on the star from the resulting square. The workpiece must first be folded in half horizontally. In photo No. 2 you can see how the workpiece is then folded step by step.
The resulting part is cut at an acute angle and then the paper is straightened by sticking your hand inside. All other elements of the star are made in this way. When all the parts are ready, they are glued together. For convenience, you can cut out the base of the “Eternal Flame” craft from cardboard, coat its surface with PVA glue and place all the rays close to each other.
Tools and materials
To make an eternal flame from paper you will need:
- star pattern;
- cardboard (large sheets);
- red napkins or tissue paper;
- scissors or stationery knife;
- red or bronze paint (it is better to use gouache);
- brush;
- glue;
- ruler;
- pencil;
- scotch;
- wallpaper with a marble pattern.
When you have stocked up on materials, you can begin the master class on how to make an eternal flame with your own hands, making each detail of the craft step by step, and then combining everything into one whole.
Assembling a star according to a drawing from individual rays
For a three-dimensional star for the “Eternal Flame” craft, you need to draw a drawing of each ray separately. This is done using a ruler and a simple pencil. How to draw it can be clearly seen in the first frame of the photo below. First, draw a segment corresponding to the size of the beam. Then equal segments equal to the height of the craft are measured in one direction and the other and dots are placed.
Stepping back 2-3 cm from the edge, move the marks below. By connecting all the points together, we get an irregular rhombus shape, one corner of which will be sharper. The same drawing is made nearby, only a thin strip is drawn on the edge of the outer side for gluing the paper. The same elements need to be made on the short inner sides of the diamond-shaped figure. The edges of these strips are cut at an angle so that when folding, the corners at the ends do not interfere.
Then make paper folds along the dotted lines and glue the first part of the star. You need to make five such blanks and then connect them together. How to do this can be clearly seen in the photo above.
Crafts from dough and plasticine for May 9: tank, plane
Children love to sculpt with plasticine. So why not perpetuate some crafts by replacing plasticine with salt dough. You can decorate such crafts ready-made or add food coloring to the dough in advance. The recipe is quite simple:
- Mix flour and fine salt in a 2:1 ratio
- Dilute with water and knead until it reaches the consistency of plasticine.
- You can add a little vegetable oil for plasticity
To connect the dough parts, use a brush moistened with water.
So, the dough or plasticine is ready, but you will also need a board (you will sculpt on it) and a knife (when working with the dough).
- Sculpt the individual parts of the tank: 6 wheels (make a sausage and cut it), body, turret and muzzle
- Connect the parts: attach 3 wheels to the body on the sides, a tower on top, and a barrel to it
- Roll a thin long sausage and wrap it around the wheels to form tracks
Tank made of plasticine or salt dough for kids
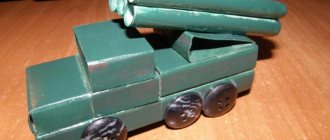
You can make a larger tank by preparing the necessary parts. You can make things easier for yourself. For example, to make the tower the correct rectangular shape, take a matchbox as a base, wrapping it in plasticine. A tube or rod from the handle in the middle will give the muzzle stability.
Tank made of plasticine or salt dough
Modeling an airplane is no less exciting:
- Sculpt the details of the hull, wings, cockpit
- Connect the parts. For realism, you can pre-mix the parts of the body and wings with a sausage made of yellow plasticine - this will create camouflage
- Make a propeller and stars
Another version of an airplane made from dough (you can also use plasticine)
- Mold the body of the aircraft, bend the part slightly upward at the base
- Make wheel and fender parts
- Connect the parts
- When working with dough, secure the parts additionally with toothpicks
- Make several propeller parts, connect and attach with a toothpick
One-piece star made of thick cardboard
To create such a star you will need thick cardboard, a protractor and a compass. First you need to use a compass to draw a circle with a diameter corresponding to the size of the star. Then place a dot anywhere on its circumference. From it, use a protractor to measure angles of 72 °C each. They will connect in the center of the circle at one point. These are the rays of a star, which are combined with a pencil through one using a ruler.
Then, using scissors, cut out a star along the contours and bend the cardboard along the drawn lines, smoothing the edges well. If the cardboard is thick and the folds are carefully ironed, then the figure will perfectly hold the shape of a three-dimensional star anyway. If you want to strengthen it further, then you need to outline the figure from below with a pencil and cut out the base along the contours. All that remains is to attach it by placing a couple of drops of hot glue along the edges. After completing the main work, the star is painted with gouache paint. After drying, you can coat the top of the work with acrylic varnish, then the paint on the craft will not stain your hands.
– pedestal
Despite the fact that instructions have already been given on how to make an eternal flame with your own hands, the master class would be incomplete without mentioning how to make a pedestal. After all, it is also part of the layout. In our case, the pedestal consists of two parts: the first will stand, the other will lie. The star with the flame will be placed on the last one.
Instructions on how to make an eternal flame with your own hands - the first part of the pedestal:
- Take a sheet of cardboard, a pencil, a ruler and scissors.
- Place the sheet vertically in front of you.
- Draw a strip from the edge, small in width but long, covering the entire height of the sheet. You will get the first strip.
- Mark a distance from the line that will be equal to the width of the finished star (or will be slightly larger).
- By drawing this width, you will get a second stripe.
- Make another strip, which will be the same width as the first. Strip number 3 will come out.
- Draw a fourth strip, which is equal in width to the second.
- Make stripe #5 equal to stripes #1 and 3.
- Fold all 5 strips.
- Make a box along the folds, but without the top and bottom.
- Glue strips 1 and 5 together.
- Make small cuts on one side on the folds of the thin sides of the box.
- Close the box.
The first part of the pedestal is ready. It can either be painted or covered with wallpaper with a marble pattern.
The second part of the pedestal is made similarly to the first, only there are a number of features:
- The width of the second part should be equal to the width of the first.
- The height should be slightly larger than the first one. This is done quite simply: increase the size of the side walls.
- The second box should be closed on both sides.
After you assemble the second part of the pedestal, decorate it with paint or wallpaper.
How to draw fire
You have already learned how to make the main part of the craft in the form of a three-dimensional star. Now let's look at ways to make fire from paper. It is mainly made from colored double-sided sheet. Yellow, orange and red colors and their shades are suitable.
Fire is usually drawn as follows. The flame is made rounded from below, and pointed corners of different sizes are drawn on top. Often the tallest element is in the center. The corners can be simply pointed, or they can have rounded sides. In the picture above you can see that the craft is assembled from two parts. The large flame is drawn along the contours of yellow paper, and the inner flame is made red or orange, and smaller in size.
Bonfire for New Year's performance
What's a New Year's fairy tale without a luxurious bonfire?! Do you remember how we warmed ourselves by the fire for Twelve Months? Let’s try to “light” a fire with our own hands. A cool decoration for a festive performance and a cozy interior element for the whole winter.
A bright fire made of felt, smoldering coals made of sticks, foil and New Year's garland - it is impossible to take your eyes off such beauty. Be sure to make a safe New Year's bonfire at home or offer to make an interesting craft for your friends for a school performance. The New Year's decorations will certainly be appreciated by both guests and spectators.
How to make a fire from felt?
Soft and pleasant to the touch felt will be an excellent basis for creating a New Year's bonfire. And bright colors will leave no chance for him to go unnoticed.
You will need:
- felt in yellow, red and orange colors,
- scissors,
- threads or glue,
- filler (synthetic fluff) - optional,
- paper templates,
- sticks and stones.
Hard felt with a thickness of 1.2 mm is ideal for work.
1. Make three arbitrary templates - tongues of fire: large, slightly smaller and very small. Transfer to felt.
2. The fire must consist of two parts, each of which must have five layers. The biggest one is red. On both sides of it, glue two smaller pieces: orange and yellow. Now make the cuts to create the 3D effect later.
3. Collect some sticks and stones from the street, wash them and dry them. Collect the hearth parts.
Congratulations! The fairy fire is lit.
But if you want to make a fire in the shape of a soft toy, make six parts: two large, two smaller and two smallest. Sew as shown in the photo below and fill with synthetic down. To create a fabulous fire, you need to sew together three three-dimensional parts.
If desired, make soft toys such as firewood, cookies and marshmallows from felt.
With such a fire you can arrange various children's games: jump over it; “cook” food over a fire, imagining yourself as fairy-tale characters; play Indians and even learn English - why not?
How to make fire out of paper
Let's now look at how a light cut out along the contours looks in color. The large element is outlined on an orange background, drawing with a pencil several flames of different sizes. The lower part is cut into an even strip so that the craft can then be inserted into the slot in the center of the star.
Then cut out pieces from yellow and red flowers. They are attached only along the bottom edge with glue; the remaining parts of the design must be free. To add volume, they can be slightly tilted to the side with your hands.
collecting all the details
When all the components - the flame, the star and the two parts of the pedestal - are completely dry, you can begin to assemble them.
Operating procedure:
- Place the second part of the pedestal on a table or other surface.
- Place the first part on the second, close to the edge. You can secure it with tape.
- Make a small hole in the center of the star. The most convenient way to do this is with a thick needle or awl.
- Insert the flame into the resulting hole. This must be done carefully so as not to tear the parts. To do this, you can help yourself with a needle or toothpick.
- Place the star in the center of the lower part of the pedestal, having previously lubricated its support with glue.
- Spread the flame.
The eternal flame is almost ready.
Fire from squares
A volumetric fire, assembled from individual squares of different colors, can be glued to the drawn star of a postcard for May 9th. To do this, you can use either regular double-sided colored paper or plain napkins, corrugated or parchment sheets.
They are laid out around something dense and round. This could be a candle or a simple mayonnaise jar. The sheets are laid out one on top of the other with a slight shift so that the corners do not overlap one another. Then the paper is collected by hand from all sides and pressed into the center. You need to press it down well so that the folds of the folds hold the flame in a vertical position. This procedure can be done layer by layer, or you can assemble all the layers at the same time.
Fire Safety Crafts
Here are some ideas for crafts on the topic of fire safety. As you know, the main enemy of all firefighters is fire.
In order to depict a fire or a bonfire, you will need six cardboard rolls, brown gouache, a brush, PVA glue and thin paper in red, yellow and orange. Paint the rolls and stack them in two rows, like logs in a fire.
Place small lumps of paper between them, having previously lubricated the joints with glue.
I am fire! I am a friend of the guys. But when they play pranks on me, I then become an enemy and burn everything around!
Only a team of brave and courageous firefighters can cope with the fire. You can draw these characters by making a handprint and completing the necessary details.
Our fearless firefighters race to fight the fire in fire trucks that can be drawn in minutes from a footprint.
This is how firefighters save people from a burning house. This painting was made using colorful felt, glue and scissors.
Guys, remember that you can’t joke with fire. Those who are not careful with fire can cause a fire!
Fire Safety Crafts
4.3 (86.67%) 12 votes
Volumetric flame
The next type of craft for the holiday of May 9 is made on a cylindrical base made of cardboard. Pasting with colored paper occurs in order of decreasing height of the flames. First you need to use a flexible meter to measure the perimeter of the side of the tube for the base. Then draw pointed corners with rounded sides on a rectangular sheet of paper. The height of the first blank will correspond to the inner layer of the paper light. The remaining several layers are made lower so that all the flames are clearly visible.
Gluing occurs alternately in several rows. You can use either a glue stick or PVA glue. Such a craft can be placed at an exhibition dedicated to Victory Day, placing it at the foot of the stele drawn on the poster. To do this, you can make a vertical stand with a drawing or photograph of a memorial pillar. Under such a poster, on the table surface, you can place a small box, for example, from candies, cover it with colored paper and make a hole in the center for the fire according to the size of the cylindrical base. Draw a star around it. It will seem that there is actually a fire burning in front of the stele. In addition, you can run electrical wires under the base of the fire craft and connect a small light bulb. Then the fire will glow like a real one.
Crafts from dough and plasticine for May 9: tank, plane
Children love to sculpt with plasticine. So why not perpetuate some crafts by replacing plasticine with salt dough. You can decorate such crafts ready-made or add food coloring to the dough in advance. The recipe is quite simple:
- Mix flour and fine salt in a 2:1 ratio
- Dilute with water and knead until it reaches the consistency of plasticine.
- You can add a little vegetable oil for plasticity
To connect the dough parts, use a brush moistened with water.
So, the dough or plasticine is ready, but you will also need a board (you will sculpt on it) and a knife (when working with the dough).
- Sculpt the individual parts of the tank: 6 wheels (make a sausage and cut it), body, turret and muzzle
- Connect the parts: attach 3 wheels to the body on the sides, a tower on top, and a barrel to it
- Roll a thin long sausage and wrap it around the wheels to form tracks
Tank made of plasticine or salt dough for kids
You can make a larger tank by preparing the necessary parts. You can make things easier for yourself. For example, to make the tower the correct rectangular shape, take a matchbox as a base, wrapping it in plasticine. A tube or rod from the handle in the middle will give the muzzle stability.
Tank made of plasticine or salt dough
Modeling an airplane is no less exciting:
- Sculpt the details of the hull, wings, cockpit
- Connect the parts. For realism, you can pre-mix the parts of the body and wings with a sausage made of yellow plasticine - this will create camouflage
- Make a propeller and stars
Another version of an airplane made from dough (you can also use plasticine)
- Mold the body of the aircraft, bend the part slightly upward at the base
- Make wheel and fender parts
- Connect the parts
- When working with dough, secure the parts additionally with toothpicks
- Make several propeller parts, connect and attach with a toothpick
From the tape
Glue several sheets of double-sided colored paper in matching colors together. Then draw flames on the top side and cut them out with scissors along the contours.
All that remains is to simply roll the tape with carved edges into a roll and place it vertically. Spread the edges of the lights nicely in different directions and glue the edge onto the last turn.
Templates
Many children are happy to use glue, scissors and paper, so you can make a postcard template that they will finish on their own - cut out and glue ribbons, inscriptions, laurel, medals. You can also make a fire template using two or three types of colored paper. A win-win option is a star template - it is transferred to thick paper or cardboard and then cut out.
For crafts, use the templates:
Design of the “Eternal Flame” stand
Now you know how to make fire and a three-dimensional star out of paper with your own hands. But the craft for the May 9 holiday will look beautiful if it is additionally decorated with paper flowers. After all, no one comes to the monument to fallen soldiers empty-handed. Everyone tries to bring at least a small bouquet of flowers as a sign of respect to the soldiers who gave their lives for the freedom and well-being of other people.
Let's decorate the craft with large white flowers. They can be cut according to patterns of different sizes. First, attach a large flower, and glue a small one inside, and place the petals with a slight shift to the side so that all the details are visible. In the center of the flower, you can make a contrasting color core with an applique or draw it with markers. Add green leaves between them, and the craft is ready!
Be sure to make such a craft with the guys for this great holiday, so that the younger generation remembers the terrible consequences of the war and never allows such a disaster to happen in our days!
Bonfire for New Year's performance
What's a New Year's fairy tale without a luxurious bonfire?! Do you remember how we warmed ourselves by the fire for Twelve Months? Let’s try to “light” a fire with our own hands. A cool decoration for a festive performance and a cozy interior element for the whole winter.
A bright fire made of felt, smoldering coals made of sticks, foil and New Year's garland - it is impossible to take your eyes off such beauty. Be sure to make a safe New Year's bonfire at home or offer to make an interesting craft for your friends for a school performance. The New Year's decorations will certainly be appreciated by both guests and spectators.
How to make a fire from felt?
Soft and pleasant to the touch felt will be an excellent basis for creating a New Year's bonfire. And bright colors will leave no chance for him to go unnoticed.
You will need:
- felt in yellow, red and orange colors,
- scissors,
- threads or glue,
- filler (synthetic fluff) - optional,
- paper templates,
- sticks and stones.
Hard felt with a thickness of 1.2 mm is ideal for work.
1. Make three arbitrary templates - tongues of fire: large, slightly smaller and very small. Transfer to felt.
2. The fire must consist of two parts, each of which must have five layers. The biggest one is red. On both sides of it, glue two smaller pieces: orange and yellow. Now make the cuts to create the 3D effect later.
3. Collect some sticks and stones from the street, wash them and dry them. Collect the hearth parts.
Congratulations! The fairy fire is lit.
But if you want to make a fire in the shape of a soft toy, make six parts: two large, two smaller and two smallest. Sew as shown in the photo below and fill with synthetic down. To create a fabulous fire, you need to sew together three three-dimensional parts.
If desired, make soft toys such as firewood, cookies and marshmallows from felt.
With such a fire you can arrange various children's games: jump over it; “cook” food over a fire, imagining yourself as fairy-tale characters; play Indians and even learn English - why not?
Subject Features
Every educational institution pays great attention to fire topics, and the task of parents is to promote such upbringing of the child at home. When making crafts, children gain certain labor skills and develop fine motor skills; they become familiar with fire safety rules and the difficulties of working in the Ministry of Emergency Situations.
Crafts can be taken to kindergarten or school, submitted to a competition, or simply used as a toy.
In the works on the topic under consideration, the following main plots stand out:
- What causes a fire and how dangerous it is. You can reflect the following directions: “Matches are not a toy”, “Be careful with fire”, “Do not light a fire in nature”, “From a spark begins a flame”, etc.
- Actions in case of fire. Of particular interest are fire extinguishing means and equipment. A bright fire truck is a popular craft. By making a fire shield, the child gets acquainted with the basic methods of fighting a fire.
Children's crafts can be created from different materials depending on the age and skills of the child. It is important to start with simple things, gradually moving on to more complex products.
Flowers on a postcard
What's a card without flowers? Each flower is cut out according to a template. To make it seem voluminous, cut the petals and wrap them around a pencil, or pass them from the back with a scissors blade. Connect 2-3 parts together, then glue them to the canvas. The core is decorated with a bead (button) and flowers are framed with greenery.
A bay sprig is collected from individual leaves. Each element is bent lengthwise, glue is applied to one side and placed on the picture. The dried leaves are slightly straightened. The composition turns out to be voluminous and festive.
Volumetric tulips folded using the origami technique look great on applique. This bouquet can decorate any picture. Tulip heads are collected from a square sheet according to the diagram, placed on a boiler tube wrapped in corrugated paper and attached to a postcard or canvas, greenery is added.
The size of the tulip head depends on the size of the square. The quality of the paper determines the appearance of the product.
Craftsmen with paper rolling skills will enjoy making a postcard from quilling elements. The technique allows you to create amazingly beautiful paintings and panels. I can’t even believe that they were assembled from ordinary strips of paper.
A handmade gift for May 9 brings warmth and joy. A miniature eternal flame is a great idea for a souvenir. Prop models are suitable for stage design. All of them are easy to make, you just need to put in a little effort.