Undoubtedly, a glass waterfall is a wonderful addition to the interior. Streams of water flowing down glass have a beneficial effect on the human consciousness, pacifying emotions and calming the mind. Moreover, it has a beneficial effect on the microclimate of the room, making the air humidified. Another good news: you can create such a waterfall yourself at home.
Streams of water flowing down glass have a beneficial effect on the human consciousness, pacifying emotions and calming the mind.
Outdoor installation
You should consider a method for making an artificial glass waterfall that will be installed outdoors. This design resembles a real waterfall, with the only difference being that the water in such a waterfall flows over a glass surface.
To create such a waterfall yourself, you need:
- beam;
- wooden boards;
- veneer;
- paraffin paste;
- masking tape;
- tempered glass of the required size;
- low-power sediment for water circulation;
- plastic pipe;
- brackets with fasteners;
- decorative stones.
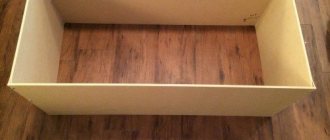
Using wooden boards, you need to make a box that is the right size for the glass. The inside of this structure should be treated with paraffin paste. This will protect the wood from contact with water. In addition, it is necessary to treat the wood with antiseptic agents .
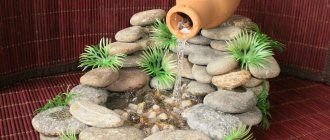
Nature at home
With the help of a floor waterfall, you can bring a piece of nature into your home. In addition, the flow of water reduces the formation of dust and promotes air humidification. Moreover, an indoor waterfall is not just a static product that is usually installed in one place and remains there until the end of its service.
You can move it to any other corner of the house, install it in a room, move it closer to the window or door - it’s up to you to choose and experiment.
At the same time, some people believe that an artificial indoor waterfall requires a lot of free space, but this is not so. Summer residents are sometimes surprised how it can fit without taking up almost anything in the room. Naturally, this is not a garden pond or a swimming pool.
Sequencing
You can take a frame part as a basis. To make it, you will need timber. The internal dimensions of the structure itself should allow the box to fit inside the frame and take a stable position.
When the box is already placed inside, its bottom and walls are lined with plastic film, preferably dark in color and opaque. The film is used to completely seal the structure. For this purpose, you can lay out the film in several layers.
Then you will need to cut 2 boards the same size as the height of the glass. Their function is to fix the glass wall to the frame. Veneer will be needed as finishing. Wooden lining may also be suitable for this purpose.
Tempered glass is mounted in the center of the box, above which a board is installed to secure the glass. When this work has already been completed, you can proceed to installing the pump and connecting plastic pipes through which water will circulate.
To attach the pipes to the side posts, you need to use special rings, which are sold at a plumbing store. The top pipe is additionally equipped with a hole so that the leaking liquid flows directly to the top of the glass. The hole size can be arbitrary. To begin with, it is usually done small, and then, if necessary, it can be increased.
After this, the frame must be sheathed with a special material intended for these purposes, and then painted. The wooden components of the structure are coated with a transparent water-repellent varnish. Stones are placed inside the box as decoration, after which water is poured into its lower part and the pump is turned on.
After connecting the pump to the electrical network, you should check the operation of the fountain. As an additional decoration, you can create color effects using LED lighting.
After connecting the pump to the electrical network, you should check the operation of the fountain.
Video description
The installation of a tank for a decorative pond and fountain is shown in the video:
Making a bowl with your own hands
If you can’t find a suitable container in the store, you can take a different approach to the question of how to build a fountain in your dacha with your own hands. To do this, you will need sand, geotextiles and pool film or regular thick polyethylene film (it is cheaper):
- First, a pit of the required size and depth is dug.
- After removing roots, stones and other protrusions, the bottom is carefully compacted and covered with sand.
- Then the pit is completely covered with geotextiles to prevent plant germination.
- The film is laid loosely on top of the geotextile. It should not be pulled, and the edges should extend to the surface of the ground at least 25 cm.
- Along the perimeter, the edges of the film are pressed with boulders; pebbles and rounded stones without sharp edges that can damage the waterproofing are also placed on the bottom of the bowl.
Ready reservoir for a fountain Source i0.wp.com The cable from the pump is brought to the surface, hidden between boulders. To reach it to the outlet, dig a shallow groove from the reservoir and lay the cable in it, after passing it through a corrugated or plastic water pipe.
DIY home waterfall
You can also create a home waterfall with your own hands, which will look organic in the bedroom or living room.
To create this masterpiece you will need the following materials:
- organic glass (size is selected individually);
- light bulbs and other materials for creating lighting;
- compressor (least noisy);
- vinyl hose;
- check valve
Before starting work, you should make a drawing of the future waterfall. It is necessary to take into account such qualities as compactness and convenient location. The width and height of the product should be calculated based on the room parameters.
The upper part of the structure must be equipped with an additional cover to protect the product from dirt and dust.
To give the waterfall not only aesthetics, but also functionality, you can install lighting in it. For this purpose, you should use neon waterproof lamps , which are sold in hardware stores. Their characteristic feature is a bright light that water cannot drown out. The location of these lamps is also selected at your own discretion.
https://youtube.com/watch?v=YC76IUaxh-k
To create a home waterfall using glass, it is necessary to develop a diagram that will specify its size and parameters, materials for each part, installation locations for lighting and deposits, and the nature of the finish.
The very first foundation for the future glass waterfall is being built. The main requirements for it are good strength and tightness. Its dimensions should allow the glass wall to easily fit into it. Then you need to install a check valve, power supply elements and an air supply system.
Do not forget that the valve turns off the water supply, as well as completely solidifies it. Moreover, you should pre-arrange the lighting. For this you can use both neon and LED lamps. After installation, be sure to check their operation.
Next comes the installation of organic glass, after which the operation of the backlight is additionally checked.
At the bottom of the tray there is a glass container with water. It is imperative to maintain the same water level to ensure proper operation of the system. The oxygen bubbles supplied along with the water must have the same shape and size. To achieve this effect, you will need an acrylic sprayer with additional holes. By adjusting them, you can achieve excellent results during water supply.
Then you need to decide where the water tank will be located. It can be mounted in the upper part of the structure or at the junction of the floor and foundation. First, wash the glass surface using window cleaner. It should also be taken into account that for such a structure you should use only distilled water that has undergone purification.
Care and maintenance rules
There are several basic rules for servicing hydraulic structures, which are presented:
- diagnostics and performance testing of all equipment;
- replacing, if necessary, all failed components, assemblies and parts;
- cleaning equipment to remove all dirt and accumulated deposits;
- timely replacement or topping up of water.
In summer, artificial reservoirs do not need weekly cleaning, but if necessary, evaporating liquid should be added. High temperatures and high humidity levels contribute to the very active development of all kinds of pests that need to be destroyed with special chemical or biological means. As fall approaches, remove all fallen leaves and debris, trim plants, drain water, and remove equipment.
It is recommended to cover a completely drained decorative pond with film, board boards or a thick tarpaulin. If there are fish, an electric water pump should be installed. In the spring, when preparing a hydraulic structure for the summer season, a water vacuum cleaner is used, which easily and quickly removes all contaminants from the bottom, walls and stones.
Self-construction of an artificial country waterfall has become a very fashionable trend in recent years in the context of modern landscape design. Such hydraulic structures look very unusual and impressive, and their construction with your own hands is not too labor-intensive or excessively expensive, therefore it is quite affordable for most owners of personal plots.
Wall design
To make a wall waterfall on glass, you need to know some nuances. This waterfall will be installed on the wall, and the cost of a hand-made product will be 3-4 times cheaper than one purchased in a store.
You can come up with a waterfall decor based on your own taste. However, the principle of creating such a product will always remain unchanged.
To work you will need:
- pump;
- pipes;
- fittings, gutters, plugs;
- transparent hose;
- plugs for plastic pipes;
- polyurethane glue;
- gloves.
Using glue, the individual parts of the future structure are fastened together. To give a more aesthetic appearance, you can use colored glass, as well as varnish and stain. In addition, you will need tin, wood veneer, waterproof plywood, pieces of wood, rags, wires and lamps.
To give a more aesthetic appearance, you can use colored glass, as well as varnish and stain.
Styles
In landscape design, the number of styles is no less large than in the interior. But if we talk about the design of the waterfall, then their list is not so long. In principle, all diversity can be reduced to three areas:
- Natural style. Suitable for all landscaping styles using natural stone in natural, chipped or tumbled form. And a specific direction is set with the help of small architectural forms, plants and the way the space is organized - they are the ones who emphasize the historical or ethnic features of the design. It can be any European or Asian style - for example, English, French, Chinese or Japanese.
Terraces for cascades or a rock for a “single” waterfall are laid out of natural stone. To do this, you can use any material that is commercially available - limestone, sandstone, granite or marble. Large pebbles (okat) and boulders that can be found on or near the site are also suitable. - Regular style. To be precise in terms, this is a classic cascading fountain with tiers of polished granite or marble slabs.
Although in essence and form it is nothing more than a waterfall. It is the same man-made as the previous version, but without imitation of natural origin. - Modern urban forms in the style of minimalism. In fact, this is another design option with strict geometric lines, but made of artificial stone - concrete or brick.
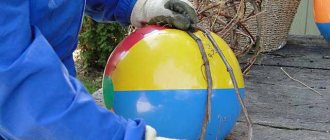
This can be either a cascading fountain with overflow over concrete slabs and trays, or a small decorative waterfall from a wall based on a monolithic reinforced concrete slab or brickwork. - Mediterranean or Moorish style. Another type of cascade fountain, but in this case they use a series of round bowls from which water flows in the form of small waterfalls.
It can be either a free-standing structure or wall-mounted (in the image of the Bakhchisarai Fountain).
Manufacturing stages
You should get sandpaper, an antiseptic for wooden surfaces, sealant, LEDs, as well as various screws for fastening parts.
As in the previous case, first of all you will need to build a box from wood using plywood or boards. Its dimensions depend on the size of the glass being mounted. The joints of the wooden elements are attached to each other using tape. Internal joints are treated with paraffin paste.
Before you start working, you need to place paraffin resin and an accelerator in a plastic container, then stir the composition well. Then pre-diluted resin is poured into the box, evenly distributed over the entire surface using a spatula. After this procedure, the product is left to dry. Then, after final drying, this process is repeated again to achieve complete waterproofness of the surface.
It should be noted that even before drying, small pieces of glass are immersed in resin to create decor.
When the last layer of resin has hardened, the wooden mold is disassembled, resulting in the formation of a resin structure that will serve as the bottom. You should step back 2.5 centimeters from the top of the structure and make a hole; a similar hole should be made on the opposite side.
Before you start working, you need to place paraffin resin and an accelerator in a plastic container, then stir the composition well.
It is necessary to prepare boards that will serve as a frame to support the glass. Using them, you need to make 2 boxes, one of which will be located at the top and the other at the bottom. The boards should be treated in advance with an antiseptic substance. By using veneer, you can decorate the planks that serve as partitions. To allow the veneer to dry, you should wait about twelve hours.
Then you need to level the surface with sandpaper and cover it with stain. When the latter is completely dry, you need to remove dust from the surface layer and open it with varnish.
To connect 2 boxes, you will need nails. Roofing felt is laid over these boxes for waterproofing. A hole is made in the back wall for a hose through which water will be supplied. The top of the box is equipped with hook-shaped screws, the distance between which should be identical. A bar is installed that divides the structure in half. A backlight is installed in it.
LED lamps are mounted on the distribution strip, and the extension cord is mounted on the top of the housing.
Next, you need to prepare a polyvinyl chloride pipe, in which 6 holes are made, the distance between which should be 5 cm. A plug is attached to the pipe on one side, and an L-shaped adapter on the other. The pipe is secured with brackets to the distribution strip.
Mounting of sheet metal is done with screws coated with galvanized coating. The pipe is attached so that it is evenly filled with water during operation of the structure.
The LED lamps are mounted on the distribution bar, and the extension cord is mounted on the top of the housing, where the pump and hose will also be located.
After this, you should secure the front strip to the lower frame. A plastic pipe is used to make a gutter, on both sides of which plugs must be secured. The container is filled with water and placed inside the box, and the hose is placed in the water and connected to the pump. After the work has been done, it is necessary to turn on the pump and the backlight in order to check their operation.
The boxes are attached to the wall using brackets that can be tinted to match the color of the walls. The hose through which the water will be supplied must be secured to the wall. If necessary, you can make more holes on the hose or increase their diameter.
Watching the water flow over the glass is a calming and pleasant sight. Interior decoration using a waterfall is very popular in various types of premises. This design is suitable for apartments, offices, hotels, supermarkets, shopping centers and other places. In winter and summer, the indoor air becomes too dry, which negatively affects the health of people in such premises.
An artificial waterfall will help humidify the air, drive away fatigue and lift your spirits. In addition, you can make it yourself, taking into account your own taste and preferences.
"Winter's Tale"
For the New Year, you can make with your own hands not only snowflakes and Christmas trees, but also such charming miniatures as the “Winter's Tale” waterfall.
The work ahead is painstaking, but the result is worth it. To create a miniature you need:
- a large piece of foam and paper towels;
- base - a plastic fish can or a regular plate;
- scissors, stationery knife, awl, wooden skewer;
- plastic bottles – green and transparent;
- three types of glue - PVA and Titanium (for ceiling tiles), epoxy, thermo-gun;
- acrylic paints and varnish (matte), brushes for them;
- red beads and wire for it;
- decor – dry twigs, sparkles (glitters), pebbles, crystals for needlework.
We start work by creating a sketch. You can borrow a ready-made one from experienced needlewomen, but it’s better to draw your own, unique one with your own hands.
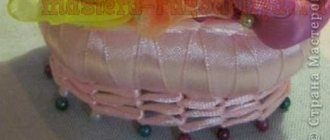
Then we prepare the base - rinse the jar thoroughly, dry it, and shorten the side on one side.
We cut out a “landscape” from foam plastic with a stationery knife. Stones can be of any configuration and size. The main thing is that they must create a stepped descent for the frozen “water”.
We glue the “stones” together with a heat gun and firmly fix them in the base. You can start gluing the workpiece with paper towels. We dilute PVA glue with water in a ratio of 1*1, moisten towels in the solution and cover the workpiece with them along with the base jar.
Paper towels do not need to be cut; they need to be torn by hand into irregularly shaped pieces. From such pieces you will get the correct relief.
After the workpiece has dried, paint it with black acrylic paints. Leave the “bowl” white.
Then we “shade” the ledges of rocks and the bowl of the lake with gray and blue.
We “apply” the snow with white paint. The final step of painting is varnishing. We start working with them only after all layers of paint have dried 100%. If necessary, apply several layers of varnish, but dry each of them thoroughly.
You can put treasures at the bottom of the lake bowl - small shells, gemstones.
Next to the winter waterfall we will “plant” Christmas trees and mountain ash. We make Christmas trees from a green plastic bottle.
Rowan - made of beads and wire. We wrap the “trunk” of the tree with strips of paper towel and paint it with acrylic brown paints, let it dry.
The next step is water from glue and a transparent plastic bottle. First you need to make the “substrates”. We cut them from a bottle into arbitrary shapes, “trying on” the parts to the workpiece. The glue, the main material of water, will flow and harden over the substrates. The substrates need to be heated with a candle so that the edges melt slightly and the elements can be shaped - they should lie tightly on the ledges.
We fix all the elements in place, and begin to pour thickened Titan glue over them. We lift those streams that roll into the bowl of the lake with a wooden skewer and fix them on the ledges.
We make icicles from transparent plastic. We cut out acute triangles, heat the blanks, twist them and heat them again so that they “flow” but retain their shape. We glue icicles onto the ledges.
All that remains is to decorate the craft with trees - rowan trees, fir trees, poplars made from dry twigs. We simply stick them into the foam.