Engraving can be applied to different materials, the most popular of which are metal, wood, plastic, stone and glass. Initially, engraving was considered a part of jewelry; now it is a separate decorative process.
It is used to decorate various products - from small souvenirs to large interior items.
How can you engrave on glass?
Manual method
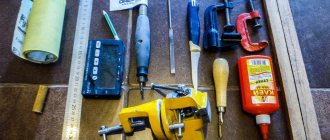
This method is considered the most labor-intensive. To apply manual engraving on glass, you can use a drill, electric engraving machines, air pistols, grinders and gravers (special cutters).
Hand engraving is great for creating exclusive gifts.
But this method has one significant drawback - hand engraving takes much longer than laser engraving.
If a glass is engraved on a laser machine in 30 minutes, then it can take several hours to do it manually.
Laser engraving
Any design, pattern or text can be applied to glass using laser technology.
Let's list the advantages of laser engraving:
- High speed and accuracy of work;
- Persistence. The image obtained on a laser machine lasts almost forever, because engraving occurs due to the evaporation of particles from the surface of the material;
- Organic image of things;
- Possibility of engraving for small runs. After all, with laser engraving there are no intermediate stages or preparation stage. Thus, you can calculate the cost of any number of products, starting from 1 piece;
- Economical. Already when ordering 50 units of a product, the cost of each of them is significantly reduced.
- Versatility. With a laser machine you can work with many materials except glass. For example, with wood, leather and acrylic.
Manual method
Manual glass engraving is performed using various mechanisms, including:
- electrically driven engraving unit;
- drill;
- air gun;
- Bulgarian;
- special cutters - gravers.
This processing method is considered the most labor-intensive. For example, laser processing a glass takes half an hour, while manual processing will take several hours.
Hand engraving is most often used when making exclusive one-piece products, such as gifts.
What kind of glass can be processed with a laser engraver?
Cheaper cast glass is easier to engrave due to its low lead content. The result is a more uniform structure.
Expensive hand-blown glass or crystal may be subject to stress on the material, exacerbated by heat during laser engraving, which can lead to cracks.
CO2 laser
The equipment processes window glass, mirrors, glasses, glasses and bottles.
In addition, mirrors can be processed using a fiber laser
, which only removes the reflective layer on the back of the glass.
At the same time, the fiber laser itself does not engrave the glass.
Features and general description of the technology
Glass engraving is a special method, which means applying any images and patterns to glass or plexiglass, which occurs by changing or modifying the physical and chemical structure of the material used. Such application is possible both on flat surfaces and on three-dimensional products. The result of engraving is a pattern of one color, which can be either in relief or with a recess.
The complexity of the work directly depends on what material you use. The thicker and more reliable it is, the more difficult the engraving process, and vice versa. Thinner, more brittle materials are usually easier to work with due to their low lead content. Surfaces made from stronger materials, in turn, have high thermal conductivity, which is why cracks can appear when exposed to heat in combination with cutting force.
The easiest way to engrave mirror surfaces. This is due to the fact that the engraving tool must be adjusted only to remove the layer with reflective properties. The smooth surface does not have to be touched, which is why it remains without any defects, and the pattern itself seems to be located in the inner part of the mirror.
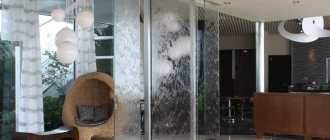
Engraving is often used to decorate indoor furniture. This helps make the products unique and inimitable. Nowadays it is also used to create souvenirs.
It is also worth saying that engraving is a universal method. An engraver used to apply patterns is suitable not only for creating images on a glass surface.
You can also use metal, wood or plastic for the workpiece. The only way the process of working with other materials will differ is the power of the tool.
How to choose a laser machine for glass engraving?
Any Wattsan CO2 machine with a laser tube power of up to 120 W will be suitable. At higher power the spot will be too bright.
The minimum ignition power of any machine is 10%. It turns out that the tube has 120 W, the ignition power is 12 W, and the 60 W tube has 6 W. Accordingly, a 60-watt tube will have a less bright spot than a 120-watt tube.
Any tube no more powerful than 120 W is suitable for glass. For example, Reci W4, Youngli R5 or Lasea F4.
In one of our videos, we conducted tests where we engraved a glass with a soap solution and on a dry one, through a napkin and without it. It is best to work with soapy water when the engraving is very thin and the lines are close together. Then the glass crumbles less.
When purchasing a machine or laser tube, it is advisable to test the equipment on a sample of the glass you will be working with. This way you can choose the laser tube power that suits you.
Areas of application
Thanks to the enormous technological capabilities in creating various decorative patterns, engraving can be seen both on decorative and household items, as well as on advertising structures. Most often, engraved patterns can be seen on the following items:
Recently, more and more orders have been received by specialists for the decoration of signs, nameplates and advertising items, the effect of which can be enhanced by installing additional lighting. Rays of light striking the engraved lines are refracted at different angles, creating a spectacular luminous glow.
How to engrave on a laser machine, and how much does it cost?
Let's look at the cost of engraving on glass using a bottle as an example. On average, in Moscow and St. Petersburg, engraving one bottle costs from 500 to 5,000 rubles, depending on the amount of work.
To perform engraving, in addition to the machine itself, we need a rotary axis and a lifting table, which is included with the CO2 machine.
Before you start working, you need to open the layout, expand the drawing and set the required size and engraving speed of 250 mm/s. The power of the laser tube that will be used in the work should not exceed 80% of the total power of the tube. Next, click “Ok” and start working.
In addition, you need to first prepare the bottle itself - wrap the neck with tape and stick a piece of plywood on the bottom. Next, insert the bottle into the rotary axis, set the focal length and you can start engraving.
The cost of engraving one bottle averages 2 rubles. Thus, if we engrave a bottle for 500 rubles, then we will make a profit of 498 rubles.
We decorate the decanter and glasses using glass engraving technique
We will need:
1. Diamond tip engraver No. 9929-DREMEL ENGRAVER.
2. Drill (engraver) - I have this FIRSTPOWER.
3. 6 kinds of engraving diamond bits for drill.
a) cylindrical 1mm diameter fine fraction;
b) ball 1mm diameter fine fraction;
c) oval with a narrowed end 2.5 mm, tip 1 mm fine fraction;
d) ball 3.5 mm average fraction;
e) ball 2.5 mm average fraction;
e) ball 3 mm coarse fraction.
4. A sheet of paper, tracing paper, pencil, glass marker.
5. Alcohol, can be diluted 50%.
6. Cotton pads, napkins.
7. Glass decanter, cup (you can use any homogeneous glass object).
8. For safety while working, you need to use a dust mask and goggles.
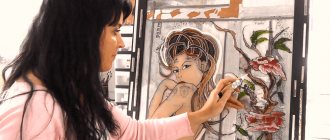
We select a design that we want to engrave on the decanter (we come up with it ourselves or find a suitable one), create a sketch on paper (in this case, I simply traced the decanter with a pencil on A4 paper, then applied the design I liked and added something of my own).
We transfer the drawing to tracing paper and cut out the image of the decanter along the contour.
Then use tape to attach the tracing paper to the surface of the decanter. It is important that the tape does not touch the contours of the drawing!
Using DREMEL ENGRAVER we transfer the design to the surface of the decanter. We pass the engraver along all the contours of the drawing, without missing details. It is important to start tracing with the details that are inside the image of any object in the sketch, since after tracing this detail may fall out of the picture (it will be cut off with a cutter).
We remove the tracing paper from the bottle.
This is what happened - we have a clear outline of our drawing.
In order to clearly see the outline on the glass, take a dark soft cloth and cover the working surface of the table with it. Now it will be easier to continue working.
At the first stage we will need attachments for the drill:
d) ball 3.5 mm average fraction for large parts;
e) ball 2.5 mm average fraction for smaller parts.
Using a drill, we process the surface in the drawing in places where we think the image should be the lightest.
It is important to apply engraving strokes in a certain direction, and not randomly!
At the second stage, we need a nozzle b) ball 1mm diameter fine fraction.
It is needed for processing smaller parts and additional clarification of some parts that have already been processed. Here it is also important to apply the engraving strokes in a certain direction, and not randomly, with the exception of places that we want to highlight. In such places we use the nozzle to completely fill the entire surface without leaving any marks. It is also important to choose the direction of the stroke from light (beginning of the line) to dark (end). This will give a smooth transition effect.
Now we need a nozzle c) oval with a narrowed end of 2.5 mm, a tip of 1 mm fine fraction. We use it to work out the details that we need to lighten for stretching from dark to light.
At the last stage, we take the DREMEL ENGRAVER again and apply small details with it, such as scales on fish, patterns on shells.
On the back of the decanter we do everything the same.
When the decanter is ready on both sides, we begin to decorate it with colored rhinestones. To do this, we will need rhinestones of various sizes and colors, tweezers with pointed ends to grab the rhinestones and special glue for rhinestones (you can also use super glue, but be very careful and try not to get the glue on the front side of the rhinestone, since it will make him cloudy). You can use a toothpick to adjust the rhinestone, moving it in the desired direction if you were unable to immediately attach it in place.
This is what we got!
Create a sketch on paper, then use a marker to apply the design to the cup.
We take a drill attachment b) ball 1mm diameter fine fraction, and pass it along the contour of the pattern applied to the cup, without missing anything. Afterwards, wipe the cup with alcohol to remove marks from the marker.
This video shows how to process flower petals. We use nozzle a) cylindrical 1mm diameter, fine fraction. With its help, carefully from the edge of the petal to the center of the flower, with directed strokes we fill the space of the petal, leaving only the middle untouched (a narrow strip in the center not reaching the edge). We process the buds and leaves of flowers in the same way.
This video shows how to decorate a butterfly. We draw a design on the butterfly with a marker, take the DREMEL ENGRAVER and run it along the lines of the marker, wash off the marker with alcohol.
We continue engraving the butterfly. We take a drill attachment b) ball 1mm diameter fine fraction and with its help we process the wings of the butterfly. We pass the engraver from the beginning of the wing to the body of the butterfly, trying to make the line decrease as we approach the body of the butterfly. It is also important that the lines are brighter and more expressive at the outer edge of the wings and shade towards the end of the wing.
Finishing the work: using the same nozzle (ball nozzle 1 mm diameter fine fraction) we add volume to all the details of the design. We highlight the places that should be lighter. We choose the direction of lighting ourselves.
Now let's start decorating with colored rhinestones. To do this, we will need rhinestones of various sizes and colors, tweezers with pointed ends to grab the rhinestones and special glue for rhinestones (you can also use super glue, but be very careful and try not to get the glue on the front side of the rhinestone, since it will make him cloudy). You can use a toothpick to adjust the rhinestone, moving it in the desired direction if you were unable to immediately attach it in place.
Our cup is ready!
How to engrave glass objects with rounded shapes and handles?
For example, glasses with handles are processed using a circular engraving device. But it is extremely important to set them very precisely so that the handle does not rotate in the engraving area. You need to move the Y axis to the highest position and secure the workpiece so that the handle is slightly above the level of the laser beam.
Since the workpiece rotates backward during the engraving process, the risk of the pen colliding with the laser head is reduced to zero.
But for all blanks with handles, you need to make sure that the graphic image is not too long and is not located near the handle.
The exact location of the drawing can be seen in the control program.
How to make 3d engraving?
Volumetric 3D engraving consists of three-dimensional images inside glass crystals. These can be images of animals, zodiac signs or landmarks, made up of silver bubbles.
Typically, this engraving method is used in the manufacture of souvenirs, gifts, accessories for interior design, logos and symbols.
The technology for creating three-dimensional engraving has its own characteristics. To do this, you need to master a special program that coordinates the actions of the camera and the laser machine.
When creating 3D engraving, the laser penetrates inside the glass, where it creates micro-destructions in the form of silver dots, but does not damage the surface of the product.
Areas of use of engraved plexiglass
Plexiglas panels are used in various fields of activity: to create signs, plaques, and decorative elements. They are suitable for both home use and installation in public establishments, such as cafes or clubs.
Engraved plexiglass is used as signage and interior design elements
Etched glass panels are used to install signage that replaces the usual inscriptions at the entrance. Illuminated inscriptions are especially popular, adding brightness and creativity to the design.
Small slabs with meaningful inscriptions are used in business centers, consulting or legal companies for advertising. Often the company logo is also depicted on such tiles.
Engraved glass is also actively used for the manufacture of souvenirs and decorative products: figurines, key rings, plaques and other things.
How to achieve the best results from photoengraving on glass?
To do this, you need to use a grayscale matrix at 70% black. Thus, there is a lower thermal influence on the glass, and, as a result, the result is as clear as possible.
For photoengraving, an average resolution of 500 dpi and rasterization using the “ordered excitation” method are recommended. This allows the image to be optimally adapted to the material.
Equipment
As for engraving equipment, it depends solely on what method is used to apply images to glass surfaces. In production, for the most part, laser machines and other professional devices that are automated are used for this. To work at home, more compact and less expensive equipment is used. Most often, an electric engraver is used for this, that is, a drill, which comes with special attachments.
How to prepare an image for engraving?
For computer modeling of images for engraving, programs such as CorelDraw, Adobe Illustrator, LibreCAD and others are used.
So how do you prepare an image?
- Create a workspace in a graphics program.
- Set the workspace resolution to 300 dpi.
- We import the image that we will prepare for engraving.
- Find the image in the folder and open it.
- Place it in the working area of the screen and insert the image by clicking the mouse button.
- Convert the image to black and white with a color depth of 1 bit
- Select the conversion method. The best result is achieved using the Floyd-Steinberg half-toning method. And set the intensity to the maximum value. This is how a color image is converted to black and white.
- Remove the white margins using the Crop tool.
- Export the resulting image to BMP format.
Next, you need to open the resulting image to see the result. Now you can run the file in the control program and engrave with optimal power and speed parameters.
LiveInternetLiveInternet
—Categories
- Textiles. Various ideas for working with materials (868)
- Rag rug or what can be made from old things (275)
- Sewing (175)
- Teddy bears (120)
- Leather (97)
- Clothing designers, fashion (57)
- Fabric flowers (48)
- Batik (33)
- Indian patchwork (11)
- Soutache (7)
- Knitting (854)
- Spokes (502)
- Hook (244)
- On the fork (9)
- On fingers (7)
- Furniture and everything related to wood (518)
- Wood carving. (96)
- DIY furniture (65)
- Wood painting (38)
- Birch bark (31)
- Sawing (30)
- Burnout (13)
- Leaf products (12)
- Furniture of the 21st century. (12)
- Screen (12)
- Products made from matches (7)
- Art Nouveau. Furniture and craftsmen (5)
- Art Deco. Furniture and craftsmen (1)
- Home renovation and design (517)
- Interior detail (148)
- Interior (123)
- Mosaic (93)
- Interior painting or frescoes (42)
- Stained glass (39)
- Cleaning and means for it. (36)
- Everything from garbage (16)
- Cooking (450)
- Baking (173)
- All meat (91)
- Blanks (41)
- Drinks (18)
- Korean dishes (13)
- Soups (12)
- Salads (10)
- Milk and dairy products (10)
- Fish (5)
- Sauces (5)
- Embroidery (434)
- Beads (80)
- ribbon embroidery (41)
- Cross stitch (24)
- Satin embroidery (10)
- All made of paper (291)
- Papier mache (60)
- Cardboard (36)
- Corrugated cardboard (7)
- Arte Francese (4)
- Paper mosaic (4)
- Weaving (227)
- Macrame (36)
- Wire (24)
- Wicker furniture (8)
- Notebook (217)
- Painting (186)
- Modeling (177)
- Plaster (78)
- Cold porcelain (20)
- Salt dough (7)
- Art history. Cultural studies (168)
- Philosophy Stars (3)
- Art (157)
- Watercolor (32)
- Health. (150)
- Felt (140)
- Cottage.Garden.Vegetable garden (100)
- Stories from life. Life in France (46)
- Plastic and everything made from it (43)
- Introduction to Drawing (42)
- Eggshell carving and embroidery (30)
- Sculpture (30)
- Metal. Working with it (18)
- Candles (16)
- Glass.Working with it (13)
- Bone (8)
-I'm a photographer
Tips for Laser Engraving Mirror Glass
- When preparing the material, place a piece of anodized aluminum on the engraving site on the workbench.
- Laser settings for engraving: power 80%, speed 10%, frequency 1000 ppi.
- After engraving, it is necessary to clean it, as erosion and dust settle under the mirror.
- Finally, apply acrylic varnish to the back of the mirror.
As a result, the mirror layer is removed by laser engraving, part of the mirror is transparent, so the paint colors remain bright and saturated due to the transparency of the glass.
Selecting an Engraving Nozzle
Choosing an engraving attachment is a very important matter and therefore you need to clearly define what you want. There are nozzles that leave a thinner path, and there are nozzles for rough application of the pattern. Sometimes it makes sense to use different engraving tips , for example, you can make a design with a thicker tip, and then trim the edges with a thin one.
A “bur” type nozzle with a working part, made in the form of a ball, is more suitable for rough application of a design.
A cylindrical nozzle with a working part similar to a truncated cone is more suitable for inscriptions and finer work.
It is better to do engraving at minimum speed (in my case it is 8000 rpm), because At high speeds, the plexiglass will melt strongly and may even remain on the nozzle. It’s not difficult to clean it, but why do we need unnecessary problems?
Where is glass engraving used?
Engraving on glasses
Handling fragile glass products requires extreme care. Laser engraving eliminates pressure on the glass, so laser processing of glasses is the safest. Moreover, he is the fastest. Engraving one glass will take no more than 20 minutes.
The engraving of glasses is done on a rotary device, so the machine must be able to connect it. For example, Wattsan 6090, 1290 and 1610.
We recommend applying wet engraving to glasses, as it gives less roughness and a more accurate design.
This can be done either by using a soap solution, which retains moisture on the workpiece, or through a damp cloth.
In the second case, it is important to straighten the edges of the napkin well to avoid air bubbles and folds.
We prefer to engrave using a damp cloth.
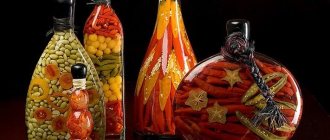
Engraving on perfume bottles
In past centuries, aristocrats applied monograms, family coats of arms and monograms to perfume bottles. And now, in the age of automated technology, engraving on perfume bottles has become widespread, and is usually used to create exclusive gifts.
So, the bottle can be decorated with a symbolic design, pattern, or inscription of the name or surname of the person to whom you plan to give a gift.
As a rule, engraving on perfume bottles is applied using laser equipment, as this is the fastest, most convenient and economical method.
Engraving technology
Images on plexiglass will look different on artificial glass, it all depends on the technology used to produce the glass. If plastic glass is made using casting, then the surface of the engraving will be soft, similar to velvet, but on the surface of extruded acrylic the image will be rough and grainy in structure. By using the depth of engraving and adjusting the angle of the beam, you can achieve quite different and delightful effects in the decoration. For example, inscriptions with shadows appear in images or images with a mirror image are obtained. All this is successfully used when creating signs with three-dimensional letters or backlit signs.