Soon matinees will be held across the country in kindergartens and other entertainment institutions. Many guests and relatives will come to your house. Now is the time to think about a costume for your little one, so that he feels like he’s in a fairy tale. For a child, New Year is the main and joyful event. A carnival costume will help to immerse him in a fairy tale. However, you shouldn’t spend money, start making it yourself, brightening up the winter evenings with an interesting activity in which your child can also participate.
We sew raspberries from felt
Using a “forward needle” stitch, stitch with a needle along the entire edge of the circle, returning to the beginning.
Tuck it up a little. Crumple a strand of padding polyester (or other filler) into a ball and place it in a gathered circle of felt. Tighten the thread gradually, squeezing the resulting ball at the same time. Push the padding polyester with a stick or pencil into the cavity and tighten the thread again until the edges of the cavity close in a single center. Since felt is still a voluminous material, its folds can prevent the edges from meeting in a single center. When the thread can no longer be tensioned, you should sew up the hole (see photo) carefully using random stitches so that the folds fit neatly and do not stick out.
When the hole is sewn up, the knot is tightened; the thread is not cut if there is still enough of it.
Now we form the surface of the raspberry. Insert the needle into the place of the tightened assemblies and bring it closer to the center of the former circle. The needle should hit close to the center of the former circle at a distance of approximately 2-3mm.
Pass the thread through the ball and again direct the needle from the place of the tightened gathers (from bottom to top). Now the needle should be brought out next to the previous puncture (not in the center) at a distance of approximately 2 mm.
Pull out the needle and pull up the thread that hugs the ball so that the thread pushes its surface, making a fold. That is why it is necessary to stuff the ball neither loosely nor tightly.
Each time, bring the needle out from the bottom up until you have gone around the entire volume. The result is in picture 17.
The thread should be secured with a knot. If it is still long enough, do not cut it off
Using your fingers, squeezing as in the photo, form the raspberry into a more rounded shape.
Insert the needle into the base of the raspberry and bring it out (see photo) at the fold and below the punctures, which are close to the center. This is how we form raspberry “seeds” from the segments.
Now a back stitch is used. Direct the needle into the deepening of the folds, tightening the thread so that raspberry seeds are formed. Sew in circles until stitches begin. The first ring of grains was obtained.
Now pass the needle into the second row and continue to form grains along the second ring
When the second ring of grains is completed, move on to the third. How many such rings of grains there will be depends on the diameter of the felt circle.
Place the needle at the base of the raspberry and make a knot. Do not cut the thread, but pass the needle through the raspberry and bring it out, then cut the thread under the spine. The end of the thread is hidden.
Source
Tutu skirt - option 1
You will need:
- Tulle (or any other thin material) of one or more colors;
- Wide elastic band;
- Scissors;
- Needle and thread;
- Ruler.
- Cut the elastic to the required length (waist circumference, minus 2cm). Sew it together.
- We cut the tulle into strips: width – 15 cm, length – double length, depending on the height of the girl and your wishes.
- We stretch the elastic band to make it more convenient to work.
- Fold the tulle strip in half. We pass the middle of the strip under the elastic band. We pull 2 tails of the strip into the resulting loop. We tighten it.
- That's all! The fullness of the skirt will depend on the number of stripes (from 40 to 60).
By the way, as shown in the video, there can also be options with an elastic band, for example, a hair elastic, or just a ribbon. Then the ribbon on the finished skirt will need to be tied at the baby’s waist.
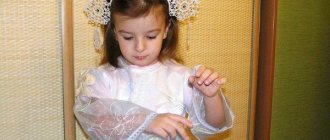
DIY raspberry costume for a girl
Soon matinees will be held across the country in kindergartens and other entertainment institutions. Many guests and relatives will come to your house. Now is the time to think about a costume for your little one, so that he feels like he’s in a fairy tale. For a child, New Year is the main and joyful event. A carnival costume will help to immerse him in a fairy tale. However, you shouldn’t spend money, start making it yourself, brightening up the winter evenings with an interesting activity in which your child can also participate.
DIY raspberry costume for a girl
We propose to create a raspberry costume for a girl using foam rubber. Such a raspberry will resemble a real berry as closely as possible, and will surprise everyone at the matinee.
Required tools and materials
Making the top of the dress
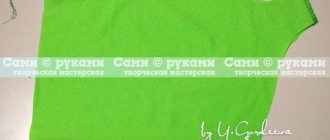
Making a raspberry blouse.
Body of the dress
We make the bottom of the suit from red velor.
Now let's take care of our circles and make them convex.
Now we sew our balls to the base of the skirt as tightly as possible in a circle. Sew a green velor belt to the skirt. You can also take a ready-made red skirt and sew our red balls onto it.
Sewing the dress into one piece
We sew together a T-shirt and a raspberry skirt. It is better to use a sewing machine so that the seams are neat and invisible.
Decorations for a raspberry costume
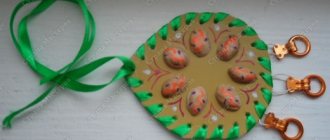
The costume will be complemented by accessories on the head in the form of a hoop or a bracelet with raspberries .
Take a ready-made plastic base for the hoop and cover it with small raspberries and leaves. You can also buy green and bright red rubber bands and glue raspberries to them with a glue gun. Make lots of ponytails and tie them with fancy elastic bands.
You can decorate a dress or hoop by making the decoration yourself . For the raspberry you will need:
Now let's start making the malnika.
You can make several of these berries and decorate a hairpin, bracelet or hoop.
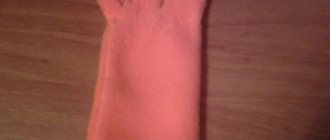
You can also make gloves from green satin and decorate them with decorative elements.
An original decoration will be a hat in the shape of a raspberry . You can take a ready-made light hat and sew voluminous red velvet balls onto it.
Source
Even beginners can sew these small bright strawberries. Sew a few of them, put them in a basket and they will enliven your interior and will remind you of the past summer for a long time)
To start, select a few scraps of bright, rich fabrics in shades of red and pink (I used American cotton for patchwork). If the fabric is smoothly dyed, you can bring the strawberry to life by embroidering small grains on it using floss and a few simple stitches. For the leaves you will need pieces of green felt. If there is no felt, you can sew leaves from green fabric. This is a little more complicated, but the result will also be excellent.
For stuffing we use holofiber or synthetic fluff.
We will also need scissors, a needle and thread in color, paper, a pencil, pins and a sewing machine and skillful hands).
We go to the machine and make a stitch right along the outline of the pattern. At the beginning and end of the stitching we make securing stitches, making a couple of stitches back and forward again. We cut off the excess threads.
When turning the stitch, raise the presser foot, leaving the needle in the fabric, so the turns will be smoother, without displacement. I usually choose 1.5-2 mm stitch length. And the tension is 4.5.
Then we remove the pins and the pattern and make cuts with scissors along the outer edge of our strawberry, not reaching 2 mm to the seam, or simply trim off the excess with zig-zag scissors. Fold the top edge 0.7-1cm and iron it.
We turn our strawberry inside out, take a thread and a needle and collect the needle along the upper edge with a simple seam forward. There is no need to grind, a stitch length of 0.5 cm will be enough. We do not cut the thread.
When you are sure that there is enough stuffing, tighten our thread and tie it with a strong knot. If you are planning to embroider your strawberry using floss, now is the time. And I'll skip this stage and move on to the leaves. To do this you will need a piece of felt and floss for the loop. You can cut out the felt right away, or you can first make a paper pattern by cutting out leaves from a 5 by 5 cm square. I made a rope from floss, folded it in a loop and tied a knot at the end.
Next, we make a small cut in our felt and insert a loop there, collect it in a little bag and secure our loop with a couple of stitches, while simultaneously giving shape to our sepal.
Next, we insert the resulting structure into the upper hole of our strawberry and sew it on by hand, pulling it up and straightening it. We tie the last knot. And we enjoy what we have done.
I wish you all happy sewing. Your Olga Frolenkova
Source
Crown for the princess
A princess's New Year's costume won't look complete without a tiara. You can purchase a ready-made version, or you can create it yourself. The material you will need is a regular plastic bottle, adhesive glitter and a template. So:
- Take any liter plastic bottle. Cut off the top part of it.
- Find a beautiful pattern for the tiara in advance and transfer it to paper. Cut it out.
- The made template will be needed to wrap the bottle. Now, using sharp scissors, carefully cut out the shape for the future tiara along the contours.
- Using tracing paper, you can transfer any beautiful design or pattern onto a plastic blank. Draw it on using adhesive glitter. Choose any color. Listen to the child's wishes. Steel, gold or blue looks beautiful.
- Leave the painted tiara to dry for several hours. All. The product is ready.
We also offer other simple options for making a crown. Materials:
From foil. Buy a roll of foil that is thick and durable. It bends perfectly. Create a circle equal to the circumference of the baby's head. Next, you can roll a lot of large and small balls from the foil and distribute them in a circle. Here you can show your imagination as you please.
From a peat pot. A princess costume for a girl can be complemented with a small crown, like cartoon princesses. It’s easy to make one like this from a ready-made peat pot. Draw and cut out the crown teeth along the top line. Paint the future crown with white acrylic paint both outside and inside. After the white paint has dried, use a sponge to paint the crown golden. Next, use your imagination - decorate the crown with beads and rhinestones. At the bottom you need to glue a regular hairpin. With its help, a small crown can be easily attached to your hair.
How to sew suits from knitwear, useful tips, main stages of work
| You pick my berries and store them in jars for a year. If there is a flu in winter, then my decoction will help. |
(author: Natalya Ivanova)
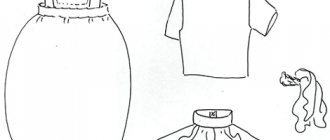
| CARNIVAL COSTUME “MALINKA” consists of elements: |
1. Blouse 2. Skirt 3. Hat
Recommendations for choosing fabrics and accessories
For the costume you will need:
crimson silk satin, green silk satin, padding polyester, elastic, zipper.
Description of the work
Blouse.
Sew a blouse according to any pattern and description from a fashion magazine. The front and back are straight, the sleeves are A-shaped, bell-shaped. Cut the shelf and back from green satin, decorate the shelf with applique or embroidery “raspberry branch”. For more experienced needlewomen, we offer the “raspberry” motif, which can be embroidered or made in the form of appliqué. Cut the sleeves from crimson satin, duplicate them with padding polyester, and place them on the lining. Apply markings resembling raspberry seeds with soap and perform decorative stitching. Due to the padding polyester, the sleeve should be voluminous and embossed.
Sew a bell skirt with elastic according to any pattern and description from a fashion magazine. Cut out the panels from crimson satin, duplicate them with padding polyester, and place them on the lining. Apply markings resembling raspberry seeds with soap and perform decorative stitching. Due to the padding polyester, the skirt should be voluminous and textured.
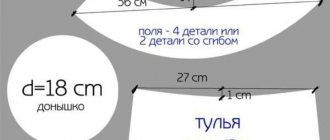
Make a blank. Sew a rectangular piece of satin and lining, steam the seam, fold wrong sides together, do not press. Place padding polyester inside and sew a decorative stitch (see above). Make a conical yarmulke hat from the resulting blank. The hat can also be knitted by choosing a large “bumpy” pattern.
From the archive of photo competitions:
Description, sketch, diagrams: Lyudmila Orlova, Malinka costume design: Elena Krampets, coordination and layout: Tatyana Evtyukova
The material was prepared specifically for the children's portal "Sun" and published on November 14, 2011.
For personal use only! Republication in other publications is prohibited!
DIY jewelry made from fabric. Raspberries.
Hello. Today I want to tell you how to make a beautiful decoration with your own hands from fabric; we will make raspberries.
For a long time I did not dare to make raspberries from fabric. It is possible to make small balls separately and put them into a berry, but it is difficult and time-consuming. Monotonous work is boring and tiring. I tried to find a more optimal option for making it. I like to simplify everything. If you have previously used my master classes, you will have noticed that all the products are relatively simple to make. But, despite the ease of manufacture, the finished jewelry looks quite elegant.
Cucumber bone for a boy video
https://youtube.com/watch?v=x_g5npSJQV0
Valentina Bodrova
Master class “Vegetable caps for autumn”
Lately I've been tired of the usual flat printed hats with images of vegetables for skits and round dances. I thought for a very long time about how to make them more interesting and brighter. In the end, this is what happened.
Material: colored corrugated paper, Whatman paper, ruler, pencil, scissors, stapler (or glue gun)
.
Step-by-step photos are presented using beets as an example.
1. To begin with, I took whatman paper and cut off a 7cm strip. and stapled the edges together. The result is a frame.
2. Then I measured burgundy corrugated paper along the length of the frame and folded it in half, so it’s stronger.
3. Using scissors, I made cuts on the paper at equal distances, approximately 4 cm long.
4. I stapled the paper and the frame of the hat in a circle using a stapler (I stapled it inward so that they would not catch on the children’s hair)
.
5. I assembled the top, folded the corners and stapled it together to form a cone.
6. I cut out the tops from green corrugated paper, folded in half.
7. I turned the resulting cone of the cap inside and attached the tops from the inside so that the beets turned out round.
I made carrots and onions using the same principle. Only on the bow, so that the feathers stand, I fold them several times and attach each one separately. And I drew “eyes” on the carrots with marker.
I made the potatoes a little differently. I cut out a square from brown corrugated paper, covered the frame of the hat on top so that the paper remained on top, and secured it on four sides. Then I collected the remaining paper evenly in a circle. I stapled it on top in several places from the inside to create “eyes.”
Lesson summary on the topic: “Dandelions for Little Red Riding Hood.” Full name of the teacher - Olga Sergeevna Ivantsova Preschool organization - MBDOU kindergarten No. 81 in the city of Orel Position - Educational teacher.
Summary of the lesson “Dandelions for Little Red Riding Hood” Full name of the teacher – Ivantsova Olga Sergeevna Preschool organization – MBDOU kindergarten No. 81 in the city of Orel Position – Teacher Educational.
A master class on making a daisy hat and for the matinee on March 8th we staged the “Daisies” dance. To make it more interesting we decided to make these funny daisy hats. Children.
Master class “Basket of vegetables” using plasticineography Master class “Basket of vegetables” using non-traditional drawing techniques (plasticineography) with children of the second junior group Goals:.
Master class “Hats and masks for musical games” Hello again. Dear colleagues! This time I bring to your attention attributes that are very necessary for us, music directors.
Master class on making a cockerel hat I have always loved doing handicrafts. With the onset of 2022 (Year of the Fire Rooster), I decided to please the children and make it for the New Year.
Master class on animal caps made of colored cardboard. Children love to act out different scenes (dramatizations of fairy tales, cartoons). The necessary costumes are not always available in kindergarten or at home.
Project “In the footsteps of Little Red Riding Hood” for older children Project “In the footsteps of Little Red Riding Hood”. Relevance: Russian President Vladimir Putin, in order to attract public attention to Russian cinema.
Scenario “Osenin” for children of older groups with mental retardation ANO DO “Childhood Planet “Lada” Kindergarten No. 198 “Cherry” ENTERTAINMENT SCENARIO THEME “In Autumn. Autumn, we invite you to visit us!” Groups.
Knitted hats-toys for theatrical games To develop the individual creative inclinations of each child, staging theatrical performances and staging familiar fairy tales help.
Features of working with knitwear
The process of sewing garments from knitwear does not pose any particular difficulties. The versatility of the material allows you to create almost any thing from it: from luxurious evening dresses to beautiful underwear. The fabric has many varieties. The following types are suitable for making a knitted suit:
Among the features of knitwear are high plasticity and stretchability. That is why the patterns are applicable to several sizes at once, up to 5. Before starting work, cotton knitwear must be washed, thoroughly dried and ironed. Only after this can you start cutting out the suit.
When working with knitwear, minor sizing inaccuracies are acceptable. Stitches are of great importance, so before sewing a suit you should decide on the size of the stitches, select the optimal needle, and then practice on a small piece of fabric.
Cotton jersey Viscose Jersey French jersey Supplex Cashmere jersey Wool jersey Fleece Fucra Velor
Ice costume - snowflakes
The name itself suggests that the suit is small, for a baby. I selected 3 models.
With a purchased “holey” top
The simplest option is a store-bought knitted top with holes through which tulle ribbons can be threaded. More details in the video
And another type of tulle skirt is not tutu. This is "chrysanthemum". Here, folded tulle triangles are sewn onto the base in several rows.
With a top
We will make the bottom easily, especially if we use the “tutu” technique. A little higher there is a tutorial on how to make such a skirt, only it is made of red tulle.
But for the top you need to choose a fabric that matches the bottom. Further:
Creative style
This is an elongated tutu. Only the elastic is not on the belt, but on the chest. Two more elastic bands are sewn to this elastic band on the sides (they will be on the shoulders). They also have tulle stripes, only short ones. These are sleeves
Bodice
First you need to make the top of the dress. The princess costume pattern is very simple. To create it, draw a rectangle. Its width will be equal to the circumference of the princess’s chest, and its length will be equal to the length of the back to the waist. The neckline will depend on the intended model. The neck can be made closed or open. The princess costume can be cut out with a small neckline, on which decorations made of stones and beads will flaunt. For the shoulder seam line along the top line of the rectangle, set aside the “back width” measurement. For a beautiful fit, the shoulder line should be lowered by 1.5 cm.
Materials and tools
Before starting work, you need to prepare all the necessary tools. To create a knitted suit you will need:
To make a high-quality knitted suit, it is not enough to have one sewing machine. It is advisable to use a chain stitch device in your work. The equipment allows you to make the reverse sides of the seams smooth. An overlocker is indispensable when sewing suits from stretchy thin materials; it quickly makes a zigzag. Finished seams are elastic and have no ties or skipped stitches.
You should definitely replace the needles on your machine. Products with rounded ends that will fit between the fibers without damaging them are suitable. There are tools designed specifically for a certain type of material: jersey - for wool and cotton knitwear, stretch - for synthetics or fabrics containing lycra.
Multi-tiered Christmas tree costume
Interesting option. It can be done even if you are not good at sewing. To be honest, I prefer tiered Christmas tree costumes, as they look more like a Christmas tree. We take the base - a matching jersey fabric. You can trace a girl’s T-shirt or dress and sew the base yourself.
Then you need to make tiers from tulle. We take organza or tulle of the same green color (but you can take a tone darker or lighter), cut out the strips (the length of the strip is 2 times wider than the girth in the place where you will sew. We sew each strip along the top with a machine and gather it a little, moving the fabric along the thread. We sew these strips to the dress in rows. If you find it difficult, then you can use a ruler to mark the place for the stitching and use tailor’s needles.
We sew on the stripes, process the armholes, neckline, bottom of the product and you can try it on. If it’s hard for you to work with organza, then you can simply singe each strip along the bottom over a candle. Just do it carefully so as not to spoil the fabric. And if it is tulle, then there is no need to hem it.
Another cute version of the Christmas tree tiered outfit.
A green dress is also taken as a basis, and an organza dress enlarged three times is sewn onto it. By gathering the dress into folds and tiers, we get a lush Christmas tree. Let's complement the outfit with bows, beads, and rhinestones.
Work on your look together
A DIY princess costume is a wonderful way to spend time with your little one. Let your daughter take part in the process. Entrust her with the simplest tasks - stringing beads on a fishing line, cutting out decorations. This is not difficult to do, but pleasant impressions from joint creativity are guaranteed. The very thought that she created something beautiful with her own hands will be a reason to be proud of herself, to believe in her strength. In the future, the girl will always have a desire to create something, to create something with her own hands.
If your daughter wants to recreate the image of the oriental princess Jasmine from the cartoon "Aladdin", this is also easy to do. The top of the dress can be sewn as described above. For the trousers, you can make a pattern based on your daughter’s sports pants. Turn them inside out, outline them on the fabric, leaving more space for allowances - 10 cm on the sides and 5 cm on the bottom and top. It is better to choose bright, light, oriental-style fabric for a suit. The outfit is complemented with various jewelry, beads, and brooches.
We looked at the simplest steps to make a princess costume. Don’t be afraid to fantasize, consult with your “princess” and her eyes will sparkle at the holiday with happiness and the feeling that she is the best!
Steps to sewing a tracksuit yourself
To make a knitwear suit with your own hands, you need to perform several steps:
Each stage is performed as described. This is especially important for beginning seamstresses.
Measurements
To make a tracksuit with trousers from jersey, you will need to measure all the parameters of your figure. For pants the following are defined:
If a tight-fitting model is intended, you will need to measure the circumference of the ankles and knees. To make a sweater, the length of the arms, back, shoulders, waist and chest circumference are specified. When creating tight-fitting knitwear products, the girth of the elbows and hands is determined. Measurements are taken using a centimeter tape.
Building a basic pattern
For the jacket and pants you will need to make two patterns. You can use ready-made options or create your own scheme. When working, it is necessary to use individual parameters so that the product corresponds to the desired size.
The pattern for making trousers consists of two elements: front and back. If a loose item is planned, another 3 to 5 cm is added to the measured parameters. For tight-fitting models, the increase is reduced to 1-2 cm. The back should be several centimeters wider than the front, taking into account the structure of the hips. The optimal length of pants is ankle-length or slightly lower.
When creating a pattern from knitwear, it is not recommended to make a large seam allowance, since the fabric stretches well.
The jacket is made in the form of a sweatshirt with a hood with or without a fastener. The top of a knitwear suit consists of several elements, a separate pattern is created for each:
When forming the pattern for the front part, the circumference of the bust is taken into account, so the front will be slightly larger than the back. If desired, a cutout is made, and decor in the form of locks, lacing or patch pockets is placed on the knitted product. For a summer suit, a sweatshirt can be replaced with a simple T-shirt, sleeveless vest or top.
Jacket trouser pattern
Uncover
The patterns are laid out on the surface of the knitwear, and it is necessary to take into account the fact that the direction of the grain thread and the loop columns must coincide. Paired elements and parts located in the same plane should be placed so that their edges point in the same direction. Due to the structural weave of the threads, knitwear can change shade from matte to glossy and vice versa if the material is placed at different angles.
For thin fabric, it is not recommended to use pins. Chalk will not be noticeable on a glossy surface. You can replace it with disappearing markers, the trace of which will completely disappear after 12-48 hours. You can use tape to secure the paper pattern, then tracing will not be required.
Slippery knitwear should not be cut in two layers.
Cut out the details of the jacket Cut out the elements of the hood Cut out the details of the trousers and pockets
Stitching parts
Before sewing a suit from knitwear, all elements are cut out in accordance with the patterns. Stitching is done in the following order:
The product is sewn using a special knitting machine. The equipment creates a neat pigtail-shaped seam. A four-thread overlocker will also work.
If the knitwear is very agitated when sewing, you need to put paper on the surface or starch the seams. This reduces the slipping of the material and ensures an even connection. Another popular method is to use Avalon water-soluble film.
Attach pockets Fold the top and cuffs, sew, insert an elastic band inside Sew on the sleeves, connect the front and back panels of the jacket Sew the hood into the neck Add rivets, insert laces
Sewing a suit with a narrow skirt
A simple knitted suit consists of a blouse without fastenings and a pencil skirt with a vent. You can use ready-made patterns taking into account individual parameters. All actions are carried out in accordance with the step-by-step master class on making a suit from knitwear:
Depending on the type and color of the knitwear, the suit can be used to create everyday and urban looks. You can sew an office version from dense matte fabrics. Evening clothes should be made from more elegant materials, for example, velor or French knitwear.
The elements of the blouse are cut out. The breast darts are connected and ironed. The shoulder seams are sewn down from the wrong side. The back and front are carefully straightened out. A sleeve is inserted into specially designated armholes. The blouse is assembled and sewn. The facing elements are sealed with double tape and connected to each other. Sewn to the neckline from the wrong side. The bottom cut and sleeves are folded. and stitched To make a narrow skirt, all elements are cut out of knitwear Darts are created and ironed, areas for vents and zippers are sealed The edges of each part are processed on an overlocker Elements are turned with the front side, side seams are sewn Ironed For vents, areas with a seal are tucked and stitched A double leather is laid on the waistband The strip is folded and ironed to create an arched shape. Once completed, the element is joined to the knitted garment. A zipper is sewn in. The hem of the knitted skirt is hemmed with a straight stitch to give an attractive appearance. The finished suit.
How to make sepals?
First, triangular-shaped decorative elements are cut out from a paper base. Everyone decides for themselves how many of these blanks are needed, but the decorations will look more original if they are made a little gathered.
Here again you will need bias tape, which is used to sew triangles transferred to the fabric. You need to trim on each side. The sepals are then stitched using a sewing machine using a straight stitch. The result should be a series of elements that are evenly assembled.
The decorations are distributed along the belt of the strawberry costume, secured with pins and finally secured with a machine seam.
For the dress itself, it is best to choose a sun flare shape. Here you will need red fabric on which a circle is cut out with a diameter of ½ the waist in circumference plus 2 hem lengths. The calculation is made as follows: if the waist is 60 cm, and the length of the skirt is planned to be 30, then the circle should have a diameter of 60:2 + 30x2 = 90 cm. A hole is made in the center of the circle with a diameter of ½ waist circumference.
The hem is sewn to the top of the strawberry suit and finished with an overlocker.
What to do if you don’t have an overlocker
Traditionally, knitwear is processed using an overlocker. The equipment is used for stitching edges, which prevents the appearance of arrows on the surface of products. If special equipment is not available, you need to use stitches that have a high degree of elasticity:
To check the elasticity of the seam, it is necessary to strongly pull the elements and determine the area of \u200b\u200bthe tear. It will be necessary to adjust the thread tension to prevent damage.
With knitted suits you can create casual and office looks. They are also comfortable to play sports in. Comfortable and elastic knitted items fit pleasantly to the body, give comfort, lightness, and do not restrict movement. You can update your wardrobe yourself; even novice seamstresses can handle the job.
Types of stitches
Sewing a top
All seams in a knitted suit will be made on a universal carpet machine; you will learn more about this miracle machine and its properties from my free video course: we sew easily and quickly.
Processing shoulder seams
Sew the shoulder seams on the carpet using a strip of adhesive fabric. Place the strip with the adhesive side on the seam allowance and sew. This strip prevents stretching of the shoulder seams when worn. What is adhesive fabric, what is it used for and what types are there, see here: everything and even more about cushioning fabrics.
Trim off any excess adhesive strip.
Press the seams to the back.
Attention! It is better to sew the adhesive strip on the back side; when ironing the seam it will not be visible.
Setting in sleeves
Sew the sleeves into the armholes and press the seams towards the sleeves.
Sew the side seams and sleeve seams with one seam. Press the seams to the back.
If you find unfamiliar words, then refer to the dictionary of sewing terminology and definitions of basic sewing terms
sleeveless shirt
Baba Yaga is an elderly woman, she needs to warm her old bones, so she always wears a sleeveless jacket. A vest made of natural sheepskin, with the fur facing out, is ideal for the look. But you can take any old jacket, preferably not a modern one, cut off the sleeves from it - and the sleeveless jacket is ready.
The simplest vest can be made from a piece of faux fur, suede, or leather. Two slits are cut out on a rectangular piece of fabric, the width between which is equal to the width of the back. You put your hands into them like sleeves and the improvised vest is ready in one minute!
Rogue Pirate Costume
Dark trousers, a worn-out T-shirt or shirt, a vest, a black eye patch or a bandana on the head - all these attributes will help create the image of a real pirate. Add a belt with a noticeable buckle or a regular thick belt to your suit: sliding the clasp to the side will give you a dashing, casual look. You can try to look even more convincing by making a couple of holes in your T-shirt or slightly tearing the shoulder line of your vest - a real ragamuffin, a daring corsair from the vast expanses of the ocean.
When making a pirate costume, you need to choose your role on the ship: captain or sailor
Cat
This is also quite a current costume.
The first step is to make the tail, ears and paws. Prepare a hoop, paper, needle and thread, pencil, felt and start making decorative parts of the costume.
The final detail in the look is a skirt made of black tulle. The more material you take, the fuller the skirt will be.
In general, this image will look quite impressive and will be remembered for a long time. For an older girl, the same materials are used to make a costume. You just need to think through all the details of the image and complement it with suitable makeup.
Gloves with claws and interesting tights will become a bright accent. A bow attached to the neck is also often used for this look.
Today there are a huge number of variations of festive costumes.
You don’t have to spend money on buying a finished product; with a little effort and imagination you can make an original and attractive costume with your own hands.
All that's left to do is to collect the elements of the image and add decor to the outfit. It is important to harmoniously combine all the elements into a single whole, so that the girl’s costume is the best and unique among others.