Despite the fact that construction equipment manufacturers offer new technological solutions for the behavior of construction work at height, builders often use wood as a material when constructing scaffolding. A few years ago, for this purpose, racks made of wooden beams 50x150 mm were installed, crossbars were nailed to them and boards were laid. Nowadays, the most popular material for creating scaffolding is wooden pallets, which are used in large quantities for transporting building materials.
Scaffolding made from pallets is widely used in private low-rise construction due to its simple installation from ready-made structures and the ability to save on material. To build strong scaffolding, it is enough to place the pallets on edge, embroider them with jibs for stability and lay down the flooring. Such auxiliary equipment is well suited for construction work at a height of up to 10 m. If you are building a house above the third floor, you should consider purchasing or renting metal scaffolding.
Features of wooden pallets
Pallets, or pallets in other words, are wooden structures made of wood, intended as containers for various small-format products.
They consist of two board panels connected by square bars. This design allows mechanical forklifts to lift them. Wooden pallet
A standard pallet must withstand a load of up to 1 ton, which indicates the strength of the structure and products made from it. In addition, it is worth knowing about the following characteristics:
- The total weight is 20 kg, although deviations are possible - it depends on the type of wood and the degree of its dryness.
- Only durable wood is used in production, otherwise the pallets would not have such strength. It dries well, but is not processed, so you will have to do it yourself.
- The size of a standard pallet is 120*120*12 cm. There are other models, but the differences will not be significant.
Garden bar counter made from pallets What can you say about furniture made from pallets:
- These stands are very popular among designers working in the loft style. From them you can create truly unique compositions without spending a lot of effort and money on purchasing expensive materials.
- If finished garden furniture is properly treated, it will last for many years. If you want, you can redo everything - it depends on the creative abilities of the user.
Cabinet for garden tools and wooden fence
The structures are easy to assemble and dismantle. There are a lot of pictures online where you can get ideas and technical solutions.
Pallet gazebo
It is also easy to disassemble such furniture if you need complete dismantling or for temporary storage.
Neat bar counter It is impossible not to mention the low price of materials. If you want, you can take away half-broken pallets from the bases for free and assemble whole ones from them yourself. All expenses will then go only to finishing.
His Majesty the pallet: where the danger lurks
Pallets can be hazardous to health, therefore, before using pallets in construction, you should definitely inquire about the history of their origin.
The following pallet options are not suitable for construction:
- Pallets heavily painted with bright colors - they may contain life-threatening toxic formaldehyde;
- Pallets that were previously used at retail outlets in markets and spontaneous bazaars - absorbed odors and moisture can negatively affect not only the quality of the wood, but also the smell of the entire building;
- Marked pallets are IPPC, since they are treated with chemicals that can provoke various diseases in a person who has direct contact with the pallet.
Therefore, the first rule for choosing pallets is an environmentally friendly material without visible defects or damage to the integrity of the wood.
The process of building a large house from pallets
The second rule for successfully choosing pallets is trusted suppliers. You can order pallets from any transport company that deals with cargo transportation. Here the necessary information will be provided and the pallets will be selected better and cleaner.
Rules for choosing pallets for construction
It is better to purchase pallets from the manufacturer.
Pallets are ready-made fragments for assembling the frame of the floor, walls, ceiling and even roof. In some cases, blocks can be obtained for free or for a symbolic amount from transport companies, where scheduled write-offs of consumable property are regularly carried out.
Not all types of such products are suitable for such construction. An important role in the selection of raw materials for the construction of a house from pallets is played by its origin, storage and operating conditions.
The following products are not suitable for building a house:
- Covered with bright, sometimes reflective paint. Such mixtures may contain toxic substances harmful to human health.
- Previously used for selling vegetables, in open areas, stored in damp and cold rooms. Such wood absorbs a lot of moisture and unpleasant odors, which can disrupt the feeling of comfort and cause allergies.
- With IPPC marking. It means treatment with chemically active substances that are incomparable to residential construction and human habitation.
- Having dark spots, inclusions of mucus and many small holes. This is evidence of damage to the material by fungus, mold and insects.
When choosing material for a pallet house, it is necessary to study the condition of the wood. It should be clean, dry, even. The overall gray tint is not a cause for alarm - this is a natural property of the raw material. Stains of dried dirt are also not a problem. It could just be splashes from a passing car.
The best option for purchasing building materials is to purchase directly from the manufacturer or at a food base, where cleanliness, constant temperature and humidity are maintained.
Features of building a house from pallets
Structurally, pallets consist of bars on which boards are packed. If you look at the products creatively and from an engineering point of view, they are very similar to the frames that are used in frame construction. Their sizes are very suitable for arranging window and door openings.
When planning the assembly of a panel structure, the following features of the project should be taken into account:
- It is not necessary to create a strong foundation. A few concrete or brick pillars are enough.
- It is better to take material with a large reserve. The surplus can be used to make home and garden furniture and many light utility rooms.
- Pallets have a large volume. You should take care in advance of a dry place for storing them, protection from the sun and precipitation. It is advisable to spend a little more, but keep the goods intact.
There are different opinions regarding construction technology. Some people prefer to disassemble pallets into parts and erect buildings from the pieces. Others use them as is, supplementing them with the necessary elements. From an optimization point of view, it is advisable to use assembled blocks, using someone else’s previously completed work to your advantage.
Roof arrangement
A barn or house made of pallets needs protection: pallets alone cannot protect the building from rain. To do this, it is necessary to treat all the wood with an antifungal agent, and then apply paint to all elements of the building. In addition, using roofing felt or any type of soft roofing, cover the wooden elements.
The interior decoration remains, and you can move into the constructed building for the whole summer. Such a structure can only serve as a short-term shelter during the warm season and protection from precipitation. But this does not mean that it cannot be equipped in such a way that one can live in it even in winter. Of course, such a structure can hardly be used as a permanent place of residence in regions with very cold winters, but for temporary residence on weekends from November to March it is quite suitable if it is additionally insulated.
Necessary materials
1. Pallets. Their number for building a house will depend on the size of the room planned. 2. Logs and beams. 3. Cable reels. 4. Self-tapping screws. 5. Ruberoid. It will be used as a roof. Here, too, you can save money if you take an old advertising banner instead of roofing felt. 6. OSB boards. They will be used to cover the walls. We should not forget that the house will need at least one window and one door. It is not practical to order new metal-plastic windows for such a structure. Solving this problem is not difficult. Due to the massive replacement of windows in new buildings after the completion of the house, many residents are replacing window frames with better ones, since the developer initially installs technical windows. You can find an inexpensive door in the same way. An alternative and most profitable option is when the house has old windows and doors.
Stages of creating a track
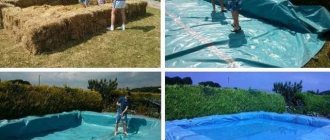
You can make such paths with wooden pallets at your summer cottage with your own hands. This work does not require special skill; you do not need to use complex hand tools. To understand how to make a path on a summer cottage with your own hands, you should outline the work in stages:
- First you need to dig a hole. A 15 cm layer of soil should be removed. To do this, it is enough to use a regular shovel. Striving for a perfectly flat base is also not worth it. The main thing is that the depth of the trench is at least 15 cm;
- Non-woven material should be laid at the bottom of the resulting trench to protect the boards from moisture when groundwater rises. The specified non-woven material does not rot and is very tear-resistant. Therefore, it will be an ideal option. It is recommended to use covering material for garden beds, which is sold at any garden supply store. This material will last for many years; it is resistant to slightly aggressive soil influences and high levels of humidity. In addition, it will protect the path from grass sprouting;
On top of the material, the trench can be filled with sand or small crushed stone. It is best to use sand and lay crushed stone on top of the sand bed. (adsbygoogle=window.adsbygoogle||[]).push({}); It is important that the pillow is strong and firm. In essence, it represents the foundation of the track. It is she who will be exposed to precipitation and groundwater. Therefore, it is necessary to achieve greater strength of the sand bedding. To do this, it is recommended to use tamping devices. You can make such a device yourself. To do this, you will need a wide board to which you need to attach a handle. A wooden stick is suitable for this. You should hold the tool by it and forcefully lower it onto the sand. Due to the striped surface of the board, the sand will be crushed and compressed. It takes quite a long time to process the path. As a rule, you will need to spend at least half an hour on 1 square meter. This is a rather labor-intensive and difficult compaction method. You can use simpler technology. When the sand is evenly distributed over the entire surface of the future path, it should be spilled generously with water. Thanks to this procedure, the grains of sand will be very close to each other. To achieve the best effect, you should spill water on the sand several times. And each time you need to wait for the sand to dry completely. Only after this the procedure will need to be repeated. The resulting base will be very durable. It will not be inferior in density to asphalt;
- You can sprinkle fine crushed stone on top of the sand cushion. This is done for beauty. And pallets are laid on the crushed stone layer;
- Separately, it is worth noting the curb. It is necessary because moisture will cause the edges of the trench to collapse. They will slide and erode. To avoid this and preserve the path of pallets, it is necessary to lay curbs. You can use ready-made concrete curbs, which are sold in the same place where paving slabs are sold. However, since we are talking about using pallets, it is best to use boards. This is wood and it will look organic together with pallets. Therefore, this option seems more appropriate. You should select edged boards and lay them on edge. In this case, the board will be slightly buried in the sand and firmly fixed.
As you can see, you can make a good path from a pallet. And the process itself will take no more than a few days. This is an economical and functional option. You can do all the work yourself, even without the help of assistants.
Other crafts
There are still many different things that can be done in a short time using such inexpensive and pliable material as pallets.
Hanger
You can easily make a very practical and attractive hanger from pallets. It can become an original decoration for a country house or an ordinary city apartment.
To do such a thing, you will need to use the flooring from the pallet (its base). The side parts will need to be carefully removed. There is no need to throw away the leftovers right away - they can still be useful.
The base will need to be thoroughly sanded, coated with protective solutions, and then painted in a suitable color. All that remains is to attach a few hooks to the prepared part. Their number and intermediate distance depend only on the wishes of the owners. The finished structure is installed near the entrance door in the hallway.
Shoe shelf
A great idea is to create a shelf out of pallets to place pairs of shoes on.
You need to cut one pallet into 2 halves, and then put them on top of each other and fasten them together as securely as possible. In the space occupied by such a shelf, it will be possible to place many more shoes than before. In addition, a well-decorated shoe rack can easily become an original interior decoration.
Outbuildings
Few people know, but you can build an entire gazebo or outbuilding from pallets. Of course, these crafts will be more complex to make than shoe racks or hangers, but their functionality will be much higher.
Using the same principle, you can make gazebos, sheds, chicken coops, and so on from pallets. Ready-made designs are complemented with various decorations and decorations.
- If you plan to build a large structure, then you will need to prepare a good foundation for it. The choice of its type depends on the characteristics of the soil located on the site. In places where the soil is clayey, it is better to install a pile-type foundation. If the soil is rocky, then a tape option is suitable. The floor in a home-made building can be laid out with a beautiful terrace board or from the same pallets.
- The frame base for the construction of outbuildings can be made from wooden blocks or metal pipes. It is to them that the pallets will be attached in one or two layers.
- Using pallets it will be possible to completely cover absolutely all the walls of the gazebo or install them only to a certain height. One way or another, the interior space will still be sufficiently filled with natural light and will be well ventilated.
- The easiest way to construct the roof of a homemade gazebo on a summer cottage is from polycarbonate sheets. If polycarbonate seems too simple and boring, then you can use flexible tiles, ondulin or metal tiles instead.
- If you line the inner walls of the gazebo from pallets with plywood sheets, you will get a full-fledged summer house. From the outside it can be decorated with different plants and flowers. They should be placed in the “pockets” formed in the structure. Some summer residents decide to decorate the outside of such buildings with siding panels. As a result, few people can discern homemade pallets in such buildings.
Support for flowers
You can make neat flower stands from wooden pallets. To make them, a minimum of actions will be required: you just need to turn the pallet on its side and it can already be used as a stand for flowerpots with seedling material. Additional shelves with hooks will allow you to turn your homemade structure into a beautiful garden shelf.
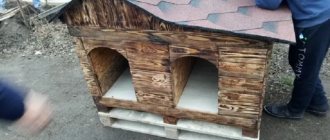
Dog bed
From wooden pallets you can make not only furniture for people, but also for animals. Many summer residents often go to their plots in the company of four-legged friends. To take care of your pet, you can make a cozy and cute bed for him from wooden pallets: build small sides, and in the space between them put a soft mattress with thick foam rubber pillows. The end result is a very cute and convenient homemade product. This is an excellent alternative to a simple closed booth in fresh air conditions.
You can make a lot of cool products for your garden from pallets.
Use these wooden structures for beautiful vertical gardening in your summer cottage. The pallet will be an excellent base for hanging flower pots and entire containers of flowers.
How to make a sofa from pallets, watch the video.
Interior decoration of a bathhouse made from pallets
In general, we adhere to this order:
- We cover the floor with pre-milled and sanded boards from a pallet. If desired, you can buy ready-made tongue and groove boards.
- We fix aluminum foil on the ceiling combined with the roof, overlapping it by 15-20 cm, making an approach to the walls. The material is easy to damage, so we work with it very carefully.
- We cover the walls with the same layer. Please note that the reflective surface must be turned inward.
- We carefully glue all joints and areas damaged during installation with metallized tape.
- We fill the lathing on the ceiling and walls in increments of 0.5 meters and a thickness of 2-3 cm.
- We install wooden lining on the ceiling, then on the walls.
- We install an electric heater, fencing the surfaces around it with a galvanized sheet of metal.
Third stage
In general, our pallet floor is ready. All that remains is the last operation - giving the surface a normal appearance. To do this, you need to arm yourself with a grinding machine. Without this, everything can be done, but such work will require a huge amount of time and effort. The surface is thoroughly sanded in the same way as when laying regular parquet - the technology is exactly the same.
Having sanded the surface to a smooth state, remove the dust remaining after this operation, saturate the boards with an antiseptic and, very preferably, with a fire retardant. The last addition will create, although not one hundred percent, protection against fire, which may well happen in a country house or in a private house. In order for a floor made from pallets, assembled with your own hands, to turn out like in the photo above, you need to cover it with varnish. More layers will be required than usual and the total thickness of the varnish layer will also be greater.
Insulated single plank floor on the ground
Unlike a cold floor, here insulating layers are placed under the sand cushion
Unlike a cold floor, here there are insulating layers under the sand cushion. To do this, after removing the fertile layer, the site under the future building is compacted. Then the first thermal insulation layer is laid. The material for it can be packaging bags left over from the cement mixture. They need to be laid in 2 layers and covered with a layer of crushed stone 8-10 cm thick. The crushed stone is compacted and filled with lime milk.
Then the remaining layers are laid: roofing felt, fiberboard and expanded clay (thickness 8-10 cm). They are filled with “lean” concrete (with a high content of filler (gravel and crushed stone)).
Choosing pallets and pallets for your shed
Pallets or pallets are containers that ensure the safety of goods during transportation. Such containers are made of plastic or wood
Moreover, for the construction of a barn it is worth paying attention to wooden pallets. One of the best options is larch
This wood has sufficient strength and is resistant to moisture. A larch barn will last a very long time.
In Russia, wooden pallets are made in the following sizes:
- 80x120 cm, flooring thickness 2.2 cm;
- 100x120 cm;
- 120x120 cm, board thickness up to 2.5 cm;
- 120x160 cm;
- 120x180 cm.
Pallets are also available in other sizes, for example, 32x40, 36x42 and 48x48 inches. Euro pallets have dimensions of 120x80x15 cm and 120x100x15 cm. Pallets with a deck thickness of 2.5 cm are best suited for construction.
Parameters and features of wooden pallets
The first and quite logical question that any summer resident may have is where to get those wooden pallets? Firstly, they can already be stored aimlessly in a barn since some cargo was delivered to the site, because the main purpose of pallets is to transport various types of building materials. Secondly, they can be inherited from the previous owners of the summer cottage. In the end, if you are inspired by some ideas and definitely want to build something for your dacha or home, it is not difficult to get wooden pallets - any more or less large hardware store sells them for pennies. If you consider that you can make full-fledged furniture from them or even build a gazebo, then the investment will more than pay off. Enterprising summer residents can try to contact construction companies directly and pick up unnecessary pallets from them for free - they will be happy to give them away so as not to dispose of them themselves.
Pallets were designed to allow for easy movement of loads using forklifts, pallet trucks and other lifting devices. There is no single standard for pallets, but the most widespread are the so-called. Euro pallets with dimensions of 120*80 cm and a side height of 14.5 cm. The flooring is made of boards 22 mm thick, the distance between them should not exceed 5 cm. The load capacity of a Euro pallet is 1500 kg. Pallets with parameters 120*100 cm and a height of 14.4 cm (domestic standard) are also used. For flooring, seven boards of different widths (14.5 and 10 cm) are used, the distance between them is no more than 4.5 cm, and the load capacity is up to 2500 kg.
As a rule, inexpensive types of wood are used without a pronounced pattern, but are quite durable: pine, less often spruce, aspen and birch. The elements are fastened with jagged or screw nails, and the pallets stand on nine legs. Pallets are characterized by excellent geometry, high quality, strength and, most importantly, environmental friendliness. This is an accessible and cheap material that can be easily processed, especially since it is not difficult to create structures from ready-made modules.
It’s quite easy to revive pallets, extend their life and protect yourself and your household from splinters. All irregularities can be smoothed out with a plane, the surface can be treated with a sander, cracks can be filled, and the surface can be treated with a primer and protective compounds for wood. After this, the pallet can be painted in the desired color and the result can be secured with varnish. There are a lot of possible options for what can be made from wooden pallets - they are limited only by your imagination, because literally everything is created from them: from shelves and coffee tables to gazebos, decking and sheds.
Upholstered seat design
When a comfortable corner or sofa for a kitchen made from wooden pallets is completed, it’s time to decorate, for which a variety of pillows or mattresses are used. Carefully selected textile accessories can radically change the appearance of furniture. When choosing them, they take into account where the device will be located (in the yard, on a covered terrace or in the house). Based on this, the final decision is made. Recommendations:
- It is more advisable to use water-repellent furniture fabric for the soft seat of a sofa, for example, flock or jacquard.
- Most often, the soft part is filled with crushed foam rubber or wear-resistant sheet polyurethane foam. If you need a particularly comfortable mattress, choose sheet latex foam for filling the sofa.
- On thin mattresses, it is better to use non-removable covers (stitched through), on thicker models - with a zipper.
How to make a two-story house from pallets
Most children love play structures with a room on the second floor. The construction of such projects begins with the assembly of the frame of the lower tier. Essentially, this is a frame assembled from six piles with a cross-section of 90x90 mm, buried in the ground to a depth of at least a meter.
The heads of the pile supports are trimmed and leveled in one plane, after which the timber frame is stuffed.
The next step is to lay boards or cut pieces of pallets on the strapping. To make it comfortable for children, the surface can be sanded or covered with plywood.
At the third stage, the frame of the playhouse is assembled. The walls are covered with slats, boards or filled with whole pallets.
The most important part of the project is making the stairs. It will need to be made as comfortable and safe as possible for children, so often such elements are welded from a metal profile or ready-made stepladders are used.
Selection of materials
You need to start using the method “by contradiction” - which you definitely can’t use. Since we are talking about a building that will be used by children, the prohibition applies categorically.
Which pallets are not suitable for a children's playhouse:
- covered with paint - it can be toxic, therefore, if you want to make the house colored, you need to choose the appropriate composition yourself;
- already used in markets, large warehouses where chemical products were stored - this is unsafe;
- pallets marked IPPS (they were treated with chemicals).
If wooden pallets do not meet these characteristics, if they look clean, there are no defects, nothing is broken, they are suitable for building a house.
The minimum set of tools for construction is as follows:
- hand saw (or table saw);
- hammer and nail puller;
- screwdriver and electric drill;
- jigsaw
Be sure to stock up on film that will cover the structure that is not yet ready. However, construction may be delayed, and it is better not to leave untreated Euro pallets to be torn to pieces by the rain.
The construction components themselves must be returned to normal condition before work begins - if necessary, cleaned, ventilated, rubbed with a stiff brush. After this, the pallets should be disassembled into thick crossbars - the frame of the house will be built from them, but thin ones are optimal for building walls. A saw and a nail puller will be very useful at this stage.
Benefits of using pallets
DIYers and those who know how to work with wood often use lumber to make simple pieces of furniture. If you have inspiration and tools, it’s easy to make beautiful tables and chairs, sofas and other products and for this you just need to prepare several pallets in advance:
- minimal costs for the purchase of basic materials;
- ease of processing lumber without high labor costs;
- use of environmentally friendly materials and their reduced consumption;
- long service life of finished products outdoors;
- From pallets you can make furniture of modern style and design.
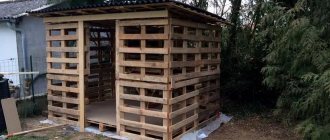
Scaffolding made of wood (pallets)
Despite the fact that construction equipment manufacturers offer new technological solutions for the behavior of construction work at height, builders often use wood as a material when constructing scaffolding.
A few years ago, for this purpose, racks made of wooden beams 50x150 mm were installed, crossbars were nailed to them and boards were laid. Nowadays, the most popular material for creating scaffolding is wooden pallets, which are used in large quantities for transporting building materials. Scaffolding made from pallets is widely used in private low-rise construction due to its simple installation from ready-made structures and the ability to save on material. To build strong scaffolding, it is enough to place the pallets on edge, embroider them with jibs for stability and lay down the flooring. Such auxiliary equipment is well suited for construction work at a height of up to 10 m. If you are building a house above the third floor, you should consider purchasing or renting metal scaffolding.
How to prepare the material correctly?
Wooden pallets are convenient because they are very easy to disassemble and use to make various items. Before using pallets to make any items, they must be prepared.
First, all wooden elements are cleaned of dirt and dust. To increase the service life of wooden pallets, you can remove all snags and roughness by sanding the surface. To do this, use a special grinding machine; the work is performed in a well-ventilated room. A mask or goggles and a respirator are put on the face to protect the respiratory system and eyes from dust. You can’t sand the entire pallet, but only the outer parts. If workpieces of non-standard sizes are planned, then the pallet must first be disassembled into individual elements. Sanded boards are sorted by width and appearance. When making garden furniture, it is necessary to take into account that humidity will have a negative effect on it, so it is worth taking care of protection in advance. To do this, the sanded surface is coated with a primer, which is used for external work; it will have a water-repellent effect. In this way, you can preserve wooden furniture, protect it from moisture, and extend its service life.
Leveling the floor on the balcony with your own hands. How to level the floor on a balcony - convenient ways
A balcony in a new house does not always have a perfectly flat floor, and in old buildings it can be even worse - the concrete covering is crumbled or covered with numerous cracks. And then the question arises of how to level the floor on the balcony in order to refine and transform this entire room.
How to level the floor on a balcony
If the apartment has a balcony, this is a great success, since it can easily expand the area of the apartment, becoming an additional room. An insulated balcony becomes an excellent greenhouse, a small workshop or even an office where you can place a computer and quietly do work.
But before the balcony becomes cozy, it needs to be insulated, and effective insulation is only possible with leveled and waterproofed floors - this is where you need to start working.
If the balcony is open, then the floor needs to be leveled differently, taking into account the decorative coating, the characteristics of which will correspond to the weather conditions of the region.
Floor leveling methods
You can level the floor surface in different ways, which will depend on what functions the balcony will perform in the future:
– using logs and plywood covering;
– dry or wet screed.
In some cases, insulation for a room is simply necessary, and sometimes it will be unnecessary. But in any case, before you start leveling the base, it is necessary to carry out preparatory measures.
Leveling the floor on the balcony with a screed
Preparing the base on an open balcony
On an open balcony, the floor surface should not only be leveled, but also have a slight slope so that during rain or melting snow, water does not accumulate, but flows down into the drainage system. At the same time, the slope should not be allowed to be too great, otherwise it will be uncomfortable to stand on the floor.
Labor-intensive but necessary work - dismantling the old coating
- This tool may also be needed when leveling the floor on a closed balcony if you plan to carry out repairs using a wet screed. If you do not remove the old one and lay the new one according to all the rules, these layers will seriously weigh down the concrete slab, which should not be allowed, as the balcony may collapse.
- The slope of the floor from the wall on an open balcony should be from 3 to 5 degrees; if there is no connection between the floor and the fence, then water will flow freely down the surface.
- If the floor and wall of the balcony are connected to each other, or there is a small border along the edge of the slab, then you will have to make a drain for the water - this can be a small groove along the wall and a hole for drainage, or a PVC pipe embedded in the screed - a pipe and a drain ladder anywhere floor. In this case, the slope of the screed should be directed precisely towards the drain hole.
- But first of all, old concrete and small stones are cleaned from the slab, and then the floor is covered with a primer.
- The next step is to install formwork around the perimeter of the balcony. The joints between the formwork and the floor must be caulked so that the leveling solution does not leak down.
Fence construction
When all the preparatory work is completed and all the necessary materials are prepared, you can proceed directly to the construction process:
- First, let's mark the perimeter along which the fence will be built.
- It is necessary to mark all the places on the ground where the support posts for the fence will be installed.
Scheme for installing fence posts
Depending on the characteristics of the soil on the site, additional measures may be required to give the structure strength and also increase its service life. For example, if the soil is predominantly clayey, then you will need to carefully consider the design of a drainage ditch. In the places marked for installation of support pillars, you will need to dig holes for their installation. Pour crushed stone into the bottom of the resulting holes. Laying waterproofing is not mandatory, but it is still prudent to do it in order to avoid direct contact of the material and the soil, which over time can cause rotting and deterioration of the wood. It is necessary to place roofing material at the bottom, and also wrap it around the part of the supports that will be in the ground. Using a building level, you need to make sure that all support posts are installed level. If this is confirmed, then you can begin to concrete the fence posts. After the concrete pouring has completely hardened, it is advisable to further strengthen the support beams again with crushed stone. Now you can proceed directly to installing the pallets. It is recommended to place the pallets in a checkerboard pattern on opposite sides of the support beams. Fastening is best done using screws or self-tapping screws. Then you need to check whether moisture gets inside the support beams. If the fears are confirmed, then such a fence will last for one or two years at best, since after the first cold weather the water inside will freeze and destroy the pillars. To avoid this, the pillars need to be covered with something on top. The simplest protection can be a metal paint can placed on a pole. But using your imagination and capabilities, you can find other, more attractive ways to protect the support from destruction.
Treating pallet fence posts with stain
When the fence is ready, it must be treated with a special water-repellent antiseptic, which will reliably protect the structure from moisture. After drying, the structure can be left in this form, or you can additionally paint sections and fence posts using brushes and sprayers.
It is important to remember that pallets can support loads of up to one ton. Therefore, it is necessary to take into account that if during construction not new pallets are used, but previously used ones, then the degree of load that they can withstand will be significantly reduced. The most famous and common method of construction from pallets was presented to your attention, but there is another, alternative option, for which a slightly different technology is used
The most famous and common method of construction from pallets was presented to your attention, but there is another, alternative option, which uses a slightly different technology.
An alternative option for installing a pallet fence
The change will affect only the first stages at which the installation of support pillars takes place, and it will consist in the fact that you will have to dig not holes, but a trench along the perimeter of the fence. In this case, not only the strength of the fence will increase, but also the consumption of concrete solution, because you will have to fill the entire trench. If this particular technique is chosen, then when installing the pallets, they will no longer need to be placed in a checkerboard pattern, but close to each other, and additionally fastened with screws or self-tapping screws for reliability.
Construction of a residential building
To build a small house, it is not at all necessary to buy long, expensive lumber. In fact, you don’t even have to look for pallets - the main blocks can be assembled from any non-grade boards. For example, those left after dismantling an old building or large packages.
Therefore, when purchasing pallets for building houses, you should first of all choose environmentally friendly materials without signs of damage, cracks or other obvious defects.
To build a residential building, even the most compact one, you will need a lot of pallets. However, given their low cost, all costs will more than pay off.
Step-by-step instructions for building such a house involve performing the following work.
Each pallet should be divided into two parts. The lumber of the base is thickened - they are used to build the frame. Thinner transverse ones play the role of walls. These manipulations are quite labor-intensive, tedious and the longest in the entire construction process. If you set yourself the task of reducing the cost of work even more, then when disassembling pallets you can use a nail puller. In this case, you will minimize the risk of damage to the wood, and the nails can always be reused.
Then measurements are taken, a drawing is drawn up and the contours of the future structure are marked on the prepared plot of land.
All work is performed in strict sequence:
- installation of the base and its fixation;
- installation of logs;
- fiberboard sheet flooring.
At the next stage, vertical supports are installed; they will be used for mounting door and window openings.
At the final stage of building the frame, the roof is attached; it is also made of boards.
After this, you can proceed to the cladding of the building. To do this, pallet boards are attached to prepared joists.
During operation, it is important to control their location relative to the guide axis
The roof is additionally covered with roofing felt, the top layer is covered with tiles. This creates reliable protection from rain, which is especially important when it comes to wood.
The building is ready. All you have to do is treat the building panels with fungicidal preparations. They will protect the material from fungus, mold and the adverse effects of water. It is advisable to paint the surface - paint creates obstacles to premature rotting and the activity of small rodents.
Keep in mind that such a house can be used as a residential building only in the warm season. By the way, in many areas of the United States, average Americans live in such buildings.
What is furniture made from pallets and pallets?
A pallet or pallet is a container consisting of a platform and “checkers” with support skis and used for storing, collecting and transporting various goods. The two-tier structure is made from untreated engineered wood and can withstand heavy weight. Pallets for construction and furniture making can be used as a whole, like Lego pieces, or disassembled and assembled into various structures from individual boards. However, in any case, the container used must be carefully processed, the surface made smooth and impregnated with protective compounds.
Structure of a cargo pallet
Furniture made from pallets for a garden, home or apartment can be an excellent option when arranging the interior. Even if a product made from a pallet is damaged, it can be easily restored due to the low cost of the base material.
The simplest sofa for a loft interior
Advantages and disadvantages
In recent years, pallet sofas have steadily become a trend.
They can be found in the apartments of many craftsmen. A pallet or pallet is a special type of container that looks like a platform assembled from boards and is intended for storing and transporting large cargo. More recently, such furniture was considered suitable only for arranging a garden, since it had a modest appearance and primitive design. Today, simple materials are used to make household items that are not inferior in beauty and originality to products made from solid wood. The main feature of a sofa made from wooden pallets is its ease of production. The second distinctive feature that makes it popular among a wide audience is its favorable price-quality ratio. Such furniture has many competitive advantages. Its main advantages:
Environmental friendliness. The raw material is natural wood. The products are safe for human health and pets, so they can be safely used to make furniture not only for the living room, but also for the children's room. Budgeting. Making your own sofa from pallets will save you a significant amount of money.
If we take into account that it takes 8-10 pallets to assemble a sofa, and consider that the average cost of packaging is 80-120 rubles, then we get an attractive amount of 1000-1200 rubles. Strength. Pallets weigh 15-20 kg and can withstand a weight of 700-800 kg, which makes them an ideal material for the manufacture of large furniture. Diversity
Sofas made from pallets are the easiest way to add a touch of uniqueness to your home. They are made to individual sizes and decorated to the taste of the owners. Ease of use. There are several standard sizes of pallets available on the market, making the job easier. The finished product does not clutter up the space, which is especially valuable for a small room, both in the country and in a country house. Versatility. A sofa made from pallets has a special appeal, adds natural warmth to the interior, and becomes its highlight. It easily fits into popular styles - loft, eco, Scandinavian; turns into a decoration for a home designed in a rustic aesthetic (Provence or country).
Despite its practicality, furniture made from pallets is not without its drawbacks. The most significant disadvantages:
- Additional preparation of materials. Even new pallets will have to be cleaned of dust and dirt.
- Treatment. The structures originally intended for warehouse needs do not have a flat surface. Many people wonder how to make pallet sofas attractive. To make the furniture look neat and elegant, careful sanding is used, followed by wood processing.
- Protection. The material needs antiseptic treatment, otherwise, with a high degree of probability, bugs will appear in the fashionable sofa.
- Additional expenses. The product is given a presentable appearance by covering all the wooden parts of the future sofa with varnish or paint.
Coffee table made from pallets
Making a table on wheels yourself is not difficult, because to make this stylish and comfortable piece of furniture you will only need some available tools and a few pallets.
To make a coffee table you will need the following set of materials and tools:
- Varnish, or bleached primer mixture.
- Liquid soap.
- Special glue for wood.
- Several brushes.
- Wheels (4 pcs).
- Set of screws.
- Screwdriver.
- Hammer.
- Nail puller.
- Brush for drill.
- Drill.
- Clamps.
This is the table we will make from pallets
Sequencing:
- The surface of the pallet is thoroughly cleaned (for this it is more convenient to use a drill with a special attachment).
- The pallet is disassembled into individual elements.
- Nails are removed from boards using a nail puller and a hammer.
- A small tabletop is made from the boards (the boards are attached to a crossbar and then glued), and the structure is left in clamps for some time.
- Afterwards you should carefully glue the table and its base and nail the boards.
- Two legs are made. One leg is a sawn-off piece of the pallet (shown in the figure below).
- The surface of the material used is covered with a primer mixture and varnish.
- The places where the wheels will be attached should be marked with a pencil.
- Holes are drilled using a drill for the self-tapping screws for fastening the legs, in them and in the table top.
- To ensure that the screws fit into the wood better, they are lubricated with soap.
- The legs are screwed to the tabletop.
- The wheels are screwed to the legs (2 pieces on each side).
- The table is completely ready, and you can start decorating it.
Roofing and insulation
Pallet buildings are usually made with a pitched roof.
Usually, for a simple panel structure, a pitched rafter system is chosen. It is made without any problems from the same pallets, secured between racks that rise on one side and inclined rafters. The frame obtained during assembly is an excellent basis for installing the roofing. Taking into account the low load-bearing capacity of the building, lightweight materials are selected for roofing - corrugated sheets, metal tiles, plastic slate.
Installation of thermal insulation is carried out if the building is intended for temporary or permanent residence. After being secured in the house system, the ends of the pallets will be closed, so the insulation is inserted into them in advance. The best option would be basalt wool, which is characterized by flexibility, elasticity and low thermal conductivity.
After installing the walls and ceiling, all surfaces outside and inside are sheathed with membrane film and only after that the finishing is attached. High-quality acrylic paint will protect the wood from ultraviolet radiation, insects and dampness.
How to build it yourself
Laying the foundation
It is not necessary to make a capital foundation. For example, you can clear the area, fill it with sand, crushed stone and pour a floating concrete pad, which will also serve as the floor of the barn.
Another option is a columnar base. In this case, concrete will be poured into pre-dug holes, the walls of which are wrapped with roofing felt. It will be necessary to install metal rods into the freshly poured solution, to which the walls of the shed will be attached.
Making the bottom trim
You can skip this point of work, saving on building materials. The beams are cut according to the dimensions of the poured foundation. At the corners, 4 beams are joined using the “wood floor” or “paw” method
.The frame is connected to the foundation with anchors through holes drilled in the beams.
Installing corner posts
This point is also a recommendation. The lower trim and racks will increase the rigidity of the structure, but if you need to save money, you can do without these beams. Corner posts are attached to the bottom frame with dowels, metal perforated corners and self-tapping screws. Additionally, jibs are nailed for reliability.
Laying the subfloor
The floor joists are connected to the bottom trim with metal plates (fastening perforated corners) and self-tapping screws. Edged boards are laid on the joists. The lags and boards are fastened with nails (20 cm long).
You will find all the information about the construction of wooden outbuildings and cabins.
Walling
Work begins from any of the corners of the barn. The first pallet is taken, placed on its edge (with the flooring inside the shed), screwed or nailed to the bottom frame and vertical beam. It is advisable to check verticality with a bubble level.
The second pallet is nailed in the same way. The structure can be further strengthened with perforated mounting angles.
The first row of pallets must be fastened with boards, nailing them into the grooves between the pallet decks. Don't forget to pre-cut the opening for the door or gate
. Pallets can also be fastened with wire.
Even if vertical beams were installed in the corners, before installing the second row, it is necessary to nail vertical boards to the pallets of the first row. They will become stiffeners and prevent the walls of the barn from tilting.
Roof and roofing
Before installing the roof and roofing covering, a ceiling is constructed and the top trim is attached. The latter is either a 100x100 beam, nailed along the perimeter of the shed walls, or double 25x100 boards installed on the edge. If the roof of the barn is single-pitched, then the framing is done only on two sides - from the rear of the building and from the facade.
Floor boards are laid edgewise on the mounted frame, which can simultaneously serve as rafters.
The design of the roof may change, but the general rules for arranging the roofing pie remain unchanged.
A waterproofing film (or roofing felt) is stretched over the rafters and the sheathing is stuffed
. Next, the roofing finishing covering is installed - profiled steel sheet, ondulin, slate, etc. If necessary, roof overhangs are sheathed.
Blocks for building walls
It is convenient to erect small buildings from blocks, each of which consists of two boards from 1 to 2 m long. Short trimmings (liners) are nailed between the boards, which are always available in abundance during any construction. The length of these liners does not matter.
For blocks intended for the construction of walls, liners are installed on one side just above the edges of the boards. They form protrusions, a kind of ridge. On the other side of the block, the liners are recessed relative to the edges. The ridge of one block, inserted into the groove of another, forms a reliable connection, similar to the connection of tongue and groove boards. The same principle is used when constructing the corner and intermediate posts of the frame.
To save on expensive long materials with a large cross-section, they make a kind of “sandwich”. Blocks from pallets are installed on the inside, and long boards are placed on the outside, strengthening the structure. Before building a house from pallets, you should prepare the required number of such wall elements.
In particular, this is done when installing the lower and upper trim or rafter system.
Look at the house you built from pallets with your own hands - the photo illustrates all the stages of its assembly:
Where can I get pallets?
Pallets, despite their unusual shape for containers, are considered packaging material, which means you need to look for them in warehouses and retail outlets of enterprises involved in logistics or sales; many companies use them only once, after which they are written off and sold at cheap prices
You can stock up on designs by looking for an advertisement for the sale of used packaging on the Internet (this kind of information is not uncommon on thematic portals), or you can resort to the old fashioned way - look in newspapers or pay attention to stands with information, the role of which in Russia is often played by poles and fences. The cost of products is most often purely symbolic, but they are usually sold in bulk
Pallets in warehouses
You can directly contact pallet manufacturers and logistics companies involved in cargo transportation. Many will be happy to give you used materials absolutely free of charge. It is expensive for them to dispose of it themselves, and storage requires a lot of space, which can be used for storing goods and products.
You can also make pallets yourself, in which case you will have to buy boards with a 15-20 mm section and 70 mm timber. They will need to be cut according to the dimensions of the future structure, and then fastened in the standard way, mainly with nails or self-tapping screws.
Material characteristics
For a house made of pallets, any standard wooden pallets, which can be found in large quantities at any base outside the city, are suitable. And it doesn’t matter what the organization stores. The stand is equally used for both food products and any household items.
Playhouse made from palletsSource roomester.ru
Pallets began to be widely produced at the beginning of the twentieth century due to the increase in cargo transportation. Over the course of a century, the product has retained its relevance and structurally has changed little. Inexpensive types of wood and ordinary nails are also used for production. But over the years, a common standard emerged and the whole world began to use products of the same shape and size.
Today, the entire planet uses a wooden pallet made according to only two standards - European and Finnish. Moreover, the latter differs only in its wider width (by 200 mm). Otherwise, both designs are completely identical.
European standard wooden palletsSource art-pallet.ru
A standard Euro pallet consists of five boards at the top and three at the bottom. The sides are fastened together using square bars. And the finished design is obtained with the following dimensions: 800×1000×145mm. All lumber is chamfered and the product has a mark of three English letters - EUR.
It happens that pallets are produced for one-time use. But basically the products are consumed until they are completely discarded. Before this, the product may undergo repairs, and more than once.
Wooden pallet, European styleSource palletshop.ru
Therefore, all pallets that have already been used are divided into three grades:
- Higher. A strong and intact white item that has been used no more than 3 times.
- First. Sturdy construction without cracks, light color. The product has never been repaired.
- Second. Quite strong specimens, but darkened with age. Those that have been repaired and even have small cracks (up to 30 cm).
It is the last position that you can pay attention to when choosing material for building a house. Because in rare cases the material is received for nothing
Most likely, you can come to an agreement with your superiors and get second-class products cheaper. And at best, write it off like firewood.
Constructing a structure from wooden palletsSource Pinterest
DIY pallet flowerbed
You can make a small box for flowers or seedlings with your own hands using a pallet and several boards.
For this you will need the following materials:
- primer;
- drill and drill;
- hammer;
- nails;
- file;
- pallet.
First, you should saw off part of the pallet so that two separate boards are formed, while a separator should remain in the middle and along the edges. After changing the openings, several more boards are cut along the cuts.
The bottom is made of several boards of a certain diameter. Afterwards, the boards are inserted and secured with nails. Two holes are made so that the water can quietly drain from the container, after which the soil can be filled in.
Ideas for buildings
The big advantage of using wooden pallets as a material for country houses is the huge variability. With the right approach, you can build almost any functional extension. Everything will depend on its complexity, the skill of the builder and the thoughtfulness of the plan. Below are some interesting ideas for summer cottage buildings made from wooden pallets along with instructions. They will differ in their purpose, as well as the scale of the design and, accordingly, the complexity of execution. But strict adherence to the plan will allow the summer resident to implement them on his site without much difficulty.
Quote from a famous Russian architect:
Pallets in construction. It certainly sounds strange. But it’s quite interesting, there is enough material like this, and it’s cheap. And proper design and assembly will allow you to create a whole masterpiece from wooden pallets.
Decorative fencing
From wooden pallets you can build a cozy garden fence, the design of which is extremely simple.
Decorative fencing for a summer house made of wooden pallets
First you need to calculate the required number of pallets and prepare them in advance. About a third should be cut off from each. The cut is made perpendicular to the legs of the pallet.
Pallet fencing scheme
The next step will be to assemble the individual sides of the fence. To do this, you need to lay out the pallets in a row so that the large edges touch each other. They will be held together using cut pieces and nails. Perform similar actions for each side. If the fence is planned to be large, then a through hole for the entrance should be cut in one of them. This completes the pre-assembly.
Pallet fence with exit hole
The last step will be installing the fence. For greater reliability, each of its sides should be half immersed in the ground. They can be fastened to each other using metal corners with grooves and self-tapping screws, or simply a small block of wood secured at the joint with nails.
Decorative fence made from wooden pallets
The pallets can be pre-painted or otherwise decorated. In this case, the fence will also be beautiful in appearance.
Decorated fence made from pallets
Bench
An unusual idea would be to build a bench from wooden pallets. Quite a practical and easy to implement solution. For a simple variation you will need three of them.
Simple benches made from pallets
Two pallets must be cut exactly into two parts, parallel to the smaller rib. They will become the basis of the seat.
Sawed pallet into two parts
Next, you should lay them on top of each other so that everyone’s cutting location coincides. This will be connected to the face of the third pallet, standing horizontally, using nails, which will be the backrest for the bench.
Bench base
The end result is a bench of a fairly simple design that does not look very attractive. For greater beauty, it can be painted and varnished, and the back can be covered with a second pallet.
Attaching the legs and armrests to the bench
By analogy with this method, it will be possible to build a much more advanced and aesthetically beautiful bench.
Tool shed
A practical solution would be to build a tool shed from wooden pallets. This design will be quite inexpensive and will look good. But it will be much more difficult to implement than a bench or fence.
The basis of a utility unit for tools made from pallets
The first step is to allocate space on the site for construction. Its area will depend on the amount of material, as well as the preferences of the summer resident. But a high-quality and functional shed will take from 6 square meters. m (3x2). The place itself should be level, without snags and stones.
Before building a utility block, level the area
The easiest way to build a barn is using the block method, that is, install the floor separately, then assemble the four walls, ceiling and supports separately. And only at the end do you combine all the elements into the finished structure.
Laying floors from wooden pallets
The floor will simultaneously serve as the foundation of the structure, supporting its entire weight. Therefore, its strength should be given special attention. Select only solid wooden pallets for it, without any defects. There is no point in processing, painting or varnishing them; they will only serve a functional purpose.
Processing pallets before installation
The basis of the floor will be a structure of 6 pallets (2 rows, three in each). They are laid with their front side to the ground so that the legs point up. Afterwards they need to be fastened to each other. Either directly, or install metal elements on the side joints of the pallet legs, and then secure them with washers and screws.
Fastening the walls of the shed to the floor
The same number of pallets are installed on top of the main structure, but with the front side facing the sky. So that the legs of the lower layer fall into the voids of the upper one. Next comes the fastening. It will be enough to have a lot of self-tapping screws piercing the upper pallet with the legs of the lower one. It is not advisable to use nails. Due to the double-layer installation, the top level of pallets will protrude on one side. This element should be sawed off. Afterwards the floor for the barn will be ready.
Tool shed wall installation
The ceiling is similar in size. To make it, there should be no through holes on the pallets so that rain does not get inside, causing damage to the tools. To get rid of them, whole boards from rotten and sawn pallets will be useful. They should be placed at intervals and then nailed in place so that water cannot penetrate from the roof into the building. Unlike the floor, the ceiling must be varnished. There is no point in painting it either, since it will not be visible from the outside. The ceiling is made single-layer, since it is not a load-bearing structure, but is installed with the legs down.
Method of attaching pallets to each other
There are two pairs of walls in the barn, the optimal height is two vertical pallets. A hole must be made in one of them for entry and exit. They are assembled according to a similar principle as the floor and ceiling. But, special attention is paid to their connection. For greater reliability, as many connections as possible are used, including remote ones. You can also attach them to a metal frame. The walls should be painted and varnished, you can also decorate them.
Start of installation of the tool shed roof
All individual elements are ready, now you can start assembling. This will require several people. First of all, the walls are installed on the floor, which serves as the foundation. On the inside they are fastened together using many metal corners with grooves. With the outside, separate boards or whole pallets. It is enough to fasten the walls between each other with long corners, evenly distributed over the entire height. Same thing with the ceiling.
Connecting pallets with corners
You can install two walls at the same time, then externally fastening them to the floor will not be necessary; it is enough to connect them to each other.
It is best to cover the roof with some kind of water-repellent material.
This is a plan to build a shed that will last at least a few seasons. In case of additional strengthening of the structure, the service life of the structure will increase significantly. In addition to strengthening, you can also modernize the barn. For example, make windows or make shelves using pallets.
How to make a garden sofa
How many pallets are needed for a sofa? It depends on how long it will be. To accommodate 4 people, the sofa needs to be made from 8 pallets (for the first work experience it is better to take 10, in case something goes wrong).
Outdoor furniture must be impregnated with special solutions to extend its service life and protect it from fungus and mold.
The first four pallets are placed next to each other in two layers and secured together. The backrest is made of two more pieces, fixed at an angle to the seats. Armrests are nailed to the sides.
The structure can be upholstered with foam rubber and fabric already assembled, or sewn with removable soft covers and pillows.
How to build summer cottage buildings from wooden pallets
Before you start creating a building, you should think about its design, as well as its future location. For small structures, it is acceptable to do everything for the eyes. For large buildings, you should calculate in advance all the dimensions of the parts and the load. Approximate calculations are undesirable, as they may affect reliability.
Drawing of a utility block for a summer cottage made from pallets
The process of creating buildings can be divided into two main parts: preparing materials and assembling the structure. Also, at any stage, decoration, painting, varnishing and other decorations of wood can be carried out.
Wooden pallet for country houses
Pallets are assembled pieces of wood. Therefore, the process of constructing buildings from wood is absolutely the same as in the case of using boards. However, in the end there are more possible variations.
Preparatory stage
Wooden pallets should be prepared for subsequent use. First of all, they should be inspected for the presence of various defects, the possibility of splinters and general integrity. If necessary, get rid of negative factors that may affect the safety of the structure.
If part of the pallet is rotten, then separate it from the whole part. Use a hammer and a double-sided crowbar or nail puller to remove all nails and screws. Smooth out all roughness with sandpaper.
Sand the pallets before starting construction
The preparatory stage is completed by shaping the wooden pallets for assembly. Here everything depends on the final design of the building. A power tool is best for preparing the workpiece, but a simple saw will suffice.
Preparation of workpieces according to the drawings
Assembly
Assembling the elements is the main stage of constructing a building for a summer house from wooden pallets. The further service life and reliability of the design will depend on its quality, as well as the thoughtfulness of the plan.
The assembly process is individual for each structure. But, there are also similarities. The main methods will be to fasten the pallets.
Connecting pallets with self-tapping screws
The simplest option for connecting would be to use nails or self-tapping screws. They simply attach the pallets to each other. In particularly thick places, hammer nails or screw in screws at an angle.
A more difficult option to implement is remote connections. With this type of fastening, additional materials are used. For example, metal fittings or wooden beams. They are applied to the junction of the pallets and then attached.
Fastening pallets with metal corners
The first method is less expensive in terms of materials and easier to implement, but provides low reliability of the design. The second method will make the structure more durable and strong, but requires additional materials.
Treatment
At any stage, additional processing of wooden pallets can be done. This can be done both for the purpose of decoration and with the intention of increasing the service life of the building.
First you need to degrease the wood and also remove microcracks. This is done by grinding the surfaces of the pallets with sandpaper. It is not necessary to process all the edges; only those that will be visible on the front and inside of the building are enough. This is necessary so that the paint and varnish last longer.
Before starting assembly, sand the pallets with sandpaper
After the tree has already been processed, the next stage begins. The pallet is painted on it. One layer will be enough. Enamel, oil-based, and aerosol paint will work. It will take a day to dry. After or instead of the painting process, you can apply a water-repellent varnish. Exterior products are preferred.
At the end of the work, treat the finished building for a summer house made of wooden pallets with varnish
Wood carving and other types of decoration are carried out before painting and varnish work.
Pallet floor
One of the most inexpensive options for flooring a small summer house or shower room is the use of wooden pallet boards. Pallet boards are carefully separated from the pallets without damaging the wood, impregnated with an antiseptic and laid on the logs. Then they can be cleaned and used to refine the varnish, or they can be leveled with plywood and covered with linoleum.
The flooring on the second floor does not require insulation. This overlap is performed single. The floor boards are attached to the floor beams, and from below (like the ceiling of the first floor) they are covered with plywood, fiberboard sheets or panels.
Pallet drawings
Wooden Euro pallets have dimensions of 800 by 1200 mm, are made in accordance with GOST 9557-87 and fully comply with European standards. Made from deciduous or coniferous wood (most often pine).
Pallet drawing 1000 x 1200 mm:
Material consumption and symbols in the drawing:
1. Longitudinal board - 120x100x22 - 10 units. 2. Cross board - 1000x100x22 - 3 units. 3. Checker - 100x100x80, requirement - 9 units. 4. Screw nail - 90x3.5, requirement - 27 units. 5. Screw nail - 70x3.5, requirement - 27 units. 6. Smooth nail - 60x3, requirement - 24 units.
Technical specifications for the production of panels for pallets:
1. The manufacture of a pallet is allowed from any type of wood with natural moisture content. It is recommended to use edged lumber. Wood of grades 2 - 3 must comply with GOST 8486-86 or GOST 2695-83.
2. Natural roughness from sawing is allowed in wood material.
3. Blunt wane is allowed on internal boards. The wane area should not exceed 10 (mm) in thickness and 20 (mm) in length.
4. Four chamfers are made at the corners of the pallet.
5. To fasten the pallet boards I use smooth and screw nails: three decking boards are attached to the cross boards using 9 x 3.5 (mm) screw nails, the lower longitudinal boards are attached with 7 x 3 (mm) screw nails. The flooring boards are fastened to the cross boards with smooth nails 6 x 2.5 (mm).
6. GOST pallet 9078-84.
| Main settings | |||
| Drawing Drawing and parameters of a typical model | A (mm) Total width in (mm) | L (mm) Overall length in (mm) | H (mm) Total height in (mm) |
| 1000x1200 | 1000 (mm) | 1200 (mm) | 138 (mm) |
| Pallet parameters 1000x1200 | ||
| Characteristics Characteristics of the pallet | 800x1200 Euro pallet 800x1200 | 1000x1200 Pallet 1000x1200 |
| Width | — | 1000 (mm) |
| Length | — | 1200 (mm) |
| Height | — | 138 (mm) |
| Load capacity | — | 1200 (kg) |
| Weight | — | 16-20 (kg) |
| Pallet drawings 1000x1200 (mm) | |||
| (increase) | |||
| (increase) | |||
| |||
| (increase) | |||
Drawing of a pallet 800 x 1200 mm euro:
Material consumption and symbols in the drawing:
1. Longitudinal board - 1200x145x22 - 4 pcs. 2. Longitudinal board - 1200x100x22 - 4 pcs. 3. Cross board - 800x145x22 - 3 pcs. 4. Side checker - 145x100x78, requirement - 6 pcs. 5. Central checker - 145x145x78 - 3 pcs. 6. Screw nail - 70x3, requirement - 27 pcs. 7. Screw nail - 90x3.5, requirement - 27 pcs. 8. Smooth nail - 60x2.5, requirement - 24 pcs.
Technical specifications for the production of panels for pallets:
The nominal size of the product is 800 x 1200 (mm).
1. The moisture content of wood material should not exceed 24%.
2. Natural roughness from sawing is allowed in wood material.
3. Blunt wane is allowed on internal boards. The wane area should not exceed 10 (mm) in thickness and 20 (mm) in length.
4. To make the pallet, only coniferous boards are used.
5. Nails used on blocks 90 x 3.5 (mm) - on top, 70 x 3.5 (mm) - on the bottom.
6. The boards of the top panel are nailed with a smooth nail 60 x 2.5 (mm). The nail is bent on the back side of the board.
7. It is necessary to ensure that the chamfer is cut 15 x 15 (mm) at an angle of 45 degrees.
8. The checker fibers are parallel to the surface.
9. GOST pallet 9057-87.
| Main settings | |||
| Drawing Drawing and parameters of a typical model | A (mm) Total width in (mm) | L (mm) Overall length in (mm) | H (mm) Total height in (mm) |
| 800x1200 | 800 (mm) | 1200 (mm) | 144 (mm) |
| Pallet parameters 800x1200 | ||
| Characteristics Characteristics of the pallet | 800x1200 Euro pallet 800x1200 | 1000x1200 Pallet 1000x1200 |
| Width | 800 (mm) | — |
| Length | 1200 (mm) | — |
| Height | 144 (mm) | — |
| Load capacity | 1200 (kg) | — |
| Weight | 18-22 (kg) | — |
| Pallet drawings 800x1200 (mm) | |||
| (increase) | |||
| (increase) | |||
| (increase) | |||
| (increase) | |||
Drawing of a lightweight pallet 800 x 1200 mm:
Material consumption and symbols in the drawing:
1. Longitudinal board -1200x100x20 - 8 pcs. 2. Cross board - 800x100x20 - 3 pcs. 3. Checker - 100x100x80, requirement - 9 pcs. 4. Screw nail - 90x3.5, requirement - 18 pcs. 5. Screw nail - 70x3, requirement - 18 pcs. 6. Smooth nail - 60x2.5, requirement - 12 pcs.
Technical specifications for the production of panels for pallets:
The nominal size of the product is 800 x 1200 (mm).
The actual size of the product is 800 x 1200 mm.
1. The manufacture of a pallet is allowed from any type of wood with natural moisture content. It is recommended to use edged lumber. Wood of 2-3 grades must comply with GOST 8486-86 or GOST GOST 2695-83. (spruce, pine, aspen, alder, poplar).
2. Natural roughness from sawing is allowed in wood material.
3. Blunt wane is allowed on internal boards. The wane area should not exceed 10 (mm) in thickness and 20 (mm) in length.
4. Four chamfers are made at the corners of the pallet.
5. To fasten the pallet boards I use smooth and screw nails: three decking boards are attached to the cross boards using 9 x 3.5 (mm) screw nails, the lower longitudinal boards are attached with 7 x 3 (mm) screw nails. The flooring boards are fastened to the cross boards with smooth nails 6 x 2.5 (mm).
6. To assemble the pallet, screw/or/ribbed and smooth nails are used: the transverse boards and flooring boards are attached to the blocks with screws or rough nails 90 x 3.5 (mm) on top, the lower longitudinal boards are screwed/or/ribbed with nails 70 x 30 (mm) ). The flooring boards are attached to the cross boards with smooth nails 60 x 2.5 (mm).
To make the finished sofa a bright addition to the interior, we suggest painting our wooden blank. If the sofa finds its place somewhere in the garden or on an open balcony, then the pallets should be treated in advance with a special water-repellent impregnation. It is worth covering even internal floors with impregnation. When the composition is thoroughly absorbed, you can begin painting.
How to paint the pallet? There are a lot of paints on the market, but you should start with a primer. Applying a primer to a cleaned and smooth wood surface significantly reduces paint consumption, because the primer reduces the wood’s ability to absorb moisture.
DIY furniture from pallets: preparatory stage
If you receive used pallets, you must first clean them of dirt and dust, and then clean the surfaces. You can save on your labor costs and process only those boards that will come into contact with people during operation. It is advisable to use a grinder to perform this work.
Preparing tools for work
Before starting work, you need to prepare the following tools:
- screwdriver and drill;
- nail puller;
- hammer, screwdrivers, screws;
- glue;
- primer, paint, varnish;
- tassels.
This is the basic set of tools; if additional equipment is needed for any work, we will definitely remind you about it.
A nail puller is necessary for dismantling pallets
Features of choosing pallets
The final version will depend on the quality of the pallet; its choice should be taken with due care. To do this, you need to know that under the general name there are several classifications that differ not only in size, but also in condition and appearance.
Basic rules for choosing pallets:
- structures must be intact, without cracks or signs of rotting boards;
- Pallet marking:
- IPPC means that the wood has been processed in accordance with international safety standards;
- NT and EPAL – processing was carried out under the influence of high temperatures;
- MB and EUR cannot be used for the manufacture of home furniture. Chemical compounds were used to prepare the wood.
EUR marking is undesirable for residential and office premises
Pre-treatment of pallets
The pallets should first be prepared for use. To do this, all boards are cleaned and sanded so that no one is injured during operation.
If subsequent work requires not whole pallets, but individual elements, they are disassembled and sorted by size. It is advisable to treat the boards with a special compound at this time; this is especially recommended if the products will be located outdoors. Otherwise, by the end of the season, the wood will acquire a grayish tint, and the process of rotting will begin in areas in contact with the ground.
A sander makes it much easier to polish boards to perfection.
Pallets/pallets - what are their dangers?
Pallets have ways of being hazardous to human health. For this reason, before using pallets in the field of construction, it is necessary to inquire about their history of origin. The following types of pallets are not suitable for construction:
- Pallets that are heavily painted with bright paints and varnishes may contain life-threatening formaldehydes, which are very toxic.
- Pallets that were previously used at retail outlets in spontaneous markets and bazaars - absorbed aromas and moisture can negatively affect not only the quality of the wood material, but also the aroma of the building as a whole.
- IPPC pallets are marked because they are treated with chemical compounds that can cause all sorts of diseases in people who have direct contact with the pallet.
For this reason, the first rule when choosing pallets is an environmentally friendly material without certain disadvantages and damage to the integrity of the wood. The photo shows the process of building a large house from pallets. The second rule for successful selection of pallets is trusted suppliers. You can order such materials from all transport companies that engage in freight transportation. They will provide you with all the necessary information and also select the best and cleanest pallets.
Finishing
Wooden flooring indoors should not only be durable and rigid. Beautiful flooring: linoleum, carpet or varnish, enamels of various shades can make the floor attractive and comfortable for walking. For example, varnishes will not only highlight the structure of the wood, but also create a protective surface layer. If necessary, the easiest way to level a plank floor is with sheets of plywood.
You can come up with many ideas for constructing the necessary products from pallets. From such wooden elements you can make pieces of furniture for your home or summer cottage, build a temporary shed in which firewood will be stored, or make an unusual decoration. The main advantage of pallets is the material, that is, wood, which allows you to create unusual elements that will add coziness and convenience. Let's consider what products you can make from pallets with your own hands.
Care
To increase the service life of summer cottage buildings made from wooden pallets, they must be properly cared for. Renew varnish and paint in a timely manner, as well as replace damaged pallets. In fact, it is quite simple, and all actions will be carried out quite rarely.
It is recommended to update paint and varnish once a season. The old layer is removed using sandpaper. As a result, nothing should remain on the wooden surface. Afterwards a new layer of paint is applied, dries during the day, then a layer of varnish.
The surface layer of buildings made from pallets needs to be renewed annually
Replacing damaged pallets is much more difficult. Most of their designs are modular. Then getting a separate pallet is either very difficult or impossible. It will be easier to assemble a new structure or think through a disassembly system in advance.
Advantages and disadvantages
There are many advantages to using pallets. The following factors are usually mentioned:
- open design of the gazebo (free air circulation in the gazebo has a beneficial effect on health, it is pleasant to be in it even on the hottest days)
- affordability (pallets can be made from boards yourself, you can purchase used options - all this will not cost that much)
- environmentally friendly construction (by the way, when using pallets as construction raw materials, try not to choose pallets marked IPPC, the wood of which is coated with chemicals).
At the same time, pallets have their own disadvantages that must be taken into account. The problematic nature of using the material lies in its vulnerability.
Leveling the floor on the balcony with logs. Leveling the floor with joists
Leveling with joists is a great way to not only level the balcony, but also slightly raise it and even insulate it.
In this case, the base of the balcony is not loaded with excess weight. The technology of this method
Wooden joists for leveling
involves the preliminary installation of timber sheathing, sewn on top with boards. The design of the floor makes it possible to lay any communications, insulation and waterproofing materials.
To carry out the work, it is necessary to prepare the following materials:
- beam;
- insulation (if necessary);
- waterproofing film (if necessary);
- self-tapping screws;
- dowels;
- material for finishing cladding of logs.
Traditional options can be used as thermal insulation material:
- mineral wool;
- expanded clay;
- Styrofoam.
As a finishing material, you can use boards, plywood, fiberboard, chipboard and others. The choice of both materials mainly depends on the financial capabilities of the owners and the characteristics of the balcony.
The order of work is the sequential execution of the following actions.
- The initial stage is preparatory; here, debris, dust and dirt are removed using a broom or a construction vacuum cleaner. If there is an open space under the concrete slab of the balcony, for example, a neighbor’s balcony without glazing, then waterproofing the floor is mandatory. A polyethylene film is laid on the floor, the edges of which are placed on the walls. In addition to the film, it is suitable to use combined materials for simultaneous hydro- and thermal insulation - penofol and other similar ones.
Pallet selection
Pallets or pallets are containers that ensure the safety of goods during transportation. Such containers are made of plastic or wood
Moreover, for the construction of a barn it is worth paying attention to wooden pallets. One of the best options is larch
This wood has sufficient strength and is resistant to moisture. A larch barn will last a very long time.
In Russia, wooden pallets are made in the following sizes:
- 80x120 cm, flooring thickness 2.2 cm;
- 100x120 cm;
- 120x120 cm, board thickness up to 2.5 cm;
- 120x160 cm;
- 120x180 cm.
Pallets are also available in other sizes, for example, 32x40, 36x42 and 48x48 inches. Euro pallets have dimensions of 120x80x15 cm and 120x100x15 cm. Pallets with a deck thickness of 2.5 cm are best suited for construction.