March 23, 2017
Many people like various neon signs. Bright and attractive, they involuntarily attract the eye. That is why they are so often used for advertising. After all, her main task is to attract the attention of as many people as possible. And I think many would like to have something similar at home or in a corner where you spend a lot of time. But where can I get it? Order from an advertising agency? This will cost a lot of money. What if she gets bored or wants to change something about her? Will you have to spend a lot of money on changing and restoring it again? No. Today we will create such a sign with our own hands. And everyone will be able to choose an image or inscription on it to suit their taste.
Creating text
Step 1
Create a text with all letters in capitals. Font 'Beon Medium'. Text color #a33e88, font size 103 pt.
Step 2
Duplicate the text layer. Turn off the visibility of the original text layer by clicking on the eye next to the layer thumbnail. Next, right-click on the duplicate layer and in the window that appears, select the Rasterize option .
What we'll do next is separate the vertical and diagonal text from the horizontal text to apply effects using different Angle .
Step 3
Select the Rectangular Marquee Tool (or choose any selection tool you like), in the settings of this tool, select the Add to selection , and using this tool, select the horizontal fragments of text.
Step 4
Next, go Editing – Cut (Edit> Cut), and then go Editing – Paste Special – Paste in Place (Edit> Paste Special> Paste in Place). Thus, horizontal fragments will be selected on a separate layer. Name the layer with vertical fragments Vertical , and the layer with horizontal fragments Horizontal .
Step 5
Reduce the Fill value to 0 for both the Vertical and Horizontal .
Step 6
the Vertical and Horizontal layers twice , then group the layers into appropriate groups. Name the new groups Vertical / Horizontal.
Translator's note: each group should have 3 layers.
Step 7
Place the layer with the Horizontal group below the layer with the Vertical .
Add Styling to Wires
Double-click the wire layer to apply the following layer styles:
Step 1
Add a Bevel and Emboss layer style . Set the following settings:
- the Anti- aliased box
- Highlight Mode : Vivid Light
- Color: #ec6ab7
- Opacity : 24%
Step 2
Add a layer style Contour with the following settings:
- the Anti- aliased box
Step 3
Add a layer style Pattern Overlay with the following settings :
- Blend Mode : Multiply
- Pattern : 8
Step 4
Add a layer style Shadow (Drop Shadow) with the following settings:
- Opacity : 60%
- Distance : 13
- Size : 10
So we've added some styling to the wires.
Installation of LEDs
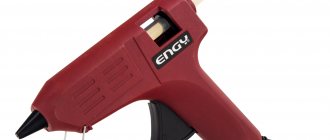
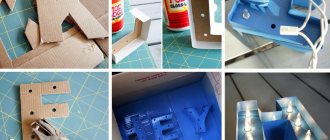
We use hot glue to attach the LEDs to the back of the plexiglass. It is better to set the temperature of the gun not too high, so that the glue hardens faster and the LEDs do not “drip.” It is also worth remembering that the wires from the LEDs are not very long. Therefore, it is worth considering where to make the transition from letter to letter. Otherwise you will have to solder the wires. Another point is the shape of the top of the LED. If you purchased round ones, it is better to grind off the top and make it flat. It will be much easier to glue.
Transparent lightbox (acrylight)
Transparent lightboxes became an original modification of the classic box.
In a standard lightbox, the image is on paper mounted inside the case. In acrylic, an image is formed when a layer of transparent acrylic is destroyed due to the reflection of light in it. Advertising agencies use CNC engravers with cutters and grinding attachments or laser engravers to apply images. At home, this effect can be achieved using matting compounds.
Dynamic Acrylight
By using your imagination, you can create a multi-layer acrylic with a dynamic image. Here is an example of such a design:
Responsibility for violation of advertising laws
Responsibility for violation of legislation in the field of use of signs is set out in Art. 31, 38 No. 38-FZ. Punishment includes administrative and criminal liability. In most cases, the initiator of the cases is Rospotrebnadzor, the FAS and the territory improvement authorities.
Punishments:
- clause 1 art. 14.8 of the Code of Administrative Offenses (failure to provide important information for the consumer);
- Art. 14.3 Code of Administrative Offenses (incorrect sign placement);
- Art. 14.37 Code of Administrative Offenses (lack of permission);
- Part 1 Art. 14.3 Code of Administrative Offenses (false advertising);
- Part 1 Art. 14.3 Code of Administrative Offenses (advertising of alcoholic products);
- Art. 180 of the Criminal Code (use of personalization means for advertising purposes without legal grounds).
An information sign is required for all forms of enterprises and individual entrepreneurs. To avoid becoming advertising, a sign must contain a limited list of information (including additional information) and comply with legal requirements. In these cases, its installation is possible without permission, but with responsibility before the law and the consumer.
When choosing additional formats of signs (shapes, letters, boxes), which are designed to inform the consumer about the type of activity, goods, services, they are guided by the provisions of Resolution 902. Their approval is also optional. But judicial practice shows that the installation of such structures often ends in dismantling, and challenging the conclusions of expert groups is complicated by the lack of criteria for information and advertising signs in the legislation.
Backlight
The final, but optional step, which creates an unusual highlight around the letters. It's like the neon tube is shining a little onto the wall.
How to make a neon sign illuminated:
- In the Layers panel, where your label layers are located, there is a small arrow in the very corner that allows you to collapse all the settings. You need to do this procedure with 2 layers of text.
- Hold Ctrl and create a new layer. It should be under the label layers.
- Hold Ctrl and click on the pentagram of the text layer (letter T). The entire text layer should be selected.
- In the top menu, select the tab Selection – Refine Edge .
- In the window that appears, in the “View” , select the “Overlay” .
- Feather to 50 and Shift Edge to 70.
- Press Ctrl + Delete and fill the text with white.
- In the Layers select Blend Mode – Overlay .
- Next, double-click on the same layer, in “Color Overlay” select any shade for the inscription, and the Blend Mode to “Chroma”.
Work order
Front of the box
Translucent banners are the cheapest, but they require a more expensive tension system or have to use a rigid structure.
The most commonly used material is milky acrylic. Its main property is the diffusion of light, thereby visually making the backlight even.
Handmade illuminated signboard
An alternative to acrylic is polystyrene. It is used because it is cheap, but it is more fragile and susceptible to environmental influences.
Applying an image to the box
A film or an applique of vinyl films is applied to the front of the box. Printing on film has long been outdated, as it quickly fades in the sun and loses its colors. The same cannot be said about vinyl applique. It is much more colorful, more practical and almost does not deteriorate. There is, of course, a drawback - it is very expensive, and installation requires certain knowledge.
Side surface of the box
If we are talking about a small box, then you can use aluminum or plastic as a profile. This part is made in completely different sizes and shapes. But it is best to make boxes no wider than 180 mm, since lighting costs will increase significantly.
Back of the box
The best option for the rear is galvanized steel, as it does not corrode and is very durable. It is also important that it has a low cost. Also, the back part can be made of other opaque materials - plastic, composite panel.
Box lighting
To illuminate the box, fluorescent lamps are often used. They are very cheap and practical, and at the same time they produce a good luminous flux, but they get very hot. They were replaced by LED strips, as they are better in all respects.
Neon sign glows brightly at night
Neon lamps are used to illuminate shaped signs.
Add Stylization to the first duplicate layer with vertical text fragments
Copy the layer styles of the first duplicate of the Horizontal layer , and then paste the copied layer styles to the first duplicate of the Vertical .
Double-click the duplicate Vertical layer to adjust the Angle to -76 in the Bevel and Emboss layer style , and change the Altitude to 53.
The result for the first duplicate layer.
Add Stylization to the second duplicate layer with horizontal text fragments
Double-click the second duplicate layer Horizontal (Horizontal) to apply the following layer styles:
Step 1
Add a Bevel and Emboss layer style . Set the following settings:
- Size : 16
- Use Global Light box
- Angle : 18
- Altitude : 58
- Gloss Contour : Half Round
- the Anti- aliased box
- Highlight Mode : Vivid Light
- Shadow Mode – Opacity : 0%
Step 2
Add a layer style Contour with the following settings:
- Gloss Contour : Sawtooth 2
- the Anti- aliased box
Step 3
Add a layer style Inner Glow with the following settings:
- Mode : Linear Light
- Noise : 5%
- Color : #ffdcfa
- Source : From Center
- Size : 38
Step 4
Add a layer style Outer Glow with the following settings:
- Color : #7f2d65
- Size : 15
This is a stylization of the final layer Horizontal . We additionally added gloss and glow.
Add Stylization to the second duplicate layer with vertical text fragments
Copy the layer styles of the second duplicate of the Horizontal layer , and then paste the copied layer styles to the second duplicate of the Vertical .
Double-click the second duplicate Vertical layer to adjust the Angle to -82 in the Bevel and Emboss layer style , and change the Altitude to 53.
So, we have completed styling both parts of the text.
Add Stylization to the original layer with vertical text fragments
Step 1
Right-click on the original Horizontal layer and in the window that appears, select the Copy Layer Style , and then right-click on the original Vertical layer and in the window that appears, select the Paste layer style Layer Style).
Double-click the original Vertical layer to adjust the Angle to 90 in the Bevel and Emboss layer style , and change the Altitude to 74.
Step 2
For the layer style Inner Glow, simply change the Size to 15.
We adjusted the effect according to vertical and diagonal text fragments.
What is flexible neon
Features of flexible neon are uniformity of glow, stability and resistance to external factors.
Flexible neon design.
Includes:
- A set of LEDs that convert electricity into a bright glow.
- Wiring. A set of wires connecting diodes to each other.
- Shell. Flexible structure made of silicone or polymer materials. Can have almost any color. Performs a protective function and also forms the necessary shade of glow.
Where can flexible neon be used?
The most common areas include:
- decoration of building facades, architectural monuments;
- design of advertising signs, banners and billboards;
- decoration of parks with illumination of trees and bushes;
- car design (body, interior);
- design of interior spaces of clubs, bars and other establishments.
Using flexible neon.
How to make volumetric illuminated letters for a sign with your own hands
Or you can avoid wasting time and effort by purchasing a sign from us. The article will be useful not only for those who want to make letters themselves, but also for people who want to buy a sign. In it we will talk about the intricacies of the process, and what result you should get. The technology for making volumetric illuminated letters with your own hands for an advertising sign is not very complicated. If desired, you can make them yourself. When we needed a sign for one of our offices, we decided to make a short photo report and describe for you all the technologies and subtleties, and give advice on making it yourself.
Preparing files
Before we begin, we will need a mock-up of the future sign. We are preparing a layout in a program in Corel Draw. This is necessary in order to then cut out the necessary headings on a CNC milling machine. If you have not worked with this program, we can advise you to contact a designer you know, he is familiar with it.
It is better to prepare the front faces (the front part of the future letter) “lowering” (the second milling contour for a sidewall thickness of +0.5mm). Next, in the same program, we convert the image into curves using ultra-thin lines. If the designer is not familiar with “lowering”, then specialist milling specialists will help you with this. Read about them below.
Don't forget to invert the letters to cut horizontally. We prepare the backdrops (the back of the future letter) along the inner contour of the future letter. Those. they should be slightly smaller than the front parts. To the thickness of the side wall.
Making the front and back of the letter
For the front part of the letter we need milky acrylic glass 2 millimeters thick (our letters are small, for large letters we use thicker glass). For the back part - PVC sheet 3 mm thick. We cut the fronts and backs on a program-controlled milling machine. Of course, you can do this yourself, but it’s easier and faster to order from specialists. It costs 30-60 rubles per linear meter of cut. Milling can be done with us, or Google the company closest to you. More or less large advertising companies, as a rule, have their own milling machine. By the way, they can sell you materials there. You will save a lot by not having to buy a whole sheet. You will only pay for the quantity you need.
This is what a “lowering” made on a milling machine looks like.
Blanks cut on a milling machine for future illuminated letters.
The article will be useful not only for those who want to make letters themselves, but also for people who want to buy a sign. In it we will talk about the intricacies of the process, and what result you should get. The technology for making volumetric illuminated letters with your own hands for an advertising sign is not very complicated. If desired, you can make them yourself. When we needed a sign for one of our offices, we decided to make a short photo report and describe for you all the technologies and subtleties, and give advice on making it yourself.
How to make the side parts of letters for a future sign with your own hands
Our letters will be 5 centimeters deep and 8 centimeters high. For the side part we will need a PVC sheet 2 millimeters thick. The thickness of the selected material depends on the height of the future letters. Two millimeters is suitable for letters up to 15 centimeters high. Further up to 40 centimeters - three millimeters. If the letters are higher, then for strength we use thicker sheets - 4, 6, 8 and 10 millimeters.
Please note that we chose the depth of the letters to be 5 centimeters (no less) so that when they are illuminated there are no light spots from the LEDs. The letters should glow evenly and equally. If we want to reduce the depth of the letter, we will have to use special “lensed” LEDs or make letters using a more complex technology, which is beyond the scope of this article. Otherwise, spots of light cannot be avoided. How do careless advertisers save money here? They make the letters deeper and install fewer LEDs (and this is the most expensive component in the sign). The result is that there are no stains, but such a sign will also glow dimly. Ask them what the minimum illumination in lux will be on the surface of the letter. What will they answer you?
We mark the PVC sheet. Mark 5 cm.
Cutting strips for the sides
We measure the required piece of sidewall according to the letter with a small margin. We'll cut off the excess later.
How to glue the straight sides of letters.
Next, we glue the cut PVC side panel to the plexiglass front with Cosmofen CA12 glue in parts. Essentially, Cosmofen CA12 is based on cyanoacrylate glue, which is sold in any department store. We glue the sides of the letters where we made the lowering on the milling machine. This is done so that the end of the PVC sidewall is not visible on the front of the letters.
Please note that careless advertising companies save on customers and glue the sidewall directly to the side of the front panel. It's easier. Such a letter will look sloppy and cheap. Moreover, if the sign is located on the street, the end will quickly become covered with dirt that cannot be washed off, and the film on the front and side will begin to peel off and fray. In a year it will be a pity to look at such a sign. And they charge money for quality work.
Glue the cut PVC sidewall to the front
We continue in the same spirit, cutting and gluing the sides.
The result obtained.
The technology for making volumetric illuminated letters with your own hands for a sign cannot be rushed. There is no need to rush to glue the parts together.
Please note that there should not be even minimal gaps between the glued parts of the side parts (see the picture with the workpiece above). Otherwise, then the bright light from the backlight will “see through” them. Careless advertisers may tell you that this is normal. No. This is marriage.
Next, we try on the backdrop to the resulting workpiece and, if necessary, eliminate the flaws. If the backdrop fits perfectly, then cut off the excess with a mounting knife.
We try on the backdrop to the glued blank.
How to glue the rounded sides of letters.
Straight and round illuminated letters are glued using different technologies. We first heat the rounded parts of the letters with a hairdryer until they soften evenly. We give it the desired shape with our hands, cut it and then glue it. A household hair dryer is also suitable for this purpose. Of course, you won’t be able to bend thick PVC sheets on it, but 2 millimeters will be enough.
Heat the cut strip with a hairdryer.
We try it on and cut off the excess.
Glue it.
If the PVC hardens faster, heat it again. This will not harm the workpiece in any way. To bend the material quickly and accurately, you need to “get your hand.” Small irregularities can be smoothed out on an already glued product.
We do the same with the inside of the letter “O”
This completes the gluing of the sidewalls to our “do-it-yourself volumetric letters”. All that remains is to sand down the rough edges. For this we use a grinding machine. But this is not at all necessary. A sheet of sandpaper and a block of wood will do.
Sand out any uneven surfaces.
Give our letters the desired color
Wash the letter with water (you can use dishwashing detergent) and dry it. Next we need translucent film. It scatters light well and is produced specifically for these purposes.
Please note that when the sign is turned on and off, the color translucent film (which will give color to the front of the letter) will have different shades. To choose the necessary compromise, it is better to first use the catalog and look at its shades in both states. Otherwise, you may see a sign that is not the color you expected.
. We cover the light parts “wet” with Oracal 8500 series film. That is, the front part must first be wetted or sprayed with a spray bottle.
Cut off the required piece of film.
Glue the film to the front part “wet”
Please note
that if the sign will hang on the street (for interior letters this point is not so important), then the film from the front of the letter must be stretched and folded onto the side (You can see it by examining the letter closely).
This is done so that the letter serves for a long time. Otherwise, over time, blisters and cracking will appear at the junction of the side and front parts. The letters will take on a shabby appearance. By the way, this is the point where careless advertisers save. Some are simply in a hurry to “cut” money, some have their hands growing in the wrong place or lack the qualifications to do it carefully. Since the side parts of our letters are not illuminated, we cover them with Oracal 641 series film “dry”.
We measure out the required piece of film with a margin.
We paste the sidewalls “dry”.
Cut off excess film from the back of the letter
And from the front.
Heat it with a hairdryer and smooth out any unevenness. Be careful, if the hairdryer is professional, the film can be burned through. A household hair dryer is also suitable for this purpose.
Heat it with a hairdryer and smooth out any unevenness.
Electrics. How to make volumetric letters illuminated.
For our letters you will need an interior LED strip.
Please note that if the sign is located on the street, then the tape needs to be waterproof. But it is also rarely used due to low reliability. Most often, waterproof modules are used. There are many types and designs of them. It would be strange if careless advertisers did not deceive clients here too. After all, LEDs are the most expensive part of a sign. Let us briefly list their manipulations:
- They put up interior tape and pray that the sign doesn’t burn out during the warranty period.
- Interior modules are installed. They last for a year and a half.
- Buy the cheapest Chinese waterproof modules. You can sleep peacefully for one and a half to two years. Then they fall apart (literally).
- They install normal modules, but with outdated chips, and your sign glows dimly.
Replacing defective modules throughout the entire sign is slightly less than the cost of a new one.
Believe me, this is really true. Cut the pieces of tape to the required size. The tape has a pictogram marking the places where it can be cut. Don't cut into others. We glue diode strips onto the backdrops.
We measure out the required pieces of tape.
Glue the tape to the backdrop.
We clean the contacts on the tape, treat it with acid (you can use rosin or ready-made flux), apply acid and solder to the wires and tape
Apply rosin to the tape.
We strip the wires and apply rosin to them.
Solder the connecting wires.
The connection is parallel. Solder the wiring.
Final assembly of the sign yourself.
All we have to do is install the finished letters on the backing. For the backing we used a small scrap of composite material. It was cut out in advance on a milling machine. Covered with gray film. The technology is the same as described above for letters. The wires from each letter were passed through the holes onto the back of the substrate.
We install the backdrops of volumetric light letters on the substrate.
We secure the glued parts to the backs with self-tapping screws.
We cover the visible heads of the screws with circles made from the same film that covered the side parts. They become almost invisible. You could also glue the letter to the backdrop. But such a design would be non-demountable and unrepairable.
Please note that in the case of an external sign, it is necessary to seal the joints of the backdrop and the letters with silicone. Otherwise, street dirt will soon appear inside the illuminated letter, which will be very clearly visible when the backlight is on. Careless advertisers often don't do this. The result is that in order to properly wash the sign, you will have to dismantle it, disassemble it and wash each letter from the inside. Or put up with dirt stains when the sign is on.
Let’s note right away that if you saw a flashing sign on the street, this means that careless advertisers saved on the power supply. They installed a power supply without a power reserve (well, it’s cheaper). The power supply has become hot (this happens more often in the summer), and its efficiency has decreased. The power consumption of the sign has become greater than the power of the power supply. The power supply “went into protective mode” and the sign went out. The power supply “came out of protective mode” and it caught fire again. And so on endlessly. It is necessary to choose a power supply with a power reserve of 20 - 30%, and for highly critical and hard-to-reach objects - 40 - 60%.
We connect the wiring on the back of the substrate.
We will cover it with film so that the wires do not dangle.
We connect the sign to the transformer and check the product.
We made a sign out of volumetric lights with our own hands.
Materials and tools for making volumetric illuminated letters for a sign with your own hands:
Tool:
1. Plastic squeegee 2. Garden sprayer (0.5-1.5 l) 3. Drywall knife (stationery) 4. Screwdriver 5. Metal ruler 6. Metal square 7. Pencil 8. Soldering iron min 30W 9. Hair dryer 10. Grinder manual Materials:
1. Plexiglas milky plexiglass 3 mm. 2. PVC sheet 3 mm. and 2 mm. 3. Film Oracal 8500, Oracal 641 4. LED strip protection class strip IP-20 6W per meter. 5. Transformer 10 Watt 6. Wire 2*0.25 7. Wire SHVVP 2*1.5 8. Self-tapping screws JPMT 16 1.5*12 9. Water 10. Fairy 11. Glue Cosmofen CA-12 12. Solder 13. Acid
Work on mistakes:
- There are glue streaks on the front - scrape them off with a knife blade. If traces still remain, you can pour a thin layer of dichloroethane and wait until it hardens.
- The sidewall is glued crookedly - remove the sidewall, clean the gluing area with a blade, and repeat the operation.
- The backdrop does not fit into the glued letter - trim the backdrop in the right places.
- The volumetric letter does not light up - the contacts are not connected correctly, check the “+” and “-” starting from the transformer.
- When you connect the flashes and clicks, you have connected the sign to a 220V current. The diodes are most likely burned out, replace the diodes.
- When illuminated, dots and streaks are visible on the front - dust has entered. Remove the film, wash the front, dry it and re-apply a new film “on wet”. Dry and check.
Denis Chumaev Chief engineer of the company Visibly
We make all kinds of letters. To find out the cost, select the desired type below
Pseudo-volume letters (flat)
With and without backlight; Plastic thickness from 3 to 10mm; Great for interiors. from 169
rub. per letter
More details
Volumetric illuminated letters
Increased brightness Elements of any complexity and size from 1980
RUB per letter
More details
Volumetric letters made of metal
With and without lighting From stainless steel, brass or ferrous metal from 2450
rub. per letter
More details
Retro letters with light bulbs and neon
Made of plastic, wood and metal. Stylized solution for interior or signage. from 1790
rub. for 1 letter
More details
Print an image
An image of our size easily fits on two A4 sheets. You can split an image in any graphics editor. In our case, this is the word ARDUINO. The highlighted areas should be light. That's why we print white letters on a black background. It is also worth noting that you should not use thick paper for printing. Since light will not pass through it sufficiently. Regular carbon paper will do.
Tip eight. Don't repeat the same information on the same board.
Make the most of every inch of your advertising space. Do not duplicate images with inscriptions. If the picture is chosen correctly, it can tell about the product without unnecessary words. If your headline is good, encourages you to buy or order a product, and the image is not of high quality, then you will miss the opportunity to make your ad memorable. For example, it often happens that on a billboard we see a call: “Order our high-quality products,” and below we see a faded, blurry picture or one that blends into the background, then this is unlikely to make us want to actually order something.
Therefore, it is better to limit yourself to one high-quality image that does not need additional appeals.
Add Stylization to the original layer with horizontal text fragments
Double-click on the original Horizontal to apply the following layer styles:
Step 1
Add a Bevel and Emboss layer style . Set the following settings:
- Size : 10
- Use Global Light box
- Angle : 0
- Altitude : 70
- the Anti- aliased box
- Mode : Linear Light
- Shadow Mode – Opacity : 0%
Step 2
Add a layer style Contour with the following settings:
- the Anti- aliased box
Step 3
Add a layer style Inner Shadow with the following settings:
- Blend Mode : Screen
- Color : #e658d4
- Angle : 30
- Distance : 0
Step 4
Add a layer style Inner Glow with the following settings:
- Opacity : 85%
- Color : #fe66f1
- Source : From Center
- Size : 18
Step 5
Add a layer style Shadow (Drop Shadow) with the following settings:
- Distance : 13
- Size : 7
So we added some styling to the first layer with the horizontal part of the text.
Permission to place advertisements
By decision of various courts, signs can be recognized as both informational and advertising, and unauthorized installation of advertising is punishable by law. Therefore, permission to install a sign is obtained regardless of the guarantees of advertising agencies. To do this, contact the town planning department, and upon receiving a positive response, the project is approved by the administration.
Additionally, a permit is obtained if the building is not in personal ownership (lease agreement).
For this purpose they organize:
- auction (state municipal property);
- voting of residents (multi-apartment buildings).
The permit is issued for 5 years. If the sign is recognized as informational, then obtaining permission will not be required.
We create fastenings
Step 1
Select the Rectangle Tool to create an 11 x 15 px rectangle.
Translator's note: below, I will describe the entire process of creating a mount: 1. in the settings of this tool, set the Layer- shape mode 2. Add anchor points, move them (using the Arrow tool) 3. Rasterize the shape 4. Create a duplicate. 5. Apply layer styles.
Step 2
Select the Point Tool. Add two anchor points in the center of the vertical lines of the rectangle.
Step 3
Now, select the Direct Selection Tool , use this tool to select the center points you added, and then press the Left Arrow key once to move the points 1 px to the left.
Translator's note: 1. When selecting points with the Arrow, hold down the (Shift) key 2. You will not see the outline selection, do not worry, you have already selected them, because the points will become active, you will see it, now, just press the left arrow key to move the points 3. Try pressing the left key several times to notice the effect of the shift.
Step 4
Duplicate the rectangle layer. Rotate the duplicate rectangle, for this we go Editing – Transformation – Rotate 90° clockwise (Edit > Transform > Rotate 90° Clockwise). Name the first layer with the rectangle 'H' (for horizontal text fragments), and name the second layer 'V' (for vertical ones ).
Add Stylization to the first duplicate layer with horizontal text fragments
Double-click the first duplicate of the Horizontal to apply the following layer styles:
Step 1
Add a Bevel and Emboss layer style . Set the following settings:
- Size : 16
- Use Global Light box
- Angle : -36
- Altitude : 42
- Gloss Contour : Cove - Deep
- the Anti- aliased box
- Highlight Mode : Vivid Light
- Shadow Mode – Opacity : 0%
Step 2
Add a layer style Contour with the following settings:
- Contour : Cone - Inverted
- the Anti- aliased box
So, we have additionally added a glow to the text.
