Sometimes one look at a rusty tool is enough to decide to get rid of it. However, there is no need to rush, as there are many ways to combat corrosion at home.
Folk or store remedies or devices for mechanical cleaning come to the rescue.
Read the article to learn how to apply them correctly in practice, successfully remove rust from an instrument at home and restore its original appearance.
A mixture of vinegar and lemon juice
The “classic” rust remover is a solution of vinegar and lemon juice, which are mixed in equal proportions.
- The resulting mixture is applied to the damaged areas of the instrument using a sponge or soft swab.
- After treatment, the tool is left for a couple of hours so that the product has time to remove the rust. It is important to ensure that the applied solution does not dry out, and to do this, periodically apply the product to previously treated areas.
- After a couple of hours, the remaining mixture should be rinsed off under running water and then the instrument should be dried.
Note! When using this method, it is important to follow safety rules, use gloves, and protect mucous and wound surfaces!
Specialized compounds
If available products cannot cope with rust, you can use store-bought compounds. The following removers work well to remove corrosion:
Neomid 570 .
The concentrated composition contains a complexing agent, a solvent and a corrosion inhibitor. The composition is applied to the problem area with a synthetic sponge and left for half an hour. After the reaction is completed, the remaining product is removed with water. The cost of 1 liter of solution is 580 rubles.- Rust Remover Prosept 023-05 . The composition is applied to the surface using a spray bottle, which is equipped with a bottle. Leave the product for 20 minutes to take effect, after which it is washed off with water or removed with a damp sponge. The cost of a solution with a volume of 0.5 liters is 250 rubles.
- G-Power Zinc Remover . Apply the product to the cleaned surface, wait until it dries completely and thoroughly clean the tool with a soft brush. The cost of a solution with a volume of 0.75 l is 200 rubles.
You can purchase the compounds in hardware stores and in stores for car enthusiasts, as well as on the Internet.
Potato
It may seem strange, but even ordinary new potatoes are suitable for removing rust. To do this, the potato tuber is cut in half, and one of the halves, which will be used in the work, is sprinkled with salt. The latter is necessary in order to draw moisture to the cut, as well as to give the potato surface abrasive properties.
After cooking, the damaged area is generously rubbed with potatoes and left in this form for 15-20 minutes. At the end of the period, the instrument is wiped and dried. This method is suitable for removing surface rust that has not yet penetrated deep into the metal.
How to remove rust from jeans using vinegar
Rust may even appear on fabric items. One material that is at risk of damage is denim.
Sequence of action:
- Apply the acid to the corroded area without diluting. Leave in this state for 20-30 minutes.
- Then heat the area with hot steam from a hair dryer. You can also place fabric on top and iron it.
- Then wash the item in the washing machine on a normal cycle, or wash the jeans by hand.
Author's note
Kirilova Olga
Vinegar is a fairly aggressive substance. To prevent it from corroding the fabric, treat only thick jeans.
Soda
I think many of you still remember the horror story about how a carbonated drink can allegedly eat away at the esophagus. The “proof” of this claim was the fact that soda can remove rust from a spoon, coin, or other metal item if left in the drink for several hours.
The interesting thing about this story is that half of it is true. Although soda is unlikely to corrode the esophagus, it can indeed be used to clean rust from an instrument. By analogy with removing corrosion from cutlery and other small items, the tool must be soaked in a drink for several hours or even overnight.
This method is good for removing small damaged areas, but is not suitable for deep rust. In addition, its use is difficult when restoring large instruments, since in this case a fairly large container and a lot of soda are needed.
Mechanical cleaning to restore original appearance
You can get rid of rust on tools mechanically. For this use:
- Hand brushes with metal bristles. They differ in the stiffness of the bristles and the way they are attached to the handle.
- Mechanical brushes with pneumatic drive. This method may seem easy to use at first glance, but working with automatic brushes is quite difficult, since you have to process small parts. During the procedure, a lot of fine metal dust is generated indoors, so the respiratory system must be protected with a respirator.
- Aluminum foil soaked in vinegar or other acid.
- Sandblasting machines. With their help, you can clean the tool in a few seconds. Moreover, the thickness of the corrosion does not matter.
Regardless of the selected device, the procedure does not change. General instructions for using the tools:
- Before cleaning, the tool must be securely fixed - the optimal setting for this purpose is a vice;
- The surface should be rubbed evenly, controlling the pressing force;
- movements should be circular;
- The stiffer the brush, the less time the procedure takes.
When working with any tool, your hands should be protected with gloves, and your face and eyes with a mask.
Baking soda
Regular baking soda is equally good for removing rust from tools. To do this, add a small amount of water to the soda, necessary to obtain a thick “porridge”. Then the product is applied to the damaged areas.
Depending on how deep the corrosion has penetrated, you will need to wait from half an hour to an hour and a half. If at the end of the procedure the rust is not completely gone, the treatment should be repeated.
We will need
You can, of course, get by only with hand tools, but we will still list everything that will significantly facilitate the work process and speed up the restoration of the ax. A hand-held metal brush, grinder, grinder, sandpaper, and mechanical jigsaw will come in handy. As well as a sharpening machine, calipers, a vice, a hammer, a wood file, a pencil and a ruler.
Do you believe in the benefits of visiting cosmetologists?
Not really
There are several things you definitely can’t do without. These include a wooden beam at least 50 cm in length. You also need a block to make a wedge. Two small metal plates. You will need glue, rags, and water-repellent agents.
Sandblasting
An alternative mechanical way to remove corrosion is a sandblasting machine, which can easily remove even stubborn rust. The necessary equipment is quite expensive, so purchasing it only makes sense for processing a large number of damaged tools.
The main advantage of sandblasting compared to metal brushes is the ability to process even hard-to-reach areas. However, sandblasting is not recommended for use on sheet surfaces. The fact is that sand released under high pressure can leave a serious dent or even a hole in thin metal.
Adviсe
Simple tips will speed up the process of removing red stains:
- Traditionally, a 9% acetic acid solution is used for cleaning. If you don’t have one at hand, you can use 70%, provided that it is diluted with water (1:1 ratio).
- Surfaces treated with vinegar should not be actively rubbed with metal brushes and hard sponges (there is a high risk of color loss, scuffs and scratches).
- When choosing between white table vinegar and apple cider vinegar, it is better to give preference to the second option to combat rust stains. It will quickly deal with the problem of yellow stains.
Working with vinegar solution requires compliance with certain precautions. Removal of stains is carried out only in a well-ventilated area, wearing a respirator and protective gloves.
Ignoring recommendations may cause skin burns and respiratory tract irritation.
Removal of stains is carried out only in a well-ventilated area, wearing a respirator and protective gloves. Ignoring recommendations may cause skin burns and respiratory tract irritation.
Laser processing
As a more technologically advanced means of fighting rust, it is worth considering a laser, which can be used to remove corrosion quickly and effectively. Laser processing has only one disadvantage - the cost of the equipment, which starts from several hundred thousand rubles. Therefore, its purchase makes sense only for commercial use. However, nothing prevents you from contacting workshops that have the necessary equipment.
Features of removal from various tissues
Removing traces of corrosion from fabric must be carried out not only taking into account the degree of contamination, but also taking into account the quality and color of the material. In order not to damage the structure of the fibers and maintain the shade, you should choose the right cleaner:
Black fabrics
The presence of dark pigment requires careful use of potent agents. Such things are treated with glycerin compounds, toothpaste, diluted vinegar
The use of bleach and strong acids is unacceptable.
Colored products. Clothing with a pattern belongs to the “complex” group. Many bleaches can worsen the color, so choose only those products that are gentle. Recipes with vinegar, glycerin, and toothpaste are suitable for colored ones. Colored items should not be left in the sun and treated with whiteness.
White linen. If the light-colored fabric is of natural origin (cotton, linen, viscose), then chlorine-containing or acid bleaches can be used to clean it. Citric and oxalic acids are allowed as home remedies.
Jeans. The thick fabric from which jeans are made is difficult to clean. To remove rust marks, use products with good penetrating ability. Vinegar, citric acid, and household chemicals are suitable.
Synthetics. Thin fabrics made from artificial fibers are sensitive to strong reagents. It is recommended to clean them using universal liquids or mixtures based on glycerin, vinegar, and citric acid.
Cotton, linen. Natural fabrics withstand organic acids (citric, oxalic, acetic). Household chemicals intended for these fabrics are also suitable.
Silk, satin. Delicate tissues do not tolerate aggressive substances and strong mechanical stress in the form of friction. To clean them, neutral, mild-acting compounds are used.
Rust removers
The most affordable professional way to remove corrosion from tools is through various solvents, cleaners and rust converters. They are present in huge quantities on the domestic market, and prices for such products start from several tens of rubles.
Unfortunately, among them there are quite a lot of low-quality items that can only remove surface corrosion. Therefore, before purchasing a specific product, I strongly recommend that you study reviews and reviews of it.
To summarize, I would like to note that it is much easier to prevent corrosion than to later solve the problems caused by its occurrence. To do this, do not forget to dry the tool after use (especially important for gardening tools) and store it in suitable places.
The working process
Once the rust is cleaned, you can polish the ax using a felt wheel previously placed on the shaft of the sharpening machine. This operation is purely aesthetic.
Now you need to make an ax handle. Here we need a suitable block of wood. It is best to choose hardwoods: oak, ash, birch, maple. We mark the future block with a pencil and begin cutting. The easiest way to do this is with a mechanical jigsaw. When the blank is ready, the inner contour of the ax is marked and sawed out in the same way, after which there will be a long and painstaking work - using a wood file. The work should be completed with a grinding machine.
Materials
- to automate the process, special machines are used that are equipped with fabric or felt circles;
- a certain amount of GOI paste is applied to the abrasive;
- the goyi paste in question is a special powder consisting of an active substance that has an activating effect on the surface of the product;
- A typical paste consists of approximately 60% abrasive and 40% binder. content of activating additive 2%.
Often the above problems lead to the fact that the work in question is done by hand using a special paste under mechanical influence. This point determines a significant decrease in productivity, since processing on an automated line is impossible. Due to the use of outdated methods, the production line often results in a conveyor failure, and this negatively affects the cost of obtaining the product and reduces the competitiveness of the enterprise.
Making the head
To make a head, you need to know what you want your future ax to look like. To implement the idea, you need to draw a sketch.
Step-by-step production:
- Place the old head on a blank sheet of A4 paper.
- Trace the outline of the blade using a pencil.
Drawing. - Add additional elements to the sketch, such as reducing the span of the blade or adding additional notches.
- Cut out the sketch and glue it to the old head using regular glue.
- Use a grinder to cut off any excess metal.
- Treat the workpiece first with a grinder or metal polishing wheel to make the head shiny, then with sandpaper to make the color uniform. If you don’t have a grinder or a metal polishing wheel, you can use a metal grinder.
- Ready!
Why does an ax rust?
This is caused by the destruction of alloys and metal due to chemical contact. The speed of this process is affected by temperature. At a temperature of 100 degrees, the speed increases several times.
Only under ideal conditions is rigidity and strength maintained. But such conditions almost never happen. When a metal ax comes into contact with air or water, corrosion occurs. The metal part is varnished, but over time the protective layer wears off.
The following causes of rust can be noted :
- increased air humidity (oxidation occurs);
- sedimentation on the untreated part;
- the presence of stray currents;
- presence of chemical elements in the air.
First, bright spots appear, then corrosion. If this process is ignored, plaque destroys the metal. Any sharp edge is a weak point, since the protective layer is thin around the edges.
Even the most dirty ax can be cleaned.
Hydrolysis
This method is suitable if you need to clean a tool of complex shape, which consists of a large number of parts. There is no point in sanding or brushing such elements, so hydrolysis remains. Its principle is purification almost at the molecular level. During the hydrolysis process, hydrogen is released, it can quickly ignite, so when working it is important that the room is well ventilated.
Do you like guys with long hair?
Not really
Healthy! Some don't use stainless steel. Instead, the hydrolysis process is carried out in a metal bucket into which a baking soda solution is added. This option is also suitable. But it must be taken into account that during hydrolysis the liquid is very heated. In a plastic bucket it reaches 50 degrees, in a metal container the heating will be greater.
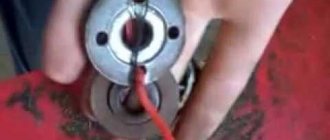
- In order to get good contact, it is necessary to first clean a small area on the instrument (the “crocodile” will be installed on it later).
- We lower the tool into the bucket. At the same time, he should not be allowed to touch the screen. Therefore, the part needs to be suspended (for example, using a clamp and a small plastic pipe, which we will place on the edges of the bucket).
- Fill the bucket with water so that it completely covers the instrument.
- Add pipe cleaner (2-3 caps per 1 bucket of water) and mix it well with water.
- The “+” (red wire) must be connected to the stainless steel, and the “minus” (red-black wire) must be connected to the part being cleaned.
- We connect the charger to get a voltage of about 9-12 Volts at the output. The stronger the current, the faster the cleaning will occur.
- The liquid will foam a little. This is a normal hydrolysis process.
- Leave the part in this state overnight.
After this, all that remains is to remove the tool and clean it of flaking rust. For processing simple tools, this method is labor-intensive. But for large elements (for example, a rusty vice) it’s perfect. You can also clean car parts using this method. For pliers, screws, bolts and other things, you should choose the simpler cleaning methods described above. The best option is citric acid and vinegar.
Selection of an ax and its preliminary preparation
As practice shows, axes and lugs may differ slightly in size and shape. To avoid making a mistake, you can take an ax head with you to the store. But it’s more convenient to mark the outline of the upper part of the eyelet on paper, cut it out, and when trying it on, apply it to the upper end. The outlet, upper hole of the eyelet is larger in size than the lower one.
If you buy an ax handle:
- smaller size, it will not be possible to fit the head tightly;
- larger than necessary, it will take longer to adjust it.
By selecting an ax close to the required size, the master saves his time on fitting. When choosing, you need to pay attention to the following points:
- the wood of the product is dense and dry;
- the surface should be smooth, without potholes or splinters;
- There is a bend and a slight expansion from below so that the hand does not slip during a chopping blow. The process of fitting an ax.
Even if the ax handle seems dry, it is recommended to keep it for an additional 2-3 days:
- in the summer in the sun;
- in winter on a hot radiator at home.
During drying, be sure to turn it over periodically.
We consolidate the result
No matter how well you clean your cast iron cookware, during use it will come into contact with water and acids. Therefore, there is a high probability that you will see the rusty coating again. The above-mentioned flaxseed oil will help avoid this. In order to obtain a reliable protective film, it is not enough to simply grease a frying pan or cauldron. The vessel should be preheated to approximately 300ºC. Indicators of achieving the desired temperature will be the color of tarnish, and the oil on the surface should smoke
The resulting protective layer will last a long time. However, you should remember that by relying on detergents you will not only clean the dishes, but also destroy the film that protects them from corrosion. So you shouldn’t rub a cast iron frying pan until it has a metallic shine.
Impaling an ax
The inlet and outlet holes of the eye are specially made different in size. With this technology, it becomes possible to wedge the ax handle in this place. At the top it will be wider than at the entrance to the eye, and will not allow the metal head to slip off.
Even understanding such nuances, it is necessary to make the correct adjustment before installing the nozzle. By following some rules, this is easy to do:
- A line is drawn 5 mm from the top of the ax handle. It is the boundary of the ax head attachment. The head is placed along this line and the lower limit of the landing is marked.
- A paper template is attached to the end, which was prepared for selection upon purchase. It is outlined in pencil. This outline is used as a guide for subsequent adjustments.
- On a machine or by hand using a large wood rasp, the ax handle is ground to the required size. Processing is carried out to the lower outlined border.
- It is necessary to grind until it enters the exit hole of the head by about 1 cm. Please note! Fitting is carried out along the outlet hole of the eyelet.
- Using a caliper, we fix the input size of the eyelet. Focusing on it, making periodic control measurements, the ax handle is ground to a reverse cone to the lower landing mark.
- A small chamfer is removed at the end, which will make it easier to fit into the eyelet. By hand, without additional tools, an attempt is made to place the ax head in place. If this happens, then an indicator of a job done correctly will be a tight fit of the metal on the tree.
- The head is removed. A cross is drawn on the end of the handle with a pencil. The intersection of the lines should be a little closer to the butt. Using the resulting markings, cone-shaped cuts are made. They end 10 mm before the lower border of the landing.
- The ax head is put in place. Here you can already use a hammer or hit the workbench with an ax.
- First, a large longitudinal wedge sits on the glue, then small ones. They are seated to the end using a hammer. The end of the handle is processed to a smooth surface. This is where the work on the nozzle ends.
Special reagents from the store
- Firstly, inattention to the product during operation. The knife is either forgotten on the street and exposed to rain for a long time, or is not systematically wiped after washing.
- Secondly, improper use of dishwashers. Many people place utensils with food residues in the drum, which is not recommended, because as a result the metal oxidizes.
- When using dishwashers, sometimes the integrity of the internal rubber bands is damaged, resulting in the formation of rust in the unit, which, circulating in the drum during washing, settles on the devices, sticking to their surface.
- Rusty water pipes can also cause plaque to form during cleaning. In this case, nothing short of a major plumbing repair will help.
- A “violent” reaction also occurs when alloys frequently interact with fruit acids, salt, and vinegar.
Among the most popular are Adrilan, Omega-1, Avs Avk and Runway.
Folk remedies Recipes for masks At home Hair loss in women How to stimulate growth Causes of hair loss Hair loss in men Review of vitamins Helpful tips