To maintain order on your home desk, you need to buy, or even better, make your own stands for pencils, pens and other office supplies. Thanks to the pencil holder, all writing objects will always be at hand and will not get lost at the most inopportune moment. Moreover, you can involve children in the work, who will definitely add something new and interesting to the design! Today we will show you various pencil holders with your own hands, all you have to do is choose a suitable idea and bring it to life.
DIY pencil holder
Option 1. Salt dough owl stand
Stylish desktop decoration
To make such a cute owl at home, prepare:
- flour;
- water;
- table salt;
- stack;
- toothbrush;
- a cardboard jar of a suitable size;
- acrylic lacquer;
- PVA glue;
- corrugated paper (can be replaced with decorative rope);
- scissors, gouache, brush.
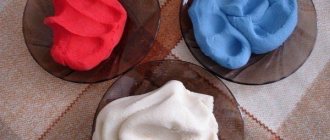
Step 1 . To knead the salt dough, pour a glass of salt and flour into a large bowl, then add water and knead to the consistency required for modeling. Separate a little of the finished dough, add beige gouache to it and knead well.
The jar is wrapped in salt dough
Step 2 . Roll out the dough into a “cake”, the thickness of which is 1-1.5 cm. Apply glue to the outer side of the jar, then wrap it with dough. Trim off any excess dough and smooth the seams with a wet brush.
Step 3 . Using a toothbrush, make a slight stipple over the surface of the dough.
Step 4 . Then knead the brown dough and make the same flat cake 1-1.5 cm thick. Cut a 5 cm thick strip out of it and glue it to the bottom of the jar, as in the photo.
Creating eyes for an owl
Step 5 . Make 2 eye bases from the white dough and then attach them. Make the beak from brown dough, and the irises from turquoise.
Step 6 . Take the pink dough, roll 8 strips out of it, and from them make 4 ropes and make a bow. Leave the part for a couple of hours to dry.
Step 7 . Make teardrop-shaped wings from brown dough and glue them to the body. Glue the ropes woven from white dough to the neck.
Final decor of the pencil holder
Step 8 . Make a sausage from white dough, draw a lace texture on it with a stack, and glue the finished collar under the beak.
Step 9 . Place the craft in a warm place for 24 hours. After that, paint the bottom part with brown paint and make white dots.
Step 10 . Draw eyelashes and pupils, and after the paint has dried, paint white highlights on the eyes. Glue a bow above the wing.
Owl pencil made from salt dough
Step 11 . Glue a button with a corrugated strip bow on top of the lace. Apply varnish to the craft and wait until it dries completely. That's it, the pencil holder made from salt dough with your own hands is ready!
→ How to make a tattoo machine with your own hands
How to do
Preparing raw materials
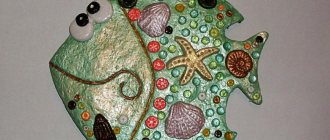
To make a salt dough vase we will need green salt dough, orange salt dough, a bottle of contact lens cleaner, a silicone glue gun, scissors, toothpicks, acrylic paints, a leaf, a piece of tulle or braid, and varnish.
Making salt dough
So, first we make colored salt dough. For this we need 3 parts flour, 2 parts fine salt and 1 part water. Mix water with food coloring of the desired color and pour it into the salted flour, poured in a slide. Knead the dough well. If it crumbles, add a little water; if it seems runny, add flour. It is important to achieve a uniform color of the dough mass. We make salted dough in other colors we need.
Making the base of the vase
We cut off the top of the bottle of contact lens cleaner and we get the base of the vase. Take the green salt dough and spread it evenly over the surface of the plastic. To level the vase, roll it with your hands on a flat surface.
Making relief
To make the vase more interesting, take a piece of paper and begin to carefully apply it to the vase so that you get imprints.
We make bees and dry them
Now we make bees from orange salt dough. To do this, we make an oval part from a piece of mass, then use a stack to separate the head from the abdomen. Break off a piece of a toothpick with a point and insert it into the middle of the head, forming a bee sting. Leave the craft to dry at room temperature for 1-2 days.
Forming bees
Now we coat the vase with varnish. We paint the bees with acrylic paints, making a black head and black stripes. We cut a rectangle from the mesh fabric, round the edges, tie it in the middle with a thread and glue it to the bee. We got the lids. All that remains is to glue the bees to the vase.
sqart for Vse-sama.ru (
text from the author
)
“For a long time I have been looking at floor vases made by myself.
But my 45 square meters and my son, who had just learned to walk, simply did not leave me such an opportunity.
And then such an opportunity arose - to try a new type of creativity through adventurous exchange, which was organized by our forum “All by myself.”
And the work began to boil, it really took a long time to boil - a month, but this is what happened.
I bought 1 m of the thickest sewer pipe, sawed off 80 cm with a hacksaw. The excess is in the pantry, waiting in the wings.
I cut out the bottom from a plastic container lid and glued it on.
At first I simply painted the vase with a regular construction primer and acrylic paint - the result was not impressive - the paint strokes were too obvious.
Then I glued a piece of regular wallpaper for painting - I painted it - I liked it.
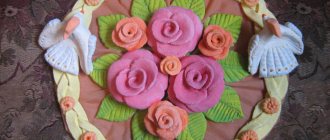
I kneaded the most ordinary salty dough and kept it wrapped in cling film in the refrigerator. I tore it off piece by piece - otherwise the dough will quickly become airy and dry. I rolled out the dough into a layer, using a regular leaf from a houseplant as a template, and cut out the amount I needed. I also pressed through the veins of the leaves with a knife. I glued glue onto the “Master” in a rather chaotic order.
Next came the turn of the lilac clusters themselves. A small ball is made, a droplet is made from it, which we cut into 2 or 4 parts with nail scissors. Open them a little - the lilac flower or bud is ready. A bunch of these small flowers is collected. I glued it directly to the base. I dried it near the radiator, turning it one way or the other. I decided to somehow decorate the top - I cut out circles from the dough and glued them
.
The main sculpting work was completed. I painted the grapes and leaves with watercolors and shaded them with glitter nail polish. Something was missing—my flowers looked like little orphans on a white background—I went over the convex parts of the wallpaper with blue paint. Painting the vase as a “birch tree” improved the appearance. At intervals of a day, allowing it to dry thoroughly each time, I coated it 3 times with acrylic varnish.
This is exactly how my vase left for its new place of residence. All!!!
«
You can make a huge number of crafts from salt dough, for example: flowers, animals, various figures, inscriptions, numbers, toys, paintings and whatever you want! Modeling from salt dough is called bioceramics. The advantage of salt dough is that it is convenient to work with, this material is absolutely harmless and crafts made from it will delight you for several years. In this article we will look at how to make crafts from salt dough with your own hands.
You will need:
a glass of wheat flour, a glass of extra salt, half a glass of cold water, a bowl.
Recipe
The finished salted dough should not stick to your hands or crumble. It should be cool and easy to sculpt. I recommend watching the video master class!
There are two most common ways to dry salt dough. The first method: the finished craft will dry on its own. The main thing is that it should not be exposed to direct sunlight, otherwise it will crack. The craft can be placed on a flat surface and wait a few days. Second method: dry the finished craft in the oven for 3 to 6 hours (depending on the size of the craft). Drying occurs in batches with breaks. One approach is 1-2 hours. For quick drying in one go, set the oven to 75-100 degrees, and then the craft will dry in an hour. At a temperature of 120 degrees, the craft will dry in 30 minutes, but it is better to dry it naturally.
There are two most common ways to color salt dough. The first method: after drying, paint the finished craft with acrylic paints or gouache using a brush. Second method: food coloring is diluted in water, then added while preparing the dough. When the craft is completely painted and dried, it must be coated with transparent manicure or furniture varnish in 2-3 layers. Each layer must dry before applying the next. This way the craft will last for a long time.
You will need:
colored salt dough, stack, clear manicure polish, toothpick.
Master Class
The salt dough star is ready!
Option 2. Stylish cardboard pencil holder
Useful accessories made from toilet paper rolls
A roll of wallpaper or toilet paper is an ordinary piece of garbage, but not in skillful hands, who can even make cute pencil holders out of such seemingly unnecessary material!
Materials and tools
What you will need for work:
- bushings;
- thick fabric (velor or velvet);
- cardboard;
- decorative buttons;
- twine;
- ribbon;
- colored paper;
- glue.
Step 1 . First, make a stand. Cut a circle out of cardboard corresponding to the diameter of the sleeve and glue it. You can additionally nail the bottom with small nails if the roll cylinder is tight.
The bottom is nailed down
Glue is applied
Step 2 . Cut out two circles from colored paper: one according to the size of the sleeve, the other according to the diameter of the bottom. Cover the bottom and inside with the resulting blanks.
Circle is glued
The inner side is glued
Step 3 . Apply a small amount of glue along the edge of the cylinder. After this, apply the twine and, as soon as it sticks a little, begin wrapping the sleeve. Proceed carefully, slowly, turn by turn.
Glue is applied along the edge of the cylinder
Twine is applied
Step 4 . Cut a circle from thick fabric along the diameter of the bottom and glue it. Decorate the finished product with a ribbon, attach a bow and sew on a button. Ready!
Twine is wound
The craft is decorated with ribbon
Use bright thread
Circle of thick fabric
The bow is glued on. The button is sewn on.
On a note! The simplest pencil holder from a sleeve is made like this: strips of colored paper are cut out to fit the size of the cylinder, then it is covered with them and decorated.
Video – Penguin Pencils
Cat bookmark: how to create it yourself
Cats always look cute and cute. As a bookmark, they will be the most suitable options for girls.
To work you will need:
- scissors;
- glue;
- colored paper;
- a simple pencil;
- White paper.
Cats always look cute and cute
Stages of work:
- Cut 3 identical squares from white paper;
- Then also cut out 3 identical squares from colored paper but of a larger size;
- Glue the colored squares together to get a diamond-shaped muzzle and ears;
- Cut off a part from the upper squares (first draw a line diagonally);
- Bend the right corner towards the middle;
- Apply glue to the left one and glue it to the curved corner - you get a rhombus;
- The workpiece should be folded in half and straightened;
- Glue 2 small white triangles onto the ears (1 each);
- Glue another white square onto the bottom of the workpiece in the form of a diamond.
Be sure to engage in the exciting origami art with your child in your spare time. An inquisitive mind will find it incredibly interesting to fold paper to create an unusual product. And if the paper is also bright and glossy, then the interest will double.
An unusual craft - an origami pencil. Of course, you can’t draw with it, but it looks quite childish and attractive, especially if you use double-sided paper. A detailed description of the process of creating a pencil from paper, illustrated with photographs, is given below.
1. Prepare a square of colored paper of any bright shade. The length of its side can be arbitrary, for example, 10 cm.
2. Make the first fold of the square through the middle of the opposite sides.
3. Return the square to its original position.
4. Make a fold using the other two sides.
5. Unfold the part again.
6. Measure a quarter from the side of the square, make another transverse fold. An ironed strip, prepared in advance, will help make measurements accurate.
7. Unfold the square.
8. Similarly, define another fold, focusing on the new strip.
9. Moving closer to the edge, bend the square again and leave it in this position.
10. Finally fold the square through opposite sides, perpendicular to the ironed strips.
11. The marked stripes will help you perform all subsequent operations. Bend the top ends towards you.
12. Bend the corners for future fastening.
13. Form a pencil-like shape. Secure the paper in this position.
The final look of the craft.
The origami paper craft is ready.
Gifts have long become one of the indispensable attributes for any, especially children's, holiday. And if we are talking about a school holiday, then in order to lift the mood, you should definitely give each of the students in the class at least a small present. At the same time, it is quite logical to want the surprises to have a practical purpose, but at the same time look festive. One of these options could be a craft in the form of a pencil made of cardboard.
What is good about a paper pencil?
This version of the craft is relatively easy to do; even the youngest children can do it, albeit under the supervision and under the strict guidance of adults.
Advice
Before you start doing it and calling the children to join, look at the workshops for the corresponding one. This will help avoid many mistakes.
Option 3. DIY paper pencil
A simple, but beautiful and useful accessory.
To make such a pencil stand, you will need:
- toilet paper rolls;
- a simple pencil;
- colored corrugated paper;
- ruler;
- glue;
- scissors.
Step 1 . First, measure the circumference and length of the sleeve, then prepare pieces of colored paper based on the obtained dimensions.
Making a pencil holder from sleeves and corrugated paper
Step 2 . Cover each of the bushings with paper.
Step 3 . From a new sheet, cut out a cloud that will accommodate all the bushings. Glue the sleeves onto the cloud, then decorate the stand with cut out multi-colored flowers.
Vintage masterpiece made from cardboard paper towel tubes
- You will need 3-4 pieces of cardboard tubes, strong glue, scissors, and a lot of decor.
- Make the tubes different in height. Cut cardboard circles of the required diameter for the bottoms, glue the bottoms to the tubes.
- Cover the outside of the tubes with vintage wallpaper or fabric; you can do decoupage. Decorate with roses, lace, ribbons, pearl beads.
- Prepare a round or fancy-shaped solid base from self-adhesive foam board. Remove the backing from the foam board that protects the adhesive side. Place the base with the adhesive side on the satin material, trim off the excess fabric along the contour, and melt it. Glue thin knitted lace along the contour.
- Glue the tubes with their bottoms onto the base in different places.
- Complete the composition with a vintage bird, a miniature in a frame, or a scattering of artificial pearls!
Option 4. Clay pencil holder
An idea for those who like to create clay products
. What you will need to make:
- clay;
- pen rod;
- rolling pin (can be replaced with a board);
- stacks;
- sackcloth;
- knife;
- lace with rough texture.
Step 1 . Cover the board with burlap and roll out the clay on top. It is necessary that the strip has a length corresponding to the circumference of the pencil.
A design imprinted on the clay
Step 2 . Place the lace on top and use a rolling pin to imprint the pattern.
Step 3 . Using a knife, cut a rectangular strip with a pattern to the desired size.
A rectangular strip is cut
Step 4 . Place textured fabric over the longitudinal sections, press with your fingers, and align the curved edges.
The fabric is pressed down with your fingers
Step 5 . Coat the short (side) side of the strip with liquid clay from the inside out. Roll the rectangle into a cylinder and glue it together.
The side is coated with liquid clay
The strip is rolled into a cylinder
Step 6 . Turn the top edge of the cylinder out. Additionally, make a bottom from a piece of clay.
The top turns outward
Another piece of clay is rolled out
Step 7 . Cut a circle with a diameter slightly larger than the diameter of the craft. Press down the cut of the circle with your fingers to make the edges thinner.
A circle is cut out
Step 8 . Turn the craft over and coat the bottom cut with liquid clay.
Step 9 . Place the cylinder on the circle with the coated side. Also coat the protruding edges of the latter with liquid clay, and then wrap it onto the cylinder.
The cylinder is laid on a circle
Step 10 . Roll the clay into small balls. Splash them, make 2 holes in the center with the rod from the handle. You will get buttons with which you will decorate a pencil holder.
Step 11 . Roll out a piece of clay onto a textured fabric, then cut a pocket out of it. Having aligned the cuts, glue the pocket using the same liquid clay. Stack the trim on the seams.
Buttons are glued
The pocket is glued
A patch is glued to the back
Step 12 . Roll out another piece on the textured fabric and glue the patch to the back. Ready! Fire the pencil holder in the oven, then paint it with light brown paint.
→ TOP 5 ways to make topiary from coffee beans
Option 5. Unusual pencil holder made of logs
An original table accessory in the loft style.
It is better to give preference to pear or birch.
Step 1 . Prepare a log about 12 cm high, sand it on both sides. Drill the required number of holes of different diameters with a drill (their height should be 10 cm).
DIY log pencil holders
Step 2 . Sand each hole, for which you will have to change the nozzle to sandpaper.
Every hole needs to be sanded
Step 3 . Actually, this is where the work ends. An unusual and creative pencil holder is ready to use! If you want, you can varnish the product, but keep in mind: after this the color of the wood will change.
Log pencils
Creative coasters
→ DIY cat scratching post - TOP 9 master classes
Video – Cute pencil holders with faces
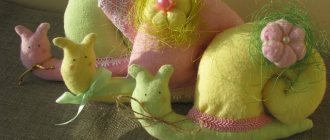
Fabric monkeys
Do you prefer another fabric to felt? Patterns of monkeys - very, very different ones - have been collected especially for you!!! Choose any one you like and sew with pleasure!
Monkeys in Tilda style
Fans of Tilda dolls will definitely want to sew the symbol of 2016 using this technique. A master class consisting of 2 parts (part 1, part 2) will help you.
But you can sew such a monkey toy with your own hands if you purchase the pattern from its author (tilda4kids).
Coffee monkeys
Coffee toys are sewn from simple white fabric (for example, calico), tinted in a special solution of coffee, cinnamon and vanilla, dried in the oven, and then painted with acrylic paints. The technology for making such toys is described in great detail in this Cross master class.
Do you already understand where I'm going with this? Of course, this means that you can make coffee monkeys in the same way, which will fill the house with a wonderful aroma, and everyone who gets it will be in a great mood!
You can buy these naughty coffee monkeys here
Another good idea is to sew a pillow in the shape of a monkey. There are many options here, as they say, choose to your taste. Here are some ideas for inspiration!
You can buy this pillow
Option 6. Stand made of ice cream sticks
Amazing rainbow pencil holder
For this craft, prepare:
- threads of different colors;
- glue;
- scissors;
- brush;
- ice cream sticks;
- a thick plastic cup.
Tools and materials for crafts
Step 1 . Cut off the top of the cup, leaving the bottom and another 3-4 cm of the walls. Cover the glass with chopsticks, leaving small gaps between them.
Step 2 . From the inside, where the cup ends, glue the tip of the thread, then intertwine the sticks with it.
The sticks are intertwined with thread
Change the position of the lace
Step 3 . Having finished a row, change the position of the thread in the next one. That is, if it passed along the front side of the stick, then pass it from the back. Continue weaving the sticks in the same way, changing the position of the colored thread.
Step 4 . Complete the decor to the top, changing the color of the lace after a certain distance. Leave the tips of the sticks on top, as in the photo.
The end of the lace is glued
Pencil holder made from ice cream sticks
Step 5 . Glue the beginning and end of the thread. The rainbow pencil holder is ready! By the way, it is also good because it does not slip out of your hands when carrying it.
Drying and varnishing
When the vase is ready, it should be dried. You can simply dry it near the radiator, in which case it will dry at a rate of 1 mm per day. Or use the oven, maintaining the temperature at about 70-80 degrees. It is important that there are no drafts or temperature changes, otherwise the product may crack or even become blistered. To check readiness, you need to knock on the vase with a stick. If the sound is ringing, then everything is ready, but if it is dull, more time is required.
The vase must be coated with one, or better yet, two or three layers of varnish, otherwise the dough will wash out upon any contact with water. If it was painted with gouache, it is better to use a non-water-based varnish (for example, alkyd, PF or NC), but if not, use absolutely any nail polish.
Option 7. Pencil pencil made of fleece and felt
Beautiful and original stand for pencils
To make such an original stand, prepare:
- tin can;
- plastic toy eyes;
- fleece (green and white);
- pencil;
- green felt;
- meter;
- scissors;
- a needle;
- padding polyester;
- threads;
- glue gun
Step 1 . Measure the diameter, height and circumference of the tin. From green and white fleece, cut out 2 pieces of the corresponding sizes (height of the can + 5 mm allowance and circumference + allowance).
Paired details and faces with ears
Step 2 . Sew the parts together using a sewing machine or a needle with a backward seam. As a result, you will end up with a pair of blanks, as in the photo - white and green. After turning out the white part, set the cylinders aside.
Step 3 . Make paired parts - muzzles with ears (18 pieces), sew them together, not forgetting to leave holes for stuffing. As a result, you will have 9 such faces. Mark on them the places where the eyes will be attached.
Step 4 . Fill the faces with padding polyester and sew up the holes. Glue plastic eyes in the right places.
Stages of wrapping a can
Step 5 . Wrap the jar with padding polyester, then sew the edges and sew on the bottom of padding polyester. Then take the green fleece piece and place it on the can. Glue padding polyester to the bottom.
Step 6 . Cover the bottom with glue and glue the white fleece piece. Sew the edges of the green and white fleece together using a blind stitch.
Final decor of the pencil holder
Step 7 . Glue the faces to the jar. Then cut out leaves from felt and glue them too. The original pencil stand is ready!
→ DIY bean bag chair
Stationery organizer made from cardboard boxes “Owl”
Ordinary small cardboard boxes can become the basis for a bright organizer. It is suitable for children's and school office. Everyone can make an unusual and useful craft without any special expenses. Elena Nikolaeva's master class shows how to make an organizer using two tea boxes and colored paper. The work of turning waste material into such a useful craft will be relevant in the summer, before the start of the school year, and at any time of the year, when you want to make something useful with your own hands.
Materials for creating an organizer:
- 2 cardboard tea packages;
- glue and stapler optional;
- colored paper;
- a simple pencil;
- scissors;
- ruler;
- pen;
- a piece of bright glitter foamiran, if desired;
- white acrylic paint or corrector.
How to make an organizer step by step
Take two tea cardboard boxes of the same size and glue them together, coat the wide sides with glue. You can also use a stapler for secure fastening.
Leave the lower part of the resulting structure unchanged, cut off the upper part. First, you will open the inside of the container, it will be divided by a partition into two compartments, pens and pencils will be inserted into them. Secondly, cut the paper so as to highlight a semicircle in the center - the head of an owl, and two sharp ears at the edges.
Cover the sides on both sides with cardboard. In the future, you will have to paste over with thin paper, and if you lay thick cardboard, the joints between the boxes will not be visible.
Choose bright paper of any color for the base of the craft. Cover the box. It is advisable to do this inside too.
From a small piece of a contrasting color, cut out half an oval and glue it to the central part as the apron of a wise bird.
Cut out huge round eyes from yellow or any other paper, glue them in the center, add pupils. Use white acrylic paint to paint highlights. Add an orange beak.
Draw a mesh pattern on the apron using a ruler and pen. Cut out two bright droplets and glue them as wings. Add eyebrows using bright glitter foamiran. Cut these pieces into fringe. An interesting organizer in the shape of an owl is ready. It turned out to have two compartments. In one of them you can store pens, in the other - pencils or any other stationery at your request.
In order not to forget the page address and share with friends, add to your social networks:
Option 8. Another option from a tin can
In the example, a linen cord is used.
To make such a pencil holder you will need:
- can;
- white paint (enamel, acrylic);
- linen lace (red and white);
- film or cardboard to cover the table;
- glue gun;
- acetone;
- brush;
- pliers;
- lighter;
- gloves;
- scissors.
Step 1 . Press down all the nicks on the can using pliers.
The notches on the can are pressed down
Painting a can
Step 2 . After treating the jar with acetone, put on gloves and paint it. Wait for the craft to dry.
You need to wear gloves when painting
Step 3 . Cut a piece of clothesline and singe one end. Secure the cord at the base of the can with a glue gun, then wrap it tightly in a circle.
The end of the rope is glued
The rope is wound in a circle
Step 4 . Having passed 1/3 of the can, cut the cord, singe the end and glue it.
Step 5 . Take the red rope, go another 1/3, then finish the cover using the white rope again.
White, red, white
Additional decor
Step 6 . Decorate the craft with small decorative objects. Soft toys and shells can also serve as decorations.
If you don’t have a gun, you can glue the rope with any superglue
Video – Cute pencil holder made from a tin can
Option 9. Stand made from old jeans
An unexpectedly beautiful desktop device.
To make such a denim pencil holder, you need:
- old jeans;
- lace;
- a shoe box (or rather, just the lid);
- tin cans (or other containers) of different sizes;
- glue;
- paper clips;
- scotch;
- pencil;
- ruler.
Step 1 . Place the denim on the table and the lid on top of it. Mark the boundaries and connect them with lines.
Borders are marked with a pencil
Step 2 . Cut a rectangle along these lines, then, armed with double-sided tape, glue it inside the lid.
The fabric is glued inside the lid
Double sided tape is used
Step 3 . Cover the sides of the lid in the same way (see photo).
The sides are also covered
Step 4 . Place the can on the material, measure, cut off the excess, and then glue the fabric to the can. Don't forget to leave an indent at the top by folding it inward and gluing it. Wrap the remaining cans in denim in the same way.
The jar is placed on the fabric
Gluing fabric
Wrap each of the cans
Step 5 . Almost done. Wrap the pencil jars with braid, and you can also decorate the lid with it. Then assemble the entire composition.
Wrap the jar with tape
In the finished set you can store not only pencils, but also other small items that should always be at hand.
Step-by-step instructions (master class)
Prepare the jar. Wash the inside and clamp the tin along the rim with pliers so that the ends are not sharp. Remove the label so it doesn't bother you. Prepare any scrap fabric to decorate the tin base. If the material is thin, then it can be taken in 2-3 layers; in general, there is no need to buy a new piece, save as much as possible. You will definitely find waste fabric from old clothes. First, glue on a piece of any fabric. Cut this section with a margin to lower it inside and also decorate the bottom. Apply hot glue to the junction of the ends of the segment, and then pull the flap. On top you can glue a more rigid material in the form of a mesh, the one you have available. Beautiful lace or decorative ribbon, for example, in the form of a floral ornament, will not only additionally decorate the craft , but also decorate all the joints. Using a minimal amount of glue, attach the tape along the edge and down the seam. If desired, such a ribbon can also be placed along the bottom edging. Now you need to figure out how to decorate the pencil holder. The easiest way to create a flower bouquet is if you have something suitable for it. Cuttings or plastic leaves, twigs, stamens and flowers are suitable for this. Check out a craft store. Flowers can be bought ready-made in small bouquets, any copy, or made with your own hands from polymer clay or hardening mass. It is also easy to make stamens using the same hardening mass or ball plasticine. It is enough to attach the parts to a strong thread or fishing line and allow the plasticine to harden. Assemble a lush composition from the prepared parts. Apply greenery (twigs or leaves) as the first layer. Next, attach the bunches of stamens. Focus on the color of the finished base so that the resulting bouquet matches the material used in the first stage. Attach 1 or more flowers. Fill the voids with complex stamens or berries. A beautiful pencil holder is ready. Now you can place any accessories you have planned in it. You can also take the craft to work and put it on your desk or give it to someone as a gift. She looks bright. Such an accessory also claims to be a gift for some school holiday or a sign of attention. As you can see, there are many things in the house that at first glance seem unnecessary, but with a skillful approach and indefatigable imagination the housewife will become quite useful accessories. Like the author
Option 10. DIY apple pencil
A simple craft using a few pencils.
To work you will need:
- oval plastic bottle;
- plate;
- red acrylic paint (liquid);
- file;
- golden lace;
- glue gun;
- artificial leaf.
Step 1 . Fill the bottle with paint and shake well to thoroughly coat the entire interior surface. Drain off any remaining paint.
Step 2 . Place the bottle on a plate and wait until the paint is completely dry. If necessary, file the neck and remove excess paint.
Making a pencil holder in the shape of an apple
Step 3 . Tie the neck with a golden cord. At the end, glue the leaf. The apple pencil holder is ready!
→ TOP 11 ways to sew gloves with your own hands
Creative pencil holder
You will need: glass jar, yellow liquid acrylic paint, black permanent marker, nail file.
Master Class
- Pour the paint into the jar, close the lid and shake well to evenly color the inside of the jar.
- Drain off any remaining paint.
- Wait until completely dry.
- File down the edges of the jar neck, removing excess paint if necessary.
- Draw a funny face with a permanent marker.
The creative pencil holder is ready! I recommend watching this video!
Option 11. Pencil for a young princess
Glamorous set for stationery
For this craft you need:
- jars of cotton swabs (2 pcs.);
- olive jars (3 pcs.);
- napkins with a pattern;
- plain paper.
Step 1 . Take pliers and bend the edges of the tin cans. Then wash all the jars thoroughly and degrease with nail polish remover.
Painting jars with acrylic paint
Step 2 . Paint the jars with white acrylic paint. Paint in two layers: the first with a brush, the second with a sponge (can be replaced with a sponge). You can apply paint on the inside in one layer.
Step 3 . Cut out rectangles from paper according to the internal size of the cans. Use the resulting blanks as a stencil for napkins and cut them out too.
Napkin blanks are glued
Step 4 . Glue the napkin blanks to the paper. After the glue has dried, apply two layers of PVA on top - the napkins are thin and can tear easily. Then, when the glue is completely dry, apply varnish in two layers.
Step 5 . As a result, you should make 5 blanks for the bottom and 5 for the sides. Glue all the parts in the inside of the cans; you can apply another layer of varnish for added security.
Blank for the bottom
Step 6 . The jars will stick to the stand, but they have ridges on the bottom. To solve this problem, cut out circles of the required diameter from cardboard and glue them. Glue felt cut to size on top (it will easily stick to any surface).
Universal PVA glue
Step 7 . Prepare a 25 cm piece of laminate and paint the side surfaces with brown paint. Apply white paint on top. Glue the napkin, then apply glue and varnish on top.
Step 8 . Return to the banks. Decoupage the outer surfaces. Cut the napkins to size, glue them, apply glue and varnish.
Decorate the jars with lace braid and beads
Step 9 . Finally, decorate the pencil holders with beads and lace braid. Glue the jars to the base.
On a note! Before painting the inside of the cans, be sure to sand the surfaces. Otherwise, the paint will not “lay down” and nothing will stick to the cans.
"Pencil"
A simple model of a stand in the form of a pencil will appeal to the youngest artists. The “glass” with a thematic design consists of three parts - two of them form the body, and the third serves as the bottom. You will need 3 squares of different colors 21x21 cm. One side must be white.
Step-by-step instruction:
- We place the first square with the colored side up and begin work. We divide the workpiece into 3 parts. Then, bending in half from left to right and from top to bottom, we outline the axes.
- We turn the top edge 0.5 cm. This is the lead of our pencil. You can make it larger by increasing the width of the bent edge.
- Fold the right and left corners towards the center.
- We bend the workpiece in half horizontally into a “mountain”.
- Repeat steps 1 – 4 for the second square.
- We insert both parts into each other.
- Place the third square first with the white side up. We outline the diagonals. We divide each of them into 3 parts. Bend the corners 1/3. Moreover, they partially overlap each other.
- We fold all the corners of the new square towards the center.
- Raise the triangles perpendicular to the base.
- Glue the bottom into the “pencil” body.
Option 12. Pencil in the form of a minion
Your child will definitely like this tabletop device.
To make such a pencil holder, prepare:
- template printout;
- Super glue;
- pencil;
- hole puncher;
- felt-tip pens (blue and black);
- scissors;
- EVA polymer material (it is used to make bathroom rugs) in several colors - brown, gray, black, white and blue;
- wooden skewer.
Materials for work
Step 1 . After printing the template, cut out such blanks.
Sample
Step 2 . Cover the jar inside and outside with yellow polymer. Then make a jumpsuit out of blue polymer and glue black buttons on top.
Glue the material to the jar
We cut out panties for the minion from blue material
Step 3 . Make eyes (white background + brown eyes + pupils). Also make a belt and gray glasses frames.
Step 4 . Take a blue felt-tip pen and use it to draw stitches on the clothes. Draw a smile with a black felt-tip pen. That's it, the minion pencil holder is ready!
Making glasses frames from gray
Finished pencil holder in the form of a minion
→ TOP 6 ideas on how to make squishies with your own hands
Decorate with twine, threads
We invite you to look at more interesting decor ideas using twine
The stand for writing instruments became an integral accessory of the office interior around the middle of the 20th century. A pencil helps maintain order in writing materials, so it will be useful not only for office workers, but also for preschoolers, schoolchildren and students. In this article you will learn about DIY crafts for schoolchildren. A variety of stands for pencils and pens will be a good gift and at the same time a useful item.
Materials for making a pencil holder: - cardboard; - scissors; - PVA glue.
1. A cardboard pencil holder will consist of several modules, each of which is made separately. Cut a square from one sheet of cardboard. 2. Fold the square in half, and then in half again.
3. Bend the extreme sides of the square towards the center. Turn the rectangle over and fold the other sides toward the center. Thanks to such folds, the square that was at the very beginning was divided into 16 identical squares. 4. Fold the corners of the main square. Then fold the parallel side pieces towards the center. 5. Turn the workpiece over and fold the parallel parts towards the center again. Insert the pieces one into the other to create a square in the center. If the square is sloppy, cut out a square from the remaining cardboard and insert it into the blank. You can insert a photo or picture instead of regular cardboard.
6. Make five more of these blanks. If necessary, glue the parts to be joined. 7. Six blanks need to be connected and glued so that a hexagon is formed at the bottom. 8. Trace the base onto a blank piece of cardboard and cut it out. Glue the pencil holder obtained in step 7 to the bottom.
The cardboard pencil is ready
. This craft can be made not only by schoolchildren, but also by young children in kindergartens. An original stand for writing instruments will decorate your desk and help maintain order in your study area.
You can also make writing holders from used shampoo bottles. Such pencil holders will bring a touch of cheerful mood and can decorate a child's room.
- scissors; - plastic shampoo bottles; - self-adhesive; - stationery knife; - double sided tape; - glue.
1. Cut off the top of the bottle in a semicircle. You can make a cut with a stationery knife, and then cut all the way through with scissors. 2. You can cut out handles or legs from the top to make the pencil holder more interesting. Glue them with glue.
3. Cut out eyes, mouth and teeth from black and white self-adhesive paper. Glue it onto the bottom of the bottle. 4. Apply double-sided tape to the back of the pencil holder so that it can be mounted on the wall.
What the finished pencil holder from a bottle will look like depends on your imagination.
Even small children will love this minion-style pencil, and it’s easy to make if you have all the necessary materials. This master class will be useful for teachers in labor lessons.
Materials: - tin can; — EVA (foam rubber); - hole puncher; - felt-tip pens; - pencil.
1. Download the minion clothing template and print it on paper. 2. Remove the label from the tin can, wash and dry well.
A universal selection of gift ideas for any occasion and occasion. Surprise your friends and loved ones!
FAQ. Questions and answers
Why is a pencil better than a pen? A pencil is much more practical. Firstly, text written with a pen may fade over time, but this will not happen with a pencil. Secondly, if you need to write on a vertical surface, the ink may drain and the pen will begin to write poorly, but the pencil will still write just as well. Thirdly, a broken pencil will produce two smaller pencils, but one pen will not produce two.
What are pencil holders for? A pencil is an indispensable thing on your desk. Agree, some office supplies constantly accumulate that can come in handy at any moment: you need a paperclip, a paper stapler, or an eraser. And about pencils and felt-tip pens it’s a completely different story!
What is foamiran? Foamiran is a soft rubber with pores, which is often used to create dolls, toys and jewelry.
What can replace fleece? To create a pencil holder, it is not necessary to use fleece; all parts can be cut out of felt. Felt is good because it is very pliable, easy to work with, and the variety of colors allows you to embody the most original ideas.
What were the very first pencils? The history of the pencil begins in the 11th century. Artists then drew mainly with sticks made from a mixture of lead and zinc, sometimes called “silver pencils.”
A pencil is a must-have attribute of any desk. Of course, you can buy it at any stationery store, but anything made with your own hands always has more advantages. This way you can make an exclusive pencil holder for every taste!
Stand for pencils and pens made of wood knot
Perhaps a pencil holder made of wood hemp is the most successful option for an organizer for wooden stationery. Judge for yourself: the material is available, in fact, waste, the work is not difficult, and the product turns out unusual every time, not like everyone else!
To work you will need:
- a hacksaw for wood with fine teeth, perhaps suitable for metal;
- fine sandpaper;
- drill with drills;
- wood varnish;
- brush.
The most creative part of the work is the selection of material. Any piece of wood you like, comparable to the dimensions of a pencil, will do. In the simplest case, it can be a thick branch; it is more interesting if it has a twig. Birch or pear are good. Next we proceed step by step:
- Use a hacksaw to cut a piece 120-150 mm long.
- We clamp it in a vice and drill from the end a series of blind holes with a diameter of at least 13 mm. Larger nests can be prepared using feather drills or Forstner drills. In the simplest case, an ordinary drill is enough, but it is more convenient to work on a drilling machine. Large holes, including rectangular ones, are best made using a cutter. If you have experience, you can drill a series of holes with a drill, and then connect them with lateral and inclined movements of the drill. A chisel will help remove excess wood. Unevenness can be smoothed out with sandpaper wrapped around a strip or a file.
- All that remains is to sand the product and varnish it.
You may want to change the color of the wood by using stain. You can make the craft more expressive using a burner or using the technology of burning wood with a blowtorch.
Using the same scheme, you can make a stand for stationery from a horizontally placed “log”. Its large area allows for many slots for pencils and pens.
The geometrically correct organizer made from valuable wood looks very impressive. This material can be easily purchased at a building materials store.