The purpose of the easel in painting
Using an easel allows the artist to properly organize his work space. The easel allows you to position the canvas at eye level. Therefore, the artist completely covers the image with his gaze, taking into account the lighting, which allows him to more accurately convey colors, shadows, depth, perspective of the image, and composition.
Types of easels by purpose and design
Today, the choice of easels is unusually wide; the variety of models can be appreciated in the pictures below. Models may differ in appearance, size, material, installation method, be stationary or mobile, folding or collapsible.
The choice of easel model is influenced by the type of creativity (portraits, landscapes, etc.), the place of work (studio, home workshop, nature), the size of the future painting, the required tilt in the work, the age of the artist (special requirements for children's easels).
"Lyra"
A simple "A" shaped design (three-post design), invented by Renaissance artists. This is a universal floor-mounted folding easel, most popular in painting. It can be stationary and mobile, used at home and in the studio.
A suitable easel for teaching painting as well as for art exhibitions thanks to its elegant design. However, such an easel is not suitable for watercolors and other water-based techniques, since it cannot be rotated horizontally to allow the work to dry.
Tripod
A tripod is a stand with three points of support, the main advantage of which is its compactness, small size, and lightness. Least stable and not as reliable as other easels. However, it is suitable for beginners, artists working on the street and for clients at home.
Note!
DIY ottoman: TOP-190 photos of the best diagrams and drawings. Do-it-yourself master class with a full description of the stages of work
- How to Write a Screenplay: Tips and Best Practices for Writing a Screenplay. Step-by-step master classes for beginners with detailed descriptions of the stages
- DIY medical mask: TOP-140 photos of the best DIY options. Instructions for making a mask at home
Studio easel in the shape of the letter “H”
Professional art stands with expanded functionality compared to the “lyre”. This easel has clamps for the canvas, height and tilt adjustment for better lighting.
Suitable for large jobs due to its rigid design and massiveness. Can be used for works in watercolor and gouache techniques, if the design allows for rotation parallel to the floor to dry the canvas.
Sketchbook
The sketchbook is intended for plein air work - outdoor work. This is a portable easel that can be carried on your shoulder or back, like a backpack. The design of the easel is a box for storing and transporting paper, paint, and brushes.
Folding legs make it easy to transport the easel and quickly assemble it outdoors.
Easel-mast
Mast easel is a lightweight easel designed for exhibitions.
Note!
- How to make a piggy bank with your own hands - the best ways to make a piggy bank with your own hands. Detailed master class for beginners with photos and videos
Cold porcelain: features and methods of making it at home. Reviews of the best recipes + 120 photos
- Cake decorating: TOP-170 photos of the best ideas for decorating a cake at home + instructions for beginners with simple patterns
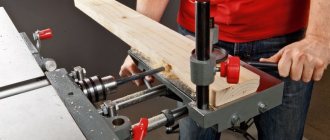
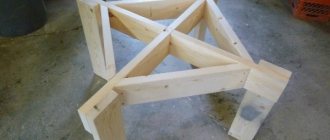
Advantages of a homemade easel
Savings and the ability to manufacture an easel according to individual requests are the main advantages of making it yourself.
With all the wealth of choice, an artist, especially a beginner, often has the question of what to spend the money set aside for a hobby: on high-quality paints, brushes, paper, canvas, or buy an easel?
You shouldn’t skimp on paints and brushes, as their choice will affect the quality of the work, but making an easel with your own hands at home is quite a feasible task.
Minion pencil holder
You will need: superglue, hole punch, scissors, EVA polymer material (bathroom mats are made from it) in blue, white, black, gray, brown, wooden skewer, black and blue felt-tip pen, simple pencil, printout of the template.
Master Class
- Print the template and cut out the blanks.
- Cover the outside and inside of the jar with yellow polymer.
- Glue the blue resin jumpsuit and black buttons onto it.
- Glue on a white background for the eyes, then brown eyes and black pupils, a black strap for glasses and a gray frame.
- Draw stitches on the overalls with a blue felt-tip pen and a minion smile with a black felt-tip pen.
Minion pencil holder is ready! I recommend watching this video!
DIY Minion / Stationery organizer / DIY pencil holder / Master class