Life often makes its own adjustments to people’s plans, forcing them to look for ways out of sudden difficult situations. It is very uncomfortable for a modern city dweller to be left with a non-working smartphone, especially if they need to make or receive an important call/email soon. And at the most inopportune moment, the gadget turns off, but there is no charger with you or it is faulty. So you have to rack your brains - how to charge your phone battery without a charger? There are actually a lot of ways - from other devices or batteries, and even using the operating principle of a mobile battery. The question is whether it is possible to charge the battery safely for a smartphone and not shorten its life. In fact, it is quite possible - just be careful and attentive.
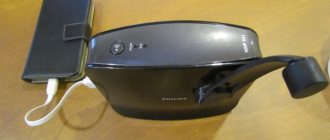
Use different batteries
Using this method, you can charge your phone battery without the phone itself.
To do this, you need to perform the following algorithm of actions:
- Open the cover and remove the battery from the mobile phone . Models with a non-removable battery do not have this option, which means the described method will not work. Most smartphones on Android and Windows provide such a feature by design, but you should not try to remove the back cover from Apple devices; the manufacturer does not provide for this.
- Find several AAA, AA or nine-volt batteries . Their internal energy is completely identical to that found in the phone battery, in contrast to the current from the outlet, which is characterized as alternating. Why shouldn't you try to directly use AA batteries instead of your own phone battery? Because its fine design and settings are very sensitive to the characteristics of the incoming energy, and deviations in them, characteristic of the connected elements, can irreparably damage the device.
- Figure out which of the contacts on the found batteries and on the charged element itself are positive and which are negative . If you look closely, you can see icons clearly showing the charge sign. With a telephone battery, it is sometimes difficult to disassemble them; as a rule, the contact with the “plus” sign is located closer to the edge, and the contact with the “minus” sign is further from it. You should pay attention only to the outer protrusions; the central ones serve for other tasks.
- Assemble the batteries so that their total voltage is equal to that required for charging . On average, for modern phones, DC charging should be carried out at a voltage of at least 3.7 V. There are 9 V batteries, and you can use them. The usual AA or AAA voltage is only 1.5 V, so you will need at least three pieces so that their total voltage is greater than the required value.
- Get two pieces of wire, preferably insulated along the entire length, except for the ends - there should be bare metal there.
- Connect the wire between the batteries and the battery being charged, secure the connection with tape or something else. Then put the structure down and wait while the battery charges. If several batteries are used, they can be connected in parallel to each other. To do this, a metal piece of wire is attached to all the negative terminals of all small batteries on one side, and a second wire is attached to the positive terminals on the other.
- Of course, you shouldn't expect a large charge . The battery will not be fully charged, but the little that is there should be enough to make an urgent call or other important action.
Types of universal chargers
You need to choose a “frog” based on several parameters:
- charging current;
- the largest capacity of the battery being charged.
The choice of voltage source for charging the battery is also important. There are several types of memory, differing in this parameter.
| Voltage source | Input connector type |
| Household network 220 volts | Built-in power plug |
| Universal Serial Bus (USB) | In most cases - USB-A |
| Automotive network | CP-703 (car cigarette lighter connector) |
Charger with mains socket and USB connector.
Chargers that are more universal in this regard are available. They are equipped with two connectors. Such devices can be used for charging both from the mains and from the USB input.
You can also choose a charger according to the level of service - fully automatic and manually controlled. The former are slightly more expensive.
Friction
You need to remove the battery from the phone and begin to rub the cell strongly and quickly with your palms, creating a lot of heat and friction. This should last for at least thirty seconds, and preferably several minutes. Afterwards, insert the battery back into the smartphone. The resulting energy is enough for a very short operating time, so it needs to be used as efficiently as possible.
Some believe that this trick relies on creating static electricity, which slightly charges the battery. This assumption is wrong. In fact, the reception works thanks to the device itself and the principle of operation of the battery. The chemical reactions that result in an element storing energy proceed better at higher temperatures, so that active friction can be said to become a catalyst for increasing electrical conductivity.
Materials and tools
List of items that will be needed to create a charger:
- a small base (board) (the remaining components will be attached to it);
- an inductor with high resistance to alternating current should have from 5 to 10 turns (wire diameter is 1 millimeter);
- a film capacitor with a capacity of 0.33 to 1 microfarad;
- two UF type rectifiers;
- soldering iron;
- several field-effect high-voltage transistors that amplify the voltage up to 10 Volts;
- two current converters with rated power dissipation up to 1 Watt;
- solder (material used for soldering and having a melting point lower than the elements being connected).
First, let's see what materials we need to build a homemade wireless charger for a smartphone with our own hands.
Using other technology
To charge in this way you need:
- to have access to a computer, laptop, tablet or other device powerful enough to charge your phone;
- this device and the phone have USB connectors;
- appropriate adapter , fortunately, there are no problems with adapters, because most phones have standard micro USB.
The procedure is very simple - connect the phone with the charging equipment using a wire and wait until a certain amount of energy accumulates. It is not even necessary to switch the smartphone into USB connection mode with a computer; the charge will flow in any case. You can also carry it with you or ask someone for a power bank - a special device for powering your mobile phone without charging.
What effect do these methods have on your phone's battery?
Using the frog does not damage the battery. The device fully charges the battery without degrading its performance. Connecting AA batteries is safe, but unreliable. If the batteries are discharged, the procedure does not work. In addition, the method is difficult to implement. First you need to build a structure for batteries with leads.
If connected to an adapter, the battery may be damaged. The only way to safely revive a battery is with tape. Heat and deformation make the phone's power supply faulty. Experimenting with wires is suitable for old batteries.
"Frog"
There is a technical means for charging a phone battery directly, which is called a “frog”. It has special contacts to which the discharged battery is attached, taking into account the polarity. If everything is done correctly, a signal will light up on the “frog”. It will take up to three hours to replenish the entire battery charge, but the advantage is that the charging device will automatically turn off and stop supplying energy. The completion of the charging process will be indicated by a lit light.
How to make a 1.5 Ampere USB device
The voltage stabilizer of the L7805 series (current 1 A) or its analogue L7805CV (current 1.5 A) will be used as the “heart” of our charger. In fact, there can be a great variety of analogues used. In principle, the entire 7805 series of chips will be suitable for this. We will tell you more about analogues a little later.
The electrical circuit for connecting the stabilizer itself is simple; it is similar to the power stabilizer, which we talked about in our other article, “Power stabilizer in a 12-volt car.” We can say that these are brother microcircuits, only their stabilization voltages are different. The table below shows popular charger models.
Table of popular charger models.
Everything can be assembled either by surface mounting or on a board. It can be done on a regular, simple universal circuit board. In order for the microcircuit to develop its maximum supply current, it must be placed on a radiator. In our case, the radiator is taken from a computer processor. The stabilizer microcircuits themselves can be produced in various packages.
Connecting mini and micro USB plugs.
After you have assembled the USB device, you need to connect the USB connectors correctly. You can take a wire with a factory-made mini, micro USB plug, or you can buy an “empty” plug in a store and solder the wire to it. In my case, a mini USB plug was needed, which was soldered to the wire. The view is shown without the body.
Then, using a universal device, the voltage was checked again so as not to damage electronic gadgets. And then the battery of the audio player was already charged. Subsequently, the charger was installed under the instrument panel, and mini USB plugs were brought out: one on the instrument panel for the navigator, the second under the roof for the DVR.
Interesting read: What is a frequency converter and why is it needed.
5 volt device
However, the saga with the charger did not end there. Again, for a banal reason, when there is not enough supplied power or supply current for consumers, which is essentially the same thing, provided that the on-board voltage in the car is constant, since these values will be directly proportional. So, during long-term joint use of the navigator and the DVR, one microcircuit was not able to “pull” the power from these two devices, even with a radiator installed. As a result, it overheated and briefly turned off. At the same time, the navigator “cussed” when the power was turned off.
Capacitor - simple words about complex things.
Read more
How to make a charger for a car battery with your own hands.
Read more
How to calculate a resistor for an LED.
Read more
There seem to be two solutions to the problem. The first is to “fence the garden” and create parallel circuits, each of which will have its own consumers. Let's say one is a DVR, the other is a navigator. In fact, in the photo above, where two microcircuits are mounted on one radiator, this is what was done. However, it’s good if everything is limited to this, and if you need to connect a smartphone, tablet, something else... There is no way to do without more serious currents, and therefore without alternative options. An alternative option would be to use microassemblies with PWM modulation.
Phone charger.
So, such a scheme will not require large radiators for heat removal, and rather high currents will be provided. In general, everything will be as we need it. This option will be discussed further below. To reduce the voltage, a microcircuit, an inductor and elements for strapping are used. The microassembly is designated KIS3R33S. Its installation can be done according to the diagram from the Datasheet. However, by default with this configuration it has an output voltage of 3.3 volts, but for USB we need 5 volts.
It will be interesting➡ How to check a varistor using a multimeter?
In this case, it will be necessary to select resistors R1, R2. The table with recommended resistor values on which the supply voltage depends is also taken from the Datasheet. This feature of changing the voltage by selecting resistors makes this device a universal assistant if you need to power the load not only with a voltage of 5 volts as for USB. It should be noted that this device confidently holds a load with a current consumption of 3A, and peak performance can reach 4A. If you are too lazy to assemble such a device, have no time, or cannot do it, then you can purchase such an assembly for about $2 on well-known sites and online stores.
I must say that this Chinese voltage converter KIS-3R33S (MP2307) is quite good for its price, and is capable of delivering high currents, which we already know, up to 4A. This means that such an assembly can replace a pair of KRENOK or the 7805 series, which we talked about in the first part of the article. At the same time, it will be more compact and with higher efficiency. So, I bought this assembly. Then I also bought a distribution box, which are used for installing electrical wiring in apartments. This became the body of the converter - charger.
Related material: How to choose a digital-to-analog converter.
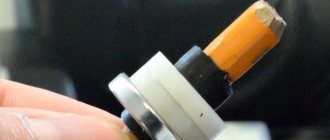
Urgently charge your phone using a knife
This method is a unique variation of the friction trick; it can be used even far from the city. However, it is fraught with troubles with the device, so it should be used only as a last resort.
Procedure:
- Remove the battery from the smartphone.
- Find or make some kind of source of great heat , like a barbecue or at least a lighter flame.
- Heat the knife blade on this flame.
- Place the battery on the hot blade with the contacts facing it.
- Wait until the element warms up slightly (not too much!) and a little charge appears in it.
- Put the battery back.
Tips for choosing components
The richness of the existing elemental base
Many elements of the inductive current transmitter and receiver circuit have both Russian and foreign analogues. For example, the NE555 timer can be painlessly replaced with its full analogs (for some you will need to check the calibration of the legs and operating voltage) - 1006VI1, 1006VI2, AN1555(N), GL555, LB8555(D|P), LM555(CN|N), MC1455(P|P1), NJM555D, RC555, TA7555P, UPC1555(C), UPC617C, KP1006VI1(A), KF1006VI1, 142EH6, ICM7555(CBA-T|IPA)), LM555(CM|N), MC1455(D| U|G|P1), NE555(D|M|P|N), TA7555(F|S), UA555(TC(-8)|PC), ECG955M, M51841P.
Its variants MTP50N05, KP723A, MTP50N06V, STP45NE06, STP50N06, MTB50N06V, STB45NF06T4, HUF75329(P3|S3(S)), STP45NF06, STP60NF06, STB60NF06(T4|L|LT4) or similar are suitable as a field effect transistor e according to the characteristics.
Diode M4 in the receiving circuit - can be replaced with any one with permissible currents of 1A/400V. It can be a little less powerful, since the power of the incoming power is much less.
The voltage stabilizer can also be replaced with any one with an output current of 5V. Full analogues: L7805CV, MC7805CTG, Russian KR142EN5A.
Precautionary measures
The following recommendations should be followed:
- Before removing the battery from your mobile phone, you must turn it off - otherwise some settings may be lost.
- Never attempt to charge any of these methods with regular batteries that are not marked “rechargeable” and are not intended for reuse.
- Make sure that the incoming charge does not exceed what the battery can hold , this is explosive.
There are a lot of possibilities on how to charge a phone battery when left without a charger, and if you have knowledge about them and about the possible dangers associated with certain methods, then the likelihood of finding yourself somewhere without the ability to get in touch is minimal. Read about how to charge a car battery without a charger here →
Security measures
There is still an opinion among users that in order to maintain battery capacity, it must be completely discharged and charged periodically. However, this recommendation is only relevant for outdated devices that are difficult to find on sale. Modern devices are only demanding in terms of power output - they can be recharged throughout the day.
It is equally important to take precautions - they will prevent damage to the phone and the connected charger. Therefore, whenever you use the charger, take the following precautions:
Faulty memory.
- Do not open or disassemble the phone, charger or accessories;
- do not press forcefully on the device body;
- do not short-circuit external contacts and electrical terminals;
- keep the device and charger away from fire and water, do not touch them with wet hands;
- do not drop, throw or bend the phone and charger;
- do not use the charger or device if it is faulty;
- Do not twist or pinch the USB cable;
To charge the phone battery, it is recommended to use only the original power supply and a limited voltage cable - the value depends on the specific device model. In all other cases, follow safety precautions, especially if you need to deform or heat the battery. Remember that any of the described methods is temporary. They should only be used if the original charger included in the kit is not available.