Car enthusiasts are often interested in how to make a rain sensor for a car with their own hands. This is a very useful element to make driving in the rain more comfortable. When it rains, the sensor sends a signal to the control unit, which regulates the frequency of operation of the wipers, depending on the severity of the rain.
In most modern cars this is a standard feature; they can be found even on domestic cars. At the same time, this function seriously increases the cost of the car in the showroom. Therefore, many people refuse it. But this does not prevent you from making this modification later, by making the sensor yourself, or by purchasing a ready-made one in a store.
How to make a rain sensor with your own hands for a car? First you need to understand what they are and how they work. The most common are optical sensors; they respond to light and are the easiest to install. The only drawback is the reaction to insects and dust. Also, they cannot be installed on glass with limited transmission of infrared radiation. Moisture sensors can be called more effective; they are much more accurate and there are no failures. The disadvantage of such a system is the complexity of installation.
How to make a rain sensor with your own hands for a car? If you really want to
Car enthusiasts are often interested in how to make a rain sensor for a car with their own hands. This is a very useful element to make driving in the rain more comfortable. When it rains, the sensor sends a signal to the control unit, which regulates the frequency of operation of the wipers, depending on the severity of the rain. In most modern cars this is a standard feature; they can be found even on domestic cars. At the same time, this function seriously increases the cost of the car in the showroom. Therefore, many people refuse it. But this does not prevent you from making this modification later, by making the sensor yourself, or by purchasing a ready-made one in a store.
Useful tips and nuances
The rain sensor is an auxiliary tool that makes it easier for the driver to control the car, especially in difficult weather conditions. Infrared sensors work regardless of the time of day.
Triggering of the sensor can be caused by fluff, leaves, or occasional splashes. It all depends on the sensor sensitivity setting.
When the device is operating, the driver should always have the opportunity to switch the windshield wipers to manual control mode. In dry weather conditions, the sensor may also detect incoming insects. If the road passes through an area with a large number of them (rural areas, etc.), it is better to turn off the rain sensor. This will help prevent the brushes from running on dry glass, which will prevent damage.
When choosing a device, you need to focus primarily on your car model and compatibility with the device you are purchasing. To completely disable the standard device, it is better to contact a car service.
Popular;
- Making a circuit for a car radiator temperature sensor
- What to do if your windshield is cracked
- How to switch wipers to winter mode?
Types of car wipers and methods of caring for them.- How to make an automatic lighting or alarm system from a cheap RCWL-0516 sensor
- How to check a temperature sensor, operating principle.
Do-it-yourself pulse charger for a car battery- DIY rear window heating repair
Installing a light sensor
The work here is quite simple, you won't need to do anything special. But, keep in mind a few nuances. The first and main thing is the need for vertical installation. Otherwise, the sensor will give false signals much more often. It should be placed within the coverage area of the wipers, this will allow for more precise control. Be sure to check the installation location for chips and cracks. They can, under certain conditions, significantly refract light. To install you will need the following things:
- Sensor;
- Holder;
- Special gel;
- Wires;
- Microprocessor.
You can use the suction cup from the DVR as a holder, but it will have to be modified a little. It is much more efficient to purchase special fasteners, since they are inexpensive. Before installation, a gel is applied to the glass in direct contact with the sensor; it evens out the refraction. The device body is mounted in the holder, the assembly is complete, all that remains is to connect it.
Installing a Humidity Sensor
You probably won't find one designed specifically for cars. Of course, you can buy a ready-made kit, but it is quite expensive. Therefore, we will reinvent the wheel. Purchase basic humidity sensors designed for greenhouses. They come in the form of flat tablets or thin strips made of a plastic-like material. The second option is best.
We place the sensor on the windshield; it is most convenient to do this at the very top. There is usually a colored stripe there. Therefore, nothing will interfere here. The easiest way to secure the sensor is with glue. It is advisable to securely insulate the connection point of the wires. The wires themselves are routed into the interior. This should be done along the front pillar. Be careful to position the wiring so that it is not damaged by doors.
Disadvantages of automatic irrigation systems
The soil is heterogeneous and differs in its composition, so one moisture sensor can show different data in neighboring areas. In addition, some areas are shaded by trees and are wetter than those located in sunny areas. The proximity of groundwater and its level relative to the horizon also have a significant impact.
When using an automated irrigation system, the terrain of the area should be taken into account. The site can be divided into sectors. Install one or more humidity sensors in each sector and calculate its own operating algorithm for each. This will significantly complicate the system and it will hardly be possible to do without a controller, but subsequently it will almost completely save you from wasting time awkwardly standing with a hose in your hands under the hot sun. The soil will be filled with moisture without your participation.
Connection
The most important process is connecting the device. The reliability of the rain sensor depends on how you do this. You should start by connecting to ground:
This is a wiring diagram for a self-assembled sensor. This is how both types of such sensors are connected.
If you decide to install a ready-made assembly, the connection will be similar, only the control unit will be installed instead of the fuse going to the wipers. Please note that on some models several different devices can be connected to one socket. In this case, this scheme will not work. Since the fuse is removed from the circuit, for greater safety it should be additionally embedded in the wires.
Conclusion
. As a rule, when buying a car, people think first of all about saving. And only later do they think about comfort. Therefore, many people want to know how to make a rain sensor for a car with their own hands. In fact, it is not difficult, and self-assembly will be much cheaper than the factory version.
Connecting to Arduino
The device has a 4-pin male connector. One pair of conductors is the power and common wire, and the second pair is digital and analog outputs.
Connection to development board
The board has two LEDs, one of which is a power indicator, and the other displays the status of the digital output of the sensor.
Arduino and water sensor block
By default, a logical one signal is present at the digital output of the sensor; when triggered, it changes to a logical zero level. The response threshold can be set using a trimming resistor.
Useful: Device for finding lost things
Rain sensor
A
— dry windshield;
b
— wet windshield.
1
- LED transmitter;
2
- prism;
3
- photodiode receiver;
4
- drop of water.
Detects the presence of water droplets on the windshield using an optoelectronic measurement method. The sensor's sensing element consists of one or more LEDs (transmitter), a prism and a photodiode (receiver).
The infrared rays emitted by the LED enter the windshield through a prism, are reflected from the outer surface and enter a sensitive photodiode. The beam is reflected almost completely from dry and clean glass, and therefore the signal at the photodiode is large. When water drops hit the glass, the light rays are refracted, and therefore only a small part of them reaches the signal receiver. The heavier the rain, the fewer rays hit the photodiode.
The electronic unit continuously determines the amount of water on the glass and adjusts the frequency of strokes and speed of the wipers. The system even knows how to assess whether the glass is dirty: if after one double stroke of the wipers transparency has not been restored, the windshield washer automatically turns on.
Light sensor
V
— front light sensor;
d
— external light sensor.
1
— light guide with lens;
2
— light guide with a light filter.
In the first combined light and rain sensors, there was only one element that measured illumination. When darkness fell or when entering a tunnel, he turned on the headlights, side lights and instrument lighting. Then, up to three photosensitive elements were placed in the same assembly, each with its own area of responsibility.
The light intensity in front of the vehicle is measured by a narrow-angle front light sensor. Using the signal from the sensor, the electronics recognize day and night and turn the headlights off or on accordingly.
Light sensor response zones:
If the car is equipped with a head-up display, a narrow directional HUD sensor is installed. It measures the illumination of the area where information is projected. And the electronic system adjusts the brightness of the backlight of the elements displayed on the display.
Interaction of light and rain sensors with other vehicle systems
- Windscreen wipers.
If raindrops appear on the glass, the automation activates the windshield wipers, and if the drops are not removed in one pass, the windshield washers are activated. - Outdoor lighting technology.
Based on a signal from the light sensor, the lighting equipment switches from the daytime running lights mode to the low beam mode. - Internal lighting.
The light sensor controls the brightness of all interior lighting elements and the instrument panel. - Comfort system.
At the first drops of rain, the automatic system closes the windows and sunroof, allowing the driver not to be distracted from driving. - Multimedia system.
The light sensor, monitoring the amount of outside light, sends a signal to the multimedia system to change the screen brightness. - Climate control.
At the command of the rain sensor, climate control dries the air by turning on the air conditioner and directing air onto the windows to prevent fogging. The ambient light sensor records the intensity of solar radiation entering the windshield and reports adjustments to the climate control unit. - Head-Up Display (HUD).
The display brightness is adjusted based on the light sensor signal. - Automatic drying system for brake mechanisms.
Based on a signal from the rain sensor, the anti-lock braking system pump briefly raises the pressure in the brake circuits by no more than 2 bar. The brake cylinders are padded, and they touch the rotating brake discs, removing moisture and dirt from them.
On your own
If your car does not have a standard rain and light sensor, you can install it. For example, there are rain sensors on sale, both domestic and foreign (usually Chinese) made. They are a small plastic box that is glued to the inside of the windshield and connected to the car's electrical system with a wiring harness. There is even a version for 24-volt electrical equipment. Simple universal rain sensors cost up to a thousand rubles, the most sophisticated ones cost a little more than two thousand.
If you don't want to understand the car's electrical circuits to adapt the sensors, look for ready-made kits for a specific model. In addition to the sensor, the kit includes a central light switch with the Auto position, wiring harnesses, and plastic sensor covers that fit onto the rear view mirror bracket. The price of such sets is in the range of 3800–4500 rubles, and complete with a self-dimming rearview mirror they can cost up to 9500 rubles.
Destroying MYTHS
- The rain sensor is triggered by the impact of water drops. No.
The sensor operation is based on optoelectronic measurement. - At night the rain sensor is powerless.
No.
External lighting does not affect the operation of the system since it uses its own infrared light sources. - You can say goodbye to the sensor when replacing the windshield.
No.
Glass manufacturers provide a window in the tinted or silk-screened layer. Installing an old sensor on new glass is possible, but subject to the technology, and after installation you need to check the correct operation of the sensor. - In winter, the sensor acts up.
No.
The sensor may not respond correctly to snow. But the reaction to water droplets from melted snowflakes will be correct. The worst thing is if the sensor installation site is covered with a crust of ice. In this case, it is better to switch to manual control of the windshield wipers. - Rain sensors work the same on all cars.
No.
The car manufacturer is responsible for adapting the rain sensor to the vehicle. At the same time, a full range of finishing work is not always carried out with all possible types of glass (thermal glass of different colors, equipped with electric heating, with a tinted stripe in the upper part). With some options, slightly less correct operation of the sensor is possible. Cars almost always have manual adjustment of the sensor sensitivity. And only on some cars this function is software disabled.
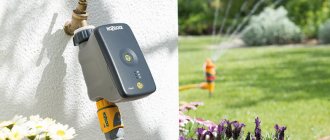
Irrigation automation systems
If you are interested in a full-fledged automatic watering system, then you need to think about purchasing a programmable controller. If the area is small, then it is enough to install 3-4 humidity sensors for different types of irrigation. For example, a garden needs less watering, raspberries love moisture, and melons need enough water from the soil, except during excessively dry periods.
Based on your own observations and measurements of humidity sensors, you can approximately calculate the cost-effectiveness and efficiency of water supply in areas. Processors allow you to make seasonal adjustments, can use the readings of humidity meters, and take into account precipitation and the time of year.
Some soil moisture sensors are equipped with an RJ-45 interface for network connection. The processor firmware allows you to configure the system so that it will notify you about the need for watering via social networks or SMS messages. This is convenient in cases where it is impossible to connect an automated watering system, for example, for indoor plants.
For an irrigation automation system, it is convenient to use controllers with analog and contact inputs, which connect all sensors and transmit their readings via a single bus to a computer, tablet or mobile phone. The actuators are controlled via a WEB interface. The most common universal controllers are:
These are flexible devices that allow you to fine-tune your automatic watering system and entrust it with complete control over your garden.
We equip our car with a rain sensor
Features of rain sensors
When the wipers operate in the first position, the speed of movement of the wipers is monitored by a rain sensor. In this case, the intensity of glass cleaning depends on it. The harder it rains, the more active the wipers will work. If the rain subsides, the wipers will also slow down. As for positions 2 and 3, in this case the wipers will work exclusively at the specified speed.
It is important that the glass cleaning system can be controlled manually. So, for example, if the sensor is installed on the passenger side, then if the driver's side window is dirty, the sensor may not recognize the dirt and will not turn on the wipers. Or it happens that in dry weather the sensor is triggered idle due to bugs or leaves getting into the glass. In this regard, it must be possible to completely turn off the wipers or turn them on if necessary.
As an example for connection, the author proposed two rain sensors, one made abroad, and the second domestic.
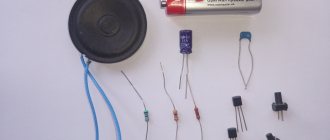
Materials and tools for connection: - rain sensor of a suitable brand; - glue; - self-tapping screws; - wires; - screwdriver, wrenches and other tools.
Rain sensor connection process:
Step one. Installation of RS-22 type sensor
In total, the author considers two types of sensors, these are RS-22 of foreign production, as well as a domestically produced DDA sensor.
How to install an RS-22 type sensor:
1. You need to glue the holder for the rain sensor to the windshield. 2. A special gel must be applied to the sensor housing, which will reduce the refractive index of the two working zones. 3. The base of the sensor housing is fixed to the base using a self-tapping screw. 4. At the final stage, we check that there are no bubbles between the working area of the sensor and the glass.
Step two. Connecting an RS-22 sensor
Now you can start connecting the electrical part. The sensor is connected to the wiper mode switch.
1. The blue wire of the sensor is connected to the car body, this is a minus. 2. The red wire of the sensor must be connected to the contact marked “I”, and the standard yellow wire with a green stripe is disconnected. 3. Now the yellow wire from the sensor needs to be connected to the yellow wire with a green stripe. 4. And finally, the black wire is connected to the block, this is pin “53”, a blue wire is used for this.
In order for the device to start working correctly, you first need to calibrate it depending on the sensitivity and throughput of the glass. The sensitivity is adjusted so that the sensor is triggered when the glass is dirty or wet to the desired degree. You can learn more about how such a sensor works from its instructions.
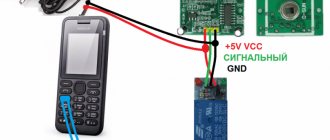
Testing the operation of the rain detector
The rain detector we designed based on Arduino board works in such a way that when there is rain, it turns on the buzzer and when there is no rain, it turns off the buzzer. The rain sensor is connected to pin A0 and the buzzer is connected to pin 5 of the Arduino board. If you wish, you can easily change these pins without touching the rest of the code. When it rains, the buzzer turns on, and when the rain stops, the buzzer turns off. You can watch the project in more detail in the video at the end of the article.
Taking our project as a basis, you can easily design on its basis devices based on a rain sensor suitable for practical applications, for example, a system for automatically watering plants, closing windows in a house when it rains, a system for automatically turning on windshield wipers on a vehicle, etc. etc.
How to install a rain sensor for a car with your own hands?
It’s not for nothing that they say that laziness is the engine of progress. It is she who helps to come up with various systems, such as an automatic windshield wiper control system. It controls the operation of the wipers, depending on weather conditions. The system is even installed on the latest models of domestic cars.
Many foreign cars have windshields with rain sensors, that is, the device is built into the windshield and cannot be removed. Motorists who do not have a rain sensor as standard can additionally install this option themselves. A universal sensor installed on any car model will help you do this.
Device
The operation of the sensor is determined by the comparative function of the optical properties of the windshield in different weather conditions using an infrared beam.
It contains two LEDs : emitting and receiving. The operating algorithm depends on the surface of the glass and how dirty it is. Based on the analysis of incoming information, the system makes a decision about the need to turn on the windshield wipers.
Operating principle of the sensor
The optical sensor is placed vertically inside the passenger compartment on the windshield of the car in the area of action of the brushes. There should be no defects in the form of cracks or chips on the glass at the installation point.
Using infrared radiation, this sensor scans the condition of the outside of the glass. If there is moisture or dirt on the glass, the level of the reflected signal changes, and a signal is sent to the electronic control unit and it turns on the wipers. The system can automatically change the pause of brush movement, depending on the rain.
Rain sensors can be installed on different windshields, including those that have a tinted strip on top. An exception is glass with an infrared filter, which is installed on Chevrolet Niva Lux cars, etc.
Photo and description of the module
Electronic water sensor unit
Electronic water sensor unit - details
Electronic water sensor unit with sensor
The water detector module was purchased for 30 rubles on the popular Chinese shopping site Aliexpress.com
Module with Aliexpress water sensor
How to turn on the sensor
The sensor is activated only when the wipers are turned to the first position. Next, the sensor itself recognizes and turns on, increasing or decreasing the speed of the wipers. The second and third provisions remain unchanged.
Manual control must be mandatory, as there are different situations. For example, splashes from a puddle may fall on the driver's side without reaching the sensor and passenger areas. Or you may have gotten into your car in the morning and noticed a “gift” from the pigeons. In dry weather, we recommend turning off the rain sensor, as it may trigger false alarms. For example, when insects, fluff, or leaves appear in the sensor’s coverage area. Sometimes even a shadow triggers the windshield wipers.
Turning on the washer remains available only in manual mode. A jet spraying out at the wrong time can surprise, limit visibility, and even frighten some drivers.
Let's consider two types of modern sensors that are widely used on the Russian market. The first system is based on an imported microprocessor, and the second is manufactured by Russian specialists
Content
- Installing a light sensor
- Installing a Humidity Sensor
- Connection
What should I pay attention to during installation?
Often drivers who assemble such devices themselves make one mistake. They completely eliminate manual control. Which makes it impossible, for example, to eliminate traces of a pigeon discovered in the morning. Also, in some situations, manual control is more effective.
Rain sensor RAINsensor
This device is based on a Microchip microprocessor. The rain sensor is suitable for all vehicles with 12-volt equipment. To install you must do the following:
- Attach the sensor clamp to the windshield.
- Apply rain sensor gel to equalize the refractive indices.
- Attach the sensor housing to the holder.
- Make sure that there are no air bubbles in the working areas between the car glass and the sensor.
Sensor connection
The sensor is always connected to the operating mode switch. Let's look at the example of the domestic VAZ:
- We connect the blue wire to the body.
- Red to pin I of the switch.
- We connect the yellow wire of the sensor to the yellow one with a green stripe in the car.
- We connect the black wire to pin 53 of the switch block (blue wire).
For normal operation of the sensor, you must first calibrate the sensitivity to the light transmittance parameters of the windshield, and when using the sensor, you can set the required threshold for triggering the wipers.
DIY installation
You can install such a station wagon yourself. The installation looks like this:
Fastening technique
You need to take glue, a screwdriver and the sensor itself. Before starting installation, be sure to check the cleanliness of the device. Specks, bubbles and other external elements will interfere with the operation of the sensor.
Tinting and the thickness of the windshield do not affect the performance of the device itself, but these factors must be taken into account when setting up the DDA.
First you need to degrease the surface of the glass. A napkin for this purpose may be included in the kit. If this is not the case, any universal remedy will do. Glue the holder onto the windshield with glue. In addition to glue, the kit may contain double-sided tape.
Gel is then applied to the sides of the sensor and the sensor is installed in the holder socket. Retention occurs using self-tapping screws or fasteners. The windshield must not contain any defects. Otherwise, there is a risk that the device will not work properly.
The power cord can be “hidden” under the headliner if the mounting location is chosen high enough. This way the wire will not interfere with your view. This process requires a screwdriver.
Connection
After mounting, you need to connect the power supply to the sensor. You need to power the device in the fuse box , based on the model of the car, determine the location of the cable connection. The connection in the fuse box must be made according to the instructions (operating manual) of the car. The sensor is supplied with installation instructions. You can specify the color and eyeliner there.
The blue wire comes with a “-” sign. It is attached to the body of the machine. Red – with a “+” sign. Connects directly to the power supply of the device. The number of wires depends on the type of device. There may be yellow, black wires and wires of other markings.
Testing
After connecting, you need to check its functionality. To check you need a spray bottle. It is advisable to carry out the process of creating “rain” for at least 20-30 seconds, since the system includes protection against false positives. It is advisable to carry out the check in several modes so that there are no unpleasant “surprises” along the way.
Rain sensor DDA
Rain sensor DDA
When creating this sensor, domestic developers did not copy other people’s solutions, errors and problems, but went their own way. The following requirements were taken into account during the design:
- Easy system management
- Possibility of installing the sensor yourself.
- Connection without changes in electrical wiring.
- Possibility to disable the rain sensor and control the wipers manually.
- Affordable price.
This finished product also provides the ability to adjust the pause of the brushes depending on the speed of the vehicle. The sensor sees a large mass of water as it approaches the glass from a distance of 5-10 cm and turns on the wipers in advance.
These rain sensors are installed on the VAZ 2110 and are suitable for other domestic and foreign cars.
The system has several operating modes:
Buttons for sensor
- snow;
- rain;
- standard.
On the front side there are two indicators and a button for quickly changing the operating mode.
The product is constantly being updated. Based on wishes and feedback, the developers are finalizing their product. For example, the first models did not have sensitivity adjustment. The problem was solved by placing several layers of tint film under the sensor elements. A useful function was soon added in the next version of the sensor.
Installation
- The optical sensor must be glued to the windshield from the passenger compartment.
- You should remove the windshield wiper relay from the car's mounting block and insert the rain sensor control unit in its place.
- Lay out the wiring.
- Adjust sensitivity.
As you can see, there is nothing complicated in installing rain sensors, so you can do it yourself.
Which rain sensor is suitable for a Lada car?
| Rain sensor model | Installed instead of the standard relay | Suitable for cars | Note |
| 524.3747; 528.3747; RALD10.3747; 412.3777; 2110-37477 | VAZ 2108, 2109, 2110, Niva Chevrolet | They are the same, the only difference is the location of the relay contacts. | |
| 525.3747; 526.3747; 41.3777; RALD08,3747 | VAZ 2113, 2114, 2115, Lada Kalina, Priora, Granta | ||
| A modified version of DDA-25 can work as a rain sensor and as a relay with pause adjustment. | |||
| ─ | Niva 4x4 (diagram) | The cable from the sensor ends with a connector instead of a relay. Requires connection according to the diagram. Differences: when triggered, there is ground at the output (red wire) of the DDA-35, and +10V for the DDA-45. | |
| ─ | Lada Granta Lux (scheme), Largus, Kalina 2 | ||
| ─ | Instructions | A universal sensor that replaces DDA-35 and DDA-45. | |
| ─ | Instructions | Functions and connections are similar to DDA-55 with the addition of a light sensor in one product. |
To be 100% sure that the rain sensor will fit, it is better to check which wiper relay is installed on the car. Then compare the arrangement of contacts according to the diagram:
If rain sensors DAA-15 and 25 are not suitable, then you will have to use DDA-35 or 45, which can be connected to any car. But in this case, the connection will have to be done manually according to the diagrams.