Good afternoon - today I have prepared a BIG and NECESSARY article to help everyone who has seriously set out to make a wooden canopy adjacent to a private house with their own hands. That is, I will tell you step by step what simple steps (and they are really simple) consist of building a canopy against the wall of a house. We will make wooden sheds with a polycarbonate roof. We will look at different design options for the same canopy model for a house - that is, we will learn how to create different canopy designs based on one drawing - for any home, for any needs. And after reading the article, you will not only LEARN how to make canopies , but you will also be able to implement any design of a wooden canopy for a private home.
After all, when you understand the ESSENCE of the design, you will be able to modify this design according to your creative imagination. And who knows, maybe you will even earn a living later as a master of an attachment craft.
We will consider the following questions in turn.
- A canopy for a house - its basic elements
- How to change the design of basic elements and get different canopy designs for your home.
- How step by step .
Let's first look at the classic wood canopy.
CLASSIC SHAPE
CANNOT TO THE HOUSE
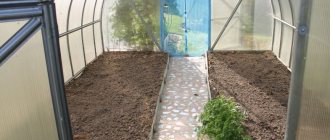
So, here (photo below) is a sample of what we will learn to do with our own hands. We see a classic lean-to canopy against the wall of the house. Such a canopy for a house can be made not only at a blank wall - exactly the same canopy structure can be made at the front entrance of the house, in the back yard for gatherings and anywhere, it doesn’t matter, the principle is the same.
THE GENERAL PRINCIPLE OF ALL CANOPIES is that one edge of the canopy is attached to the wall - and the other edge stands on support posts. That is, the canopy to the house must have two types of support - on poles and on the wall.
This is the essence of all hanging buildings... however, making holes in the wall to nail a support beam to it is NOT NECESSARY - below you will see models of canopies where the fasteners do not need to be driven into the wall, but you can install the same SUPPORT POSTS at the wall of the house as on the outer edge of the canopy. So, if you don’t want to make holes in a beautifully plastered wall, don’t rush to leave the article, there will be canopy options for your case too.
The simplest canopy for the house.
(CANOPY OPTION No. 1 - with material savings)
If you have few wooden beams, but have a task to make a canopy for the house from these small ones. Then you can make a simple design like this (photo below). A total of 5 beams are needed - 2 for support pillars + 3 for load-bearing beams.
Here, the load-bearing side beams are attached to the wall using METAL FASTENERS (the photo below shows what they are like). Such metal brackets are attached to the wall of the house and the ends of the two side beams of our canopy are inserted into them.
The roof in such a canopy attached to the house can be a sheet of polycarbonate (transparent or darkened) ... or the roof can be an awning-curtain that slides along a stretched metal string (and either moves apart like a tent or gathers against the wall like curtains). I talked more about such a curtain roof for canopies in the article How to make a roof for a canopy and pergola
.
Go ahead…
Let's take a more complex canopy... Although its complexity is purely conditional... The essence is basically the same - but this model is already close to the classic design of a canopy attached to a house. The most understandable drawing, without unnecessary elements. Only the basic elements...
- support pillars
- load-bearing beam on the wall
- load-bearing beam on support pillars
- roof sheathing beams (for laying polycarbonate sheets on them)
This is a classic - a BASIC part of any awning. And starting from these basic elements, we will create a great variety of canopy designs for the house.
And to start from the very beginning, we must start from the BOTTOM... from the substrate, from the foundation on which our canopy will stand.
Initial work
The very first thing you should do is clear the area where the canopy is located of any debris. After this, it is leveled with sand and gravel. A complex and large canopy requires a foundation.
Make recesses for the racks and lay the electrical cable. Determine the spacing of the racks. If there is a body of water nearby, then the supports should be primed and waterproofed.
Wooden flooring under the canopy.
(flat wooden base)
Before making a canopy, we need to figure out what we want in the final version - A CANOPY ON THE GROUND (so that the support pillars are dug into the ground, into concrete)... or A CANOPY WITH A BOARD FLOOR (where the support posts are attached to a wooden flooring)?... Let's look at the projects of canopies and Let's understand our desires and preferences.
Here (photo above) you can clearly see that first the man laid a neat wooden flooring... And then he installed a canopy on it.
If you're building a shade shelter for your backyard patio, it's smart to make a comfortable wood deck as the floor.
We start by leveling the soil surface where there will be a canopy near the house.
After this, we need to lay the sheathing of our future wooden flooring on the soil...
we cover the base sheathing (we nail them to the sheathing)
You can take long boards at full length (as in the photo below)
Or if our boards are short, then they can be laid out at random... in a checkerboard pattern (as in the photo below).
What to do if you need flooring, but the canopy is already on concrete.
Let's say you decided to make a country canopy... and you did... And now you want there to be a neat wooden flooring . So that the furniture can be arranged, put a rug. Here is a photo example of how this can be implemented. We lay the sheathing on posts (if you want to raise the flooring above the ground).
If the soil or concrete foundation in front of the house is uneven in height, then the support columns will be of different heights - for different soil levels - somewhere longer, somewhere shorter. Here you will need to clearly calculate the height
support columns - so that the beams lying on them are all at the same level - in the same plane.
After that, all that remains is to pave it all with boards - and your flooring is ready for the canopy adjacent to the house.
Here is another photo example of a high deck under a wooden canopy near a house. It is built on the same principle - support posts + sheathing + flooring made of boards. And (what I liked) the side planes of the flooring are sewn up here - special panels with holes for ventilation are nailed on all sides.
If you are making a canopy at a door with a high level above the ground (that is, your house has a high foundation), then the wooden flooring under such a canopy should also be high + you need to build a porch into it to go down from this pedestal. This is just such a project for flooring under a canopy - for a house with a high foundation (photo below). A very picturesque picture - a side porch with flowerbeds on the sides and illuminated steps.
Concrete base
under a canopy near the house.
You can also make a BASE UNDER THE CANOPY in the form of a concrete blind area (regular or paved with tiles)
And here is the base for the canopy, which I really like - high concrete formwork
We cast a high side from concrete (or lay it out of brick) - we give this side an elegant cladding to look like rough stone. It turns out beautiful.
This option is also good if you have support beams of insufficient height... And such formwork will raise your wooden canopy to the level you need.
Here is a similar principle, where the support pillars of the canopy stand on rocky hills. This allows you to use even short cuts of beams in the construction of sheds.
Here is another example of a canopy where support poles that are short in length are used. The support beams were placed on specially built brick walls. The result is a canopy with short legs and a beautiful wall, which can then be decorated in an interesting way and covered with decorative stone. Place a bench and fireplace nearby.
Or such a stone side wall for our wooden canopy can be decorated in an oriental style - come up with a fountain there, put flowerpots and pots with plants + stick night lanterns. And what you will get is not just a simple canopy near the house, but a magical corner where you can so comfortably retire or talk about good topics with a friend.
So, we have figured out the BASE for canopies... Now let's see what other canopies there are. And first of all, let's look at the canopy project, for which you do not need to damage the wall of the house.
Key points
There are many options for building a canopy in the yard with your own hands. To get the best result, it is worth considering several basic parameters during the construction of a canopy.
without fastening to the wall of the house.
And remember, I promised to show a wooden canopy near the house, which does not need to be attached to the wall (no need to drill holes and spoil the elegant facade of the house). Here is this model - such a canopy stands on 4 support pillars (or more pillars are possible) ... and it is not attached to the wall - it simply adjoins it, that is, it stands close to it (see options for wooden canopies in the photo below)
Such a canopy (not attached, but attached to the wall of the house) is also not at all difficult to make yourself. It is precisely these structures (supported by 4 pillars) that we examined in great detail in the article-lesson “How to make a canopy - THE MOST CLEAR LESSON.”
And such a free-standing canopy near the house can be decorated with false columns. False columns are available at home improvement stores and can simply be wrapped around your regular wooden shed beams. That is, hide each supporting pillar of the canopy inside such an elegant Greek false column.
Now look at the powerful potential hidden in your new skill of “making awnings with your own hands”...
Preparing materials and tools
Let's look at the stages of building a metal canopy with our own hands using the example of a gable structure with a polycarbonate roof, measuring 6x3m. Its device is one of the simplest.
To make such a canopy, you will need the following materials and parts:
- professional pipe measuring 80x80 mm with a section thickness of 3 mm and a length of 3.5 m - 6 pieces;
- corrugated pipes for a purlin measuring 50x25 mm with a section thickness of 2 mm and a length of 6 m - 7 pieces and 2 pieces measuring 50x40 mm and a length of 6 m;
- ready-made gable trusses with an angle of inclination of 20 and a length of 3.5 m - 5 pieces;
- sheets of cellular polycarbonate measuring 2.1x6 m - 4 pieces.
- hardware for fastening polycarbonate;
- straight joint profile - 10 pieces of 2 m each and 3 corner pieces of 2 m each;
- end polycarbonate profile – 21 m;
- crushed stone and concrete mixture.
You can’t do without a tool, such as a hole drill, a screwdriver, a welding machine, a drill, a measuring tool, a construction level, a marker, an angle grinder with a special attachment for cutting polycarbonate sheets.
with a terrace on the second floor.
If you are the owner of a private TWO-STORY house, then why just make a canopy over the porch. Make a canopy along the entire facade of the house - place it on weight on powerful support pillars of thick section - and... MAKE A TERRACE ON THE ROOF OF THE CANNOT.
It's a good idea... Agree.
After all, this is the right idea . Since you have decided to make a canopy near your house... Then why not think about the future. Make a canopy right away on thick powerful beams-pillars. And then next year, continue construction on the roof of your canopy - attach a railing with balusters - and now you have the opportunity to sit high above the ground - with a cup of tea from a samovar on a wooden terrace made with your own hands. And remember that it all started with your humble desire to make some kind of canopy...
My only advice: it is better to make such structures on the south side of the house (the north side is poorly lit and it is not advisable to additionally darken it with a canopy - there will be less light in the house and the walls will become damp).
The main types of such structures
The design can be:
- Closed type. Such canopies usually have closed openings and have windows;
- Semi-closed type;
- Open when making a light roof on several supports.
canopy support ON THE WALL.
First, you need to decide AT WHAT LEVEL you need to make a hanging beam on the wall. This is important because... If you want the roof of the canopy to be level (without slope) so that you can walk on it, so that you can make a terrace on it in the future... then the level of your beam on the wall must coincide with the level of the beam on the pillars - that is, they should be at the same height from the ground.
If you are not planning any terraces on the roof of the canopy - but you want this roof to be sloped so that the snow slides off it on its own (that is, you need a canopy with a pitched roof), then you need to nail the load-bearing beam to the wall HIGHER than the beam on the supporting ones pillars Here in the photo below I show an example of this thought of mine. Where the load-bearing beam near the wall (arrow 1) is higher in level than the load-bearing beam on the pillars (arrow 2). And due to this different height, we get a canopy with a sloping pitched roof.
Now, let's look at the ways in which this beam can be attached to the wall, or what other fasteners (besides the beam) can be used to attach the canopy to the wall of the house.
Method one - Support in the form of a beam.
We simply attach a horizontal beam to the wall (with self-tapping screws) - it will hold the roof of our canopy (we will lay our cross beams directly on it for sheathing the roof).
And so that you do not doubt the reliability of fastening the beam, you can attach an entire beam-holding mechanism to the wall - in the shape of a square (see photo with a red arrow below).
Method two - Vertical racks against the wall.
If you got the beams for the support pillars of a smaller diameter... and the load on the roof of the canopy is planned to be more serious (i.e. you want to make the roof sheathing also from heavy beams)... THEN you need to ADDITIONALLY REINFORCE your load-bearing beam on the wall and also the load-bearing beam, which lies on the pillars
We see that the load-bearing horizontal beam (attached to the wall) is reinforced with additional vertical support beams (arrow 1). Thus, the canopy attached to the house does not rest its entire weight on the wall beam, but distributes its weight onto the wall posts and beams.
And the supporting vertical pillars at the other end of the pergola (i.e. those at the outer end of the porch) have diagonal short support beams that hold the second load-bearing horizontal beam (arrow 2).
By the way (in the photo above), pay attention to WHAT THE SUPPORT POSTS STAND ON... They are based on metal bearings on a high thick metal leg, which is screwed into the flooring boards.
Here is another photo where the canopy has support beams right next to the wall of the house . It’s safer this way: you don’t have to worry about the wall, in case the beam falls off the wall under the weight of time. Additional pillars against the wall will prevent this from happening.
The third method is support in the form of metal brackets.
We attach brackets-holders to the wall (stone or wood or brick)... This is how we see in the photo below... And we place our side cross beams on them (as on model No. 1 of the canopy from this article).
An important condition: not every wall is suitable for such fasteners. If the wall is tiny, or made of porous material (foam blocks, for example), then the fasteners will not adhere well to the wall. And you must understand that heavy beams will sooner or later fall on the heads of your neighbors.
Therefore, consult with specialists. It’s better to choose the fastening method in which there is not a single bit of doubt - that is, the one where there are additional vertical posts along the wall that support a horizontal beam on the wall (see the second method).
Roof
Slate can be of several types:
- Fiber cement is very reliable and durable. Can withstand heavy loads, but is rarely used during construction;
- Asbestos-cement is a very popular type. Sheets of such slate can be flat or wavy.
- Corrugated sheeting is a very strong and durable material with good ultraviolet resistance.
- The metal profile can be hollow, with a cross-section of different shapes. Used for rafters and posts.
Lumber:
- board;
- beam;
- plywood.
Plywood is used for lining under the roof.
Roofing felt is rarely used, usually for waterproofing.The awning is also rarely used. It is a seasonal roof option.
install SUPPORT POSTS.
I described this stage in detail in the article How to make a pergola canopy - the most detailed lesson. All 4 methods of installing poles are described there - both in the ground, and on a concrete foundation, and on a wooden flooring... And here I will only show a photo of the options for fastening elements for support poles. Or you can simply dig them into the ground (after tarring them and wrapping them in roofing material so that they do not rot in the ground).
Thrust bearings (or anchors) serve to protect wooden posts from rotting. U-shaped and T-shaped anchors are best suited for this purpose. They allow the beam to rise 2 cm above the surface. Be blown by the breeze and do not retain rain moisture.
If you bury your poles in the ground, it is better to use thrust bearings with long anchors (in the form of a reinforcement rod or pipe) - this way the metal part of the pole will be in the ground, and the wooden part on the surface.
And if you don't want to spend money on steel bearings. And just dig the pillars into the cement foundation the old fashioned way, then don’t be too lazy to tar the part of the beam that will go into the ground before doing this. Resin will extend the life of the wood, protecting it from rot. Instead of tarring, ordinary roofing felt is often used . They wrap it around the underground part of the timber, and tightly wrap this roofing material “swaddling” with metal wire. Place the end of the pillar wrapped in roofing felt in the hole and fill it with cement.
And the support pillars for the canopy can be made OF BRICK MASONRY and lined with decorative stone. Like in the photo below.
Design selection
As already mentioned, the decking always rests on the frame. It can be:
- cellular structures on point supports (blocks, piles). Their structure is similar to the grillage of a residential building; the beams must run along the perimeter and be located under the entire flooring area with a certain pitch. Taking into account the relatively small load on the structure, the frame pitch is usually taken to be 1...3 m;
- logs, that is, parallel beams without additional connections. They can also be supported on piles or blocks, but more often they are laid on a platform filled with crushed stone/sand. The pitch of the lag is determined by the planned load and the thickness/material of the flooring.
Combined base for a terrace: beams are laid on the heads of screw piles, logs are distributed along them in increments of 0.5...0.8 m, fastened with a diagonal tie (along the edge of the site)
If you are planning a fence, it is better to give preference to lightweight lattice and column structures.
Fencing on posts made of profiled pipes mounted on a concrete grillage
Painted wood fencing
To install a canopy (roof), it is also better to use lightweight structures: pillars/racks made of profiled metal, wood and a simplified rafter system made of the same material. Suitable roofing materials include monolithic or cellular polycarbonate, tempered glass, wood, metal tiles, corrugated sheets and other options without insulation.
Tempered glass canopy with metal frame and posts
Monolithic polycarbonate on a metal frame
Polycarbonate with wave profile on a wooden frame
Sometimes it is appropriate to use a louvered roof, that is, instead of a continuous deck, shading is provided by inclined slats.
Let's take a closer look at several terrace construction projects.
place the BEARING BEAM on the pillars.
You will decide for yourself how to place the beam on the pillars. I'll show you several ways to attach a load-bearing beam to support posts, and you choose.
Method one (beam on top of pillars)
We place the beam on top of the post and fix it with long screws (central photo) or metal plates (right photo).
To prevent the supporting beam from bending on the support pillars under the weight of the roof sheathing, it can be REINFORCED. To do this, add diagonal beams (see extreme examples in the photo) or add an extended beam in the center (central example in the photo below).
Method two (beam from above into grooves on support pillars).
We cut out a hole-groove in each support column. And we put our load-bearing beam into this groove. Naturally, this method is suitable if our beam has a side that is thinner in size than the thickness of the support column.
Method two - instead of a beam there are 2 boards.
This method is remarkable because it saves material (boards are cheaper than beams). And in terms of endurance, 2 boards are equal to one beam. We fill two boards on both sides of the support post and together they act as a regular load-bearing beam - see the photo of the canopy structures below.
I described all these methods of laying load-bearing beams on poles (for the roof of a country house) in the article “Canopy for a country house - 10 WAYS to do it yourself.” So if something is not clear here, you can find additional explanations in this article on how to make a canopy at home with your own hands.
Racks
Typically, when creating canopies, wooden or metal posts are used. But the structure will be much more stable if you use concrete supports. The holes for the supports must be dug below the freezing level of the ground, somewhere around one meter.
However, if the shed is being built in the northern region, you will have to dig a much larger hole. Sand is poured and compacted at the very bottom, then concrete is poured and a support is placed. First it needs to be leveled, and only then should the hole be filled to the end.
canopy roof lathing
The first method is lathing over the beams.
simply lay the sheathing boards of the beams. And fasten it with metal corners. Like in the photos of the house canopy below.
The second method is on the grooves.
We cut grooves in the sheathing boards. And we put these grooves on the supporting beam. The difficulty here is that the grooves at the ends of the boards must coincide with the beams (therefore, the boards must first be dragged up, laid out on the roof, marked with a pencil where the grooves will be cut, then removed, sawed out the grooves, and lifted onto the roof again).
The second method is butt to butt.
This method is also possible, but the sheathing beams must be adjusted to fit snugly to snugly in order to fit neatly into the metal holder ears.
Roof for canopy
(roofing felt, polycarbonate, slate, tiles)
The most beautiful type of roof is transparent polycarbonate. This way there will always be light under the canopy. Such a roof is required if this side of the house faces north, so that excess darkness does not accumulate under the canopy.
If the canopy is on the sunny side of the house, and you instead want to reduce the sun above your head and sit in the shade of the canopy. Then you can choose any opaque roof - cheap roofing felt and slate, or more expensive soft tiles, or chalkboard.
Important: Do not forget to waterproof the junction of the canopy and the wall. To do this, you need to buy and nail a small iron visor. As in the photo below.
An elegant addition to a canopy.
You can cover the space between the support pillars with panels with sheathing. They are easy to manufacture - a regular rectangular frame made of thin blocks - and a thin strip is criss-crossed onto them. You can plant vines next to such a sheathing - they will beautifully crawl up the pergola.
As a result, you will have a gazebo adjacent to the house. There you can put a table and benches for gatherings with friends and neighbors.
By the way, I also have an article on making benches with my own hands.
In the meantime, while the grapes are growing, you can plant your canopy using pots - just build a green wall of pots with lush bushes near the supporting pillars of the canopy. And we hang flowerpots with flowers on the supporting beam of the canopy.
You can also design on a piece of paper - sketch out a sketch of a stone flowerbed next to the canopy. And next year we will bring it to life.
Here are simple ways to create canopies with your own hands - at a private home or country house.
And for dessert...
When your canopy is ready and you are beaming with happiness and pride, think about how you can make the canopy even more elegant.
For example, paint the canopy elegant white. Then it will look completely festive. White paint turns even a very heavy structure into a light and airy one.
And if you made a canopy for the back patio (for cozy gatherings ), then buy fabrics and sew some elegant curtains for your new canopy. They can be hung on metal strings stretched between the support posts of your country canopy. This way you will get an almost oriental tent in your backyard of a private house.
And next year, you can develop a project plan for landscaping the area around your new shed (photo below) . After all, if you have found a master carpenter inside of you... who knows, maybe a designer mason is hiding next to him.
Draw a sketch of your area around the canopy, consult with your smart wife and for the next construction season arrange, for example, a stone area like this, with benches and a fireplace for a cozy fire.
By the way, to help you - my article “HEARTHERE in the country - 7 WAYS to make it with your own hands.”
You see how interesting it is to make a canopy with your own hands ... believe in your hands... and continue to create beauty around you... This is very useful. Because when you are doing good things, there is no time to do bad or sad things... And if there is a lot of beauty in life, then there is no room for despondency.
Get busy living or get busy dying...
Take care of your health or take care of your illness...
Deal with fear or deal with courage
Engage in despondency, or engage in creating something new
We ourselves choose what to do... So let's choose to create something new and useful... Because by creating something, we create ourselves. The best version of ourselves.
Forward. You just need to start... then continue... and then finish. It's simple.
If I weren't a girl... I would build this myself. But all I can do is inspire boys. Therefore, it’s up to you to build))), dear boys.
Good luck with your dacha construction. Olga Klishevskaya, especially for the website “Family Kuchka”
If you liked this article and you want to thank the free author for this painstaking work, then you can send any amount convenient for you to his personal wallet YAD - 410012568032614
We build a house for a generator with our own hands
Regular power outages and fluctuations in electricity in a country house have probably repeatedly caused inconvenience to you or your loved ones. A universal solution in this case is to use a small power plant, which most often runs on gasoline or diesel.
At the same time, installing and ensuring uninterrupted and coordinated operation of a mini-power plant will require some effort from you. To do this, you will need a specially equipped room (in most cases it should be separate from the residential building) and fully comply with certain requirements and conditions:
convenient access for generator maintenance;
protection from extreme temperature changes, direct exposure to the sun and other external negative factors;
Options for canopies that protect cars from sun and rain
In summer cottages, three types of awnings are most often found:
- Extensions to the building. Even a novice builder can carry out the construction with his own hands. They are fixed to the wall on one side, so you will have to dig in fewer pillars.
- Stationary ones have at least four supports, their design is varied.
- mobile awnings can be easily moved to another place and rolled up to be stored.
Tip: To reliably protect your car, you should build a carport with side walls.
The choice of building a summer garage depends on the size of the summer cottage and the location of the house. The second option is more profitable; the structure is installed near the fence.
Some pro tips
When a decision is made to purchase an autonomous power plant, it is necessary to initially determine its parameters. Depending on the choice of fuel, the noise level may vary (petrol is quieter than diesel). A soundproof enclosure for a generator can effectively protect against extraneous loud sounds from the unit. Also, when selecting the appropriate equipment, you should also take care of choosing a casing. If the protection parameters you are interested in are not found, you can make them yourself. The expected noise level also depends on how correctly and efficiently the casing is made.
Regular power outages and fluctuations in electricity in a country house have probably repeatedly caused inconvenience to you or your loved ones. A universal solution in this case is to use a small power plant, which most often runs on gasoline or diesel.
At the same time, installing and ensuring uninterrupted and coordinated operation of a mini-power plant will require some effort from you. To do this, you will need a specially equipped room (in most cases it should be separate from the residential building) and fully comply with certain requirements and conditions:
convenient access for generator maintenance;
protection from extreme temperature changes, direct exposure to the sun and other external negative factors;
These are also small forms
The house in which the generator is placed can be classified as a small form of architecture. It is desirable that its outline, exterior decoration and color scheme be in harmony with other buildings located on the site.
To better fit the house for the power plant into the garden ensemble, it can be surrounded by low-growing shrubs with a dense crown. Sometimes its outer walls are decorated with climbing plants, which serve as good protection from the scorching rays of the sun in summer, and from strong winds in winter (Fig. 2).
For temporary storage of the generator, you can get by with a simpler structure. But in this case it should be turned on outdoors.
Source of the article: https://kak-svoimi-rukami.com/2016/07/domik-dlya-generator-svoimi-rukami-stroim-generatornuyu/
Advantages of standard housings
The autonomous power plant installed in the building has a relatively low noise level, which allows the equipment to be used not only outside, but also inside the facility. The metal casing also gives the equipment a more cost-effective appearance. In addition, a protective noise-absorbing casing for the gas generator helps protect the operating mechanism from damage and clogging. Currently, the market offers a large selection of enclosures that can effectively reduce noise levels.
Technical features of frames
In order to describe in detail the characteristics of canopies made of profile pipes, it is necessary to create a definition of the concept “canopy”. It is a small architectural form, often acts as a component of a covered area, and at the same time has important architectural or decorative significance. The main purpose of canopies is to protect a certain area from precipitation and external environmental influences.
High resistance to biological, physical and chemical influences allows metal profiles not only to differ significantly from other materials in functionality, but also to be quite advantageous in use and mass consumption. All types of frames built from this material are easy to install and section.
How to decorate a generator house outside
Despite the small size of the generator room, it also belongs to the small form of architecture. That is why the right solution for you will be high-quality exterior decoration of the house. This includes the outlines of the house, its external design, and the selection of colors, which should be harmonious in relation to the rest of the objects on the site.
Do you want me to help you?
Would you like us to help you?
Contact me and I will help you create the correct technical specifications for a generator house. Just leave a request.
Contact us and we will help you create the correct technical specifications for a generator house. Just leave a request.
Projects
Before building a canopy at the dacha, you need to make a detailed drawing and calculate the fastening elements and their cost (that is, create a project), this will help create a reliable shelter and save money.
What such a project includes: the number of load-bearing supports and the size of all components of the canopy, frame drawings, calculation of wind resistance and snow loads, approximate estimates.
Since the future protective roof will be intended for a car, some nuances should be taken into account when designing:
the size of the canopy should be larger than the size of the car itself, this will allow you to freely park and exit the car; the frame should be mounted so that the sun's rays do not enter inside throughout the day; It is important to provide wide and convenient access to the canopy.
However, not every person will be able to independently design and make the necessary calculations; in this case, you can always invite a specialist. He will help with the shed project.
How to build and equip a room for installing an electric generator
Power outages in country houses sometimes become a serious problem, and it has to be solved with the help of small power plants running on gasoline or diesel fuel. The demand for such units for generating electric current for domestic purposes is steadily growing.
To install a mini-power plant and establish its stable operation, a specially equipped room is required, usually a separate one, which must meet a number of requirements. The main ones are fire safety and ease of maintenance of the generator.
Power plant noise level
As you know, sounds are transmitted in two ways: through air and vibration. When airborne noise enters the house, a person hears a roar from the engine and exhaust system. As for vibrational sound, it can be transmitted through solid bodies, creating discomfort in the room.
Photo: Sound-absorbing box for the generator. Author: Artemy Ivanov
According to experts, the noise level from a power plant is 100 dB; to make it easier to understand, you should consider which sounds are equal to what.
Loud sounds in the room can not only lower your mood, but also prevent you from resting, and as a result, this problem can lead to diseases of the nervous system. Today, with the help of soundproofing and noise-absorbing materials, you can create ideally comfortable conditions.