Review of homemade ax models
In addition to restoring old axes, blades are made from other available materials. The type and purpose of such a tool is limited only by your imagination and skills.
Springs, reinforcement, a circular saw blade, and stones can be used. A homemade ax may turn out to be better and more beautiful than one bought in a store. Spring ax
The spring of a regular car is made from light, elastic, durable alloys. One 100x400 mm plate made from a spring is enough for a small decorative or throwing hatchet. To create a full-size blade, several springs must be welded into a small sheet of metal.
Draw the blade of your future ax and cut it out with a grinder. Keep in mind that the handle will wrap around it on both sides, much like a knife design. To make it, you can use a shovel handle or parts of old wooden furniture. Legs and slats will do.
Reinforcement cleaver
Unnecessary pieces of construction reinforcement can be turned into a convenient splitter for firewood. To begin, weld two identical squares from the reinforcement so that they are diagonally sized so that the logs can pass through them freely.
Then weld the letter “H” from the same reinforcement, and weld a blade with an obtuse sharpening angle onto the jumper. Connect the ends of the resulting structure with squares. The cleaver is ready.
Circular saw ax
A circular saw is an excellent material for a beautiful kitchen hatchet. Simply use a grinder to cut out a blade along with a handle from a circular saw blade, drill a couple of holes, and screw on the wooden trims.
Don't be afraid to experiment in your workshop. Skillful hands can breathe life into seemingly unnecessary, rusty garbage.
High-speed steel of different grades for knives
The knife consists of two main parts - the blade and the handle. Both parts are important. This article is aimed at the cutting part of the knife. The steel grade plays a vital role in the technical characteristics of the final product. The process of making the blade is no less important.
Rarely do people talk about pre-selection of workpieces. According to knife craft professionals, the mandatory and initial stage is screening out defects.
The test is carried out by simply throwing the blanks onto a wooden surface. This must be done several times; products that have succumbed to cracks are rejected.
Finding steel from a high-speed saw in Russia is quite easy. Discarded factory-made products, grandfather had a product from the USSR lying around in his garage, or purchase a new “quick cutter” on the market. Quite suitable options. High-speed steel grades have many suitable varieties for the manufacture of blades.
Steel P18 and knives made from it
Rapid steel P18 is rare. If you are lucky enough to find a saw or a plate, the “knife addicts” cry with envy. Steel with a strength of up to 1000 MPa retains its cutting properties when heated to 600 degrees Celsius. In production they are used for cutting tools: drills, thread cutters, taps, countersinks, reamers and cutters.
Knife steel P18.
Can be forged and hardened. Making a knife from a P18 steel saw is not difficult. Cut out the template, make the slopes, the steering wheel and the handle. No hardening required, no vacation needed. Users have only positive feedback; they have been working with knives for 15-20 years.
A damn good material in terms of strength and durability. The difficulty in sharpening applies to any rapid steel. In this case it is no exception. Afraid of corrosion, requires maintenance.
High-speed steel knives P12
Direct substitute for P18 steel. Industrial application is in drills, taps, reamers and other options. The structure of P12 is close to its “brother” P18. Despite the close similarity, there is a slight difference in mechanical properties.
The heterogeneity of the carbide affects P12 in ductility and toughness. The cutting properties of a blade made of this material are definitely high. Sharpening is slightly easier.
Brittleness is characteristic of rapid steels; you should not make a “machete” or an ax. The P18 analogue is perfect for kitchen knives.
Blades made of quick cutter R6M5
Steel is quite popular, it is not difficult to find. Used in cutting and sawing tools, copes well with shock loads. There are several varieties according to GOST. Basic rapid properties are present in all grades of R6M5.
Opinions differ on the use of blades made of this material. A dull blade is difficult to sharpen and will create a lot of difficulties during a hike. It is recommended not to take it for long events. Kitchen or cutting - its purpose. Definitely good at woodworking.
How to make a taiga ax
Taiga ax
The taiga ax is characterized by a rounded blade and light weight, making it easy to carry. The total weight of the ax and head is approximately 1400 grams. It is intended for cutting down trees, rough processing of logs, constructing huts, and working with firewood. Therefore, it differs from a regular ax in the presence of a long beard, which protects the ax from breaking during strong blows; special sharpening of the blade, in which the rear edge is twice as narrow as the front, as well as a smaller angle of inclination of the head in relation to the ax handle compared to a carpentry tool.
- You need to take an ordinary carpenter's tool, from which you only need a metal head, with which the front part is cut off so that it is level with the end of the butt.
- The back is cut down to a rounded shape using a grinder or a medium-grit sanding disc.
- A semicircle is cut out on the inside of the chopping head for a comfortable grip on the ax and for carrying out precise work.
- To make the tool lighter, you can saw off the upper corners of the butt.
- Sharpen the blade with an emery machine or a medium-grit grinding wheel on both sides until a moderately sharp edge is obtained.
Next, the ax handle is made. It should be comfortable and made of durable wood. Birch, maple or ash are best suited for this. For comfortable use, the handle should be 50-70 cm long. Before making a taiga ax, you need to select a suitable piece of wood without knots or rotten areas, with a diameter of at least 12 cm. The selected lump should be split in two and dried for a couple of months at a temperature of +22 degrees. After this, the desired shape of the ax is given according to the template. Excess wood is removed with a small hatchet, knife, and then processed with a chisel. All that remains is to attach the butt and fix it using epoxy resin. The finishing process of the ax includes grinding and varnishing.
Main stages of work
At the next stage, it will be necessary to drill two holes with a metal crown, and cut off the partition between them with a grinder. The inner edges must be processed with a file.
Next, the author lowers the blade and sharpens it on a grinder. After this, the metal hardening procedure follows - the workpiece must be heated red-hot in a forge, and then cooled in used machine oil.
After tempering the metal in a gas or electric oven, final grinding and sharpening of the blade is performed.
At the last stage all that remains is to make the handle. In this case, the author makes a handle from pieces of wood and epoxy resin, but you can simply make a classic version of the handle.
For details on how to make a kitchen ax from a saw blade, we recommend watching the video on our website.
What materials and tools are needed to make a saw?
The set of tools and consumables for creating a band saw with your own hands at home may vary depending on the features of the chosen design. But, as a rule, the construction of a machine requires the following:
- boards or sheets of plywood for the frame;
- bearings;
- motor - electric or gasoline;
- metal corners;
- metal cutting blade - homemade or purchased;
- self-tapping screws and bolts with nuts;
- rubber from a bicycle inner tube;
- wooden blocks and slats, they are needed for the supporting frame of the structure;
- bushings;
- belt for transmitting torque;
- a steel rod that will serve as a shaft for the pulleys;
- steel sheet or piece of PCB;
- varnish or paint, they are needed at the final stage of creating the machine.
Also, when making a band saw with your own hands, you will need to use the following tools:
- grinder;
- screwdriver;
- pliers;
- wrenches - sizes are selected in accordance with the bolts;
- jigsaw;
- screwdrivers;
- hammer.
Advice! When choosing boards for the table and band saw frame, it is better to choose hardwood blanks with a thickness of at least 2 cm.
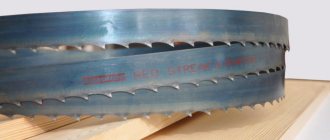
Selection of tape material
If you wish, you can make a saw blade for a band saw with your own hands from U8 or U10 tool steel. The material should be strong but flexible, with a thickness of 0.4-0.8 mm for cutting hardwood. When creating a blade yourself, you will need to use a grinder to cut out the teeth in the metal, spread them apart and sharpen them, and then solder the tape into a solid ring with a gas torch and sand the seam.
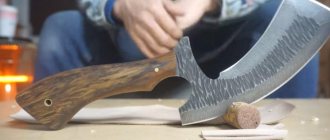
Materials and tools
This ax is made from a used circular saw and hardwood that I had. I only had to purchase a folding saw blade. It was already hardened, so it did not need heat treatment. Materials:
- Old circular saw blade.
- Hardwood timber (approximately 50 x 40 x 300 mm).
- Epoxy resin.
- Large nails for use as rivets.
- Folding saw blade (I used 200mm).
- Bolt, nut and washer.
Tools:
- Angle grinder (don't forget about safety equipment!).
- Rasp.
- File.
- Sandpaper.
- Drill.
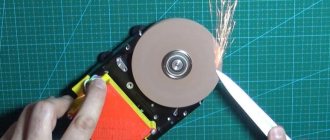
Let's make sparks!
I transferred the outline of the ax and the metal part of the handle to a circular saw and cut them out using an angle grinder with a fine cutting wheel. I then used a sanding wheel, angle grinder and files to finish shaping the pieces. The final shape of the metal part of the handle can be given later.
Important Bicycle rack made from bicycle frames
DIY ax made from a circular saw blade
There will be no difficulties during the manufacturing process. It is enough to have some experience in cutting and processing metal and wood. If you follow the recommendations, the expected result will be achieved.
What you need
The availability of sufficient quantities of certain materials and tools must be checked in advance.
Making a hatchet from a disk.
Materials:
- saw blade;
- materials for handle linings;
- cover material;
- impregnation for wood.
Tools:
- Bulgarian;
- jigsaw or band cutting machine;
- grinding machines - belt and orbital;
- oil and furnace for hardening;
- oven;
- files;
- marker;
- sandpaper.
Ax making process
Before starting work, you need to check the quality of the metal. To do this, a small piece of the disk is cut off and hardened. If the quality after hardening is normal, you can start working:
- The outline of the future hatchet is drawn with a marker on the disk.
- Using a grinder we cut off the excess. A rough profile is made, which will then be processed. If there are difficult areas, they need to be cut out in pieces. Be sure to leave a drawn outline.
- It is necessary to bring the workpiece to the desired shape. The rough profile is processed using a belt sander. To do this, you can use a grinder with a grinding disc. There may be a situation when a power tool cannot help because the profile is complex or there is not enough space. In such cases, a file is used.
- Sometimes, an oblong round hole of large diameter is made in the head of such hatchets. It is used to hang an ax or open bottles. It also gives the instrument an original look. To do this, holes are drilled along the edges of the future window using crowns with special carbide tips. The metal between the holes is cut out with a grinder and processed with files. Holes for attaching the handle are immediately drilled into the handle. This step must be done before hardening.
- The bevels are made on a belt sander. Ideally, they should have the same angle. Since the blade is small and relatively thin, they can be done by eye.
- Quenching occurs with oil. The metal becomes red hot and is immersed in oil. If after hardening it cannot be taken with a file and rings, everything is done correctly. The correct heating of the metal can be checked with a magnet. The temperature is right when it stops reacting to the steel.
- After hardening, the metal must be released. For this, you will need an oven that can heat the hatchet to 200 degrees Celsius. Heating takes about 2 hours. The metal should become the color of straw. If the process is performed correctly, the handle of the product will spring back.
- Grinding occurs in two stages. Coarse sanding is done using a grinding machine, and the blade is polished with sandpaper and water. After sanding, it is advisable to seal the head of the hatchet with masking tape.
- When making handle linings, everything depends on imagination and taste. More often the overlays are made of wood. A blank is cut out along the contour of the handle and cut lengthwise into two parts. You can cut each piece like a puzzle and fill the mold with epoxy glue. If you add a coloring agent to the glue, it will turn out more interesting.
- The pads are sanded, impregnated, put in place and secured. Overlays for metal can also be made from fiberglass. It has many color options and does not deform under the influence of the environment.
If desired, you can make a leather case. This way it is more convenient to carry the hatchet and the person will not get hurt. However, in this case, it is enough to make a cover only for the blade and secure it in the hole in the head of the ax with a button.
Hardening a knife at home
It is very good if there is a furnace for hardening steel. You can even purchase it in a specialized store, but the pleasure is not cheap. So how to harden a knife at home without a special muffle furnace? There is a way out, and to be honest, there is more than one.
But first, you need to conduct small experiments and remember in detail all your actions. If the result is positive, then the same manipulations can be performed with a real part.
This tricky technique will help you get better at working on small workpieces and acquiring the skills to heat and cool a blade. We must not forget that different alloys require different temperatures and cooling methods, otherwise cracks and brittleness of the workpiece cannot be avoided.
Heating source
Basically, several sources of heating the workpiece can be distinguished. It is better to exclude the muffle furnace, since according to all expert estimates, it is the best in this matter. But we will try to evaluate other fairly common heating devices.
The forge copes quite well with heating workpieces. A blowtorch or propane torch may be suitable for this purpose; by trial and error, you can achieve the desired result. By the way, for these two options, you can build a small oven from refractory bricks, and the process will be simpler and the result will be positive.
Fireproof brick furnace for hardening a knife.
Well, the last, one might say, completely unacceptable source of heating is a gas stove. If you want to spoil something, use this option.
Temperature
As has been said many times, every steel requires a certain temperature. In production, special thermometers are used for control, but in everyday life you can use a magnet (also mentioned above).
Dark spots should not be allowed; this is overheating, which will subsequently ruin the entire workpiece. If the master has enough experience, then he can determine by eye by the color of the hot metal whether the workpiece is heated enough or not. There is also such a hardening method: the part of the blade that is sharpened three times is heated to a temperature of 285 degrees, and the cutting part is heated only once, and to the maximum 950-1000 degrees.
The heating modes for each brand of steel are different:
- low-carbon steel requires heating in the range of 757-950 °C;
- steel with a high carbon content is sufficient at 680-850 °C;
- but alloying grades require from 850 to 1150 °C.
There is a whole table of colors, colors of incandescence. For example: brown-red 580-650 °C, dark red 780-830 °C or orange 950-1000 °C. So be careful and do not overheat the workpiece.
Cooling and holiday
For proper hardening, you need to maintain the correct temperature during cooling. It is preferable to cool stainless alloys in mineral oil with additives. And low-alloy steels, in aqueous solutions with salt and other additions.
Cooling the knife with mineral oil with additives.
There are many cooling options:
- blades with double-sided blades are dipped first into oil and then into an aqueous solution;
- Red-hot workpieces are dipped into the oil three times, each immersion taking a little longer than the previous one. And only then they lower it into the water;
- To give elasticity to the middle of the blade, this part is heated, then dipped in boiling water for 2 hours, and then in ice water.
With all these manipulations, it is worth considering that metal cools twice as fast in oil. A workpiece that has undergone hardening is subjected to a special process called tempering to restore the crystal lattice of the metal structure. There is nothing complicated in this procedure: the blade needs to be warmed up for a couple of hours. For alloy steel 270-320 degrees, for plain steel 150-200 degrees.
DIY ax
Any ax can be made at home. By following simple rules, you can make simple, hunting, taiga, tourist, throwing or decorative hatchets, tools from car springs with your own hands.
You can also modify an old tool or completely remake it, creating a new and easy-to-use axe.
From a spring
A small tool is made from a spring from a car with your own hands. It can become either a working object or an original decorative item, similar to a Viking axe. Whatever you have in mind, it can be easily accomplished if you follow all the steps consistently. Just select the option you want, watch the video and get started.
A tool made from strong and durable materials will last a long time. You can do this by following these tips:
- Take a used car spring (width - 10 cm, length - approximately 40 cm), using a previously prepared template with a marker, draw the contours of an ax on its surface.
- Cut the product along the contour with a grinder, then sand the workpiece well to give it the appropriate shape.
- An ax handle can be a leg from an old chair. For fastening, make several holes in the spring.
- Saw off any excess from the leg, then saw it in half. Drill 3 notches in both halves. Then assemble the handle, secure it with screws and bolts, and then grind it using the machine.
- Sharpen your blade.
From reinforcement
The reinforcement is very strong and durable; splitting axes are made from it. These hatchets will be useful to you at the dacha, during camping and other conditions. They are well suited for chopping wood. You will make a durable ax from reliable material, and it will serve you for many years. Mark the parameters on paper. Please include all measurements as they may vary. The handle of a hatchet can be large, medium or small, like its blade. How to make a hatchet with your own hands from rebar:
- Take 2 reinforcement bars (length 50 cm) and blanks (8 pieces) from which the upper and lower squares will be made.
- Use a welding machine to weld a couple of squares, and then the posts.
- It is better to make the blade from steel up to 10 mm thick. Weld it to the fittings too.
- Sharpen your blade.
Important Congratulations on the Day of Agricultural Workers of Ukraine in prose
From a circular saw
It is possible to make an ax with your own hands from a circular saw. A durable and strong tool is made from a carved disk. In this case, the disk will not need to be pre-hardened, since it has already been hardened.
A product made from a circular saw will be very reliable. A hatchet from this tool is made as follows:
- Sketch the product, then cut out the finished template. It needs to be placed on the cutting disc.
- Use an impeller to cut along the contour of the template.
- Heat the part with a torch, then drill holes.
- Wipe the ax thoroughly with sandpaper.
- Make a handle from wood. Apply glue to both halves of the handle, then secure the 2 screws.
- Sand the handle, then coat its surface with varnish.
From stone
A durable and reliable ax is made from natural stone. Such raw materials will produce durable blades. Just keep in mind that such work will be labor-intensive and time-consuming. But the result is worth it, because the ax will serve you for a long time. These types of stones are suitable: granite, quartzite and sandstone. The best solution for such a tool is an oak handle. Oak products are more reliable and wear-resistant. A workpiece made of smooth wood, without bulges or knots, is suitable.
Making an ax handle is simple: cut the wood, use a template to give it a shape that will be comfortable to hold in your hands. Sand the stone so that the material can fit as closely as possible to the end of the handle and is well fixed to it. There is no need to use special machines and other equipment. It is enough to remove the surface layer from the surface of the stone. The handle cannot be made from raw wood: when it dries, it will decrease in size. Because of this, you will not be able to use the axe.
Etude 1. Chernyaga or Ode to Water Pipes
Here the field for capture is wide: this includes a strip from a construction site, corners, pipes from batteries, channels, fittings. This goodness can always be found everywhere in any quantity. "What for?" - fans of high-tech alloys and steels will ask. And it's very simple. What are the overlays, all sorts of rings, etc. made from? It is clear that the simplest and cheapest is the black one.
Now let's talk about how we can improve the quality of our material. The above products are made of malleable iron and are well processed by pressing and forging. At the same time, due to deformation, the metal acquires higher hardness and strength. Yes, I am a fan of cold forging, what should I do? But it really works! For example, to make linings for some kind of survival knife, I would take not just a plate of the required thickness, but a strip 2 times thicker than necessary and accelerate it to the required thickness by cold forging, thereby strengthening the metal and significantly increasing the quality of my product . In general, the quality of a metal largely depends on how it is processed. You can forge a cool bayonet-knife of good factory quality from reinforcement, or you can ruin high-tech complex alloy steel so that it’s only good for trash.
Using cold forging, I managed to bring the blade edge strength of steel 3 to spring-spring steel 65G (raw, from the factory).
Another example of useful cold hardening is chromium-nickel stainless steel. It is not difficult to distinguish it: it is not polished with a grinder, but is covered with a bluish film of oxides. After unforging 2-3 times it becomes springy and elastic, I personally checked it. I already wrote about brass, I won’t repeat it.
Below is a knife-sword forged from chromium-nickel stainless steel.
But, but, but...it’s important, like everywhere else, to have a sense of proportion! Only experience will tell you the truth here. If you beat and wear down the steel by excessive forging or improper forging techniques, then nothing good will come of it; it will crack and break. Only one rule works here: the harder the steel, the worse and less it is pressed, the more likely it is to crack.
The forging technique is well described by Kuznetsov, but this is for hot. For a cold one, just take a hammer with a round head.
Another option for using cold working is making holes. You can, of course, take a drill and in a minute dig holes where necessary. Or you can break through them. This is difficult and time-consuming, but the hole will not weaken our product and will itself hold its shape better. You'll actually have to grind down the roses next to the hole, but it's worth it. You can pierce it with an ordinary construction nail for concrete, they cost a pretty penny. It is, of course, advisable to make a special device for this task, but with the proper skill you can do it with the help of pliers and a hammer. Looking ahead, I will say that this method helps out where you need to drill through already hardened thin (1-3 mm) steel, the heat treatment regime of which is unknown or there is no possibility (or desire) to re-harden. You just need to place a nut of a slightly larger number than the hole under the hole, otherwise your workpiece will simply be torn apart by a crack.
Separately, it is worth mentioning the fittings. The metal in it contains quite a lot of carbon and its primary hardening is not bad. If you have a forge and coal, you can make very good things from it.
Now a few words about corrosion protection. This is a sore spot for any steel, except perhaps stainless steel and high-alloy metals (non-ferrous alloys did not escape this fate, I personally saw a corner made of duralumin rotten through and through)
Automotive welders came up with a good method: while the metal is still hot (glows), you need to quickly coat it with grease. For quite a long time, steel treated in this way does not rust. That, in general, is all about water pipes.
DIY ax
Any ax can be made at home. By following simple rules, you can make simple, hunting, taiga, tourist, throwing or decorative hatchets, tools from car springs with your own hands.
You can also modify an old tool or completely remake it, creating a new and easy-to-use axe.
From a spring
A small tool is made from a spring from a car with your own hands. It can become either a working object or an original decorative item, similar to a Viking axe. Whatever you have in mind, it can be easily accomplished if you follow all the steps consistently. Just select the option you want, watch the video and get started.
A tool made from strong and durable materials will last a long time. You can do this by following these tips:
- Take a used car spring (width - 10 cm, length - approximately 40 cm), using a previously prepared template with a marker, draw the contours of an ax on its surface.
- Cut the product along the contour with a grinder, then sand the workpiece well to give it the appropriate shape.
- An ax handle can be a leg from an old chair. For fastening, make several holes in the spring.
- Saw off any excess from the leg, then saw it in half. Drill 3 notches in both halves. Then assemble the handle, secure it with screws and bolts, and then grind it using the machine.
- Sharpen your blade.
From reinforcement
The reinforcement is very strong and durable; splitting axes are made from it. These hatchets will be useful to you at the dacha, during camping and other conditions. They are well suited for chopping wood. You will make a durable ax from reliable material, and it will serve you for many years. Mark the parameters on paper. Please include all measurements as they may vary. The handle of a hatchet can be large, medium or small, like its blade. How to make a hatchet with your own hands from rebar:
- Take 2 reinforcement bars (length 50 cm) and blanks (8 pieces) from which the upper and lower squares will be made.
- Use a welding machine to weld a couple of squares, and then the posts.
- It is better to make the blade from steel up to 10 mm thick. Weld it to the fittings too.
- Sharpen your blade.
From a circular saw
It is possible to make an ax with your own hands from a circular saw. A durable and strong tool is made from a carved disk. In this case, the disk will not need to be pre-hardened, since it has already been hardened.
A product made from a circular saw will be very reliable. A hatchet from this tool is made as follows:
- Sketch the product, then cut out the finished template. It needs to be placed on the cutting disc.
- Use an impeller to cut along the contour of the template.
- Heat the part with a torch, then drill holes.
- Wipe the ax thoroughly with sandpaper.
- Make a handle from wood. Apply glue to both halves of the handle, then secure the 2 screws.
- Sand the handle, then coat its surface with varnish.
From stone
A durable and reliable ax is made from natural stone. Such raw materials will produce durable blades. Just keep in mind that such work will be labor-intensive and time-consuming. But the result is worth it, because the ax will serve you for a long time. These types of stones are suitable: granite, quartzite and sandstone. The best solution for such a tool is an oak handle. Oak products are more reliable and wear-resistant. A workpiece made of smooth wood, without bulges or knots, is suitable.
Making an ax handle is simple: cut the wood, use a template to give it a shape that will be comfortable to hold in your hands. Sand the stone so that the material can fit as closely as possible to the end of the handle and is well fixed to it. There is no need to use special machines and other equipment. It is enough to remove the surface layer from the surface of the stone. The handle cannot be made from raw wood: when it dries, it will decrease in size. Because of this, you will not be able to use the axe.
Read with this
Techniques for handling metal
In order for the blade to be strong and tight, during its creation it is necessary to adhere to the rules of handling iron.
The semi-finished product should not have noticeable or unexpressed defects. Before starting work, the workpieces must be examined and tapped. A complete element sounds loud, while a defective element sounds muffled.
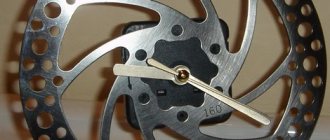
Circular disk for making a knife.
When creating a design and drawing of a cutting component configuration, you need to avoid corners. In such areas, steel can break. Transitions must be made smooth, without sharp turns. The bevels of the butt, fuse and handle must be ground at an angle of 90 degrees.
When cutting and processing, do not allow the metal to overheat. This leads to a decrease in strength. An “overcooked” blade becomes fragile or soft. During processing, the part must be cooled regularly by completely immersing it in a container of cold water.
General points
The process of collecting firewood is very labor-intensive, requiring a lot of time and physical effort. To make it easier for yourself to perform many tasks, you should wisely choose equipment for collecting firewood.
Cutting logs into logs in the old days was done using a two-handed saw and took an extremely long time, and there is no need to talk about the amount of effort expended. Nowadays, to simplify the work with wood, chainsaws have been invented, which can be an excellent assistant for you.
Important Do-it-yourself chair-cards
When choosing a suitable chainsaw for cutting firewood, you should immediately take care of spare parts for it, and additionally buy a spare chain, a file (chain sharpener), engine oil recommended by the manufacturer, 92 or 95 gasoline for refilling.
To avoid carbon deposits, it is better to use synthetic or semi-synthetic oil, unless you are going to buy a specially developed composition from the chainsaw manufacturer. It is worth saying here that on engines with low speeds, the use of synthetics is unwise, since the oil simply will not burn and will fly into the exhaust pipe.
Separately, I would like to talk about the file used to sharpen the chain. This option is most preferable to a sharpening machine, since it removes a larger amount of metal, which means the chain wears out faster. If you take the chain to a workshop for sharpening, they may well sharpen it at the wrong angle. Therefore, it is better to sharpen it yourself. If the chain fails, you should replace it with a new one purchased from an authorized dealer.
Ax design
The design of this ax consists of three parts.
Ax blade
The shape of the blade was borrowed from the tomahawk, an ax used by Native Americans and European colonists. But you can change its shape by adding some spikes or a hammer on the butt. The ax blade will be glued to the handle and secured with rivets.
Opener
First, as an opener, I wanted to make a suitable hole in the blade. As a result of test drilling, it was discovered that it was impossible to make a hole with a conventional drill, so I changed the type of opener. Both options can be seen in the image. The new type will be made in the form of a specially shaped hook.
Saw
I wanted the ax to come with a saw and thought it would be nice if it could be hidden like a jackknife. From the handle and it can be unfolded using the finger groove. The saw will be hidden between two pads. The shape of the metal part of the handle will allow the saw to be locked in both open and folded positions. Once the design was chosen, I tried it on a circular saw blade to get the dimensions to fit.
Etude 3. Ligatures or may non-ferrous metal help us
Alloyed and complex alloyed steels are very rare. But let’s immediately agree: we are talking about carbon alloy steels, because... The quality of the cutting edge is determined by the amount of carbon, and not by anything else.
The simplest and most affordable, in my opinion, are diamond cutting discs for stone and concrete. Their main part consists of steel x12 or 100x12 in Russian knife markings. This steel is perfectly hardened, annealed and has all the positive properties of the same carbon as ordinary steel (U10). There are also no problems with forging thickness, because discs are usually no thicker than 3 mm. The other side of the coin is the low toxicity of this steel. The fact is that to achieve the properties of stainless steel you need 13% chromium, this steel has less of it. If you wipe a knife made of this steel dry after grinding, it will not rust. But, on the other hand, dip it in hot tea, and the blade will instantly become covered with something incomprehensibly dark. This is chromium oxide, which is, in general, a carcinogen. This steel is ideal for camping, work, and combat knives, but it has no use in the kitchen, and you should think twice before cutting your own sausages with such a knife. Semi-combat knife made of this steel:
The guard is stainless steel, the handle is duralumin.
Next are the wrenches. They don’t need to be re-hardened; you can simply grind them out and not worry about it. Wrenches make ideal throwing knives. They have deadly strength, hold an edge well, do not rust easily and have a peculiar bluish tint (added vanadium). Below is a set of throwing knives, two bojo shuriken made from rebar and two throwing knives made from wrenches. The third is a released fragment of a shop knife.
Weapons can be made not only from metal. For example, a glass kubotan or an oak dagger looks exotic and unusual:
Both of them are invisible to metal detectors and are not considered edged weapons. An oak dagger pierces thick jeans, I checked it myself.
Features of a homemade ax
An ax is a simple and common tool that is difficult to surprise anyone with. However, thanks to it you can cope with many complex jobs and ultimately get an excellent result. On sale you can find both simple versions of axes, as well as more interesting and original ones, for example, with decorative inclusions. If you don’t want to spend money on a ready-made option or you couldn’t find a suitable one among those, you can make it yourself.
Many home craftsmen, not finding the right tool on sale, decide to make it themselves
Such work cannot be called impossible or extremely difficult, but even here it is very important to act according to all the rules in order to get a good result. It should be borne in mind that there are several types of axes that you can build on your own
For example, there are special cleavers that are very popular today:
- mechanical;
- with electric drive.
Of course, the mechanical option is the simplest and easiest to implement. It is equipped with a manual drive. Making such a model with your own hands is not difficult. The drawings of mechanical tools are quite simple and understandable, and the principle of their operation lies in simple mechanical manipulations. This device consists of the following basic elements:
- metal wedge;
- spring mechanism.
When working with such a tool, the master spends a minimum of effort and time, especially if you compare this cleaver with a standard simple ax. As for the even more advanced electric cleaver, it contains one main part, which, after activating the engine, begins its movement - constantly rotating. The master only needs to add a new batch of firewood for splitting.
You should also know about other options for axes, which many craftsmen can make on their own.
- Carpentry. This tool is light in weight and size, and has a sharp blade. It is used in cases where the most precise and accurate work with wood is needed.
- Taiga. This ax can also be made with your own hands. It is perfect for cutting down trees, removing knots and bark.
- Tsalda. This tool is made to clear an area of bushes.
- Kitchen. Such tools are made exclusively for chopping bones. A kitchen ax is a small device with a short handle and a large blade.
- Lumberjack. Suitable for cutting down trees only. Made from a long ax and a sharpened wide blade. It also has other names, for example, felling.
The taiga types of axes are recognized as the most popular and practical. They are distinguished by the following features:
- little weight;
- small area of the stabbing area;
- unusual sharpening of the blade (the edge at the back is several times smaller and thinner than the front).
Certain tree species are ideal for making a home ax. It must be taken into account that materials suitable for such purposes can easily withstand significant vibration loads that occur at the moment of impact of the tool.
Any homemade ax is distinguished by the fact that it is ideal for the master who works with it. By making this instrument with your own hands, you have the opportunity to adjust it to suit yourself, to suit your hand. The result is the most convenient, practical and easy-to-use devices.