You can easily decorate your home with a variety of table, wall or floor lamps. At the same time, they can act as bright design elements or be invisible from the outside.
But in any case, the lighting fixtures in the house must match the existing interior of the room. Otherwise, their light or simply their presence will introduce disharmony into the style, which will clearly be a negative outcome of your idea.
Today, many people use such unusual lamps as plasma ball lamps as a decorative element.
Plasma ball lamp
This lamp has an unusual appearance and creates a non-standard type of light. Therefore, such an acquisition will serve as an excellent decorative element, but only if its choice and placement in the room was competent. Our article will be devoted to this issue today.
History of creation
The world owes the appearance of such an unusual lighting device as a plasma ball lamp to the world-famous inventor Nikola Tesla.
Nikola Tesla
It was Tesla, who became famous for his experiments with electricity, who built the sulfur lamp back in the 19th century. Based on this device, the first decorative lamps of this type later appeared.
Note! Today, there are not only plasma lamps, but also spotlights and other lamps designed for public lighting. However, they are not yet very widespread in the world due to their rather complex design.
Now, after a short historical excursion is completed, we can understand in more detail the structure of such an unusual lamp.
Features of the structure of a plasma lamp
A plasma ball lamp is a specific lamp. The lampshade is round and transparent, and inside the sphere the real “magic” happens.
Numerous plasma discharges extend from the center of the lamp to the periphery of the transparent shade, which fascinate with their bright tints and curves, which defy prediction and seem to live their own life.
We can say that in appearance such a lamp resembles the prediction ball of a gypsy fortune teller, giving instructions to those who can read them.
Note! A plasma ball lamp will be an excellent replacement for a night light in a children's room.
Plasma lamp as a night light
Thanks to such an unusual and magical appearance, such a “plasma” will give a lot:
- will give an atmosphere of mystery and unusualness;
- will become an exotic design element;
- The lamp is capable of normalizing human mental activity, relieving stress and fatigue;
- and in general, this will become an original highlight of the interior, which can not be found in every house or apartment.
It is worth noting that, unlike standard lighting fixtures, a plasma ball lamp will be an unusual and original birthday gift. So, a plasma lamp is a transparent ball on a stand, inside of which energy discharges beat. They are able to respond to human touches to a transparent sphere or even a voice.
Note! Plasma discharges inside the lamp are similar to small fireworks enclosed in a glass spherical “trap”.
Lamp response to touch
When you touch such a lamp, discharges inside it begin to flow to the place touched by the finger. This is a very beautiful sight that can mesmerize for many hours.
This item looks more like an element from a science fiction movie than a lamp.
To achieve this effect, modern technologies are used, which allows us to achieve high quality of these lighting products.
The principle of operation of a plasma ball
A plasma ball lamp has an electrode at its core, which allows it to create plasma discharges inside a transparent sphere. The operating principle of the device is as follows:
- high alternating voltage, characterized by a frequency of approximately 30 kHz, reaches the electrode;
- the sphere of the lamp inside contains rarefied gas;
Note! To fill the sphere, various gas mixtures can be used, which will differ in the color characteristics of the generated plasma discharges. They can have blue, pink, yellow, green, crimson and other colors.
Plasma discharge lamp color option
- Due to the voltage applied to the electrode in the gas vapor, plasma discharges are formed.
The lamp itself, operating on this principle, will consume little electricity (approximately 5-10 W). Therefore, if you treat it correctly, it will last for decades. We will talk about how such a device should be monitored in the next section.
Features of the plasma ball operation
In order for your “plasma” to bring you joy and peace for many years, it needs proper care, which includes the following:
- Do not place any metal objects on the lamp. Often, out of curiosity, coins of various denominations are placed on the sphere. Even a small coin can cause an electric shock. In this case, the sphere itself may burst and release discharges that are no longer so beautiful and safe;
- the lamp must be connected to a 220 V power supply. You can also use a USB port to power it (if available). You can connect this connector yourself if you have an old model of lamp;
- The lamp operating time should not exceed more than two hours. Otherwise, this may lead to overheating, and this will negatively affect the strength of the transparent flask and may subsequently lead to a violation of its tightness.
Note! If the operating rules for plasma lamps are violated, the discharges generated by them can escape beyond the transparent sphere. And you won’t be able to fix the lamp yourself.
As you can see, the rules are more than simple and understandable. The main thing here is to ensure that children, who will invariably be attracted by plasma discharges, do not damage the sphere with gas and do not release “fireworks” outside.
Plasma lamp equipment
Modern ball lamps, which form plasma discharges inside themselves, contain:
- the plasma lamp itself. Modern models must have a USB connector. For models, you can make such a connector yourself by cutting off the plug for the socket and connecting USB to it from the old cord. Just before carrying out such work yourself, make sure that the USB connector is working properly;
- USB cable. This is a mandatory element of all modern models;
- user manual. Using the instructions, you will be able to find out all the nuances and subtleties of the device’s operation, the possibility of repairing it yourself, as well as other important points given by manufacturers.
Plasma lamp set
When buying such a lamp, you must make sure that the lamp (especially the transparent sphere) is in good working order. Its transparent part should not be damaged, scratched or cracked. If there are any, be sure to request a replacement product. Typically, a lighting device has the following technical characteristics:
- power supply – 220 V (standard);
- power - 8 W;
- manufacturing materials: plastic, glass and electronic components.
The technical characteristics of the lamp must be indicated both on the packaging and in the instructions for it. When purchasing a plasma lamp, you need to know that the diameter of its spherical bulb can vary over a fairly wide range (from 8 to 20 cm).
Appearance Options
Despite the fact that a ball lamp that creates plasma discharges will always have a spherical bulb and a standard design, its appearance can be decorated in various ways.
Decorative plasma lamp
Additional decor will help to fit the lamp more harmoniously into the interior of the room, while avoiding the risk of style mismatch.
Note! Such a lamp can be decorated, for example, as a dragon, which will cover the ball with its wings and tail, making it less expressive against the general background of the lamp design. Moreover, such decor will not affect the attractiveness of the ball and its plasma discharges as a whole.
Therefore, when choosing a plasma lamp, it is imperative to take into account its appearance, because a regular spherical lamp may not fit most interior styles used in the modern world.
Lamp with discharges and interior
Installing a plasma lamp in a house or apartment will be an excellent solution for the following reasons:
- the lamp is compact in size and fits well on both a shelf and a coffee table;
- the ability to decorate the appearance of the device expands the list of styles into which it can harmoniously fit without violating the overall design;
- This is an excellent night light that can create an atmosphere of mystery and fairy tales; the lamp helps relieve irritation, fatigue and stress.
Magic ball of predictions for making decisions
There is a fortune telling item that looks like a billiard ball No. 8, but is larger in size. Inside is a dark liquid containing a figurine with twenty sides. Each side carries a specific answer: “yes”, “no”, “absolutely”, “most likely” and others. To use the magic ball for decision making, it should be held with the window down. After that, concentrate and ask the question you are interested in. The next step is to shake the ball well, turn it over and look at the answer in the window.
Embedder page » Plasma ball
One day I was lucky enough to buy a flask from a Chinese plasma ball at a bargain store. The ball's electronics burned out and the body was thrown away. In general, nothing limited the flight of my imagination.
I present to the public court my design and electronics for the plasma ball.
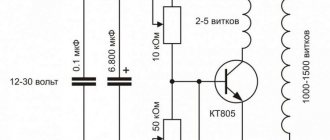
The electronics of the ball in my design are quite simple - it is a half-bridge on one microcircuit. As a transformer, I use a TVS-110PTs15 liner with standard windings, that is, I don’t wind anything of my own, and that’s good.
Despite the simplicity, there are a few mistakes here that you can step on, and I want to discuss them. Before discussing, however, you need to look at the diagram:
There are two non-obvious things in the diagram.
The first – “lightning” in a plasma ball – is a current. The current must flow from somewhere and somewhere, that is, form a closed circuit. I hope this drawing will help you understand what I mean. Blue indicates the circuit through which current should flow. We know where the current flows - it flows through the ball-earth capacitance into the ground. Now we need to figure out how to take it out of the ground (close the circuit). The easiest way to do this is to use grounding, but grounding is not always available in our harsh post-Soviet realities. Therefore, you need to make your own, virtual, grounding.
In the circuit, capacitors C1 and C2 are used for this, which have significantly lower impedance (resistance) than the ball-to-ground capacitor. One of the wires in the socket is always connected to ground, but we don’t know in advance which one, so we use both at once.
The question arises - if the ball and its lightning remain connected to the socket, will it hit us when we touch the ball? And if, by chance, one of these capacitors (C1 or C2) fails, what then? Will it hit?
Firstly, a 2.2nF capacitor is not capable of passing through itself a current sufficient to harm a person. The capacitor qualifier is written on the diagram - Y2. Capacitors with this designation are, firstly, very difficult to damage, and secondly, they are guaranteed to break the circuit if something goes wrong.
The second non-obvious thing in the circuit was related to the microcircuit power resistor - R2. I didn’t find anything useful in the datasheet, so I had to pick it up. 180 kOhm is the maximum resistance from the standard range at which the circuit worked stably. If your streamers flicker, you will need to reduce this resistance.
Now about the design. As the primary winding, I used pins 12 and 9 of the TVS-110PTs15 line. Where these pins are located can be seen in the picture.
Orange wire - goes to virtual ground, white and purple - primary, blue - high voltage
I made the operating frequency of the half-bridge equal to 30 kHz. Because the lower the frequency, the lower the power consumption. In order to have more voltage at the output, I force the line switch to work in resonance. The resonance is selected by capacitor C9.
By the way, it is better to set it to a voltage of at least 620V. You can also select the resonance by frequency (instead of resistor R3, put a trimmer, for example), but when the operating frequency changes, the consumption changes and the circuit may begin to work unstably.
The mechanics are also quite simple. I used a ventilation gearbox as a housing. These can be found in almost any hardware store. All components are held together by friction. To prevent the plywood from being inserted further than necessary, I glued wooden limiter blocks. I placed the power cord on the brackets and covered it with hot glue so that I wouldn’t even think about tearing it out.
But with the flask I had to get a little tricky. Firstly, the flask definitely needs a metal surface from below, otherwise the “lightning” begins to strike exclusively downward. The metal surface acquires the same charge as lightning and repels them. Naturally, this surface must be connected to a high-voltage wire.
To hold the flask, I cut a wooden mug, which fits very tightly into the body and does not require additional fixation. When disassembled, the flask turned out like this:
After assembly, with trembling hands, we insert the plug into the socket, aaand.... We see a beautiful plasma ball!
Lastly, I’ll share the printed circuit board. The board is mirrored.
Video
At the request of the root, I am posting a video of the plasma ball in action.
Source: https://bsvi.ru/plazmennyj-shar/
Magic ball of predictions
It takes a lot of practice and experience to get results. The first images may appear suddenly, but over time this process can be controlled. It is best to conduct sessions during the full moon. Working with a magic ball should begin with cleaning it. To do this, you can hold it under running water for 15 minutes. You can put the item in a saline solution. It is also recommended to carry out an energy charge, for which you take the sphere in your hands and, breathing deeply, imagine how it is saturated with energy. Cleaning is recommended before each contact.
In order for the magic ball to last a long time and provide true information, several features must be taken into account. You should not let anyone touch it, as it instantly absorbs someone else’s energy. It is recommended to store magical items that are not in use wrapped in black cloth. You cannot expose the sphere to direct sunlight, but moonlight is useful for it.
How to make a plasma lamp?
I came across a very cool thing on the Internet - a plasma ball made from an incandescent lamp. The bottom line is that high voltage from a high-voltage generator ionizes the gas in the bulb of an ordinary glass light bulb (maybe even a burnt one).
Despite the abundance of complex converters, I decided to come up with a simpler circuit - for beginner radio amateurs. We couldn’t come up with anything special, but we managed to simplify the assembly process to the limit. I used ballast from an energy-saving lamp as a basis. Block diagram of a homemade plasma lamp:
It is best to take a 40-watt CFL lamp - it works quite stably; I turned it on even for an hour and it works without problems. As a step-up high-voltage transformer, I used a ready-made horizontal scan transformer TVS 110PTs15. I connected it to pins number 10 and 12. Such line transformers can be found in old Soviet TVs, although you can take a new one, only they are produced with a built-in multiplier.
There are two outputs from the transformer: one is phase, the other is zero, the phase comes from the coil, and zero is the very last leg on the transformer (it is number 14).
We connect the phase to an incandescent lamp, and the other wire coming from the zero leg should be grounded. In general, in the next photo everything is painted and drawn in detail.
- If you still don’t understand something, watch this training video in HD quality:
- Also, if you connect a voltage multiplier to the outputs of the fuel assembly, you will be able to observe the glow of a fluorescent lamp from the created explosive field.
Attention! Discharges from the multiplier are deadly! After turning off, discharge the multiplier by shorting its two terminals together. See below for a video of what I ended up with:
Experiments with a plasma ball were carried out by Pasha Kuzmenkov.
Forum on explosive technology
Why do you need a magic ball?
Crystal spheres are more often used in clairvoyance sessions, since they allow you to concentrate on a certain point, and then move from it in the chosen direction. Another magic ball helps you dive into your own subconscious and learn to control energy. It is used to cleanse space of negativity and influence on people. The crystal sphere is considered a powerful storer, transmitter and transformer of energy.
DIY plasma lamp from a plastic bottle
Using the video channel “Alexander Polulyakh” we will try to make a plasma lamp, the design of which will consist of an ordinary plastic bottle, and it will be powered by high-voltage voltage. It is not very difficult to make it yourself.
And such units are sold cheaply in this Chinese store.
We take a plastic bottle, make two holes in its bottom, and also make two in the lid. From the bottom of the same bottle we make a stand, which we glue in the same way as shown in the video. Next, you need to thread one thin single-core wire without insulation into the holes.
We also push these wires through the cover. We hope that when it closes there is no short circuit. That is, you need to first twist the opposite side - a couple of turns - then thread it inside the hole, and then tighten it.
In theory, they should unwind and not short-circuit with each other.
Craftsmen buy inventions from the best Chinese online store.
DIY electronics in a Chinese store.
Next, we make knots at the ends of the wires. We pump inert gas argon into one of these holes on the side of the plug. After blowing, we also seal it hermetically with hot glue.
We connect any high-voltage source to these wires and see what happens. Watch the plasma effect lamp created with your own hands in the video below.
Source: Alexander Polulyakh
Warning! High output voltage is dangerous and may cause electric shock or burns. I accept no responsibility for any injury caused by this device. Everything you do is at your own peril and risk.
The simplest homemade plasma ball,
Source: https://izobreteniya.net/plazmennaya-lampa-iz-plastikovoy-butyilki-svoimi-rukami/
Now to practice
It doesn't matter here whether you sit or stand. As you wish. The only thing is that at first it is not recommended to walk during practice, otherwise you will not feel anything. Then it will be possible to move. Before you create an energy ball, do the following. Rinse your hands with cold water. Cold water is a conductor of energy, and hot water clogs energy channels.
Rub your palms together until a pleasant warmth arises. Now shake your hands as if you are “dumping excess potential” from your fingers. There should be no tension - the hands and elbows are completely relaxed. Smoothly and gently turn your palms towards each other so that each forms a soft semicircle.
We raise our hands to approximately the level of the solar plexus, turn our palms towards each other and make a shape as if you were holding a ball. There should be a distance of 20 centimeters between the palms.
First bring down, then spread out with a small amplitude. Next, after a minute, start moving them - bringing them together and spreading them in different directions with a greater amplitude. Breathe as you inhale, contract as you exhale.
Try this for a few minutes. There may be a slight tingling sensation in the palms, goosebumps or warmth, or even electrical discharges. By doing this, you begin to feel your energy flowing in your palms.
Imagine holding a half-deflated balloon between them. Focus completely on how your palms feel. As the distance between your palms decreases, you will feel some resistance - as if you really are holding a balloon in your hands. Feel how the “ball” does not let your hand go further.
Happened? Half the job is done. Next, start pumping energy through your hands - make the ball larger. Take energy through your hands - make the ball smaller. Make the ball elastic. After practicing, make a ball of the desired size. So, the ball is ready.
Next, you need to train your sensations: remove one hand - the ball should not disappear. Next, feel the ball again with your removed hand - you should clearly feel its boundaries. Transfer the ball from hand to hand.
How to make a plasma ball? :
A plasma ball is a beautiful decorative lamp that can become a wonderful part of the interior of any room.
This lamp provides ample space for creativity, creating designs of all kinds.
Plasma balls are now commercially available in large quantities, and it will be difficult to surprise anyone with such a miracle. However, you can try to make this beauty with your own hands.
Necessary materials
To create such a sphere yourself, you need to prepare:
- initial plasma ball;
- ABS pipe;
- former rubber band release machine;
- silicone;
- MDF;
- soldering iron;
- wires;
- sharp knife;
- acrylic sticks;
- hot glue;
- car vacuum hose;
- screws;
- fine sandpaper;
- drill;
- pencil;
- heat shrink sleeve;
- drill.
How to make a plasma ball
The work process will consist of several steps.
1. Adhering to safety precautions, it is necessary to remove the glass ball from the base of the toy, doing this very carefully, because there are practically no wires running through it, and the charge is very strong. You should also disassemble the center of the ball. The board needs to be unscrewed and put aside; it will be needed a little later.
If you do not have a certain skill in working with electrical appliances, then it is not advisable to follow this lesson, as this can lead to serious consequences and injuries to the body.
2. Next, you will need to improve the design of the rubber band dispensing machine. To do this, you will need to cut a base identical in diameter from MDF.
When dismantling the plasma ball support, you need to pay attention to the presence of ventilation holes. They must be for heat removal. The board also rises slightly to allow free air movement, but is not secured to the very bottom in any way.
3. You can further make a plasma ball with your own hands. Now you need to attach the plastic base of the base to the finished part of the MDF, marking the locations of the slots for ventilation and the points for attaching the bolts.
4. You should drill ventilation holes without making them through for the mounting bolts, create cutouts for the wire, switch and sand the MDF.
5. Next, you need to secure the board, fixing it to a step higher using acrylic popsicle sticks, and solder it to the cable.
6. You also need to solder a heat-shrink sleeve and wires that will be in contact with the ball to the board. To carry them through, you will need a slot in the device itself. To do this, a vacuum car wire of suitable diameter passes through the machine. A coupling with a cord is inserted into it, and the whole thing is filled with silicone.
7. After coating the sides of the MDF with hot glue, carefully pull the wires through the hole in the device. MDF should be glued to the center of the machine.
8. Now you need to cut out a small pad from the ABS pipe, lubricate it with silicone and place it in the middle of the outer part of the installation. Then you should collect the toy and check whether it fits into the nest. Now you can see what the plasma ball diagram looks like.
Ball with lightning
The electronics of such a toy are quite simple - it is a half-bridge on a microcircuit. The transformer uses a TVS-110 PTs-115 liner with ordinary windings.
A plasma ball with lightning is a charge of current that must constantly come out from somewhere and flow somewhere in order for a closed circuit to form. The current itself flows through the sphere vessel and goes into the soil. In order to take energy from the earth, it is best to use grounding. It would be ideal to make it yourself, since in the real world it is not always available.
Isn't this dangerous?
For the grounding itself, capacitors C1, C2 are used, which have a much lower impedance (resistance) than the ball-to-ground heat exchanger. One of the wires in the outlet is constantly connected to the ground. But, not knowing exactly which of them is connected, you have to use both at once.
And an important question immediately arises: will there be an electric shock if you touch the ball? After all, the sphere and its lightning bolts remain connected to the socket. Or, for example, will any of the capacitors break? There is an answer: a capacitor with a capacity of 2.
2 nF cannot transmit electricity in such an amount that would harm a person. The plasma ball will have capacitors marked Y2, which cannot be easily damaged.
They will also completely open the chain if there is any violation.
The second part of the circuit was connected to the energy resistor of the R2 chip. The circuit operates continuously at a maximum normal line impedance of 180 kOhm. If the streamers blink, then this resistance can be reduced.
Plasma ball design
It is better to use pins 9 and 12 of the TVS-110 PC15 line as the primary wrapping. The orange wire is connected to the virtual ground, the blue wire is connected to the high voltage ground, and the purple and white wires are connected to the primary ground.
The operating frequency of the half-bridge should be 30 kHz - this will save energy.
In order for the output voltage to be large, the lineman must operate at resonance, which is selected by capacitor C9. And it is better to set it to a voltage of at least 620 V.
You can select resonance in the same way as frequency. But if the operating frequency changes, then the power consumption will increase, and the circuit may fail.
Some tricks
The plasma ball has a mechanic that is also not complicated. The housing is a ventilation gearbox. All knots are held by friction. To prevent the plywood from fitting further than required, you can glue wooden stop sticks, place the power cord on the brackets and fill it with hot glue.
I had to cheat a little with the flask, since it absolutely needs a metallic exterior on the bottom. It's just that lightning can start striking purely downwards. A metal surface has the same reserve as lightning; it simply repels them. Of course, this plane must be connected by a high-voltage wire.
In order for the flask to hold, you should cut out a wooden circle that fits firmly enough into the body itself and does not require special fastening.
After installation, you can plug the plug into the socket. You should get a great looking plasma ball!
Source: https://www.syl.ru/article/190141/new_kak-sdelat-plazmennyiy-shar
Appearance Options
Despite the fact that a ball lamp that creates plasma discharges will always have a spherical bulb and a standard design, its appearance can be decorated in various ways.
Decorative plasma lamp
Additional decor will help to fit the lamp more harmoniously into the interior of the room, while avoiding the risk of style mismatch.
Note! Such a lamp can be decorated, for example, as a dragon, which will cover the ball with its wings and tail, making it less expressive against the general background of the lamp design. Moreover, such decor will not affect the attractiveness of the ball and its plasma discharges as a whole.
Therefore, when choosing a plasma lamp, it is imperative to take into account its appearance, because a regular spherical lamp may not fit most interior styles used in the modern world.
Plasma ball from an incandescent lamp
The 555 series timer has a lot of interesting and simple amateur radio designs. One such design is a flyback or single-ended voltage converter. The design of the converter itself is quite simple and reliable in operation. There is no additional voltage amplifier inside the microcircuit, so the output signal of the microcircuit must be further amplified.
A complementary pair of domestic low-power transistors of the KT3102 and KT3107 series was used as an amplification stage, although more powerful pairs can be used, for example KT814 and KT815, KT816 and KT817.
Without an amplifier, the voltage at the output of the microcircuit may be insufficient to trigger the field-effect transistor. A filter for suppressing reverse voltage is assembled on a 68nF capacitor and a 120 Ohm resistor.
Without a filter, the mosfet may fail.
It is advisable to use a filter resistor with a power of 1-2 Watts; its value can be deviated in one direction or another by 10%, this will not affect the operation of the device.
The KD212 diode can be replaced with an imported high-speed diode of the UF4007 series. In the circuit, you can use a field-effect transistor IRF3205 or IRL3705, pre-attached to a heat sink. During operation, the 120 Ohm resistor and the field effect transistor should heat up, this is quite normal.
A line transformer was used as a transformer - a transformer from a line scan of a domestic TV, literally any transformer. The secondary winding is factory-made, but the primary winding will have to be wound yourself - 5 turns of wire with a diameter of 1.5-2 mm; for convenience, the winding is wound with two strands of stranded wire in silicone insulation.
An ordinary incandescent lamp is used as a ball (the power is not important); the lamps can be used both working and broken ones.
Attention! It is not advisable to play with a plasma ball for a long time; sometimes the temperature of the arc melts the glass shell of the lamp, then you risk receiving a current shock of 2-4 kilovolts and a serious current of 90 mA! This can lead to very serious consequences. Do not touch the ends of the secondary winding of the liner under any circumstances, this is deadly!
Download list of elements (PDF)
Attached files:
- PLAZMENNIY SHAR.lay (23 Kb)
AKA Published: 2012 1 Reward I collected 0 0
x
- Technical literacy
- Relevance of the material
- Presentation of the material
- Usefulness of the device
- Device repeatability
- Spelling
Source: https://cxem.net/tesla/tesla12.php
Operating precautions
It is very important to follow safety rules when using a ball lamp so that the elements do not break out and start a fire in your home. Namely: you cannot place metal objects, for example, coins, on the lamp - this can lead to an electric shock, in addition, the sphere may simply burst.
As for the charging method, the cord from the lamp can be plugged into a USB port or 220V outlet.
Observe safety precautions when operating the plasma ball
How to make a plasma ball from a light bulb
The essence of the craft is to ionize the gas that is in the flask due to high voltage. Moreover, for its manufacture you can use both a working and a burnt-out incandescent lamp.
There are many converter circuits that are used to make a plasma ball from a light bulb. Most of them are complex; they can be made by craftsmen versed in electronics. There are few simple circuits, but there are some - they can also be done by those for whom electronic circuits are among the incomprehensible and complex.
For the craft, use ballast, which is found in an energy-saving lamp. It is better suited to a compact fluorescent - 40 W CFL, which is characterized by stable, problem-free operation.
The high-voltage step-up transformer required for the circuit can be used TVS110PTs15. It is line scanned. The devices used to be included with TVs, where you can get them from so as not to spend money on a new one. True, they now have a built-in multiplier, so they require rework. The outputs to which the TVS110PTs15 transformer is connected are 10, 12.
A generator with two terminals, one of which represents phase, the other - zero. The first one comes from the coil; the second is represented by the last leg on the device - its number is 14. A phase is supplied to the incandescent lamp; the wire from the zero leg is directed to grounding.
Operation of the described circuit: voltage from a household network (220V, 50Hz) is supplied to the ballast from a 40 W CFL and from its outputs to the input of the TVS110PTs15 transformer. The latter increases the voltage and supplies it to the incandescent lamp. The voltage is such that the gas in the lamp bulb ionizes and it begins to glow. Due to the shape of the flask, the glow is observed in the form of a ball.
The same circuit can be used to make gas glow in a fluorescent lamp. To do this, you will have to modify it a little - purchase or make your own multiplier and connect the transformer outputs to its input. Moreover, such a lamp does not need to be connected to wires - it is enough to place its end inside a large coil, to which voltage is supplied from the multiplier.
If you use a multiplier in your work, you need to know that the voltage it produces is dangerous and can cause death. After turning off the device, you need to short-circuit its terminals to each other to discharge the device. Only then can you start cleaning and dismantling.
Source: https://izdoski.com/kak-izgotovit-iz-lampochki-plazmennyj-shar.html
Principle of operation
The electric ionic sphere works as follows: since the Tesla plasma ball contains electrodes inside itself, when the voltage generation unit is generated, they take all its power upon themselves and start a process called “Gas Ionization”.
In simple terms, the ionization of the plasma ball inside the lamp simply makes the gas electrically conductive.
During this reaction, plasma is generated inside the lamp.
Ball with lightning
The electronics of such a toy are quite simple - it is a half-bridge on a microcircuit. The transformer uses a TVS-110 PTs-115 liner with ordinary windings.
A plasma ball with lightning is a charge of current that must constantly come out from somewhere and flow somewhere in order for a closed circuit to form. The current itself flows through the sphere vessel and goes into the soil. In order to take energy from the earth, it is best to use grounding. It would be ideal to make it yourself, since in the real world it is not always available.
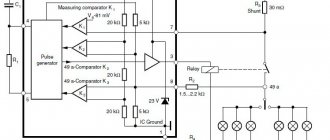
- Solid state relay: types, practical application, connection diagrams
Necessary materials
To create such a sphere yourself, you need to prepare:
- initial plasma ball;
- ABS pipe;
- former rubber band release machine;
- silicone;
- MDF;
- soldering iron;
- wires;
- sharp knife;
- acrylic sticks;
- hot glue;
- car vacuum hose;
- screws;
- fine sandpaper;
- drill;
- pencil;
- heat shrink sleeve;
- drill.
Step by step assembly
The procedure for making a glowing ball:
- connect the battery and LED. Bend the leads and wrap them with tape so as not to damage the ball during assembly;
- Turning the ball out a little, use strips of tape to glue the LED with the battery onto the inner surface of the sphere. The best option would be to use a thickening at the end opposite the inflation hole;
- turn the ball back out. Inflate it using a pump or helium balloon;
- tie the hole, secure with a rigid handle or string (if the balloon is inflated with helium).
Lamp with discharges and interior
Installing a plasma lamp in a house or apartment will be an excellent solution for the following reasons:
- the lamp is compact in size and fits well on both a shelf and a coffee table;
- the ability to decorate the appearance of the device expands the list of styles into which it can harmoniously fit without violating the overall design;
- This is an excellent night light that can create an atmosphere of mystery and fairy tales; the lamp helps relieve irritation, fatigue and stress.
Plasma lamp-ball and children
Despite the fact that this is a very beautiful and practical night light, placing such a device in a child’s room is not recommended, since children can damage its glass part and cut themselves due to active games. The best solution would be to place the lamp on a special shelf and place it on the table to serve as a night light in the evening hours. In this way, you will please your child and protect him from injury. In addition to a children's room, such a lamp will be an original solution for a bedroom or living room. The most suitable styles for placing such a lamp would be “high-tech”, “eclectic”, “minimalism”, “classic”. At the same time, “high-tech”, as the closest style to Tesla’s creations, will be the best solution. In the retro style, such a lamp will also take its rightful place.
Note! In these styles, the design of the ball lamp with plasma discharges can remain standard, without decoration.
Interior in high-tech style
But for other styles (for example, Empire, Gothic, etc.) additional stylization of the lamp is necessary. Remember, the color of the discharges should be chosen to match the color of the walls, ceiling and furniture. For example, purple flashes will look great against coffee walls. In addition, a plasma lamp will fit perfectly into an oriental design, where dark colors of wall decoration, furniture, curtains and curtains prevail.