A glow-in-the-dark lamp without power supply is the dream of many summer residents and owners of country houses. The lighting of the device is soft, but sufficient for gatherings with friends or a pleasant relaxation alone. An undeniable advantage is the lack of batteries. That is, the device does not require not only electric current, but even standard batteries. We offer a couple of options for making a lamp with your own hands from scrap materials. It will take no more than 10 minutes to create.
What is better not to do
Solar panels
They can be called a modern method that can really bring results.
But if you use solar panels in a garage, it can be called a disaster. Let's just remember how much average batteries cost now; to light a garage and get electricity for certain work, you will have to pay about 5 thousand dollars for their purchase and installation. This amount is considered unacceptable, even if you are constantly in the garage. They also need to be constantly wiped from dust and their condition monitored. And of course, there is a very high probability that they will simply be stolen.
Wind turbine for garage
The method is good, but only in those regions where there is a strong constant wind. To generate electricity to operate devices, you need a wind of 6 m/s. A light wind can provide illumination, but there are easier ways.
Solar lanterns
Here we will simply write down two main disadvantages:
- The light is dim.
- You constantly need to take it outside to charge, they also quickly break down.
Related article: How to properly make a wooden floor in a bathhouse with your own hands?
Cottage / plot without electricity: 4 options for autonomous power supply for a country house
Without electricity, modern man is like without air, and it doesn’t matter whether he is in a city apartment with an abundance of technology, or in nature. Power outages at the dacha or its complete absence forces us to look for alternative sources of electricity. Humanity has not yet come up with so many of the latter: liquid fuel engines, solar panels, wind generators and batteries, if we do not take into account more exotic and sophisticated solutions. All existing methods have drawbacks, but if a dacha or plot of land is without electricity, and construction work and simple household tasks need to be performed, then you will have to choose one, or better yet two (to be on the safe side) the most suitable options for autonomous power supply to a country house.
Switch light problem
The most common question is “Why do LED bulbs continue to light when the switch is off?” people are using illuminated switches indoors. A miniature neon light bulb (sometimes an LED) located inside the housing does not affect the operation of the lamp when the light source is an incandescent or halogen lamp. If you screw an LED light bulb into a lamp, it will often continue to burn dimly even after the voltage is removed.
Why this happens becomes clear if you carefully look at the diagrams for turning on a light bulb through an illuminated switch, given below.
From the diagrams it follows that at load L1 after turning off the lighting there is still a small potential that penetrates through the circuit of the neon light bulb (Fig. 1) or LED (Fig. 2) HL1. In some cases, this is enough to start the LED lamp power circuit. As a result, the switched off LED lamp does not go out completely. It either glows faintly or glows at half-glow, or flickers spontaneously.
Designations on the diagrams:
- HL1 – LED or neon backlight;
- D1 – diode limiting reverse voltage;
- L1 – LED main lighting lamp;
- S1 – illuminated switch.
There are three ways to fix this problem:
- Replace the existing switch with a regular one or remove the backlight from it yourself.
- Install a resistor (Fig. 3) or capacitor (Fig. 4) in parallel with the load. The radio element can be placed in the distribution box, in the lamp socket itself, or on the back of the switch if both the phase and neutral wires pass through it. In the first case, you will need a resistor R2 with a nominal value of 50 kOhm and a power of 2 W or a power of 0.5–1 W, but with a resistance of 1 MOhm. The compactness and low cost of the resistor, in this case, is an undeniable plus. But there is also a negative point - active power consumption and slight heating. The second option with capacitor C1 is free of the negative moments of the resistor and is able to compensate for network interference from other electrical appliances in the room. Installation requires a non-polar capacitive element. It is recommended to use a capacitor with a capacity of 0.1 to 1 µF, capable of withstanding a voltage of 630 volts.
- Removing the barely noticeable glow of several LED lamps is not difficult if they are powered from one switch. To do this, one of the LED lamps must be replaced with a low-power incandescent lamp. The tungsten filament will act as a shunt resistor, allowing harmful current from the backlight to pass through it. As a result, none of the lamps connected in parallel will light when the switch is off, since there is not enough current to ignite the filament.
Poor quality wiring
Another common reason why LED bulbs light up when the switch is off is faulty wiring. You should seriously think about repairing it if:
- aluminum wires have been in use for more than 30 years;
- problems arise with LED lamps from different manufacturers;
- the switch that opens the circuit with the LED lamp does not have a built-in backlight.
Electrical wiring can affect the operation of an LED lamp in two cases:
- The phase and zero are swapped, that is, the phase wire goes directly to the cartridge, and the zero wire goes directly to the switch. In this case, the LED spotlight driver or bulbs are constantly energized, causing the LEDs to either dim or flash despite the electrical circuit being open. The problem is solved by reconnecting the wires in the junction box so that the “phase” goes to the switch, and the “zero” goes to the lamp.
- Another malfunction is a violation of the integrity of the hidden wiring, or rather the insulation of one of the wires. As a result, a small leak occurs inside the reinforced concrete wall, and the LED lamp continues to glow after the light is turned off. Using a megohmmeter, you can measure the insulation resistance and make sure that its value is underestimated. But it will not be possible to determine the location of the breakdown. Therefore, there is only one way out - to replace the section of wiring from the junction box to the chandelier.
If you are unable to solve the problem of the harmful glow of switched off LED lamps on your own, write about it in the comments - we will try to help with useful advice.
Lighting a burnt out lamp
In this circuit, when the lamp burns out, the double pins at the ends are shorted together.
Select components depending on the lamp power, based on the plate below.
If the light bulb is intact, the jumpers are still installed. In this case, there is no need to preheat the coils to 900 degrees, as in working models.
The electrons necessary for ionization escape out at room temperature, even if the spiral burns out. Everything happens due to the multiplied voltage.
The whole process looks like this:
initially there is no discharge in the flask
then the multiplied voltage is applied to the ends
Due to this, the light inside instantly lights up
then the incandescent light bulb lights up, which limits the maximum current with its resistance
the operating voltage and current gradually stabilize in the flask
the incandescent light bulb dims a little
Disadvantages of such an assembly:
low brightness level
increased pulsation
And when feeding fluorescent lamps with constant voltage, you will have to very often change the polarity on the outer electrodes of the bulb. Simply put, turn the lamp over before each new start.
Otherwise, mercury vapor will collect only near one of the electrodes and the lamp will not last long without periodic maintenance. This phenomenon is called cataphoresis or the entrainment of mercury vapor into the cathode end of the lamp.
Where the “plus” is connected, the brightness will be lower and this edge will begin to turn black much faster.
This is especially noticeable when installing LB lamps in cold rooms - garage, barn, corridor, basement. If the bulb is not warmed up, it may not even start.
In this case, you just touch it with a warm hand and it immediately begins to burn.
Therefore, remember - a fluorescent lamp is an alternating current light source. Constant is contraindicated for her and kills the lamp. Especially imported ones die very quickly.
Another disadvantage of such diode circuits, which few people talk about, is the resulting current consumption from the outlet. For a 40W LB light bulb with not ideally selected components, the current consumption from a 220V network can reach up to 1A.
And this even exceeds the load of a conventional incandescent lamp of 200W. This is the savings you'll get!
Therefore, which method is right for you, decide for yourself, based on the spare parts at hand and knowledge of electronics.
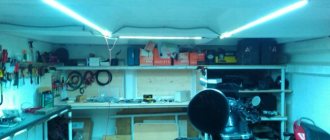
DIY garage lighting
Arrangement of a garage includes the organization of high-quality lighting. Depending on whether any work is being carried out in the room or whether it is simply a place to keep the car between trips, it is necessary to ensure full lighting in the garage or limit it to minimal lighting.
How to make light in the garage: lighting options
The power (energy consumption) of lamps and their quantity directly depend on the method of obtaining energy. When an external electrical network with unlimited consumption is connected to the building, there is no need to save on the power of lamps and their number. If you plan to have autonomous lighting in the garage, you must count on the permissible power consumption from a battery or an alternative source (wind generator, solar panels, etc.).
Working in a closed, unheated (lowly heated) and often damp room requires light sources to:
- high luminosity with minimal energy consumption;
- strength, resistance to accidental impacts and shocks;
- resistance to moisture, dust, temperature changes;
- Possibility of stable operation at unstable voltage;
- compliance of the input voltage with standards for centralized and autonomous power grids (220/380 V).
When choosing a lamp, the intensity of the luminous flux per 1 W of power is taken into account. The leaders in this parameter are LED models.
Other parameters of light sources are also taken into account (the table shows a comparison for lamps with a luminous flux of 800...900 Lm)
Important: at low temperatures (less than -5o Celsius), fluorescent lamps operate unstable, and insufficient voltage in the network also creates a problem. For halogen lamps, protection from dust, touches and voltage surges is required.
They are connected via a power supply (12 V)
For halogen lamps, protection from dust, touch and voltage surges is required. They are connected via a power supply (12 V)
Important: at low temperatures (less than -5o Celsius), fluorescent lamps operate unstable, and insufficient voltage in the network also creates a problem. For halogen lamps, protection from dust, touches and voltage surges is required.
They are connected via a power supply (12 V).
Thus, lighting a garage with LEDs is the safest and most practical, but not the cheapest, option.
Work areas: how to get the garage lighting right
Work indoors is conventionally divided into three or four main groups:
- general – requires basic lighting from above;
- on a workbench or desktop - local illumination with directional radiation;
- at the level of the middle/lower part of the car for repair work, vehicle washing - diffused or directional lighting is required at a height of 0.5...1.2 m;
- in the inspection hole there are local light sources directed upwards and forwards.
No. 2. Solar panels for a summer residence
The main disadvantage of fuel generators is the need to constantly buy fuel for them. Generators that use free energy available to everyone do not have this drawback. This is the energy of the sun and wind. To generate electricity, they also use geothermal energy, as well as water energy, but these options are unlikely to be suitable for powering a summer cottage.
To put it very simply, the principle of operation of solar cells is to knock out electrons from semiconductors located in a photocell with photons of light, and the directed flow of electrons, as known from a school physics course, is electricity. To ensure the generation of electricity from sunlight, its accumulation and further use for domestic purposes, a whole range of equipment is needed:
- The solar battery itself is of sufficient area. The efficiency of such systems is still very low, and a battery with an area of about 1 m2 provides an average of 100 W of electricity with a voltage of 15-25 V. To use solar energy as an independent and main source of energy, it is necessary that the batteries occupy an area of about 10 m2, and be located at the correct angle;
- inverter responsible for converting electricity;
- batteries for energy storage and uninterrupted supply;
- controller, with which you can control the battery charge.
It’s better to take all the elements together – it will be much easier.
Prices for solar panels vary greatly depending on their type, size, power and manufacturer's name. Of course, everyone wants to achieve maximum performance and energy independence for their money, so it is necessary to carefully study the nuances of the weather in the region, as well as understand what type of solar cells is best suited for a particular area:
- monocrystalline batteries easy to recognize by its black pseudo-squares and beveled corners. They have the highest efficiency, 15-25%, so if the roof area is small, then it is preferable to install such batteries. On the other hand, for normal operation they must always be facing the sun, and on a cloudy day, at dawn and sunset, the power will be minimal;
- Polycrystalline batteries are distinguished by dark blue plates interspersed with silicon crystals. The efficiency is lower, about 12-15%, but such batteries are also cheaper, so if there is enough space for their installation, this is the best option. Their significant advantage is the ability to generate energy on a cloudy day, since silicon crystals have different orientations;
- batteries from amorphous silicon They are the cheapest, but have low efficiency, only about 6%. They resemble film in appearance, are flexible and are best suited in cases where the roof has a complex shape, since they are easily attached to any surface and do not require the installation of additional metal structures. Such batteries use diffused light most efficiently, and are therefore suitable for regions where it is often cloudy. Their disadvantage is their low durability, since silicon layers burn out quite quickly under sunlight. Not so long ago, a more advanced analogue appeared - micromorphic silicon batteries, which are not so demanding on the angle of inclination and orientation to the cardinal points.
Whatever option you choose, solar panels always have a lot of advantages:
- the opportunity to obtain a full-fledged source of electricity, and solar energy is obtained free of charge. In developed countries, households sell surplus energy to energy companies. The first steps in this direction are already being taken in the domestic space, although the phenomenon is still far from widespread;
- no monthly payments for electricity;
- long service life;
- environmental friendliness.
There are, of course, disadvantages Firstly, it is impossible to use solar energy as a full-fledged source of electricity in regions with a large number of cloudy days a year. Snow can also become a nuisance, so you will have to constantly clear it off. In addition, you will need a lot of space for the entire set of home solar power plants: these are the batteries themselves and the equipment for them. As for the cost, it is initially high, but in the end it completely pays off.
When choosing solar panels, pay attention to:
- power. Depends on the needs of a particular home and the characteristics of the region;
- battery life directly affects the length of the period during which it will be possible to receive electricity in inclement weather;
- installation area;
- load;
- performance class. It is better to take class A batteries;
- manufacturer's name. The products of such companies as Sunpower, Sanyo, Jinko Solar have proven themselves well.
Calculating the required power is a painstaking task and requires knowledge of a lot of precise parameters. To estimate approximately what batteries you will need and get an idea of the price, you can make a simple but very approximate calculation:
- We summarize the energy consumption of all appliances and equipment for a month, taking into account everything from light bulbs to the refrigerator and pump. The figure will be approximate, but still corresponds to real consumption. Let's say it turns out to be 100 kW;
- Since there are significant energy losses in batteries and at the stage of converting direct current into alternating current, it is important to take them into account in the calculation. Approximately, about 30-40% of the energy is lost, and additional batteries will have to be installed to cover it. Consequently, we will no longer need 100 kW per month, but 140 kW;
- We divide the resulting value by the number of days in a month (140 kW/30 = 4.67 kW), and now the most interesting thing is the need to divide by the number of sunny hours in a month. For the summer period, this time is from 9 am to 4 pm, the rest of the time the power will no longer be maximum, so we get a total of 7 hours: 4.67/7 = 0.67 kW. But an array with a power of 0.7 kW will clearly not be enough, since the calculation does not take into account cloudy days, and in the autumn-spring period there will be many of them, and the duration of daylight hours is very low, so the obtained value can be increased by 1.5-2 times.
To obtain accurate calculations, it is necessary to examine weather diaries in the region for the number of cloudy and sunny days in recent years in a particular month. Only after this will it be possible to judge the parameters of the batteries and the payback. In most cases, even a large reserve does not make it possible to use solar energy as a full-fledged source of electricity in winter, so backup power from a gas generator will be required.
How to choose the power of an energy-saving lamp
Such a lamp starts up instantly, in contrast to the long blinking and flickering of the usual LB and LD models.
What are the disadvantages of this connection scheme? Firstly, the operating current in energy-saving lamps at equal power is less than that of linear fluorescent lamps. What does this mean?
And the fact is that if you choose a housekeeper of equal or less power than the LB, your board will work with overload and at one point it will go boom. To prevent this from happening, the power of boards from housekeepers should ideally be 20% more than that of fluorescent lamps.
That is, for a 36W LDS model, take a board from a sweetheart 40W and higher. And so on, depending on the proportions.
If you are converting a lamp with one choke into two bulbs, then take into account the power of both.
Why else do you need to take it with a reserve, and not select the CFL power equal to the power of fluorescent lamps? The fact is that in unnamed and inexpensive CFL light bulbs, the real power is always an order of magnitude less than the declared one.
Therefore, do not be surprised when you connect a board from a Chinese housekeeper for the same 40W to the old Soviet LB-40 lamp, and you end up getting a negative result. It’s not the scheme that doesn’t work – it’s the quality of goods from the Middle Kingdom that does not correspond to the “reinforced concrete” Soviet guests.
Gaming mechanical keyboard METOO
Original mechanical keyboard in a metal case with round keys without a number key block. The top of the keys has a replaceable polymer sticker.
Equipped with good RGB backlighting. Uses traditional Chinese analogues of red or blue switches copied from Cherry (compatible).
Price: 3,750 2,300 rub.
Lifehack for the de-energized: turning off the lights now doesn’t bother people
News
- 08:24 “Jelly” business of grandmother and granddaughter - in Armenian Lori they make sweets even for diabetics
- 07:58 It will rain all week in Armenia
- 23:59 The battlefield is Iran: a big game is underway, from the nuclear deal to ballistic programs
- 23:48 US seeks to reduce tensions with Russia - Psaki
- 23:37 Viewers have stopped watching the Oscars - the film award rating is rapidly falling
All news
The network was blown up by a video with a real trick: users decided that after such a miracle, the hated power outages and blackouts will now become a simple matter to them.
The network was blown up by a video with a real trick: users decided that after such a miracle, the hated power outages and blackouts will now become a simple matter to them.
However, the matter concerns precisely the light bulb - the most ordinary, economical one. It would seem that a trick with a light bulb can help if the electricity is cut off and there are no candles at home. But, apparently, a candle can be lit with “God’s help.”
Network activists were shocked by how the heroine of the sensational video made a light bulb burn using an ordinary glass of water. It was enough to lower the base of the light bulb into the water - and the burning candle was ready.
While some representatives of the virtual community cheerfully comment on the video, other users express skepticism and invite people to first check the truth of the miracle, and then express delight.
Source
Review of causes of glow
What to do if the LED lamp is on? There are several reasons why, after turning off the lighting device, the LED lamp continues to burn, even dimly or weakly:
- poor-quality insulation in a section of the electrical circuit or any other electrical wiring malfunction;
- the switch to which the LED lamp is connected is backlit;
- low-quality emitters are used in the design of the lighting source;
- special functionality of the lighting element.
Is this glow dangerous? This problem does not pose any danger to the wiring, but the service life of LED bulbs will be noticeably reduced if they constantly flicker or glow dimly.
If the switching device is in the off position, and the emitter still glows and burns, then it is best to check the last three factors first. This is explained by the fact that it is very difficult to find weak insulation areas in electrical wiring.
In order to do this, it is necessary to create special conditions, as a result of which a high voltage is applied to the circuit for one minute to cause a breakdown. The section of the circuit that causes the lighting element to glow after the switch is turned off will need to be opened. Moreover, if the electrical wiring was installed in a hidden way, then opening it will lead to damage to the integrity of the wall.
It is important to know! There are many situations where when LED light sources are connected to a backlit switch, they function differently. This occurs due to the fact that the lighting element, which is installed in the switching device, closes the circuit and, accordingly, passes a small current
This is what charges and allows the light bulb to glow when the switch is off.
Another problem why an LED lamp glows in the dark is the low cost of the product. If you purchased a poor quality LED light bulb, this can also lead to a similar phenomenon. This is due to the fact that there is some kind of error in the board. But it also happens that the emitter burns dimly due to the fact that it has its own peculiarity in the functioning of the structure.
We are talking about the processes that occur in capacitors when a load is applied to the lighting element. When electric current passes through the circuit, the capacitor stores energy, and then after the load is stopped, it continues to keep the elements glowing.
Another fairly common reason why LED lamps glow when the switch is off is incorrect connection. You can learn more about this from the video:
No. 3. Wind generator for a summer residence
Another free source of electricity is wind, but, like the sun's rays, it is inconsistent. The main advantages , as with photocells, are the absence of the need to constantly purchase fuel and the environmental friendliness of the resulting energy. Disadvantages : high cost of the design, the need to install not only the wind generator itself, but also additional equipment (inverter and batteries with controllers).
Two types of wind turbines are installed in dachas today :
- rotary with a vertical axis of rotation are characterized by a low noise level, do not require high wind speed and a significant installation height, but their efficiency is low;
- Vane windmills with a horizontal axis of rotation are more common, have high efficiency, their installation cost is lower, but the material consumption, and therefore the price, is higher.
The main question facing those who decide to install a wind turbine is not even its type, but its power. When answering the question, it is worth taking into account the energy generated, accumulated and consumed . Therefore, it is important to calculate how much energy is consumed, for example, per day, what is the average and peak load. It is necessary to take into account the average wind speed, the number of days when the wind speed is above 5 m/s (the most favorable), as well as the maximum duration of calm weather.
In practice, it turns out that weak winds of 2-3 m/s do not provide enough energy. Therefore, experienced summer residents advise stocking up on high-capacity batteries in order to accumulate the energy received on windy days and use it during periods of calm and weak winds.
How to light a room without electricity. Solar lights for garage and shed.
Many people have a dacha or house in the village. And of course, there are outbuildings such as a garage or shed for storing a variety of tools, gardening equipment, and more. And it happens that it is not technically possible to illuminate these rooms.
It's the 21st century and of course there is electricity everywhere. Maybe there is, or maybe not. Or there is no way to bring him to this or that building or room.
Both the barn and the garage
If a garage or shed is attached to the house, then the issue can be easily resolved. It is easier to run wires and connect electricity from the main room. But if the outbuilding stands alone, separate from the main building. At a distance. Moreover, without windows, and the light from the doorway is not enough to illuminate the far corners of the barn or garage, then what to do?
In this post I’ll tell you how I implemented lighting in my dacha. In an ordinary village, an ordinary wooden house with a barn attached to it. Of course, I installed electricity there, but it still happens that late in the evening you need to look there when it gets dark.
But that rarely happens. But here’s a question about the day, when you’re scurrying here and there, busy with housework, sometimes taking a shovel, sometimes a pitchfork, sometimes an axe. Firewood for the fireplace or fireplace should be brought into the house for the evening. And all the time I have to turn on the light to illuminate the far corners of the barn where the light from the doorway does not reach, but sometimes I forget to turn it off and the light bulb wastes electricity in vain.
P
ET bottle To implement this idea, I needed empty plastic transparent bottles. I took it from a mineral water bottle, it’s the best. They were filled with water, but not just pure water, but diluted with vinegar. About one and a half liters of water, one hundred grams of vinegar. You can also use chlorine instead of vinegar.
These additives are needed to ensure that bottled water does not bloom over time and remains clear all the time. And so, I poured water into the bottle, but not to the very neck. I didn’t add three fingers to the plug. Left room for water to expand when it freezes in winter.
I’ll say right away that it has been tested by time, the bottle can withstand the freezing of water in winter and does not burst. Now I’ll tell you why we need a bottle of water. This is an additional source of light in dark areas of the barn.
Installation
Next, I identified the place where I needed additional light. And he used a drill to make a hole in the roof of the barn. Thus, I marked where I would cut out a hole with the diameter for the bottle.
Then, armed with a marker and a jigsaw, he climbed onto the roof, and in the marked place, drew a circle the size of the one removed from the bottle and cut out a hole. I’ll say right away that the roof of my barn is covered with tin, so there were no problems with cutting.
The markings must be as precise as possible, and the cutting must be as even as possible so that the bottle fits tightly into the cut hole. I sanded the edges to avoid any sharp burrs. So that they, in turn, do not cut through the bottle.
Then I inserted the bottle bottom down, approximately to the middle, well, maybe a little lower.
All. Almost everything is ready. All that remains is to go around the sealant in a circle to fill all possible holes.
That's all. Everything is holding up very well. Doesn't fall out. Now in the place where it was very dark in the barn, it became much lighter. You no longer need light from a light bulb. And this is in cloudy weather. And when the sky is sunny and the rays fall directly on the bottle, the light scatters and illuminates like a light bulb. Almost.
Saving
The savings are obvious. No need to use electricity. You wonder if the light in the barn has been turned off. You are no longer afraid that the light bulb will be on all day and waste electricity if suddenly I don’t need to go there.
I'll be honest, without exaggeration. This life hack works and is very effective.
Lighting without electricity. Alcohol burner
An interesting option for cooking and lighting is an alcohol burner. The simplest version of such a burner can be made from two aluminum cans of cola, beer and similar drinks.
Two bottoms are used. A series of holes are punched around the perimeter of the collar of the upper part. It is advisable to arrange them evenly. If there is no rush, it is better to mark everything beautifully according to the template. The holes themselves should be small. So, they are made with a needle, a thin awl or a nail. A round hole is punched in the middle of the lid to fill and drain fuel. In the working position, this hole is covered with something. For example, a short bolt. So, first they find a suitable plug, and then punch a hole under it.
The two parts of the can move towards each other. It is a good idea to seal the connection. On a hike, this can be done with a small amount of resin. If you act carefully, you can fit the jars so tightly that they will not allow vapor to pass through, without any sealant.
Thin cans will burn out soon enough. So, if you have a choice, use large jars, liter or 0.75. Some types of beer have these. They have noticeably thicker metal, which significantly extends the service life of the burner.
Alcohol is poured into the burner. About a third or half the volume
It is important not to overfill so that there is room for gas formation. It is not the fuel itself that burns, but its vapors
It's much more efficient this way.
In addition to alcohol, kerosene, gasoline and other flammable compounds are used as fuel. The gasoline they use is not pure. Due to too active evaporation, it may burst into flames. You need to add turpentine or white spirit to it. Turpentine can be obtained from oleoresin.
Obviously, under normal conditions, only alcohol is used. The stench from burning kerosene and especially gasoline and diesel fuel does not go well with cooking. For illumination - it will do. But they try to combine these moments. People switch to alternative fuels in extreme conditions when there is no alcohol.
Before lighting the burner, it is heated by moving matches along the bottom. It is necessary for evaporation to begin. Then bring the flame to the burner. It burns perfectly, like gas on a kitchen stove. Gives heat and light.
Sources
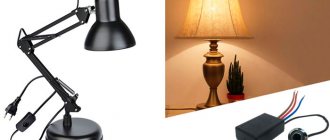
Of course, you can hang a warehouse “Ilyich light bulb” of 20 watts and at least be happy about that. However, modern people love comfort; it has already become an integral part of life. And we will no longer be satisfied with such simple and not very functional tools. Therefore, let's choose lamps that will help organize the room well. For creativity, so to speak, you can light candelabra with paraffin candles, but such romanticism is unlikely to be appropriate in most everyday situations. So, you need a lamp. You need to choose it, and for this you need to know in general what they are and how they differ.
Therefore, let's divide the lamps into two groups. That is:
- using a centralized network;
- without electricity.
Li-Ning basketball shoes
One of the best basketball shoes on the market: excellent ankle support, grippy sole with excellent cushioning, clever lacing.
It is worth noting the orthopedic last, which is well complemented by a mesh upper and a reinforced toe. Part of a line of designs promoted by David Wain.
Price: 8,500 4,650 rub.
Torch
One of the primitive means of providing light is, of course, a torch. A certain handle and a flammable element, a composition on the knob. The torch handle must be made of wood. The metal will become hot and it will be impossible to hold it, even through a rag potholder. The plastic will float and melt. So, just wood. Affordable and practical.
The simplest torch is a piece of coniferous tree root. The root is dug up and cut to the required length. The end is split into sectors with a knife. They set it on fire. Due to the porous structure and abundance of resin, such a primitive torch burns well and for quite a long time.
A slightly more complex torch is a taiga candle. All sorts of dry kindling and pieces of pine resin are pushed into the split at the end of the branch. The other end of the stick is sharpened. The candle is lit from the flame of the fire. The sharp end is stuck into the ground. It can burn and give light for a long time while you add pieces of resin.
A more civilized torch has a wooden base and a natural fabric or rag wound around the end. The fabric is impregnated with some kind of flammable composition:
- petrol
- kerosene
- alcohol
- fuel oil
- machine oil
- resin
- vegetable oils
Scarecrow for the dacha with a lantern step by step instructions. Master class on creating a straw effigy
To begin, let's prepare the following materials and tools:
- two handles for rakes or two straight sticks (made of hazel or aspen);
- a couple of screws and a screwdriver;
- a bag of dry straw or hay;
- synthetic twine;
- scissors;
- headdress (preferably a hat);
- black marker;
- thick wire for attaching the hat;
- wide shirt, trousers or breeches.
The sequence of operations is as follows:
- First of all, let's deal with the frame.
To do this, connect the two prepared slats using screws. It is better to immediately sharpen the lower end of the vertical rail so that later it fits into the ground more easily. The slats for the future scarecrow are held together with screws - We create the volume of the torso using straw.
To do this, we twist the straw rope, intertwining it with twine, and secure it to a vertical rail. We also form the volume for future hands on the transverse rail. Two straw strands will give the future scarecrow volume - Forming the scarecrow's head.
To do this, we fill a white bag with straw and synthetic filler, and fix the resulting head on a vertical rail. The head can be made from a bag or a white pillowcase - Create the scarecrow's face.
Eyes, nose, mouth can be made from pieces of leather or fabric of the appropriate color, eyebrows and eyelashes can be glued on. A scarecrow's face doesn't have to have a scary expression. - We put a wide-brimmed hat on the scarecrow's head and secure it with wire.
A straw hat will make the scarecrow look human - We dress up the scarecrow in a shirt and pants.
Preference should be given to blue. We also stuff the pants with straw and attach them to the shirt with twine. - We decorate the scarecrow by adding scaring accessories. To prevent the scarecrow from being static, you can attach fluttering and rustling elements to the hat, sleeves, and belt:
- bottle cap beads;
- canned food cans fastened in pairs;
- CD belt.
Causes
What should I do if the LED lamp glows when the switch is off? "RadioKot" is a forum dedicated to electronics, contains a lot of useful information on this topic. According to forum members, there may be several reasons for the weak light after switching off.
- Incorrect electrical wiring connection.
- The switch has neon lighting.
- The LED lamp turned out to be of poor quality.
- The LED lamp has additional options (slowly extinguishing lamp).
Popular articles DIY wreath
LED lamps are designed in such a way that their main job is constant voltage. There is a rectifier inside the device, which receives current. Sometimes it happens that after turning off the lamp burns dimly or flickers. Problems with wiring and poor quality of LEDs used are the main reasons for this phenomenon. If the device uses a resistor, it keeps the diodes glowing. Electricity accumulates in them, so even after turning off the lamps emit a weak light.
This happens when the backlit switch is open. In this case, the current to the lamp comes from the switch itself. It does not affect the network load. The current performs the function of charging the capacitor. When charging reaches a certain level, it flashes and turns off. Thus, the process proceeds in a circle, and short blinks occur in the lamp or LED strips.
If you don't want to experience flickering lights during or after a shutdown, choose the right lamp. Conscientious manufacturers always indicate instructions on the packaging, which indicate the operating principle of LED lighting devices and recommendations for correct operation. It is not advisable to use LED lamps together with backlit key switches, photocells, brightness controls, and timers. All this interferes with the operation of the product and causes periodic blinking.
Unfortunately, lighting fixtures are often counterfeited. When purchasing, try to carefully study the packaging in which the lamp is located. The cause of burning after switching off, as well as blinking, is sometimes due to incorrect installation. If this problem bothers you, try to fix it yourself. Check that the light bulb is screwed in securely (with the power off). Remember that the simultaneous use of switches with neon lights (they are needed to recognize their location) and LEDs is not recommended.
Charger-battery 45 W Baseus
Ultra-compact charger for smartphones, laptops and other advanced equipment with a built-in 10,000 mAh battery. A USB-C cable is included.
Supports QC 3.0 (via both outputs) and PD (via USB-C only). Delivers up to 45 W through a more modern slot, or 18 W when working simultaneously.
Price: 4,350 2,800 rub.
Lamp from a can
The simplest option for making a lamp, accessible even to kids. By the way, if you involve children in the activity, it will be more fun. What to do:
- find a jar of any shape and size, the main thing is that it should not have cracks;
- wash the jar and wipe dry inside and out;
- wipe the inner surface with strong alcohol or vodka, wipe with a cotton pad, covering the entire surface, including the bottom;
- the thicker the layer of alcohol, the longer the jar will glow;
- take luminescent paint of any shade and a brush;
- apply strokes, dots, strokes of paint to the inner surface of the jar, without covering the surfaces with a continuous layer;
- let the compositions dry, pour glass balls or beads inside the container to reflect light.
Now all that remains is to enter a dark room with the can and make sure that the lamp is working. The beads shimmer, creating a reflection, and the result is real magic. You can make a dozen of these cans, and then organize evening gatherings, a disco or something else funny and cheerful. If you place unusually shaped containers around the area, guests and children on the veranda will be delighted.
Reciprocating saw WORKPRO
An advanced reciprocating saw for home and semi-professional work with a wired connection, high-quality components and a very affordable price.
No worse than serious branded analogues, although inferior to options from Makita or Bosch. Uses standard equipment for the type of tool.
Price: 7,250 3,000 rub.