Hello, dear friends! Since the main focus of our site is car trailers, I could not lose sight of such a topic as a car enthusiast kit.
Once upon a time I myself could not understand what it was and what it was eaten with. Now, having understood the issue in detail, I want to share my knowledge and a little experience. This will allow you to determine whether it is worth getting involved with such kits for self-assembly, or whether the price is not justified and it is better to purchase a ready-made solution from a trusted company.
So let's begin to study the features, configuration and advantages of this set.
First meeting
The constructor from the build-your-own-trailer category is a certain type of entertainment for me. Many boys in childhood loved to play with Lego constructors and assembled cars and various complex structures on their own.
As time goes on, the toys just get a little bigger. Now there is a good opportunity to purchase a special do-it-yourself kit, which allows you to create a full-fledged car trailer from a pile of different spare parts.
Corresponding advertisements and suppliers operate in St. Petersburg, Moscow, the cities of Samara, Voronezh, Nizhny Novgorod, etc.
I can’t say that the assortment is now scarce. On the contrary, there are a lot of options, which is why sometimes your eyes run wild. Depending on the required type of vehicle, you can contact the following manufacturers:
- Source;
- Autos;
- LAV vector;
- Trailer;
- MZSA, etc.
But often buyers are stopped by the rather high price. Not everyone can afford to buy a fully equipped vehicle with all accessories costing 60-80 thousand rubles and more. Some people just don't need it.
That is why such a solution as a designer trailer appeared.
Its essence lies in the fact that you are offered a minimum set of components. The base platform is assembled from it. If you wish, you can supplement it with whatever you need. Such a kit is much cheaper than a ready-made factory trailer.
In my opinion, the important feature is self-assembly. Yes, the supplier can, for an additional fee, independently assemble the vehicle from your components. But if a person decides to buy a construction set, it would be right and interesting to make it with his own hands. This will allow you to plunge back a little into your childhood and test how well you master the instruments.
Main advantages
I deliberately delayed this moment a little, because I consider this the most important advantage of car enthusiast kits.
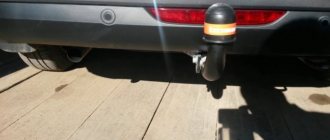
The thing is that such a kit, in addition to the basic elements for the trailer, is offered along with the documents for the trailer necessary for registering the vehicle with the traffic police. Therefore, a self-assembled trailer will not be considered homemade, but official and completely legal.
Agree, this is a weighty argument, since homemade products have a problem with their examination and design. Not all trailers assembled with your own hands from scrap materials can be registered. If you purchase a special set, you will not have any problems.
In short, I would list the main advantages of this set of car enthusiasts as:
All-terrain vehicle "BOBIK"
In my spare time I enjoy building all-terrain vehicles. I built the first such car in the summer of 2011. And now I present, in my opinion, one of my most successful developments - an all-wheel drive all-terrain vehicle with a “breakable” frame - “Bobik”.
The frame is articulated (“breakable”), consists of two box-type semi-frames, welded from profile pipes with sections 40x40x2 mm, 40x20x1.5 mm and 40x25x2 mm. The places where the bridges are attached to them are reinforced with linings made of a rectangular pipe of 40x25x2 mm.
The frames of the cabin, hood, wings and body are made of square pipes 20x20x1.5 mm and 15x15x1.5 mm.
Main dimensions of the all-terrain vehicle with a breakable frame "Bobik"
Side view
Front view
The main dimensions of the semi-frames of the all-terrain vehicle: A - side view;
B - top view Dimensions of the front half-frame (length x width x height) - 1650x800x260 mm. The engine compartment occupies 750 mm (in length), the rest of the space is reserved for the driver's seat. This half-frame was conceived as universal - for several types of engines. Therefore, the dimensions of the engine compartment were made for the VAZ-1111 Oka engine. Most of the other suitable engines are smaller in size. For example, for an engine like the Lifan 182FD, the length of the engine compartment can be reduced by 100 - 150 mm.
The rear semi-frame is trapezoidal in plan (narrower in front than in the rear), so that the turning radius is smaller. The width of the “top” is 200 mm, the base is 810 mm, the sides are 900 mm long. The height of the “box” of the semi-frames is 260 mm. To increase the volume of the body, I made a rectangular rear semi-frame.
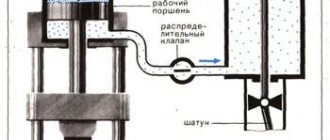
All-terrain vehicle power transmission (transmission diagram): 1 - axis of the tension roller lever (homemade); 2 — tension roller lever (homemade, inside bearings 180204, 2 pcs.); 3 — drive pulley (5 grooves of profile “A”); 4 — tension roller axis (homemade); 5 — belt clutch tension roller (homemade, inside bearings 180203.2 pcs.); 6 — engine (“Lifan” or equivalent); 7 — driven pulley (Ø250, 4 grooves of profile “A”); 8 — driven pulley shaft (homemade); 9 — driven pulley support housing (homemade, inside bearings 180109, 2 pcs.); 10 - gearbox VAZ-2101 - 2107 (clutch removed, casing cut off); 11 - flange of the secondary shaft of the gearbox (flange of the primary shaft of the rear axle VAZ-2101-2107; 12 - driveshaft (from VAZ-2121, shortened); 13 - primary shaft of the chain drive; 14 - drive sprocket of the chain drive (z = 13, pitch 19.05); 15 — bearing housing of the input shaft of the chain drive (rear hub of the VAZ-2108 assembled with bearings); 16 — movable plate of the chain drive (s10); 17 — brake disc (from the front wheel of the VAZ-2101-2107); 18 — driven sprocket of the chain drive (z=43, pitch 19.05); 19 — transfer shaft (block) of the rotary unit (UAZ-469 CV joint shaft, converted); 20 — bearing housing of the transfer shaft (homemade, inside bearings 180106, 2 pcs.); 21 — fixed plate of the steering knuckle ball joint (s10); 22 — steering knuckle ball joint (from UAZ, internally machined for bearing 1000906-2118); 23 — CV joint (from UAZ); 24 — steering knuckle housing (from UAZ); 25 — steering knuckle axle (from UAZ); 26 — steering knuckle hub (from UAZ, inside bearings 127509, 2 pcs.); 27 — CV joint bearing housing (from UAZ, modified, inside bearing 1000908-2RS); 28 — rear axle drive flange; 29 — driveshaft (from VAZ-2121, shortened); 30 — rear axle (from VAZ-2101-2107); 31 — front axle (rear axle from VAZ-2101 - 2107); 32 — driveshaft VAZ-2121 (short); 33 — adapter washer (homemade)
Layout: 1 - gearbox; 2 — cardan shaft; 3 — drive sprocket of the chain drive (chain gear); 4 — support bearing assembly of the drive sprocket; 5 - chain; 6 — support bearing assembly of the driven sprocket; 7 — driven sprocket; 8 — transmission brake disc caliper; 9 — driveshaft of the front axle (under the frame tube); 10 — front axle; 11 — articulating (fracture) unit for semi-frames; 12 — rear axle driveshaft; 13 — rear axle; 14 — rear semi-frame; 15 — front half frame
A power unit with a 5-ribbed V-belt drive pulley on the output shaft (4 belts for the power transmission and 1 belt for driving a generator or power steering) and a 4-ribbed driven pulley. The connecting spline assembly of the driven pulley shaft and the gearbox input shaft are located in the housing (in the foreground)
A driven pulley with four belts and a tension roller: it rests on a bearing assembly at the front and is connected to the gearbox input shaft at the rear
Single track driven generator drive pulley
Cardan shaft from the gearbox and drive sprocket of the chain drive
Steering: 1 — turning point; 2 - bipod; 3 - hinge; 4 - traction; (the chain on the driven sprocket and behind them the transmission brake caliper are clearly visible)
Rear axle articulation unit and driveshaft
Driver's workplace
Steel plates of 10 mm thickness are welded to the internal crossbars of the semi-frames, to the sides facing each other, for attaching the articulating joint (fracture unit). The distance from the internal “ends” of the semi-frames to the middle of the bridges is 790 mm. Thus, the base of the all-terrain vehicle is 1830 mm.
The design of the turning point is based on the steering knuckle from the front axle of the UAZ-469. Inside, in two bearings 180106, one bearing 180208 and two bushings, the CV joint from the UAZ rotates.
Of course, the articulating (fracture) unit is a rather complex mechanism, and it is worthy of a detailed description. I made it according to the method of Omsk resident Yuri Shashkin - from a steering knuckle from a UAZ-469, making only a few changes. Yuri uses a CV joint from a VAZ-2121 (or VAZ-2108). There are other differences: Yuri has a ball joint for the steering knuckle machined for the bearings, while I have a separate housing for them.
Steering diagram: 1 — column of the steering column frame and instrument panel; 2 — instrument panel; 3 — steering wheel; 4 — steering shaft in the column; 5 — steering column; 6 — cardan steering shaft; 7 — steering rack; 8 — front steering rack mount; 9 — adapter from the steering rack to the tie rod end; 10 — steering tip (2 pcs.); 11 — lock nut M18x1.5 (2 pcs.); 12 — steering rod; 13 — rear steering rack mount; 14 — hinged tip; 15 - bipod; 16 - “turning point” node; 17 - lock nut
Drive pulley
Driven pulley
Driven pulley shaft
Driven pulley shaft housing
Tension roller
Axle and tension roller bushing
In general, only on converting a UAZ knuckle into a turning unit can you write a multi-page separate article. But I didn’t make my own drawings, and giving someone else’s is unethical.
A home-made flange is mounted in the middle of the front half-frame, into which a shaft with a block of a driven sprocket of a chain gearbox, a brake disc and a driveshaft fork of the front axle drive is inserted. The disc is equipped with a VAZ-2106 caliper screwed to the frame with cylinders and pads.
A flange from the main drive of the UAZ axle is attached to the rear semi-frame plate, through which the shaft passes. breaking point with rear drive driveshaft fork.
TRANSMISSION
A drive pulley with a diameter of 95 mm is installed on the output shaft of the engine (Lifan 182FD or similar). The pulley has five grooves of profile “A”. Four of them are intended for clutch drive belts and one (outmost) is for driving a generator or hydraulic pump. The shafts on different engines are not the same size and have different keyway widths, so you have to be careful here.
The length of the “A” profile belts (generator from the D-240 diesel engine) is 1250 mm. The belts are tensioned by a roller with two springs. The roller rotates in two bearings 180203. Its axis, for convenience, fits into the bearings using a “sliding” fit, that is, quite freely (by hand). When the axle nut is tightened, the inner races of the bearings are clamped between the spacers and do not rotate.
Plate under the gearbox and support from a Zhiguli
Tensioner shaft
Tensioner shaft housing
A driven pulley with a diameter of 260 mm is mounted on a support shaft, which rotates in a double-row bearing from the front wheel of a VAZ-2108. A splined bushing from the Zhiguli clutch disc is welded to the end of the support shaft. This bushing includes the input shaft of the gearbox (gearbox) from the VAZ-2106.
The holes in the pulley for attaching it to the shaft are drilled for the flange of the “Zhiguli” propeller shaft. This was done for the versatility of using this pulley. It is not necessary to repeat this at all; you can place the holes on the pulley and shaft flange at an angle of 90°.
The gearbox output shaft is cut to the beginning of the splines. The flange of the Zhiguli driveshaft is mounted on the splines. The shaft pipe is cut to the required length. The second cardan flange is screwed to the input shaft of the chain gearbox, to which the sprocket is welded (z=13, pitch 19.05 mm). The input shaft itself rotates in tapered bearings from the front hub of the Zhiguli, which, in turn, is screwed to a movable plate. By changing the position of the plate, you can adjust the chain tension.
A driven sprocket with a number of teeth z=41 is installed on the transfer shaft of the rotary unit. The transfer shaft drives the main axle gears (from the VAZ-2106) via cardan shafts (shortened from the VAZ-2121 Niva). The drive axles (both front and rear) are from the VAZ-2106. The tires on the wheels were both homemade (“torn off”) and industrially produced. I didn't notice much difference in driving performance.
DRIVER'S CABIN
The driver's seat is located behind the engine compartment and is separated from it by a partition made of duralumin sheet on a frame made of pipes with a cross-section of 20x20 mm. The driver's cabin is semi-closed (without doors or rear wall). The seat is from a passenger Gazelle. There is a 60 Ah battery under the seat. The steering column was converted from a Zhiguli one (VAZ-2106), and the upper part of the steering propeller shaft was taken from there. Its lower part is made of a 20x20x2 mm profile pipe, the crosspiece is from the M-2141 Moskvich car. The steering mechanism (“rack”) was also borrowed from the M-2141.
Pedal units are from Zhiguli. Their location is the same as on a car. The clutch pedal is connected to the tension roller of the clutch belt via a cable. The brakes are transmission brakes, the disc is mounted on the driven sprocket shaft. The pedal is connected by a rod to the main brake cylinder (from the UAZ clutch), which drives the brake caliper cylinders (from the VAZ-2108). The gas pedal is homemade, connected to the carburetor with a Bowden cable.
Under the steering wheel there is a panel on which there is a toggle switch for turning on the headlights, a cable handle for the carburetor air damper, a horn button and a ground switch.
Rear-side view
The Bobik all-terrain vehicle has been repeatedly modernized, and even has several similar copies that were distributed to different owners. Therefore, some drawings may differ in some ways from the images in the photographs.
BASIC DATA OF THE ALL-TERRAIN VEHICLE “BOBIK”
Engine - Lifan 182FD, 11 hp, four-stroke, forced air cooling, made in China.
The gearbox is from a VAZ-2106, four-speed.
Bridges are from VAZ-2106, gear ratio 3.9.
Tires - VI-3 (from KRAZ-255B), lightweight (“torn”), actual size 1250×520-533 mm.
The wheels are non-separable (for beading), with the tires secured with bolts.
Overall dimensions (lengthxwidthxheight) - 3300x1950x2300 mm.
Loading capacity on land/water -300/200 kg.
Curb weight - 780 kg.
Maximum speed is 25 km/h.
P. Semenov, Medvedkovo village, Tver region
We recommend reading
- HAMMER ASSISTANT When dismantling boxes and panels, the nails holding them together can be easily and carefully bent for reuse. To do this you will need a simple device - a metal finger Ø...
- “WHEN LEAVING, TURN OUT THE LIGHTS!” Every time we leave for work in the morning, we try to remember to turn off the lights and electrical appliances in the apartment. Meanwhile, this function can be successfully performed by an automatic machine consisting of three main...
Universal trailer for boats and cargo: what they are, how to make them
- minimum price for the minimum set;
- PTS included;
- simplicity of design;
- possibility of self-assembly (it’s not at all difficult);
- With the help of additional components it is possible to create trailers of different types, purposes and characteristics.
Reviews clearly prove that this set makes sense. When a person has a Zaporozhets in his garage for 50 thousand rubles, he will not buy himself a trailer for 150 thousand. The cost of the set is about 20,000 rubles. This is an average price as there are different sets.
Contents and popular sets
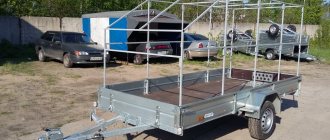
As the practice and experience of people who have chosen a kit for self-assembly shows, such kits can be used to create a wide variety of trailer options:
- flatbed trailers;
- Vehicles for long cargo;
- for PVC boats;
- for snowmobiles and ATVs;
- for bee hives, etc.
Let's see what we get when we order a DIY kit.
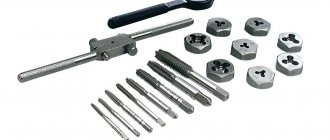
Let me point out right away that the configurations are different. Much depends on what exactly you order and from which supplier. Approximately a car enthusiast's kit may include the following elements:
How to use a controlled skid: execution technique
- torsion;
- spring kit;
- tires;
- wheel disks;
- platform;
- trailer drawbar;
- axle with hub (assembled);
- winch;
- support leg or wheel;
- operation and assembly manual;
- hitch;
- PTS;
- additional documents for registration.
Some suppliers offer a very minimal list of components. Hence the lowest cost. There are also richer configuration options, but you will have to pay more for them.
If you want to upgrade and supplement the purchased set yourself, it is recommended to use Al-Ko components. This is the best choice in terms of price and quality ratio.
You will get a frame with PTS. Then you can install a second axle, make sides, install a frame for the awning, mount various decorative and protective elements, lay the floor from a laminated sheet, etc.
A little more specifics about these sets. Nowadays on the Internet you can find a large number of advertisements offering to purchase a car enthusiast’s kit for assembling the base of a passenger trailer.
RELIABLE TRAILER
For industrial needs, trucks are made with different load capacities.
As a rule, low-tonnage tractors are used as intra-factory transport, medium-capacity tractors are used for transshipment of goods between objects, and powerful tractor units are used for intercity (“long-distance”) transportation. All this is presented in household farming, but, so to speak, in miniature. For example, even a wheelbarrow will do for transportation within the farm. You can also hire a truck to deliver goods from afar. But when transporting heavy loads over medium distances, a wheelbarrow turns out to be unproductive and a truck unprofitable. Therefore, for my yard, I decided to make a trailer, and such that a walk-behind tractor could be used as a tractor, and, if necessary, a passenger car.
The trailer is single-axle (two-wheeled), has a classic layout and a very simple design. In addition, the materials used to build the trailer are those that a craftsman always has in stock.
The frame of the trailer is combined with the frame grille of the body (it turns out to be a load-bearing body: one can distinguish one from the other rather conditionally). The frame is formed by two side members and a pair of cross members (front and rear cross members). Five more crossbars located between the traverses can be structurally attributed to the platform lattice. The cross members and cross members have small cantilevered outlets relative to the side members. Longitudinal elements are welded to the ends of these outlets on both sides, which simultaneously serve as the lower trims of the side frames: four posts are installed and welded onto the elements (just across one cross member), and the upper trims are attached to them.
Rice. 1. Single axle trailer:
1 — wheel (from the Moskvich-412 car, 2 pcs.); 2 — spring (from the Moskvich-412 car, 2 pcs.); 3 — signal light (purchased product, 2 pcs.); 4 — frame spar (2 pcs.); 5 — side board (2 pcs.); 6 — wing (steel sheet s1.5, 2 pcs.); 7 — hook (steel sheet s1.5, 14 pcs.); 8 — locking device (4 pcs.); 9 - drawbar; 10 — towing device; 11 — bridge beam (channel No. 5, 2 pcs.); 12 — tailgate hinge (4 pcs.); 13 — wheel axle (steel 45, circle 30, 2 pcs.); 14— stepladder with spring washers and M12 nuts, 4 sets); 15 — backing plate (steel sheet s5, 2 pcs.)
Rice. 2. Frame and frame of the trailer body (front frame not shown):
1 — towing device; 2 — drawbar beam (pipe 60×30, 2 pcs.); 3 — traverse (pipe 25×25, 2 pcs.); 4 — spar (pipe 60×30, 2 pcs.); 5 — spring mounting eye (steel sheet s5, 4 pcs.); 6 — side wall stand (pipe 25×25, 8 pcs.); 7 — upper side trim (pipe 25×25, 2 pcs.); 8 — lower side trim (pipe 25×25, 2 pcs.); 9 — upper trim of the rear (front) side (pipe 25×25, 2 pcs.); 10 — lower trim of the rear (front) side (pipe 25×25, 2 pcs.); 11 — hinged loop (4 pcs.); 12 — cross member (pipe 25×25, 5 pcs.)
The spars are made of rectangular pipes 60×30 mm. All the other frame and body frame parts listed above (traverses, cross members, racks, trim) are made of square steel pipe with a cross-section of 25x25 mm.
The front and rear sides of the body are the same. They are made folding (this allows you to transport long loads on a trailer), and therefore their frames, although all made from the same 25x25 mm square pipe, are made separately from the general body frame. The platform grille on top is covered with a 2-mm duralumin sheet, forming the floor of the body, and the outside sides are sheathed with thick tin - 0.8-mm steel sheet. The floor is attached to the grille with M5 bolts with countersunk heads, and the side trim is carefully (dotted) welded to the frames and posts.
The bridge beam also has a tubular rectangular cross-section: it is welded from two identical sections of channels No. 5, inserted into one another. Two wheel axles are pre-welded at the ends of one of them. The gaps between them and the beam channels at the ends were closed with plates made of steel sheet.
The beam is connected to the frame side members by means of two springs used from the old Moskvich-412 car; 13-inch wheels are also taken from the same car. The middles of the springs are pulled to the beam by stepladders, and their ends are attached to the side members: one is put on the axis of the bracket, and the other is put on the axis of the shackle. I considered shock absorbers in the design of a simplified cargo trailer unnecessary.
A simple, roomy trailer with folding front and rear sides
With such a suspension, the distance from the ground to the platform was about 600 mm, which, as operation has shown, is quite acceptable.
The trailer drawbar is double-beam. Made from the same rectangular pipe with a cross section of 60×30 mm as the side members. The rear ends of the drawbar beams are docked and welded to the front ends of the side members with a 200 mm overlap. The front ends of the beams converge on the body of the towbar and are also welded to it. I have it homemade, but I never go on public roads with my trailer (and there is no need for this). Technical requirements simply prohibit the use of homemade towing devices.
The trailer doesn’t have brakes—I use the tractor’s brakes to stop or slow down the speed. But I installed alarm devices—tail lights with turn signals and brake lights—so that my actions would always be clear to those driving on the road.
V. KURAKIN, Saransk
We recommend reading
- DRUMSTICKS Every day we use a huge number of things and have almost stopped noticing them. But it turns out that in the production of seemingly insignificant things there is a lot hidden...
- CONTROL OF MECHANISMS OF CORDER MODELS Of great interest to modellers are all kinds of devices that allow you to control engines in flight, extend and retract landing gear, flaps, turn on signal and landing lights,...
Tonar light trailer: single-axle, two-axle, characteristics, reviews
The most popular of them are:
- Titan 2.0; (produced at the plant in Voronezh);
- Titan 2.5;
- Prestige;
- Progress;
- Verda 1 Skipper.
They can cost 15-25 thousand rubles. This is significantly cheaper when compared with ready-made trailers from leading manufacturers.
How to call a tow truck and choose the right company
Conclusions have been drawn. Therefore, now I will wait for comments and feedback from you.
It is especially interesting to read from those who have personally encountered car enthusiast kits, who had to assemble similar construction sets with their own hands.
Thanks everyone for your attention! Subscribe, leave your comments, ask questions and share links to the site with your friends!
Articles from the magazine Modelist Constructor.
This page contains links to articles from the Modelist Constructor magazine, located on the website hobbyport.ru
1965
Basov V., Demchenko V. How to build a catamaran (catamaran “Rest”)
1967
Komzolov V. Dream of a tourist (folding boat) Sail-kite (sailing raft) Reznichenko G. The riddle of “Jurgen”; Mitropolsky Yu. Motorina (micromotorcycle “Jurgen”) Dinghy boat “Moth”
1968
Kurdenkov V. Yachtsman's raft (sailing raft) Afanasiev L. Formula "K" (classification of karts) Lykov A. Boat on wheels (collapsible boat) Mirov R. The simplest boat (from auto tubes) Malinovsky G. Tourist boat "Veterok" Levin G. "Umka" - winter motorboat
1969
Egorov V. From “Java” - two “Java” (boosting the engine for a go-kart) Kuibyshev V. Kayak-shuttle Malinovsky G. Viroglider (glider-gyroplane) Tabakov V., Dmitriev S. Motorhome (living trailers) Stepanov G. Water moped Malinovsky G. Again “Baby” (airplane) Todorov M., Shaev O. Kursky map
1970
Barkovsky B. Propeller - wings of a gyroplane
(part of the article)
Malinovsky G. What is water karting (hydrocards "Pioneer") Rysyuk Yu. Main rotor of a gyroplane Malinovsky G. On the track - sports hydrokarts (hydrocards "Pirate" and "Dolphin") Karts - brakes and...reliability (brake for kart) Mitropolsky Y. Jurgen-motocross (motorcycle "Jurgen-motocross") Rysyuk Y. Autogyro - fuselage design
Nikolaev V. Trailer for "Volga"
1971
Rysyuk Yu. Control of a gyroplane Ponomarev I. Launch pad - Nizhny Tagil (Airplane "Flea") Sekatsky A. Motorcycle... on skis Malinovsky G. "Snezhinka" - winter all-terrain vehicle
1972
Gladkov K. AVP is built by children Petrovsky V. Tire factory at home (homemade tires) Stromilov A. “Vyatka” on skis (motor karts “Hobby-2”) Malinovsky G. Boats... made of cardboard and paper (canoes made of kraft paper and isocardboard) Auto racing without engine (minicar)
1973
Bekhterev Yu. "Haapsalu-Kalur" - the birthplace of ice drifts Bekhterev Yu. Ice drift "Kalur"
Molchanov E. Automobile and design (car "Sport-900") "Furious" (hovercraft) Yacht on... the highway (wheeled iceboat "Manta") Chernets R. "Teremok" (caravan) Lundovsky S. Scooter... for adultsTodorov M. All about the map (karts) Todorov M. “White” karting (winter)
1974
Malinovsky V. Turbin L. Screw? It’s not easy (technology for manufacturing wooden propellers) Yuvenalyev I. Snowmobiles: ideas and designs (Snowmobile from the Impromptu motorcycle and the Yakutia motorcycle slarts) More about the Furious (hovercraft)
1975
Sukhanov L. Amphibious dacha (with track propulsion) Malinovsky G. Cabin boat “Ruslan” Zakharov V. Kart “HADI-electro” (electric kart) Komarov N. Dacha sets off (living trailer)
“Don Quixote” by Yaroslav Yanovsky (airplane) Ovchinnikov G. Cycling catamaran “Malek” Kuraev N. Flight on a cushion (hovercraft) Khusainov D. Motobuer (snowmobile)
1976
Ignatov A. Boat? Motorbike? - Automobile! (tricycle “Robot”) Taranukha V. Buggy “KVP” Yuvenalyev I. Motonarts change “shoes”
Kizhevatov A. A car without... a steering wheel (six-wheeled all-terrain vehicle) Tambovtsev V. The all-terrain vehicle is built by boys; Nalimov A., Stepanenko E. Transport for a forester (tracked mini-all-terrain vehicle) Malinovsky G. “Tit” in your hands (Glider BRO-11M “Zile”) Makarov Y., Anikin V., Sobolev A. Boat on wings (winged ekranoplan)
1977
Kizelov F. Forcing “D” (forcing engines D-5, D-6) Malinovsky G. “Tit” in your hands (Glider BRO-11M “Zile”) Arbuzov A. and G. Board and sail (windsurfing); Evstratov V. Harnessing the wind; Evstratov V. Windsurfing: a little theory
Vorobyov Yu., Makhotkin G. Your best propeller (propeller calculation)
1978
Stanotin V. “Snowflake” with a motor (snowmobile) Yuvenalyev I. Snowmobile “Morzhonok” Kremnev A. Amphitrak “Ob” Kizelov F. Dubl-IZH (two-cylinder boxer engine) Nepokochitsky V. Above the shelf - “Shelf” (submarine)
1979
Ryabtsev A. In the sky - “Albatross” (hang glider)
1980
Two sheets of plywood - and a dinghy! Zotov Yu., Shershakov N. With the wind on one board (windsurfer) Abramov B., Golovko S., Tuchkin N. Bicycle kayak On the waves - “Moth” (sports dinghy)
1981
Karpukhin V. From “Sputniks” - tandem (bicycle tandem)
Gerashchenko A. Multi-purpose two-stroke (engine based on the Privet-22 motor) Tsygankov I. Hydrokart “Mustang” Zotov Y., Shershanov N. Surfing on the snow (monoski-surfer)
1982
Bokov V., Yakovlev O. “Triumph”: comfort plus speed (snowmobile) Räikkenen R. He is not afraid of storms or shallows (polymaran “Sprut”) Kruglikov K. “Pioneer” - karts for beginners
1983
Prialgauskas S. Hang gliding desk (simulator) Peregudov V. “Altair” - inflatable catamaran E. Grunin. Flight at an altitude of... centimeters (ESKA-1 ekranoplan) Yuvenalyev I. Riding on a hovercraft; Shitikov M. “Motorcycle” of an agronomist (Hovercraft)
1984
Obedient propeller (for snowmobiles) Kruglikov K. Champion kart Chernorotov Yu. “Harps” beyond the Arctic Circle (all-terrain vehicle “Harp”)
Timchenko A. Simplicity plus reliability (all-terrain vehicle "Harp") Timchenko A. "Jeep" - reliable and simple Kravets G. Trailer-bedroom (from trailer MMZ 81021)
1985
Gromov A., Timchenko A. They are not afraid of obstacles Lisunov A., Kondratiev V. Koktebel Air Show (show-competition SLA-84) Sports dinghy - at the home shipyard (dinghy "Moth") Kachko N. "Dancing" car (car " Zyban" unique maneuverability)
Gorbunov V. Car for the city (car “Kolobok”) Greek V. “Voskhod” - Titov snowmobile. B. Let's start from scratch (buggy)
1986
Ashkin V. Moped “Cotton grower” Fomin A. “Neiva” - a rural car Ostrogin A., Grachev V. Electric motor on a boat Peregudov V. Instead of oars - a sail (sail for a rubber boat)
Vasiliev A. Dacha-traveler (living caravan "Lada-V") Shcheglov V. Successful start (buggy)
1987
Krylov A. As if from an assembly line (mini-motorcycle) Murnikov V. At the start “Alpha” (mini-yacht) Ermakov V. Motors - two, gearbox - one (opposite engine with gearbox) Gryanin V. With a boat on... a bicycle (rowing folding boat “Strug”) Ilyin M., Shelyakin A. “Pocket” velomobile (folding velomobile “Tetra”) Krylov A. Everything is like in a “jeep” (mini-jeep “Camel”)
Nikitin I. Trike: layouts and diagrams Alekseev V. A boat for every taste (folding boat) Korniyuk P., Nikitin I., Chernigin O., Vakanya B. On the slipway of SKB - “Poisk-04” (motor hang glider)
1988
Sereznov A., Kondratiev V. In the sky of Tushina - SLA (review competition SLA-87) Kuznetsov S. A country lane is not a hindrance (moped) Zach P. Twelve commandments of a self-made car builder Shershakov N. New generation sailboards
Dorfman G. Opposite - no competition! (homemade aircraft engine) Zach P. “Foundation” of a car (frame calculation) Zach P. Building a car (chassis and layout) Evstratov V. Building a dinghy (dinghy “Eureka”) Zach P. Mini-jeep: both for the city and the village (diagram jeep from SZD) Yaroshevich M. From “Java” - all-terrain vehicle Airplane - with your own hands (technical requirements for the SLA) Kondratyev V. Propulsion - propeller
1989
Stoma I. Flying on the snow (water sleds) Kulumbetov G. Buggy - yesterday and today Aki on dry land... (water skis) Ulyashev M. Running on the waves (water skis) Egorov A. “Troll” - a business velomobile Ermakov V. Aerosanny, with launcher (engine) Matonin V. Rowing back - sailing forward (gear for the reverse movement of the oars)
1990
Shalyagin V. Designing pneumatic drives Abramov A. In search of an engine with an ideal design (the idea of a connecting rodless engine) Kondratyev V. New ideas, old problems (show-competition SLA-89) Quasi-car boat Kovalev S. Velomobile for a baby Walkh B. Wicker boat ( strengthening the boat frame) Tolstov O. “Patrol” - a three-wheeled snowmobile
1991
Davydov K. All-terrain vehicle for winter and summer Muravlev A. “Rainbow” - a velomobile In the water area - an aquaroller! Kovalev V., Bezzubikov N. When fishing - with comfort (rafts from inner tubes) Kondratyev V. The MAP commissions recommend, Abramov A. On the slipway - “Argo-02” (airplane)