- November 24, 2018
- Crafts
- Alexey Potyomin
All modern girls are familiar with such a wardrobe item as nylon tights. The number of their types is huge - from thin to thick, from dense to mesh, from beige to brightest! But they have a small drawback - you just need to lightly hook them with something and that’s it... - tightening is guaranteed! We all throw away spoiled tights, but in vain! After all, you can use them to create beautiful bouquets of flowers with your own hands!
A little history
Making flowers from threads and wires was invented in one of the monasteries located on the island of Malta, back during the Crusades. In the 18th century, the art of making such jewelry began to spread throughout Europe. However, in the last century, flowers made of wire and thread were declared absolutely bad taste, and such decor completely disappeared from the homes of residents of the Old World.
Only the ancient custom of decorating the altars of Catholic churches made it possible to preserve this type of needlework. Moreover, to this day Maltese monks are commissioned to make such artificial flowers for St. Peter's Cathedral and the residence of the Pope.
Relatively recently, the government of this island state decided to revive interest in the traditional ganutel technique. Courses were organized where they taught how to make flowers from threads and wires with their own hands.
Snail
Step-by-step formation of the cochlea:
- To form the main body of the mollusk, you need to take 1 piece of yellow (or any other color) chenille and bend it in half.
- From the right edge you need to twist the tip several times in the shape of a loop to form a small tail.
- The horns will be located on the opposite edge. Take one end of the shaggy cord and twist it gently. Perform a few twists and set the workpiece aside. Design the second horn of the animal.
- Make a small space from the horns and twist 2 strips of chenille together twice.
- Then again retreat a short distance from the intended point and again scroll the original yellow material 2 times.
- Separate 2 strips of fleecy cord in 2 places to create gaps.
- Give the furry craft a shape and make it stable.
- To form the shell, you need to prepare identical fluffy sticks of 2 shades.
- At the end, twist them in a spiral together. You should get one multi-colored segment.
- After this, wrap the workpiece tightly around your finger, and then carefully remove it, pressing the spiral circles one against the other.
- You should get a shaggy spring that will serve as a home for the snail.
- The shell should take on a cone-shaped shape, and therefore the workpiece needs to be slightly deformed. To narrow, the top section should be wrapped tightly, and the bottom section should be unscrewed to expand.
- Finally, you need to bend the finished part and press the lower narrow segment to the upper part.
- Take the 2 created elements and insert the lower edge of the shell into the gap of the body. Tighten and secure the wire.
- For the animal's face, you need to take a small yellow piece of chenille and 2 black beads, which should be put on the wire ends. The right edge of the fleecy cord needs to be bent upward to the left side, and the other edge should be bent in the opposite direction. Thread through the small face hole.
- Bend the ends at the bottom and top to secure the configuration.
What is required to make a simple decoration using the ganutel technique
In our country, flowers made of thread and wire became known relatively recently, but immediately there were many people who wanted to wear a tiara made using this technique to their wedding. The ganutel decor is also suitable for bags, and it is also used to create a boutonniere for the groom.
To make the simplest version of a flower from thread and wire you will need:
- scissors;
- knitting needle or hook;
- shiny threads (iris, silk or metallic floss);
- wire;
- green satin ribbon.
Materials and tools
Before mastering a new type of needlework, it is important to stock up on sufficient materials and tools. What may be useful at work:
- Wire of different structures and thicknesses (copper, aluminum, chenille wire of different colors, etc.).
- Foil, colored paper, shreds, colored threads.
- Plasticine of different colors or clay.
- Beads, sequins, beads.
- Decorative elements, dry twigs of different shapes
To create more complex crafts, you may also need diagrams, detailed instructions and drawings.
A basic set of tools that you will have to work with:
- You will need wire cutters for biting off the wire, round nose pliers or pliers for bending and twisting the material.
- Soldering iron and tweezers - for soldering thick copper wire (when creating copper jewelry). You will need tin, rosin and a little skill.
- A small hammer and anvil are useful for flattening individual parts of the craft.
- Sandpaper, fine-grained file.
- Scissors are necessary for cutting out elements from paper and fabric.
- Scotch tape or electrical tape - for temporarily connecting parts of the craft.
Which wire is suitable for creating jewelry using the ganutel technique?
Oddly enough, experienced craftsmen do not recommend purchasing materials required for making crafts in specialized handicraft stores. In their opinion, spool colored wire with a cross section of 0.3 mm, including imported ones, is not suitable. It is better to use its analogue made of copper, intended for repairing and creating windings of transformers and electric motors. Such wire with a cross-section of 0.2 mm costs 200-400 rubles. per 1 kg is used after folding in half. When choosing copper coils, it is better to choose lighter wire, which looks more delicate.
Wire with a cross section of 0.31 mm is completely unsuitable.
Napkin holder
Like the money tree, this product depends on the creative vision of the master and can be anything. At the base of the stand is a napkin holder; the side walls are presented in the form of a wicker outline with curls.
For work, use thick wire, since a pack of napkins has significant weight. Bends and curls are formed using needle-nose pliers. To avoid scratches, drop a drop of silicone glue onto the ends of the wire. Rough areas of the surface are polished with sandpaper.
A craftswoman from Ufa makes unique jewelry from ordinary copper wire
Making a petal
Using the method described above, 7 blanks are twisted. When the work is completed, they begin to create the petals.
For this:
- each spiral is bent into a drop-shaped loop;
- the straight ends of the wire are connected, twisting around each other so as to form a petal frame;
- take a thread of the desired color;
- tie its tip to the place where the wire is twisted;
- pull the thread towards the opposite edge of the petal frame and, going around the wire spiral, draw it back to its base;
- draw the thread up again with a shift of 1 turn of the spiral to the left;
- “descend” back with a shift to the right;
- continue to wind the thread in the same way, shifting by one turn of the spiral;
- the result is a petal.
Narcissus
With the onset of spring, the theme of children's crafts changes. More and more often you can find flowers made from various materials. Our master class shows the process of creating a daffodil from chenille wire.
To make such a flower, take:
- chenille wire in yellow, green and orange;
- scissors.
The petals of a narcissus flower can be white or yellow. In our craft we will make a flower with yellow petals, so we will use the appropriate chenille wire. From one fluffy stick 30 cm long we can make 3 petals. To do this, first fold the wire 3 times.
Cut along the folds. We get 3 blanks for future petals.
From the second chenille wire we make 3 more blanks.
Fold each stick in half.
We have 6 blanks for the petals of the future daffodil.
Now the green chenille wire needs to be cut in half. We will make a stem from one part, and the second half will be needed to create a leaf.
At the tip of one green wire we place yellow blanks in a circle. In this case, the cuts of all workpieces must coincide and be located at the same level.
Then we take orange chenille wire and use it to make the center of the flower. We begin to wind this wire tightly so that it secures all the yellow petals on the stem.
After forming such a center of the daffodil, cut off the excess orange chenille wire.
We straighten the yellow petals of our flower.
Now each of them needs to be carefully straightened into the desired shape.
All that remains is to make a leaf. To do this, fold the remaining piece of green chenille wire in half and secure it to the stem. This is the result of a narcissus flower made from chenille wire.
Flower assembly
Using the method indicated above, you need to make the required number of petals of the desired shape. Then they are put together and the base is twisted. To turn it into a stem, a green satin ribbon or threads of the same color are tightly wound around it.
Having reached the bottom of the base, make a couple of turns and rise, continuing to wrap the tape, up to the middle of the stem.
Further:
- make 2-3 turns around the stem, right at the base of the free loop;
- secure the resulting leaf tightly with a loop;
- straighten the petals;
- sew or glue a bead to the center of the flower with hot glue.
Lily from nylon
Lily is a beautiful flower! It’s not at all difficult to make, and the joy it brings will be enormous!
The tools are the same as described earlier.
For the wire frame of one petal, you need to cut 2 pieces of wire, the length of which will be 26 cm. We retreat 11 cm from the edges. And twist the pieces with each other. Connect the two ends to form a loop.
Now each free tip is wound onto a thin stick - this is how the edges are wavy.
We wrap a template with a diameter of 6.5 cm with wavy wire and twist the ends. This is how it should turn out.
Thus we will make 6 blanks.
We cover each one with a nylon square and secure it with thread, and cut off the excess.
We make stamens from cotton swabs, painting them brown. We collect five together and secure them by screwing them with a wire around a skewer or wire - a stem.
We collect the finished petals around the stamens: first 3 in a circle, then the next 3 between them.
All that remains is to disguise the connection of the leaves and stem with corrugated paper.
We make the leaves in a similar way, skipping only the twisting of the wire to create a waviness. We attach them to the stem.
Our wonderful lily is ready!
Another option for winding threads
Those who are interested in how to make flowers from wire and thread can try other ways to create them using the Maltese traditional ganutel technique.
In particular, there are several options for winding threads onto a frame blank. For example, you can do this:
- fasten the thread at the base of the frame;
- wind it around the frame like a reel, passing it between the turns of the spiral;
- Having reached the top of the petal, make a revolution around the spiral;
- pass the thread through the middle of the frame all the way to its base;
- secure the thread with a loop at the base.
First steps
Wire-based products amaze with their beauty. I would like to join this art and also create something beautiful. However, in order not to encounter the beginner's disappointment syndrome, you need to start with simple crafts, gradually complicating them.
The first steps in weaving can be simple contours of animals, fantasy people, and various objects. For example, to make a simple Christmas tree, it is enough to bend the wire, why bend its halves symmetrically.
If you make blank rings, and then connect them in groups of three to five pieces with another ring, you will get a simple bracelet. A garland of rings will decorate a child's room. Children from preschool age and older are gladly involved in the work of creating wire products.
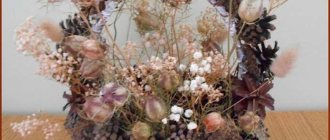
Creating a composition using the ganutel technique: what you need
For this craft you will need:
- 60 g multi-colored beads;
- wire with a diameter of 0.7 mm;
- knitting needle for winding springs and creating blanks;
- bead wire 0.4 mm thick;
- silk threads with a metallic sheen;
- scissors;
- beads for the flower core;
- floral tape;
- glue gun;
- ruler;
- pliers;
- plate;
- decorative butterfly made of beads.
Money Tree
Familiar objects sometimes become boring, you want to refresh the interior, add new interesting things to it. The money tree seems complicated, but in practice it is easy to create if you have basic skills in working with wire. You will need:
Beading. Needlework. Decorative branches. Flowers. Master Class. Step-by-step MK for beginners.
- copper wire of the required diameter;
- large and small beads;
- decorative coins;
- needle nose pliers;
- needle file;
- silicone-based glue for covering cuts.
There is no specific algorithm for creating a money tree. Everyone creates it the way they like. The common part is the barrel. Branches and curls with stringed beads are attached to it. The type of tree depends on the fantasy and imagination of the master.
Operating procedure
The creation of blanks is carried out in a slightly different way than described above. The procedure is as follows:
- the finished spring is evenly stretched so that there is approximately the same distance between the turns;
- insert a thick piece of wire inside;
- make a loop, for this purpose bend the workpiece using a bottle of the required diameter, and twist the ends together;
- give the petal or leaf the desired shape.
Next, proceed to winding the threads using the parallel method. For this:
- the workpiece is wrapped with threads;
- secure the end of the thread at its base;
- wrap the workpiece, moving upward, and without missing a single turn of the spring;
- finish the process in the middle upper part of the frame;
- the thread is lowered down;
- tension, bending the frame.
In the same way, other petals are made in the required quantity.
Bee
Prepare black and yellow chenille wire, a pencil or pen, and ready-made eyes for crafts.
- Wrap two pieces of wire, black and yellow, around the pencil so that they alternate.
- Take out the pencil.
- The black wire should protrude slightly from below, and the yellow wire from above.
- Form a sting from black wire; to do this, bend the remaining tail in half.
- Fold the protruding yellow piece two or three times, forming a round bee head.
- Glue the bee's eyes and antennae from pieces of black wire.
- Fold two horseshoes from black or blue wire and attach them to the body, you will get wings.
Some tips
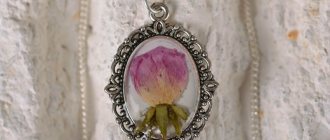
The best assistant for learning how to make flowers from thread and wire is a book. You can print the diagrams using a printer. They will allow you to create a sketch for an original craft. This way you can immediately estimate how much wire, thread, beads and beads you will need, as well as get an idea of the final look of the composition, boutonniere, tiara or other decorative item that you are going to make.
Using the ganutel technique you can make very beautiful and original earrings. To do this you will need a fairly strong wire. After the ends of the wire are tied, a “droplet” is formed. They put a metal bead on them. Then we wrap one end around the other three times and cut off the excess. A loop is made from the 2nd end. Attach a wire to it. Wrap the “drop” with multi-colored threads in the manner described above. The result is a very beautiful earring. Another one is made in the same way.
Now you know how to make flowers from thread and wire. Products created using the ganutel technique will become an original accessory for your wedding hairstyle, decorate the outfit of a little princess, or can be used as decoration for a headband, bag or boutonniere.
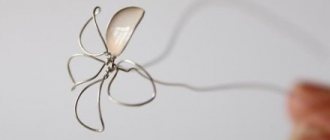
Butterfly
The Christmas tree and the flower were flat figures. The butterfly is considered a craft of a more complex level; in it you need to fill the void of contour details. The master class includes steps:
- Starting from the body of the butterfly, form the outline of the upper wings;
- By laying the wire along the body, they create the outline of the lower wings;
- The wings are strengthened by wrapping the body in a double fold;
- They move on to filling the voids inside the contours with beautiful curls;
- Pull the ends of the wire from above, cut off the excess, and twist the antennae.
The butterfly is ready. Using the same algorithm, you can create figures of animals, flowers, and people. The filled space inside the contour provides the product with a finished look.
Dog paw
You will need: white and black beads, felt, cardboard, a simple pencil, nail scissors, thin fishing line, a needle.
Master Class
- Print out the foot template and transfer it to felt.
- Thread a thin line into the needle and tie a knot at the end.
- Thread the needle in such a way that it comes out on the outer contour of the design and string a white bead.
- Catch the bead with a stitch, return the needle behind the bead and thread again.
- Sew on one white bead at a time, filling the first row (outline of the foot pad).
- Embroider the second row with black beads, then fill the entire footpad in rows in the same way.
- Embroider the outline of the outer finger with white beads and the inside with black beads.
- Embroider the remaining toes in the same way.
- Trim off any excess felt.
- Trace the paw onto cardboard and felt, then cut it out.
- Strengthen the foot in this way: connect the cardboard and felt (the cardboard should be between the felt), sew the edges of the layers by adding a white bead to each stitch.
The beaded dog paw is ready! It can be a brooch, a Christmas tree decoration, a decor for a gift, or whatever you want... Come up with your own design or figurine, select the color scheme of the beads and feel free to create holiday masterpieces.
I recommend watching this video!
Christmas decorations . Beading. Bell made of 8mm and 3mm stone
Watch this video on YouTube
Caterpillar
A child can create a simple caterpillar with his own hands.
Step-by-step master class on decorating the larva:
- Take 2 overcoat sticks of different shades and twist them together. Complete the twists without reaching the end of 4-5 cm (they will be needed to weave the antennae of the insect).
- Place the pencil in your left palm, with the lead pointing to the right. Then the pre-twisted fuzzy wires must be wound around the office supplies. You will get the body of a larva. At the end, it is advisable to narrow it slightly, so the process of weaving the spiral should be completed on a stylus.
- Turn the formed mustache slightly to the side, forming it in the head area.
- The upper part of the antennae needs to be slightly twisted.
- For the eyes, you need to glue small pieces of double-sided tape to the side of the pre-prepared plastic eyes and attach the blanks to the head.
Read more about fluffy wire
Actually, it is correctly called chenille wire. This is a thin flexible wire wrapped in pile of different colors. Its diameter varies from 4 to 15 mm. It is usually sold not in skeins, but in separate pieces, starting from 30 cm.
Once upon a time, chenille wire served only one purpose - with its help, smokers cleaned their pipes of tobacco ash. But one day, humanity made a discovery: it turns out that all sorts of cute crafts can be made from multi-colored pieces of such wire.
Gradually, the wire lost its original purpose (especially since almost no one smokes pipes now) and became primarily an ornamental material.
Wrist bracelet
An original decoration for a girl consists of large braided wire - an aluminum or fluffy model. On the outside there is a large decorative metal-cut stone.
Wire weaving is done according to the following scheme:
Three strong metal strings (elastic) are used as the basis. One of them is bent in an arc, the remaining two are twisted into a ring at the ends (the shapes should not be large so as not to interfere with the girl when wearing the product).
The next step is to assemble the bracelet: two short pieces of wire are screwed to the main string with intermediate turns of large wire.
The characteristic arrangement of the three components of the bracelet: the middle of the central string remains free, since it is on it that a stone or other decoration is glued.
It is important to first take measurements of the wrist of the future owner of the bracelet in order to model the product according to size.