You can make beautiful vases from almost anything. Therefore, today we bring to your attention a master class on a do-it-yourself plaster vase.
Gypsum is a fairly malleable material from which you can make anything you want. Plaster vases will look stylish and elegant, decorating your interior, or will be a wonderful gift for any occasion. After all, as you know, the best gift is a gift made with your own hands. And if, in addition, the gift is also as practical as a vase, then no further words are needed!
Let's watch a few master classes on creating interesting plaster vases with your own hands.
From the bottle
To make a vase based on a bottle, you can even use ordinary rope thread. They wrap the product in a circle, trying to lay the thread as tightly as possible to the glued base of the bottle. Special glue must be applied, and there should not be a lot of it, as this may affect the appearance (the glue should not bleed through the thread).
This product can be used for decorative artificial flowers.
If you want to be creative, you can decorate the product even with ordinary buttons or the same thread, having previously dyed it in a contrasting color so that it contrasts with the background of the main material.
Plaster or alabaster
Gypsum and alabaster differ in strength and appearance. Gypsum is a more brittle material, but when it hardens, it produces a flat, smooth surface. Alabaster is more durable; after drying, its surface remains rough. You should choose the material based on the look you want to achieve from the craft and how it will be used.
It is worth noting that gypsum is sold both in craft stores and in construction supermarkets. Essentially, you buy the same powder, but it will cost you less in the construction department.
Decoration technique for a vase made of plaster “Old Stone”
Let's try to master the “old stone” technique.
- Wear rubber gloves.
- Spread bitumen wax on the surface of the walls with a brush.
- We remove the remains with a napkin.
- Take baby powder and sprinkle it on the surface.
- Using a new dry brush, spread over the surface so that the talc gets into each cavity.
- Melt the candles.
- Apply it to the surface of the vase with a brush.
- Let dry and polish with a soft cloth.
The talc in the wax will age the surface, so you get an amazing piece of furniture that can be displayed in a prominent place.
Sculptural and decorative items, various vases and other beautiful things can be made from plaster. This material is very easy to work with, takes on different shapes and is painted without problems. This building material has been used by people for a very long time. How to make a vase from plaster? Simple enough. In general, making products from plaster is very exciting. Moreover, gypsum as a material is absolutely safe.
To create decorative products you need a lot of imagination and imagination. But first, you need to understand how to make your fantasy come true. This technique can be learned by molding the bodies of plaster vases. A do-it-yourself plaster vase is made as follows: a sheet of aluminum foil is placed between polyethylene sheets.
All this must be placed on matter, which is folded in several layers. Using a sharp object, squeeze out a pattern on the foil. The foil with polyethylene must be rolled into a roll and the joint must be glued with tape. This roll should be fixed on a sheet of cardboard. At the base, around the roll, you need to make a thick and durable plasticine roller.
Next, prepare a gypsum solution. Add gypsum powder (350g) to water (120ml). You should wait a minute and mix thoroughly. The result is a creamy thick mass. Afterwards, the infusion must stand so that the air comes out of it. This solution is carefully and slowly poured onto the bottom of the mold in a three-centimeter layer. And leave it to dry for half an hour.
A jar or glass is placed on the resulting foundation, the diameter of which should be no more than 6 centimeters. This glass will be the inside of the vase. The glass should be exactly in the center. Several pebbles or another heavy object are placed inside it. This is ballast. The gypsum solution is poured into the space between the glass and the outer wall using a funnel.
The solution should not get inside. To do this, you can fill a glass with paper. To release air bubbles from the solution, the structure must be slightly shaken. In half an hour the vase will be ready. All that remains is to free it from the outer shell. In order to decorate a vase, you should first sand its edges with fine sandpaper. And then you can use all your imagination to decorate it.
Sometimes tin cans are used instead of glasses. You can simply wrap it in old knitted fabric or thick crumpled paper. This material is attached to a can and several layers of gypsum mortar are applied to it. It is better to use decorative plaster, but construction plaster is also suitable. You can put both dried and fresh flowers in such vases. After all, their base perfectly holds liquid for flowers.
Unique interior decorations, created with your own hands and to your own taste, are always valued more than any, even the most expensive, purchased products. Plaster stucco molding is a huge field for creativity. Many people think that only professionals using special equipment can work with plaster, but this is far from the case. A master class on creating a beautiful vase from plaster quickly and easily with your own hands will help even beginners without any special knowledge and skills to start working in this technique.
This is not a difficult and exciting activity, the main thing here is desire and accuracy. In the future, you will be able to create beautiful products of any complexity.
A Little-Known Method for Forming a Tree Trunk Using Hot Glue
I decided to take a little break from administrative work on the site and post a useful article. In general, when you run a blog and set everything up yourself, you come across such a jungle in which there is absolutely no “boom-boom”... you have to sit and figure out for hours what and how. Anyway. I have exclusive material for you - the newest way to create a tree trunk. Yes, yes, from hot glue. He's so handsome! Hot-melt gun and various glue sticks for it.
A mixture of gypsum and PVA glue
As a rule, the trunk of a beaded tree is formed using a standard mixture of gypsum and PVA glue (1:1), simply apply the mixture with a brush to the trunk and branches, and add texture and relief by drawing bark on the mixture with a toothpick or other object. This is what most bead weavers do. Bonsai pine “Emerald” from my album on BI. Here the bonsai trunk is made from a mixture of PVA glue and gypsum. Birch tree made of beads, also a photo from my album on BI. Gypsum trunk.
Some have gotten the hang of shaping a tree trunk using polyurethane foam, but although it is light, it is, as you might guess, fragile and fragile. The hardened mounting foam can be pierced with a finger without much effort, therefore the trunk of a tree made by a craftsman with his own hands is easily damaged.
I present to your attention the most durable method! Take a closer look at it! Few people know about a quick way to form a barrel using a hot glue gun; it is also called hot glue.
The products in which this method was tested turned out to be durable, and they do not need varnishing if varnish-based paint, such as the one in the photo, is used. This is because the paint applies easily to hot-melt adhesive and is not absorbed, as is the case with a gypsum mixture.
I’ll tell you more about this fast and low-cost method.
What we need:
- semi-finished tree, that’s what I call a tree that is ready for planting, or it can be already planted, with an uncovered wire trunk,
- heat gun (hot glue) and 1-2 rods for it (for a small tree 25 cm high, one rod is enough)
- a clean wooden stick or skewer.
Important! Take the time to apply hot melt glue to the entire surface of the barrel. It is better to do this, as athletes say, in one jerk.
The process of making a barrel from hot glue
Let's get started! Turn on the heat gun with the glue stick. With one hand we hold, twist, turn the tree, and in the other hand we hold a pistol. Armed! First we apply glue to the branches, then to the trunk. We try to squeeze out the glue in an even layer; we can use a wooden stick to smooth out the glue where there are joints or where there is more glue than needed. You can also use a stick to apply glue where the tip of the gun cannot be reached. When we move on to the trunk, you can place the tree on a table covered with newspaper, because hot-melt glue leaves a “cobweb” and can drip onto the table.
During work, we make sure that the thickness of the branches towards the trunk consistently increases, as on real trees. Small branches should turn out thin, large ones should be thicker, and the trunk should be even thicker.
With a wooden stick you can also imitate natural logs or knots, and other bulges of the trunk, as if twisting freshly applied glue with a stick. You can draw the bark a little. But it won’t be possible to draw clearly, because... the glue sticks to the stick and hardens quickly. When working, we periodically clean the stick, wiping it on newspaper and removing as much of the “glue web” as possible.
Important! At the end, the glue must be applied to the base of the trunk with a transition to the ground (on the ground), slightly overlapping. This will give you a natural thickness of the trunk and reliable support for the tree.
We are waiting for everything to dry and set.
What's good about this method?
There is no need to wait long - the glue hardens very quickly (1) and after 15 minutes you can already paint the barrel. I used solvent-based paint in a glass bottle, this kind of paint is sold in construction stores and costs about 120 rubles.
With such paint, there is no need to open it with varnish, because the hardened hot glue (aka melted rod) has a very dense structure, therefore, as I already said, the paint is not absorbed (2). It is enough to cover the barrel with paint, maybe in two layers. And voila - the trunk is already shiny and, moreover, repels water.
After painting, you can decorate the product and.. done!!!
That's all the tricks!
I came across this method of forming a trunk on the Internet only once, and then without details. That's why this article was born. Sorry that there are no photos of the process itself.. I don’t have semi-finished products for clarity. But I think everything is clear. Truly a wonderful idea!
Where to apply this method?
Hot melt glue can be used to form the trunk of massive bonsai, because... they do not require a ribbed trunk surface, unlike birch and similar trees. A smooth trunk will also work for small bonsai, especially if you were ordered an office version - it’s easy to wipe off dust.
This bonsai is an example for inspiration for patient masters of sculpting from cold porcelain and polymer clay. When you make the leaves for such a bonsai, be sure to make a trunk from hot glue - strong and powerful!
Most needlewomen, and I too, try to make our work natural, so that there is a matte, realistic trunk. However, as practice shows, customers prefer gloss and shine. And the hot-melt adhesive barrel shimmers with gloss due to its smoothness.
This is such a great way! And quickly and beautifully!
In general, hot melt glue is a universal thing, but it still has one drawback - it is afraid of frost. If you want to glue the heel on your boots with a heat gun, then when you go out into the cold, you will simply lose it before you get to repairing the shoes))).
But we, needlewomen, do not need such a property as frost resistance of trees. Therefore, sculpt the trunk of a bonsai or other tree with hot glue and don’t be afraid of anything. It's simple!
Try and improve. I wish you success!
farfor-biser.info
Floor vases made of plaster
Now you can start casting. With the help of such molds, floor vases are made from plaster with your own hands.
First, the halves of the form are connected and fixed by wrapping them with twine, adhesive tape, or electrical tape. The filling principle is similar to that described in the “Master Class” chapter.
The resulting craft is coated with paint, varnish, or a design is applied. If desired, leave the vase white.
How to dilute plaster for crafts
Depending on the task, the solution can be of different thicknesses:
- Liquid – 1 kg of gypsum per 0.7 liters of water.
- Normal - 1.5 kg per 1 liter of water.
- Thick – 2 kg per 1 liter of water.
To prepare the solution, you need to take a suitable container. Fill with water first - this will reduce dust. Then slowly add the powder, stirring constantly. It is convenient to mix large quantities with a drill and whisk. There should be no lumps in the solution.
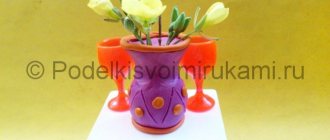
Master class on a do-it-yourself plaster vase to look like an old stone
This master class describes one of the simplest and most understandable techniques for making a vase, and the result will be gorgeous! To make a vase you will need:
- Two packages of plasticine (color is not important, plain color will do)
- Two paraffin candles
- About 20 g of liquid soap
- Low bottle with medium neck
- Dry gypsum (500 – 1000g)
- Cling film or plastic bag
- Cotton fabric
- Any dried herbs with stems, ears of wheat or oats
- Baby powder
- Bituminous wax and brushes
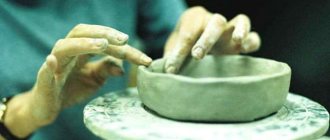
Stages of making a vase from plaster: First, we roll out 5 layers of plasticine: 2 wider, 2 narrower and one oval for the bottom.
Lubricate one side of the plasticine blanks with soap and lay out dry plants. We press them in so that the outline is imprinted, forming a clear pattern.
We collect the blank into a vase with prints inside. The main thing is to pinch the edges well so that the plaster does not leak out later.
We wrap the bottle with cloth and 5–6 layers of cling film and place it in the center of the vase.
We dilute gypsum powder according to the instructions. Holding the bottle, pour it to the middle of the vase. When it begins to harden slightly, fill the remaining portion to the brim. The drying time of the gypsum is usually indicated on the packaging, but if it is not there, it is better to wait 3 hours before removing the bottle. After this, leave the vase for another 2 hours and remove the plasticine.
The vase is ready. Now you can decorate it.
- Wearing gloves, apply bitumen wax with a brush. Carefully remove the remains with a napkin.
- Sprinkle the surface with baby powder and spread it with another brush.
- Having melted the candles, apply paraffin with a brush.
- We wait until the vase dries and polish it with a soft cloth.
Crayons
Stained gouache or white plaster makes excellent chalks for drawing on asphalt. To do this, you need to line the toilet paper rolls with film and tighten one of the edges with it so that the plaster does not spill out, pour the solution inside and let it harden for 24 hours.
After hardening, the shape is cut off and you can draw with crayons. The crayons can be made thinner, but for this you will need to take a narrower shape or make it yourself from thick cardboard or plastic.
Gypsum is a very plastic material; it can be used to create a wide variety of crafts for the home and garden. Ready plaster can be painted, painted, or varnished. If the craft is planned to be one-color, you can dissolve gouache of the desired color in the water in which the solution will be diluted. Then the concrete will immediately turn out colored.
Continuation of the "banquet"
- We dilute the plaster according to the instructions for it.
- Fill halfway, holding the bottle.
- As soon as the solution begins to harden, add it to the brim.
- Hardening time - look at the plaster packaging, but if you don’t find it, don’t touch the mold for 3 hours.
- Take out the bottle and leave for another 2 hours.
- We remove the plasticine and get the finished product.
Where to buy plaster for crafts
The easiest way to buy plaster is at a hardware store. In order not to get confused in the variety of its types, you need to be able to read the labeling.
The numbers after the letter “G” indicate compressive and fracture strength and purpose:
- G2...7 – building gypsum (alabaster).
- G13…16 – high-strength molding
- G22…25 – super durable medical
G6...16 is best suited for crafts. Next are the letters indicating the setting time:
- A – quick-hardening, 2 – 15 min.
- B – normal hardening, 6 – 30 min.
- B - slow-hardening, 20 minutes - several hours or days.
Next is the grinding fineness in Arabic or Roman numerals:
- 1 – rough
- 2 – average
- 3 – thin
For example, G-7 A1: gypsum, withstands 70 kgf/cm2, sets quickly, has large particles.
Carton boxes
When throwing away a juice box, few people think that it can be used to make an excellent vase or flower pot.
We will need:
- juice box;
- gypsum;
- brushes;
- a plastic cup or other container of the depth you want to create a hole in the vase;
- acrylic paints.
Cut the box so that you get a cardboard vase blank of the height you need. Dilute the gypsum to the consistency of thick sour cream and pour it into the box.
While the plaster is still wet, place the cup inside the box of plaster, creating a hole for the plants.
Leave the vase until completely dry. Then carefully remove the box and take out the glass. Sand the surfaces with sandpaper. The vase is almost ready, all that remains is to decorate it.
We chose the method of applying paint with a lace stencil. To do this, we took lace ribbons and secured them to a plaster blank.
Spray paint the entire surface of the vase, you can also cover the inside. Let the paint dry completely and remove the lace ribbons.
This vase can be used as a pot for succulents or, if you have made a deep hole, you can put flowers in it.
Another option
This master class is a little more complicated, but nevertheless it is very interesting to make such a vase, and it will look simply gorgeous in the interior!
For work we will need:
- gypsum;
- plasticine;
- twine;
- form for filling (you can use a baking form of a suitable shape and size);
- shells (you can use any small parts).
Article on the topic: Crochet openwork hat for a baby: master class with video and photo
Cover the filling mold with baking paper. We roll the plasticine into a sausage and roll it out to the size of the mold and, accordingly, the future walls of the vase. We dilute the gypsum to a thick sour cream.
We make imprints of shells on plasticine, then place it in a mold. Fill it with plaster to a depth of 3-4 cm. In total, you will need 5 walls for the vase (you can make it triangular or rectangular).
Until the plaster has completely hardened, after about 10-15 minutes it must be carefully removed from the mold. Leave the finished future walls of the vase until completely dry.
When the tiles are dry, you need to drill holes on the sides. We connect the tiles and tie them tightly with twine.
We place the assembled structure vertically and fill the bottom with plaster. After 15-20 minutes, remove the walls, level the bottom to the shape of the vase, and leave until completely dry. We drill holes in it to connect to the walls.
Now you need to paint all the parts. You can use acrylic paints of any color. Or you can use improvised means. For example, the color of a vase like in the photo can be obtained by mixing shoe polish with vegetable oil.
Then we coat all the parts with varnish and tie them together with twine.
Of course, you don’t need to pour water into such a vase, but you can put a small glass or plastic container in it so that you can put fresh bouquets in the vase.
Thus, making vases from plaster is quite easy; even a child can do it. Of course, under adult supervision. The main thing is to show imagination and the desire to get an original vase.
Vase decorating ideas
The decoration of the finished product is of particular importance. This is what can make a vase unique and inimitable. A wide variety of objects can be used as decorative materials.
Dry branches and wood cuts
They can be attached to the container using glue, double-sided tape, and then tied with a beautiful ribbon or lace.
Shells
It’s easy to decorate a vase made of any material with shells, but they look especially interesting on plaster.
Leg-split
This is one of the fastest and easiest ways to decorate a jar, bottle or cardboard tube.
Buttons and beads
They look interesting in any form: natural or when only their texture is visible, for example, from under plaster.
Spray dyes and glitter
A vase with this coating is made very quickly and is perfect for festive events.
There are decoupage napkins in a variety of themes, so you can create a vase in any style. For example, like this kitchen decoration, which can be used not only for flowers, but also for fresh garden herbs.
Cardboard, corrugated or crepe paper
You can twist different parts from paper and then glue them to the vase. Or simply wrap the container in beautiful corrugated paper.
A bright, original vase will be a worthy decoration for any room, especially a child’s room.
Such stylish vases will become the “highlight” of any interior, bringing harmony and beauty to it. And making them yourself will not only save the family budget, but will also give you an excellent opportunity to show your imagination and turn creative ideas into reality.
Do you think that only professionals can work with such a fragile and quickly hardening material? You are deeply mistaken, because now you will see one way in which you can make plaster vases with your own hands in a short period of time. To do this, you will not need to purchase an expensive segment, but you will have to carefully carry out all stages of the work. The main thing is patience and a little skill.
And you will also have to visit last year’s field, where ears of wheat or oats grew. Do you think that there is nothing there after the snow? In vain! After the water recedes, you can find so many interesting things! Moreover, this variety of herbs will be needed to create an amazingly beautiful relief on a future piece of furniture.
How to fix topiary in a pot without filling
Method III. Securing the trunk with stones or chestnuts
We fix the barrel in the desired position at the bottom and coat it with glue. We lay the stones tightly, leaving minimal gaps. Generously glue each layer. To secure the topiary in a pot, crushed stone, gravel, pebbles or any other stones are suitable.
The method is indispensable if you need to immediately continue working on topiary: the glue sets in 1-2 minutes. In addition, stones can be used to secure a trunk with a ready-made crown. For example, if the pot bursts when pouring alabaster and you need to quickly replant the tree of happiness, there is no time to wait for the new solution to harden.
, well-dried chestnuts and small shells are perfect The method is quick, simple and always available: you don’t need to wait for the plaster cast to dry.
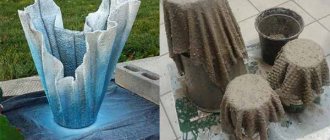
Plaster vases from scrap materials
Most often, when working with plaster, craftsmen use the casting method. In order to make a plaster vase with your own hands using this technique, you need to choose the desired shape. It is not necessary to prepare the mold specially. You can find something suitable among the materials at hand.
For work, use the main container of the required size. It can be a plastic or glass bottle, box, container, or tall beer glass.
It is also necessary to take care of the detail, thanks to which it will be possible to make a recess inside the vase. It can be of any shape. Only here the master needs to pay attention to its size: too large can lead to the fact that the walls of the vase will be too thin.
If a shaped mold with a narrow neck is used for casting, for example, a bottle, plastic or glass, then after the plaster hardens, it will not be so easy to remove the craft. The plastic can be cut and removed. And glass containers will have to be carefully split so as not to damage the hand-made plaster vase.
Alternative ways to fill a pot for a tree of happiness
A selection of unpopular, but also noteworthy ways to secure topiary in a pot:
- Filling with polyurethane foam.
- Fixing the trunk in cereals or pasta.
- Use clay, earth or sand.
- Filling with papier-mâché mass.
- Glass fastening.
- Fixation in foam.
- Fastening the barrel with plasticine.
Use alternative methods only if you are absolutely sure that this is the best option. In 99% of cases, plaster filling or fixing with stones is suitable for filling a topiary pot.
No title. Discussion on
Principles of a Natural Diet
1. Limit meat consumption . Reduce meat consumption to 1 time per day. This will reduce the level of toxins that poison the body.
2. Don't overeat . When eating, do not fill your stomach completely, that is, do not overeat (when you get up from the table, you should want to eat a little more). Remember, overeating is one of the causes of many diseases, especially the gastrointestinal tract.
3. Before lunch and before dinner, eat raw salads , in summer and autumn, from cucumbers, tomatoes, herbs; in spring and winter from carrots, beets, cabbage, apples, grated on a coarse grater. Add lemon juice or vegetable oil to the salad - 1 tbsp. spoon. The functioning of the stomach and intestines improves.
Master Class
The technique of casting a vase with a rectangular base is discussed in detail here.
To make it you will need a container: a milk or juice box, a container, a box, a box. It is important to choose the right size form. In this case, a plastic container is used to store cereals.
It is also worth taking care of the part for the recess. It is convenient to take a glass or glass bottle with a diameter smaller than the mold for pouring.
- The part to be removed is placed in a larger container. It is held in such a way that it does not touch the bottom of the mold.
- Plaster diluted with water is carefully poured into the void between the mold and the part to form a recess.
- Then you should wait a while for the plaster to harden slightly. During this period, the recess part is kept suspended.
- When the mass “sets”, the structure is left until completely hardened. Then the vase is removed and the uneven surfaces are sanded with fine sandpaper.
You can leave the vase white - it's very stylish. But if the master has a desire to paint a craft or make a drawing on it, then you should not resist him. The finished vase can be varnished.
Making molds for casting
Often you want to make a vase of a certain shape or repeat an already finished one. Then the master himself makes a mold for casting from a solution of gypsum or silicone sealant.
- Take a container slightly larger than the object from which the mold is removed. It will act as formwork.
- A mass (gypsum solution or silicone sealant) is poured into the bottom of the container.
- After hardening, the object itself is laid sideways on the resulting layer.
- The mixture is filled exactly halfway.
- The structure is left alone for a while.
- You can make a notch in the not yet completely hardened mass. These will be the “locks”, thanks to which the parts of the mold fit together precisely during the casting of the vase itself.
- Next, the structure should completely harden. This will be one part of the mold. You can check whether everything turned out correctly at this stage by removing the template from half of the mold. The mold removal sample then needs to be put back into place.
- The top layer of half the mold is greased with fat: glycerin, Vaseline, oil, cream.
- Fill the entire template with the mixture so that it is completely hidden.
- Wait until the mass becomes as hard as possible.
- Remove the mold halves from the container and separate them from the template from which the mold was removed.
Making a vase made using a box and plaster bandages
For this method you will need:
- Juice box or other container with regular shapes
- Plaster bandage
- Dry plaster
- Acrylic white paint or enamel
- Vessel for mixing the solution
- Cling film
- Paints and brush
We cut the box to the height of the future vase plus 1.5 cm. In the upper part we make cuts 1.5 cm deep, bend the edges, press them to the front side and wrap them with thread.
We place the box on cling film so as not to stain the surface with plaster.
Prepare a gypsum solution in a suitable container. You should get a mass of medium thickness.
We cut the bandages into strips of 40 cm and lower them into plaster.
Let's start sculpting. We wrap the prepared bandages on the walls of the box. We start working from the top, gradually moving down. Then we leave the vase so that it has time to dry.
Then we apply white acrylic paint and enamel.
After this, the base box must be removed. Now you can start decorating the vase.
You can paint the vase with colors of your choice or use various beads, buttons, scraps of fabric, shells and ribbons.
Cut off the neck and bottom of a liter plastic bottle.
We roll out a layer of plasticine and insert bottles into it.
Fill the bottle with plaster, but not to the full height. We wrap a bunch of wooden skewers with film and tape to make it look like in the photo:
Insert the bundle into the bottle, holding it for a couple of minutes if necessary.
When the plaster hardens, cut the film and tape and remove the skewers.
We take out the vase from plasticine. We cut and remove the plastic.
When the vase is completely dry, smooth the surface with sandpaper, cover with a layer of PVA glue and decorate the vase in any way to your liking.
Plaster vase
To make such a plaster vase, take:
- 2 liter plastic bottle;
- gypsum;
- gypsum putty;
- bandages.
When getting started, first cover the table surface (or other work surface on which you will make the vase) with cellophane or cling film. This should be done to make it easier to remove the plaster after finishing work.
We dilute the gypsum with water to the consistency of thick sour cream, wait until it sets a little. Then we lay out a circle - this will be the bottom of the vase. Place a bottle on top of this circle and begin applying plaster.
Note! You will have to work quite quickly, since gypsum tends to harden quickly.
Now we wrap the part of the bottle sealed with plaster with bandages and leave for 30 minutes so that the plaster dries. You need to cover it with plaster and bandages just above the middle so that later you can easily pull out the bottle.
Next, we dilute the plaster putty and apply it over the bandages. Then again a layer of bandages, and again a layer of putty. The lower part of the vase is ready. For the top one, you can take an additional form, for example, a plastic jar.
Related article: Burlap Christmas tree
We form the upper part of the vase in the same way - a layer of bandage, putty, another layer of bandage and a layer of putty. To make the vase strong and stable, you can apply several more layers of putty on top, and after complete drying, sand it with sandpaper.
We send the gypsum blank to dry for a day in a warm place. To paint a plaster vase, you can use acrylic or varnish paints.