Happy upcoming you!
We will soon begin to live in 2022, the symbol of which will be the white rat. Therefore, today’s selection is entirely devoted to creating mice from different materials.
Moreover, my daughter simply adores these animals for some reason. Such crafts are doubly interesting to us.
And the talisman of the year promises to bring something good to the house, I think everyone should have a mouse! And the fact that it will be homemade will only add comfort and atmosphere to the house. It will go well with our other crafts.
But you and I have already made so many New Year’s things! And a wreath and a Christmas tree. And Frost and the Snowman. A variety of crafts were taken to educational institutions, together they wrote a letter to the Snow Maiden and much more.
DIY symbol of the year 2022 from felt and fabric (with patterns)
I wanted to start with soft toys. And we will sew them. Let's start with felt products, because this material is very accessible and easy to use.
If you want to create a semi-volume or volumetric toy, then take a sheet of felt up to 1.5 mm thick. Then it will be easier to fill with padding polyester.
Here is a master class on creating a mouse in a boot.
Print this picture. The pattern is transferred to a sheet of felt 15*15 cm (inches are indicated in the picture).
We cut out two parts of the muzzle, cap and sock.
We will do it according to this idea.
On the face we embroider the eyes with eyelashes using stitches. Sew on the nose and use fishing line or thick white thread to make a mustache.
All that remains is to attach the ears and cap.
The seams are not final; we leave room for filling with padding polyester.
And insert the mouse into the sock. This is an approximate progress of work.
Below you will see a decent number of patterns.
For these mice, you can use any cotton fabric.
You want to pet such toys, they are so cute, so take fleece for the base.
This pincushion will become your assistant. Dense material such as satin or poplin is suitable.
Another simple idea. You can take thin felt or fleece.
Old jeans make such a beauty.
A fun idea for storing baby teeth. And the symbol of the year on the roof brings benefits.
Here's the pattern.
I also offer an original toy with an original design.
Similar toys can be reoriented bags. I saw that these are convenient for storing coffee beans.
Another simple idea.
All the patterns are very simple, the main thing when cutting is not to forget to leave 0.5 mm at the edges as allowances.
Sasha "Rat Lariska"
A sachet is a mini-pillow filled with solid filling with a pronounced pleasant aroma. As a rule, sachets are placed in laundry to give it a favorite scent.
For work we will need the following tools and materials :
- scraps of natural fabric;
- sewing threads;
- needle or sewing machine;
- beads;
- jute;
- bast fibers;
- glue.
How to sew a mouse: step-by-step master class
To begin with, we redraw the pattern onto an A4 sheet, like this:
Cut out the fabric:
We sew together the details of the ears and hem the lower edge of the body:
We tighten the ears with thread:
We sew down the muzzle, ears and body.
We lay a line from the nose to the belly and turn the toy inside out.
Sew on the beads.
We insert fibers into a wooden bead, glue them and carefully trim the ends. Sew on the nose by hand.
Now you need to fill the sachet :)
They can use:
- coffee beans;
- dried citrus fruit skins;
- spices;
- fragrant soap;
- Herb tea;
- spices;
- coarse sea salt mixed with essential oil, perfume or any other flavoring.
After filling, the body of the mouse needs to be pulled together with jute, leaving one long tail, on the edge of which the bead should be secured. Secure with a knot and you're done!
Volumetric crafts in the form of rats and mice for the New Year made of paper for little children
Now, it is important to note that most of the crafts we create are for our children. It is important for them to create and create something new; adults only guide. And children, especially small ones, most often like to use paper.
Therefore, below are easy ideas for making three-dimensional symbols of the year.
Idea No. 1.
You need to take a sheet of blue paper, some black, pink and white paper, scissors, a compass, glue.
1.For this beauty you need to cut out a circle. This is the body of a mouse. The diameter of the part is 10 cm.
Mark the radius from the middle and cut this line.
2. Roll the cone, tucking the edges under each other. Fix the part with glue.
3. From the remains of the blue sheet, cut out a strip of 1*5 cm (tail). Glue it under the body. And all that remains is to draw a heart, which will serve as the head for the craft.
To make the heart even, you need to fold the paper in half and draw a droplet from the fold. Cut and unfold the workpiece.
All that remains is to glue on the eyes, nose and ears. And tuck your ponytail.
The next option is a little more complicated.
Idea No. 2.
Let's take: white, pink, red, yellow and green paper, glue, pencil and scissors.
1.First of all, transfer the diagram to paper.
Cut out the details in the desired shade. We glue the muzzle from white blanks. Draw or glue on eyes and a nose.
We cut out a part from red paper and fold it into a cone onto the body.
We attach the head, paws, and tail to it. We’ll also make an apron for this housewife.
Idea No. 3.
You need to take a sheet of any double-sided paper, black paper circles for the eyes, and pink blanks for the ears. You also cannot do without glue and scissors.
1. You need to make blanks. We cut out a strip of 3*10 cm for the body. We cut out circles for the ears with a diameter of 3 cm. The tail is 0.5*10 cm
2. Let's take care of the torso. We bend two corners of a long strip inward, pointing towards each other. We fix them with glue.
3. Next, you need to mark the fold line of this triangle and bend it down.
Mark 2 cm, make a line and bend it upward. We retreat 2 cm and bend it down. We glue the resulting accordion from the inside.
4. Round the edge of the body strip. We also trim the ears.
5. Finish the craft: place the eyes, nose with antennae.
Glue the ears and draw stripes.
Idea No. 4.
You can repeat this idea with the little ones.
You need to take two sheets of colored paper, scissors and glue.
Cut out a circle from one sheet (you choose the diameter yourself, let’s say 6 cm). On a sheet of a different color we also draw a circle of the same diameter. cut out the blanks. At the same time we will cut a strip of 0.5 * 5 cm.
Bend both round pieces in half. Cut out a heart shape from one.
We bend its upper semicircular edges. Draw the eyes. Glue the muzzle to the body.
We roll the strip for the tail into a spiral and glue one end to the body.
You can make such a rat yourself.
It is made from a sharp cone.
Turn on the side keyboard with numbers
Have you ever wondered why on the keyboard, in addition to a row of keys with numbers, there is also a separate square block also with numbers? In fact, the order of numbers like on a calculator speeds up entering characters into the computer, especially if you enter them with one hand and hold the mouse with the other or take some notes.
But this numeric keypad can be disabled by a specific key or key combination. Let's figure out how to enable it:
For computer
For the standard keyboard layout there is a special key labeled Num Lock.
It is located immediately above the block with numbers. When it is activated, the indicator above it lights up, so you can immediately understand whether you have the side keyboard with numbers turned on or not.
For laptop
To save space on small laptops, the number pad was retained, but moved to the letter keys. At first glance, this may seem completely stupid, because the numbers are lost on the keyboard with other symbols. However, once you get the hang of it, you can easily begin to cope with it. To switch, you will need the same Num Lock key, which literally means “lock numbers.”
On some laptop models it will be called exactly the same, and on others it will be called NmLk, Num or NumLk. They can be located on the F1-F12 keys, all this is also done to save space. In this case, you need to hold it down simultaneously with the Fn, Alt or Shift function key.
It makes no sense to list for which laptops which key combinations will be correct. Over the past 20 years, many series of laptops have been released from each manufacturer, and each such release has its own key combination. It will be much easier for you to find this combination at random than to look for your laptop model in a multi-page list.
Symbol of 2022 made of rope and jute, made quickly and easily
Autumn cool toys are made from rope and jute. You just need to take the cord diameter no thicker than 4 mm. Otherwise, the craft will turn out very large and rough.
Now let's remember the technique of winding a thread around a balloon, soaking the whole thing with PVA glue. Do you remember? This is the technique we will use to create this mouse.
Here is a thin rope, a balloon and Moment glue (PVA in extreme cases), 4 pieces of thin wire, a pistachio shell for claws.
1.Inflate the balloon to the volume that is suitable for your rat. Let's start wrapping it with rope, passing it through the glue.
2. We make as many skeins as you want. The more windings, the denser the craft is. Leave the workpiece until the rope is completely dry. Then we burst the ball and pull it out through the rope.
You will need two similar blanks. One for the body is large. And two are small for the ears.
3. Take the wire. We bend one end of it three times, forming fingers. We take a rope, drip glue onto the tip and begin wrapping the wire.
4.This creates two upper legs. We fix them on the craft.
5. Repeat the steps with the wire and fix the lower legs to the body.
6. All that remains is to glue the ears in place and make a face.
Next, we will make a Christmas tree toy from jute rope.
This is the rear view.
Let's take a sheet of cardboard, black foamiran or paper, strong glue, jute and decor.
We fold the two ends of the cardboard towards each other. Let's turn it around again. Cut off the unnecessary edge.
The result is a similar blank.
Let's walk along the fold lines.
Now we glue the edges on top of each other.
We apply it to the cardboard and outline the wide part. It will need to be closed. For the part on the cardboard we make allowances of 0.5 cm.
We cut out the part, make slits around the perimeter with scissors and bend this “fringe”.
We insert the “body” into it and glue it together.
Take rope and glue. We drip glue onto the tip of the spout and begin to wrap the rope around it. We place the skeins close to each other.
We wrap it like this all over the body.
Cut out ears from foamiran or black cardboard. Insert pink parts.
Glue the ears to the head.
We form the eyes, nose and eyelashes.
Glue a loop to the back of the rope.
Cover the glue area with a heart.
You can add ribbon decorations.
How to make an applique in the form of a postcard with mice?
We made a lot of New Year's cards separately. But now the emphasis is on the symbol of the year. Therefore, here are several applications that you can sign and give to your family and friends.
For this option, you can take completely different options for colored paper. It can be glitter, self-adhesive, foil, etc.
We take this diagram and transfer the templates to paper.
Cut it out.
Let's form the basis. We glue only the ends of the tape to make it voluminous.
We form a background from a Christmas tree and gifts and decorate the ribbon with numbers.
Glue the mouse and decor.
Next is the idea of an applique based on a disposable paper plate. It can also act as a postcard.
Parts diagram.
We transfer them to paper and cut them out.
Making a Christmas tree branch.
We cut out the Christmas ball and decorate it with numbers. Glue the mouse elements.
Glue a ball, a branch and decor onto the base.
Next I will show you an idea that is made of paper strips.
I note that all strips must be the same width.
Circles and droplets are glued together from them. We roll the tail into a spiral.
We put the blanks into the mouse.
We glue the elements and transfer it to cardboard.
Here's another interesting postcard idea.
The nose, which was made from an egg tray, looks unusual.
What is the difference? wired or wireless mouse
YO Gadget Reviews
2 years ago
You want to buy yourself a computer mouse. But you don’t know which wireless or wired mouse to choose, if you don’t know how they differ and what advantages they have, what pitfalls they may have, then sit back, I’ll start the story. I will tell you in a very primitive way. For example, I took mice from one manufacturer, one with wire and the other without wire. Almost all modern mice are made with a USB input, who remembers the PS/2 input, like the video, it’s already hard to find mice and keyboards with such an input, it’s outdated. The USB input for wired mice is at the end of the wire, for wireless mice it is a sensor, when connected between the mouse and the device (computer), pairing occurs. It seemed that wireless technology was great, wired mice were supposed to become history, but no, they will be on the market for a long time. Find out further
The first thing that many people pay attention to is that for mice with a wire you do not need to spend money on batteries and accumulators
These mice are limited by the length of the cord, usually 1.2 - 1.5 m. Also, when working, the cord does not give complete freedom of action, and sometimes gets in the way. (can be annoying) For those who have small and not so small ones, pulling out the cord is a common occurrence. Let's move on to wireless mice, they use AA or AAA batteries or accumulators, mini finger or finger type, as I already said, this is an additional waste, this mouse requires one battery. The downside is that the battery may run out at some inopportune moment. For my own mouse, I bought spare batteries that I can quickly replace. I also saw very often how wireless mice are used for presentations or slide shows; it can also be used as a remote control while sitting on the couch, especially since the distance in this mouse allows you to be at a distance of 10 meters. Installation is very simple, just insert this transmitter into the USB input and the operating system itself will detect the mouse. Wireless mice can also be accidentally dropped from the table, but anyone who has encountered this knows. Also, one of the advantages, or more precisely the absence of a wire in a wireless mouse, will not be chewed by your pet. I’ll also say about batteries, the more expensive the mouse, the longer the batteries will last, and, of course, you need to look at the capacity, the more the better. Which mouse do you prefer, write about it, what other advantages and disadvantages there are in wireless or wired mice that I did not mention. I also recommend watching a video about a wired backlit mouse. Be sure to subscribe to yo gadget and like it. ************* Connect to AIR here https://join.air.io/go_air ************* Subscribe to new reviews of “Yo gadget” https ://bit.ly/2hmJ9p0 ************* We will be glad to receive any amount that does not burden you https://bit.ly/2mwiiJP
How to make a wired one from a wireless mouse: instructions
Craft mouse (rat) from waste material for the New Year 2022
Now let's see what can be made, using your imagination, from unnecessary waste material.
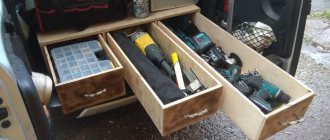
Let's start with an idea made from toilet paper rolls.
For example, the bushings were cut into strips 1 cm thick and folded into a mouse.
These bushings were used to glue together a stand for the office.
Another stand option.
To do this, the couples took a bottle of drinking yogurt and wrapped it with rope.
For the head we used purchased wooden blanks.
Wine cork idea.
More cork pendants.
Lots of fuzzy chenille wire? Here's an idea for using it.
Master class on making the symbol of the year from chenille wire and foil.
1. Form a droplet from foil.
2. Make a hole in the narrow part with an awl. Drop hot glue or Moment inside and insert one edge of the wire.
3. Periodically coat the foil with glue and wrap the wire around it.
4. We wrap the entire body. Then we make a hole in the wide part of the body with an awl, drip glue inside and insert a piece of wire. We bend it and get a tail.
5. For the ears, the wire needs to be twisted into a spiral. We fix them in place.
6. All that remains is to add the eyes and nose.
If desired, decorate with bows or beads. You can glue a loop for hanging.
You will have such animals in literally 10 minutes.
Muzzles.
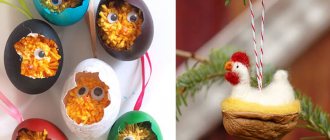
Let's look further at the ideas. Here, for example, is how half a walnut shell was used.
For decoration, we planted the craft on a cut tree.
Did you go into the forest and pick up some pine cones? These are the mice you can get.
Here is a photo that clearly shows the process of making them.
I liked the option of using a disposable plate.
A whole composition from an egg tray.
If you have an old CD left, use it.
A tea box will also make a wonderful stand for small items.
Fantasy is limitless, do it to your heart's content.
The touchpad on the laptop does not work. What to do?
Every day the popularity of laptops is increasing, and there is one main reason for this: a laptop allows you to perform all the same functions as on a desktop computer, but without being tied to a specific workplace. The touchpad not working is one of the most common problems for laptops. This article will be devoted to this topic.
A touchpad is a touch panel that serves as a full replacement for a mouse. In most cases, the touchpad recognizes several gestures, for example, simultaneous “clicking” with two fingers on the touchpad will be equivalent to pressing the right mouse button.
Below we will look at several methods that can help fix the problem with the touchpad not working. Start from the very first and move on as needed.
First, you need to determine the nature of the touchpad's inoperability. For example, the touchpad may not respond correctly to touch, but will still work, or it may not respond at all.
The touchpad responds, but does not work correctly.
First, you need to make sure that the hands with which you touch the touchpad are clean and dry, and just in case, wipe the touchpad itself with a damp cloth to clean it of dirt.
If the incorrect operation of the touchpad is clearly not due to contamination, you need to check your Windows settings. To do this, open Start and select Control Panel. Use the search in the upper right corner and open the "Mouse" menu.
In the window that opens, go to the “Pointer Options” tab, where you check the arrow speed parameter. If this parameter is too low or too high, move the slider to the middle and save the changes.
The touchpad does not respond to touch.
1. If the touchpad does not respond to your touch, you can assume that it is disabled.
Some laptop models have a special button next to the touchpad that activates the touchpad.
You can also turn the touchpad on and off using a keyboard shortcut. Typically, the function to enable or disable the touchpad is located on the F9 key (the key may vary) and is activated by simultaneously pressing the Fn key.
Try pressing this key combination once and check the functionality of the touchpad. Most often, messages will appear on the laptop screen indicating that you have activated the touchpad or, conversely, disabled it.
2. If a USB mouse is connected to the laptop when the touchpad is not working, try disconnecting it, because Some laptop models automatically switch operation from the touchpad to the mouse.
3. Check the availability of drivers that are responsible for the operation of the touchpad. To do this, open Start and right-click on the Computer menu. In the pop-up context menu, open the “Properties” item.
Expand “Mice and other pointing devices” and check for drivers. Normally, you will just see the device name. If you cannot see the name of the device, or there is an icon with an exclamation mark next to it, you should look at the drivers.
If the methods described above did not help you fix the problem, then it is likely that the cause is not software, but hardware. And here you need to contact a service center, where they can replace the touchpad.
Master class on making a mouse from a sock for school with your own hands
Now for a detailed master class on how to make a cool rodent from a sock.
It can stand on its back or lie down.
You need one sock, contrasting fabric, thread and needle, scissors.
1. Straighten the sock and draw a droplet in its wide part.
2. Cut it out and turn it inside out.
3. Cut a strip of 3*15 cm from contrasting fabric.
4. Fold the edges and stitch them on the machine. Immediately tie a corner at one end.
5. Place the strip inside the sock, leaving one small part outside and sew the workpiece not all the way. leave room to turn the part out.
6. Fill the toy with padding polyester.
7. Sew up the edges, forming a seam perpendicular to the fold.
8. Add eyes and nose.
Remember the craft by giving it different shapes.
You can decorate it with a bow.
We cut out ears from felt or foamiran and glue them onto the rat.
This is what we get!
How do you like this New Year's animal?
Self-Assembly Guide
First you need to decide for what purpose you want to build a computer. A typewriter, a workstation, an entertainment center, or maybe even a server? Next, evaluate your budget in the categories selected above and select the PC components that are optimal in cost to complete your tasks. Prepare a tool: a Phillips screwdriver, a flathead screwdriver, and in some cases a knife may come in handy. Elements for fastening parts inside the system unit may be included with the case, or you can purchase (borrow) them yourself from a store that sells computers. Purchase all the necessary computer components (motherboard, processor, memory modules, hard drive, case, power supply) and don’t forget the monitor, keyboard and mouse in order to assemble a fully working kit.
Symbol of the year - Christmas tree toy
So, now let's see how to make a simple Christmas tree toy.
This is what the crafts look like when they’re just lying there.
All materials are indicated in the photo.
For the base, we will take purchased wooden or foam blanks in the shape of an egg.
Next, cut two strips of thin tape, 0.5 cm wide and 7 cm long.
And one strip, 23 cm wide, of the same tape.
We form loops from the first two and glue them to a wooden piece. These are ears.
We form a loop from the long one and glue it on the opposite side - this is the tail.
We take the rope and begin to wrap the workpiece, lay the rows tightly, and periodically fix them with glue.
We bend the ears and continue wrapping the body.
This is what you should get.
All that remains is to glue on the eyes and nose.
And now you can hang this mouse by its tail on a Christmas tree branch.
What is the difference between a wireless mouse and a wired one?
Many may think that the difference between one of these devices and the other is that a wired mouse has a wire, while a wireless one receives power using batteries or an accumulator.
In general, this is true, but if you delve a little deeper into the question, you can find many other important differences:
- Firstly, there is a difference in size. Wired mice are always a little larger in size, as their equipment is somewhat more complex. The same applies to weight, although both weigh insignificantly.
- Secondly, wired mice respond much better and faster than wireless ones. That is why they are more often chosen by gamers and computer users, for whom seconds of braking can be a huge hindrance. Yes, wireless mice work exactly the same as wired ones at the beginning of use, but as the battery or accumulator is discharged, characteristic stutters and slowdowns appear, and choppy controls may begin to interfere.
- The third difference follows from the first. The lifespan of an average wired mouse is 10 years, while a wireless one is only 3.4 years. This is a significant difference, and if you do a little math, even the difference in cost does not cover the costs.
Mice made from scrap materials
Most often there are children's materials on hand. For example, plasticine. It makes great mice. Here are the detailed diagrams.
Making Mickey Mouse.
Another cool master class.
A simple idea from a spiral.
If you have a small piece of fleece or fur, here's a quick idea.
You need 2 pieces of foamiran, a string for the tail and a piece of fur for the body.
We cut the fur diagonally. It turns out to be a triangle. We coat the edges with glue and connect.
Turn the workpiece inside out.
We tuck all the irregularities inward and seal the back.
We cut out droplets from foamiran squares.
Glue the ears in place.
We fix the eyes and nose from beads and glue the tail.
If you have cold porcelain at home, then here's an idea for you.
Take white materials to make a symbol of the year.
Disassembling the rotation angle sensor
To disassemble it, you need to straighten the metal legs holding the plastic body of the sensor.
Then, by slightly moving the encoder base, you can easily pull out the plate, which is installed to limit the scrolling pitch by clearly fixing the position of the petals on the contacts. After it comes the disk itself with copper petals.
Most often, the breakdown is caused by the fact that the copper petals, systematically sliding over the same place, wear out the body and contacts over time, leaving indentations on them. Due to the particles of plastic that the petals drag (from the body to the contacts), the conductivity of the signals deteriorates, that is, the contacts “get dirty”.
Mouse holder for a gift
Together with your child, you can sew oven mitts and give them to grandmothers.
Here's a template for you.
We transfer the diagram to the fabric.
Sew on the ears.
And the nose.
We sew the pattern onto a thick backing that will protect it from burning.
We turn the part inside out.
Insert the tail.
Smooth out all the details.
More details on how to sew potholders are shown in the video.
Assigning hotkey shortcuts
This method requires preliminary preparation and is not suitable for users whose mouse has suddenly failed. Its essence is that for each shortcut you can assign any key combination not occupied by the system. To do this you need to take the following steps:
- Right-click on the shortcut you are interested in.
- Go to properties.
- Click on the field called “Quick input” and hold down a convenient key combination.
- Click OK.
That's all. If you have a lot of free time, you can assign hotkeys to almost all shortcuts on your computer. This will help partially avoid using the mouse.
Patterns of New Year's mice for cross stitch
Of course, I can’t ignore those who like to cross-stitch on canvas. I have selected 6 schemes for you.
Second scheme.
Another one.
Mouse with candy.
With a Christmas tree.
Sixth scheme.
They are easy to transfer to canvas. Or you can simply print it out and repeat it on fabric.
Stuffing parts with filler
Attention! Filling for toys can be different. The most commonly used are synthetic fluff, holofiber or cotton wool.
The latter is softer, but does not hold its shape for very long. Under no circumstances should toys with such filling be machine washed, as it will form clumps and the product can be thrown away. Foam rubber is used very rarely; it is quite cheap, but if used correctly it will last more than a year. The filler can be purchased at furniture stores or in factories, as it is used in the manufacture of mattresses. If you need a very soft toy, then it can be filled with scraps of knitted fabric.