5/5 — (55 votes)
Greetings to all! Maslenitsa week is approaching and, as everyone knows, there will soon be a performance dedicated to seeing off winter. And how can we spend the winter without the main character, and I mean the scarecrow of Maslenitsa.
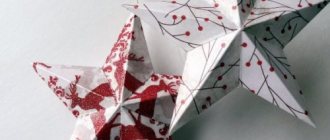
Every year she appears in the winter spaces, she is made from different materials, but in most cases from straw, and then wrapped in a bright painted beautiful fabric, the result is such a big funny girl that looks like a doll or a grandmother.
Usually on this day there is a fair, where, of course, according to tradition, the most important dish is pancakes, so tasty and lacy that you will simply lick your fingers, because it is always more fun in the cold, and even with company. You can also see all kinds of exhibitions with various handicrafts made by yourself.
At the very end of the holiday, it is burned at the stake and at the same time they welcome spring, which means the sun will burn brighter and the birds will sing loudly.
What is the name of the person who makes stuffed birds?
A taxidermist (from the Greek derma - skin, skin and taxis - preparation, processing) is a specialist in making stuffed animals and birds (stuffed).
Interesting materials:
Who voices the goose in Kung Fu Panda? Who voices Kolobok in The Last Hero? Who voices Krosh? Who voices Larisa in the cruel romance? Who voices Levi Ackerman? Who is the woman voicing Malysharikov? Who voices Mummy Pig? Who voices the cartoon Ice Age 3? Who voices Ninjago in Russian? Who voices Nyushenka in Malyshariki?
Hunting and fishing
This section is intended for those who would like to immortalize a trophy themselves.
I ask experienced taxidermists not to judge me for such a primitive method according to the professional standards. I receive requests of exactly this nature - how to make a stuffed animal for yourself as a souvenir, at home. Many years ago, I really wanted to have at home a beautiful pheasant or a spring drake - a shoveler, shining with all the colors of the rainbow in its breeding plumage. Exactly at that time, I met a soldier, the bus driver of our unit, whose father worked as a taxidermist in the museum of the Barguzin Nature Reserve. As soon as I got the teal, he showed me by example how easy it was to make a simple stuffed bird and small animal. Since then, I have made various birds using this method many times, and although many years have passed, in some offices in the capital they still admire my trophies.
The army of hunters is huge, and I think every second person would not refuse to keep the captured trophy, place a stuffed animal in the corner of his den, and, admiring it, remember the sweet moments of luck, telling his friends the details of that dawn.
Today, taxidermy has developed so that you can even order the eyes of any game, or a finished model made of foam, where all that remains is to properly stretch the skin. But let’s leave this activity for those whose goal is to earn money.
Agree, getting it and eating it is not particularly difficult, but making a stuffed animal is no longer just a hunt, but a memory for many years about a particularly successful day.
My lessons are to help those who cannot afford to buy a stuffed bird or animal for a lot of money, but have a great desire to have a stuffed animal from the trophy they got.
There are many ways to make a stuffed animal, but it is unlikely that a taxidermist will reveal the secrets of his skill; rather, an amateur will do it. As a rule, the web contains only a description and few general pictures; it is difficult to understand from them how this is done.
I will describe how to do this in simple language, with available materials, and drawings of the action that I drew myself, so do not judge these drawings strictly for their “unartisticness.”
The made stuffed animal will be stored for at least 10 years, reminding of the past hunt. Let me make a reservation right away, this is not the dressing of the skin of a bear or wolf, but a simple perpetuation of a small animal or bird, for example - muskrats, ermine, squirrels, minks, and almost all types of birds, except for the ostrich of course.
The best stuffed birds come from spring birds, when the fat layer is not so thick and the males shine with brightly colorful outfits. But for the first time, it is best to take an ordinary crow, which can be caught at any time of the year, and its strong skin will help you quickly master the necessary skills.
So, the crow is in your hands. First, you need to put aside your disgust, be patient, have a couple of hours of free time and the necessary preparations.
Namely - threads, a needle, soft wire about 2 mm thick (for wood grouse, of course, twice as thick), starch, two ordinary light bulbs for a flashlight, cotton wool (can be gray, from old mattresses), a sharp knife, a little medical bandage and a stand for poultry, for example from chipboard, measuring 20 by 20 cm. It is better to keep the harvested poultry in the cold before cutting, there will be less smell.
Before cutting, “knead” the bird from stiffness, the legs and wings should rotate freely. Place the bird on its back and, spreading the feathers on its chest, make an incision in the skin. The incision must be made from the goiter, not reaching one centimeter to the butt, as shown in Fig. 1 .
Gradually peeling off the skin along with the feathers (try not to let the feathers fall out), dry it with starch from blood and mucus, and thus free the bird’s paws one by one, but not completely, leave the paw connected to the skin, as shown in Figure 2 .
Cut the legs from the carcass and free the bones from the muscle tissue.
Moving towards the tail (tail), cut off the tail so that all the tail feathers remain intact. From the drawing you will understand how to do this.
Plug the hole in the carcass where the tail was cut off with a cotton swab so that the insides do not fall out, and sprinkle the tail itself generously with coarse salt.
Release the wings as indicated in Fig. 2 , do not forget to dry the skin with starch, and try not to stain the feathers with blood.
Next, we remove the skin with a stocking, but if it is a duck, the head may not fit through the thin neck, you need to make an incision of about 3 cm in a narrow place, then it will all be sewn up and will not be visible.
When removing the skin from the bird's head, be careful when cutting around the eyes, save the eyelids and eyelashes, this is very important, remove the skin to the beginning of the beak - Fig3 .
Separate the bird's head from the neck at the very base of the skull, and remove all the contents from the head from the hole formed; this can be easily done with a piece of wire with cotton wool wound at the end.
After this, pour coarse salt inside.
Remove the eyeballs, dry them with starch, and lightly add salt.
Skinning is over, this was the most difficult task in taxidermy.
It doesn’t matter if there are tears in some places, just sew them up with ordinary threads from the inside.
Next, we will stretch the skin in the reverse order, but before that, secure a piece of wire with the skull, dragging it through the neck hole, as shown in Figure 4 , and make two loops, one for the wings, one for the paws, and bend it as in the figure, so that stick the remaining piece into the tail of the bird.
Choose the length of the wire approximately in proportion to the bird, because the carcass lies next to you.
Now crush the bulb base with pliers as shown in the picture and remove the glass part, it looks like a drop.
Light bulbs must be selected depending on the size and species of birds; raptors have large eye sockets and I used 12V car light bulbs.
Insert cotton swabs into the eye sockets, and stick these glass blanks into them. The volume of cotton wool and glass should be as large as the removed eyes of a bird. Now you can stretch the skin. Immediately straighten your eyelashes, eyelids, and adjust the glass balls. Glass eyes will give the bird a lively look, you will immediately see it.
From the head to the first loop, wrap a little bandage so that it does not slip, along the thickness of the neck, and pull the bird over it. Now we prepare four pieces of wire, two - long from the center of the carcass to the tip of the wing, plus about 10 cm, the other two - long from the center of the carcass to the end of the outstretched legs, plus 10 cm. On one side, these pieces must be sharpened with a file or emery.
Twisting the wire, we pass it along the wing bone from the underside to the tip of the wing, leaving it open for flight, and on the other hand, having made a couple of turns around the bone, we attach it proportionally to the loop, as shown in Fig. 5 .
We do the same for the second wing. We pierce the other two wires along the bone of the paws from the back side, and pull them out of the paw by 5 cm, wrap the other end around the bone a couple of times and attach it to the second loop, creating a proportion to the bird, no matter how lopsided it turns out.
We insert the remaining curved end of the wire into the tail tail of the bird. So, it turned out to be some kind of crucified disgrace, but if you take the effigy in your hands, you will feel its lightness.
Next, we stuff the back, rump, shoulders, and lastly the abdomen with cotton. Maintain proportionality, do not overload it with cotton wool, otherwise you will end up with a fat and clumsy bird, which will be difficult to give the desired shape. Now you can safely sew the edges of the skin with a simple thread, trying to hide the seam under the feathers. So, the stuffed animal is ready, but that’s only half the job.
Now the most important thing is to give it the correct shape, so that your beloved dog does not lose consciousness from what he sees, and the parrot does not start collecting clothes to fly away from home. Attach the scarecrow to a stand or branch of your choice, as shown in the picture. Take a hunting magazine, or find photographs of this bird on the Internet, choose the pose you like, and feel free to fold your wings, bend your neck, legs, achieve the desired pose.
Just don't overdo it so that the wire doesn't break. The bird is ready, sitting on a branch, very similar to a living one.
We take tweezers and carefully remove the protruding feathers, style the hair, and use a cotton swab moistened with hydrogen peroxide or just warm water to wash away dirt, dry starch and blood stains. Now, after sprinkling a little dichlorvos (although not necessary), leave it for a couple of weeks in a dry, ventilated room, perhaps the stuffed animal will “smell” a little, but it’s not scary, the smell will quickly pass, the stuffed animal will dry out, become strong, and you can give it as a gift or attach it to your favorite place place. You can paint the nose and paws with clear varnish.
Perhaps the first stuffed animal will be crooked and scary, but with each new stuffed animal you will acquire more and more skills and add something of your own.
For example, to prevent the beak from getting dirty, before starting work, I place a cotton swab in the bird’s mouth, and now I can twist the carcass as I please, without fear that I will stain the bird’s feathers with blood. And if you do stain your feathers with blood, they can be easily cleaned with a cotton swab soaked in hydrogen peroxide.
The first scarecrow I made also frightened those around me, but after six months, the completed specimens were sent to the offices of the generals.
Once, having met one of the “formers” in Moscow, he remembered the stuffed animal I had given him and boasted that he still admires it at his dacha, and yet more than 20 years have passed!!!!
A fat autumn bird is not exactly suitable for stuffed animals.
In total, the stuffed animals I made numbered more than a dozen, and no one complained that they were eaten by moths or chewed by mice.
The only request is, do not specifically shoot at non-game bird species - hawks, eagle owls, seagulls, etc., in order to make a stuffed animal for your own amusement.
Go for it! Good luck to you and...no feathers or fluff!
[subscribe2]
A little about the cosmetic stage
After the skin is stretched and sewn up, the cosmetic stage begins. The taxidermist smooths out all the folds and irregularities and removes excess glue from under the skin. Afterwards the threads are cut. If it is a stuffed horse, then the mane is combed and styled using a hairdryer and comb.
Glass artificial eyes are carefully selected for the stuffed animal. They must match the animal. It is necessary to accurately observe the color and shape of the pupil and parameters. Man-made eyes are bought in pet stores or ordered from an eye prosthetic factory.
The technique for installing the eyes is very simple. But the main thing here is not to correctly install the organ of vision and put the eyelid in place. All the art and difficulty lie in something else - in the ability to revive an exhibit with the help of fake eyes, to give it a living expression. And to do this, you need to find the correct angle of inclination of the eyeballs relative to the head, find the desired depth of the orbit in which the eye is located, and not make a mistake in the width of the interorbital distance.
Also, craftsmen need to give the eyes exactly the cut that is typical for this species and distinguishes it from other animals.
To draw the muscles, the skin is fixed with pins. In such areas it should fit tightly to the mannequin. Any animal has flaws on its skin. To hide them, taxidermists carefully select paint. They also add wool in some places, tint it and dry it.
Making a craft from a broom
The next option is so funny because it is made from an ordinary broom or broom. Yes, you yourself have probably already guessed how to make such a stuffed animal and what is taken as a basis.
In general, create and make everyone happy).
I have no doubt you will succeed.
Master class paper stuffed animals at home
I suggest you watch this video, which I liked, I think that you will also make such an interesting souvenir, and from paper.
On one site I came across this paper idea, it looks fun.
It's just like girlfriends)).
You can use newspaper or magazine paper, even colored paper.
Step-by-step DIY instructions
When creating a ritual product, certain materials and tools are used. Options for the finished figure may be different, but each of them necessarily resembles a person in appearance.
Master class No. 1
To make a straw doll you will need the following materials:
- a pair of wooden beams;
- nails;
- straw;
- tight rope;
- brooms;
- long dress, scarf.
Making a scarecrow is impossible without a set of tools. Prepare in advance:
Now you can begin the process itself. Everything happens in the following sequence:
- We form a cross from the beams, securing it with nails in the middle. If the top part is too long, use an ax to shorten it. We sharpen the base of the cross to make it easier to drive it in. Using a sledgehammer, we drive the wooden blank into the ground.
- We wrap it with straw to form the semblance of a human body.
- We fix it with ropes. If you can’t tear off the excess, cut it with scissors. Let's make the head.
Steps 1, 2 and 3 more details
Steps 4, 5 and 6 to create a doll
When making a stuffed animal, it is not advisable to use a needle.
Master class No. 2 with photos
As a basis for a ritual doll for Maslenitsa, you can use bast - a flexible tape made from the inner layer of wood from deciduous trees - linden, birch. The product can be made from the following materials:
- wooden stick 1.5–2 m long;
- bright scraps of fabric;
- bast;
- cardboard;
- cotton wool or soft paper;
- ropes.
The set of tools here is small. Scissors are sufficient if the fabric or rope does not tear without their help. You will also need a hammer or sledgehammer to drive the stick into the ground. It is advisable not to break off small branches or whittle the stick so that it looks as natural as possible.
The step-by-step process of creating a doll looks like this:
- A head is formed from white fabric. You need to put cotton wool, crumpled paper or leftover fabric inside. The main thing is that its shape is round, and it feels dense to the touch, after which it is placed on a wooden base and tied tightly.
Creating a workpiece head
Formation of the head and torso
Handles are attached to the workpiece
Body parts and outfit are tied on straw
The finished product is left without a face
For beauty, you can put colored beads on the doll and tie a bow on the braid.
Master class No. 3
A textile effigy burns well and is easy to make with the necessary set of tools. You will need:
We will create it from the following materials:
- square of white fabric;
- filler - cotton wool, straw, old rags;
- ropes, thick threads, ribbons, braid;
- wooden stick - 2 pcs.;
- square patches for dresses and shirts;
- fabric for the petticoat;
- apron fabric;
- handkerchief.
The ritual figure is performed in a certain order. Step-by-step instructions will help with this:
- We make a wooden frame for the doll in the shape of a cross.
Materials for creating a doll
The body is prepared
The finished product can be displayed outdoors
You can tie ribbons of different colors on your hands and make wishes. It is believed that after the doll burns in the fire, they will certainly come true. If you soak the finished figure in a mixture of saltpeter and water and dry it, it will burn well even in inclement weather.
Making a Maslenitsa doll for a holiday at school for an exhibition
In one of my articles, I have already shared with you a master class of such a craft from an ordinary plastic bottle and cotton pads, I hope you really liked that doll, if you want to make the same one, follow the link.
Or make such a miracle worker for meeting spring from a tree branch, which will look like a slingshot, approximately 26 cm long.
Or this one, which one did you like best?
Schoolchildren and preschoolers can come up with anything, this is an idea for an exhibition, do you like it?
Or else, children usually make drawings and pictures depicting symbols of the upcoming holiday.
This can be done using pencils.
Or markers, or, of course, paints.
Schools also decorate the hall for this event.
Posters and stand newspapers are made.
Taxidermy
Few people know who makes stuffed animals. Taxidermy is a method of creating stuffed animals using their skin as the base. It is stretched onto a certain frame, and the cavity inside is filled with filler.
Current taxidermy uses “mannequins” (an internal base made of polyurethane foam with anatomical preservation of the proportions of muscles and all parts of the body).
Taxidermy is mainly used to create museum exhibits, as well as to preserve hunting trophies.
Profession
So who makes stuffed animals? These people are called taxidermists. A scarecrow maker is a very rare profession. This is why almost no one knows who makes stuffed animals.
In Russia today there are no specific educational institutions that train taxidermists. In fact, a taxidermist works at the intersection of many specialties. He must have an excellent knowledge of the biology, ecology and anatomy of animals.
He must also be an excellent sculptor and have an excellent knowledge of the physical and chemical qualities of the raw materials used.
And, of course, a person who makes stuffed animals must have artistic vision. Today, all famous taxidermy masters enter the profession through the transfer of experience from father to son (dynasty) or they are ordinary self-taught.
The final stage of work
The final stage of the work is decorating the mannequin with skin. He is extremely responsible and extremely important, since the result of all work depends on how lively and correctly the skin “sits” on the mannequin. Many studios have their own suppliers of skins, who bring them from slaughterhouses or markets.
Every taxidermist should know that the skin of a living animal never lies tightly. She fits her body loosely. At the same time, in some places it lies in folds or sags, and in others it is closely adjacent to the tendons and muscles, clearly outlining the plexuses of blood vessels, joints and the entire subcutaneous relief.
Methodology
Many people ask the question: “Who makes stuffed animals?” To create such exhibits, dead (dead or killed during hunting) representatives of the fauna with the smallest number of damages on the skin are used. To preserve the appearance of the skin, it is alcoholized in a 70% solution, preserved or frozen.
The base for making stuffed animals is a wooden or steel frame. With soft stuffing, the desired shape is given as the skin is filled with tow or cotton wool. When creating a stuffed animal using a mannequin, the skin is placed on a hard, finished model of the animal.
A mannequin is a copy of a living creature figure in a given pose, which is made either by wrapping it around a frame made of elastic material, or from plastic, steel mesh, foam, or papier-mâché. Current mannequins are made from polyurethane foam.
How long does it take to make a stuffed animal?
Making a stuffed animal takes a certain amount of time.
The preparatory stages include working with the mannequin skin, wire, choosing a stand, viewing photographs of the animal, etc.
In some cases, the finished product may need to be reworked as the hide may dry out. We have to put it in place, shape the nose, ears, and mouth. Thus, the production of one stuffed animal takes several months.
This distinguishes the work of a master from an amateur. After all, people who offer to make a stuffed animal quickly are unlikely to take their work responsibly and seriously, and it is important for them to get their benefit as quickly as possible.
If we are talking about very small stuffed animals, then it can be done in one day, for example, a shrew mouse.
Is it customary to give a name to a Maslenitsa doll?
Our ancestors did not call him by name, but they could affectionately call him Madam Zimushka. According to tradition, a ritual doll cannot be given a name or a face, otherwise evil forces will be able to inhabit it. If you name a product by a human name and then burn it, it can bring trouble to those whose name it bears.
Making a stuffed animal for Maslenitsa is an exciting and fun process that has a sacred meaning. It’s easy to make a ritual doll with your own hands if you carefully follow the step-by-step instructions and stock up on the necessary materials. A joint activity unites the souls and hearts of people, be they classmates, friends or complete strangers to each other.
Sources:
https://page365.ru/kak-sdelat-chuchelo-na-maslenicu.html https://karamellka.ru/kak-sdelat-chuchelo-na-maslenicu.html https://sueveriya.ru/archives/17960