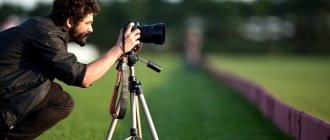
When I started working on this project, I wanted to make a device that could replace the two or three devices that are usually found in a photographer's backpack. In the end, my project culminated in the creation of a flexible camera stand, I will simply call it a “flexible stand”.
The stand is based on 90 centimeters of calcined super-flexible copper wire, at each end of which there is a screw for installing the camera. All this is placed in a vinyl tube that keeps the wire clean and safe, and it also has a soft surface that gives a feeling of comfort when bending/unbending the mount. This tool can replace many other photo tools, including:
- Standard tripod - form a base from the wire and bend one end up, then install the camera.
- Selfie Stick - Bend one end of the flexible stick into a loop and wrap it around your arm or wrist. Attach the camera to the other end of the flexible stand and bend the end to the angle you want for a great selfie.
- Shoulder (Articulated) Camera Mount - You can wrap 90cm of soft copper around anything and mount your camera almost anywhere.
Among other things, the flexible stand collapses into a very small item that is convenient to take on trips and conveniently wrap around your wrist while moving from one place to another.
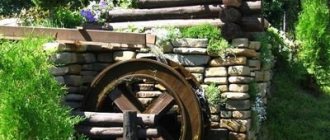
How to hang a pot on a tripod over a fire
If the tripod for the pot is made with your own hands, then hanging the vessel over the fire will not be difficult. Everything was already calculated and provided for in advance.
If the tripod for the pot is made with your own hands, then hanging the vessel over the fire will not be difficult.
However, sometimes you have to improvise. If the need to cook food arises in winter, against the backdrop of cold snow-covered expanses, and there are no special devices, then how can you hang a pot over the fire? It is convenient to use ski poles as tripod legs. By connecting the loops together, it is easy to obtain a reliable connection. And the hook for hanging the pot can be replaced with a piece of any rope.
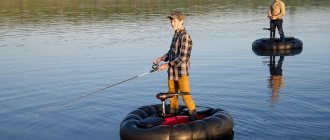
Low angle macro photography
If you're photographing subjects that are very close to the ground, a short-legged lens can be much more useful than a full-length one. Unlike most mini tripods, the Feisol TT-15M2 is essentially a miniature version of a "serious" tripod, with durable carbon fiber legs that can be independently mounted in three different positions, providing heights ranging from 11cm to 16cm without the head. It will easily hold a full-frame DSLR, but it weighs only 200 g, which allows you to carry it with you all the time. If you want the most economical option, you can experiment with Velbon EX Macro. It is used for shooting heights between 20.3cm and 56.3cm and costs just £25.
Preparation of material
Preparatory work and assembly are carried out in the following sequence:
- The pipe sections must be the same size and range from 150 to 200 cm. Using a saw, give them equal length;
- The loop of one of the bolts is slightly loosened with pliers. The loops of the remaining 2 bolts and the top link of the chain are threaded into it. Then the loop is clamped again with a hammer to ensure the reliability of the structure;
- The ends of the bolts with screwed nuts are inserted into separate sections of pipe. If the bolt enters the cavity freely and dangles, use a hammer to flatten the pipe above and below the nut;
- To hang the pot, one of the steel hooks is put on the lower link of the chain, and its upper loop is clamped with a hammer. This ensures that the hook does not come off at the most crucial moment;
- A second hook is inserted into the chain link, located 3–4–5 links from the top, and the loop is also secured with a hammer. The design will allow you to lift the pot by hooking several chain links to the lower loop.
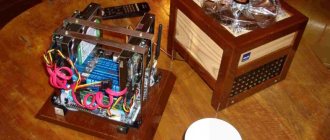
The resulting tripod folds easily. Adjustment of the height of the suspension is possible not only due to the chain, but also due to the sliding and spreading of the supporting reinforcement.
Adjustment of the height of the suspension is possible not only due to the chain, but also due to the sliding and spreading of the supporting reinforcement.
Another option for a homemade tripod is made from pieces of DIN rail. In this case, it is useful to make the legs consisting of 2 parts, which will allow you to obtain a more compact product. The halves of the supports are fastened with wing bolts, and the legs are connected at the top with metal wire.
A stronger structure will be made from a steel profile pipe. The upper parts of the supports are bent to form a shoulder and fixed between two steel plates fastened with a pin. It is impossible to simply bend profiled steel, so you will have to cut out the corners, bend them at the cut, and then fasten them by welding. The heaviness of the resulting product and the need to think through reliable fastening of the arms between the plates limit its use. It is better to focus on a simpler and easier to implement model.
A stronger structure will be made from a steel profile pipe.
Video
Thanks to the online store LTMix.Ru, we had the opportunity to personally verify the ease of using them with a smartphone, and I will share my experience with you right now. I’ll answer in advance the question of where you can inexpensively buy a similar LED ring lamp - the link has a whole selection of different models, you can go and select the option you need.
I want to start with the fact that there are several types of ring LED lamps for smartphones, which differ in size and type of connection. This means they are designed for use in different conditions.
Ball heads
At the moment this is the most popular type. Such heads benefit from lightness and speed of operation, but difficulties may arise with very precise positioning. High-end models have an independently locking base and the ability to control friction to adjust the stroke of the head. The Sirui KX line of heads is an example of particularly good performance. They boast adjustable friction, Arca Swiss-format mounting, and multiple bubble levels. Prices range from £100 for the smallest K-10X to £160 for the high-end K-40X. The Vanguard Alta BH range is a great budget alternative with prices ranging from £50 (BH-100) to £90 (BH-300).
Benro GD3WH provides precise adjustment in three axes.
Extension cable for floodlight stand
The stand must be mobile, it must move around the garage without any restrictions, so it definitely needs a long wire, for it I welded special hooks and nails on the legs and bent them to wind them up, it turned out like in the photo below.
In the photo, the stand has already been painted; you can use a can of spray paint for this; it lays flat and dries quickly. General view of the stand with an attached spotlight, raised to maximum height.
The result is a convenient portable lamp for additional illumination of the workplace, the height is quickly adjusted, and it is very light and compact.
Thermal imager from a camera
A thermal imager is a rather complex device capable of detecting infrared radiation emitted by surrounding objects at a distance. This device is mainly used for repair and rescue activities, and it is also used by professional hunters to search for prey. A thermal imager is similar in design to a digital camera.
Despite its similarity to a digital camera, it cannot be used to make a full-fledged thermal imager. On the Internet you can find many tips on how to make a thermal imager from a camera. For example, it is advised to remove the infrared filter from the matrix, after which the device will supposedly begin to detect thermal radiation. But in practice, you won’t get anything other than breaking your digital device. This video shows what happens if you remove the filter from the camera sensor.
Cardan heads
If you try to put a camera with a large telephoto lens on a tripod, you will quickly discover that traditional heads are not entirely reliable in this situation. This is where driveshafts come into play. By fixing the lens in a suspended position, they provide stability even for the heaviest models. Our pick is the Gitzo Fluid Gimbal Head (£359). It combines the smoothness of slow turns with the freedom of movement for faster adjustments. At £259, the Benro GH2 is a worthy budget contender.
Velbon Super Mag Slider allows for precise focus corrections
Making a stand for a spotlight
For this we need about two meters of pipe, maybe a profile one, I had a regular one, round in cross-section, with a fairly thick wall. The walls of the materials used must be thick so that the stand does not shake when the light source is installed.
I decided to make the legs for the stand from a curved pipe, there will be 4 legs in total, it’s more stable.
Then I welded them in the same way as in the photo
The drain itself will be made from the same pipe, I decided to make it about 160 cm high, but first I need to make an adjustable spotlight mount.
Tripod floor lamp. Master class with photos on Supersadovnik.ru
The camera I bought many years ago has long since broken down, and the tripod on which it was previously mounted is left “out of work.” And it can still be used, and not necessarily for filming.
The camera I bought many years ago has long since broken down, and the tripod on which it was previously mounted is left “out of work.” And it can still be used, and not necessarily for filming.
- electric lamp
- tripod
- shade
- electrical wire (hook)
- dismountable electrical plug
- electric socket with ring
- additional ring for chuck
- switch
- long piece of stiff wire
- long piece of stiff wire
- ceiling light part (piece of threaded tube)
- nut, 3 pcs
- drill
- screwdriver
- metal drill with a diameter of 5 mm
- drill with a diameter of 10-12 mm
Using a 5mm drill bit, make holes in the ends of both hollow tubes that make up the “leg” of the tripod - these are usually covered with plastic caps. To “pass” the end of the inner tube, it is better to fold the tripod. Take a long piece of stiff wire (no shorter than the folded tripod leg tubes) and straighten it along its entire length with your fingers. Make a narrow loop at the end by bending the wire. Pass it through the holes so that the wire passes through the tubes. Attach a long electrical cord to its end, wrapping it with wire, and pull the wire and cord through the tubes. Drill a platform for mounting the camera using a drill of a larger diameter - a part from the ceiling lamp (tube with thread) will be inserted into the resulting hole. The hole diameter must be smaller than the outer diameter of the nuts. Screw a threaded tube into the lower part of the electric socket and secure it from the inside with a nut. Screw the second nut on the outside. Rigidly secure the cartridge to the tripod platform, securing the tube with another nut on the back side of the platform. Tighten the nuts securely. Pass the electrical wire through the hole in the tube. Connect the ends of the wire to the terminals of the electric socket. Collect the cartridge. Measure and cut the wire to the required length from the coil. Disassemble the plug and secure it to the end by attaching the stripped ends of the wires to the terminals. Extend the “leg” of the tripod to the end (in this case, the wire will “go” into the telescopic tubes). Mark the location of the switch on the wire so that it is convenient to use. Remove some of the outer insulation at this point and cut one of the wires. After stripping the ends, attach them to the terminals and assemble the switch. Check how the electrical circuit works. Attach the lampshade by sandwiching it between two plastic socket rings. Your tripod floor lamp is ready.
Any room requires proper lighting. Some people prefer massive crystal chandeliers,...
Autumn is coming into its own. Multi-colored foliage basks in the last warm rays of the sun. She is waiting …
Sometimes it helps to look at the world with fresh eyes. You couldn't find a lamp for a long time and...
For a real “sea wolf”, the light on the shore is a sign that the comfort of his family awaits him...
Sometimes it helps to look at the world with fresh eyes. You couldn't find a lamp for a long time and...
You can make many wonderful things using ordinary dried flowers and leaves: ...
Source: https://www.supersadovnik.ru/masterclass/torsher-iz-shtativa-500
Monopods
Monopods cannot completely replace tripods; rather, they provide additional support when the lens is too heavy to shoot handheld for long periods of time. Here, as in all other categories, there is plenty to choose from - different weights, heights and maximum loads. Our favorites include Velbon Ultra Stick Super 8 (£59). Thanks to its 8-section design, it can fold down to an ultra-compact height of 26cm. Another option is the lightweight and stable Vanguard Veo AM-264, which also costs £59. For demanding photographers, the Manfrotto XPRO Photo (£148) is a 5-section carbon fiber monopod that can handle even large telephoto lenses with ease; It can also be purchased complete with a small tripod for £179.
This Olympus ECG-2 pad is made specifically for the OM-D EM5 II
What difficulties might there be?
Using a tripod in most cases is very helpful in creating high-quality, beautiful photographs. But sometimes, photographers using this accessory become its “hostages”. Many people unintentionally begin to limit themselves to one direction, adjusting to the position of the camera on the installation. This approach will never have a good effect on the development of a photographer. It is very easy to avoid this situation.
Tools
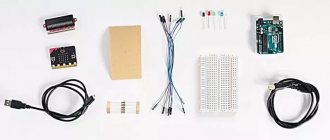
Along with an extremely modest budget for consumables, only the simplest tools were used during the work:
- Wood saw.
- Drill.
- Drills 8 mm and 2.5 mm.
- A plate for sandpaper with Velcro.
- Sandpaper (100 grit).
- Clamps (not needed if you have another pair of hands).
- Tape measure, pencil, ruler, corner - by default.
The work can be significantly simplified and speeded up if you have a miter saw, jigsaw, drilling and grinding machine. By the way, a manual jigsaw would also be very useful.
Option - from office clips
The second way to make a homemade tripod is from paper clips. You will need 2 clamps and some flat thing to attach them to. You need to clamp the paper clips on a flat surface at such a distance that you can install a phone on their handles. That’s it, the tripod is ready and you can shoot on such a stand no worse than on a regular store-bought one.
What to look for when choosing a ring lamp
There are several basic parameters that need to be considered when choosing - from the diameter of the body to the power of the luminous flux. However, first of all, it is necessary to clearly determine for what purpose the lighting system is intended to be used. After all, most of the requirements for the lamp depend on this.
Application area
Ring light is used by bloggers, makeup artists and photographers who require either local illumination or general uniform illumination of a certain area. Depending on this, it is necessary to set requirements for the lamp. If the ring light does not meet the required criteria, it is better to choose another system. Most often, such lamps are abandoned by makeup artists who need a directed local flow of light.
The main consumer audience for ring lamps are bloggers and photographers who want to save money and do not want to waste time on setting up professional light. However, makeup artists also enjoy using compact models. In this case, it is necessary to take into account the possible flickering of the light emanating from the ring lamp, which depends on the type of stabilizing driver. Flickering light is generally not suitable for video shooting and can sometimes negatively affect the quality of photos.
Optimal lamp power
There are no uniform rules when considering this parameter. The principle “the more powerful the better” does not work here. Although most modern models have a brightness control function, it is irrational to overpay for extra watts that are simply not needed. It is better to spend this amount on more useful options. When choosing, it is advisable to focus on the following data:
Phone holders
With smartphones becoming more advanced photography tools, it can sometimes be useful to mount them on a tripod. Since phones do not have special slots, tripods for them are made in the form of a clamp. Our favorite is the Joby Griptight ONE, which sells separately for £14 or bundled with a handy Micro Stand for £32. Another option is the Manfrotto Twistgrip (£29). This is a heavier model that also includes a mount for a microphone or LED lamp. If you often take panoramic photos with your phone, a motorized panoramic head like the Cullmann SmartPano 360CP can come in handy.
A folding tripod helps keep the monopod stable