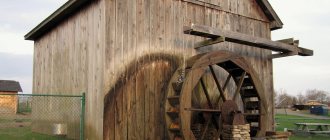
If you decide to make a water mill yourself, you will need to select materials and a suitable place to install the decorative structure. In addition, in order for a decorative water mill to work, it is necessary to provide artificial circulation of water, that is, install a device that will transmit the flow from the reservoir to the blades, setting them in motion. It is necessary to step by step disassemble all the stages of manufacturing the mill structure from choosing a style, constructing a model and drawing up a diagram to assembling the house and installing the blades.
The principle of operation of the mill is very simple: water can flow onto the blades from above, through a chute, or supplied from below. The general principle is to use the flow of water. A decorative hydromill in an old style will decorate a garden area, and the sound of water being distilled by the blades will relax and soothe.
In order for the decorative water mill to be useful after production, and not just decorate the area and relax, you can connect a small generator to it. The generator will only work if there is a stream on the site, the flow of which rotates the mill wheel, and otherwise the generator will be useless. You can place the generator in a decorative wooden house.
Materials and tools
As a material for building a mill with your own hands, you can choose wood, brick, plastic, or a combination of them. The most popular option is to use wooden blocks to construct the frame and sheets of plywood to cover the mill. Additionally, for construction and fastening you will need:
- Self-tapping screws for woodworking for fastening parts;
- One large stud, wheel axle;
- Pipe for gutter;
- Impregnation for wood.
The volume of materials required for construction is determined by the size of the structure. To calculate the estimate, it is advisable to make a drawing and reflect in it a diagram of the model of the future mill.
Sometimes bricks are used to build a mill. A mill house made from it will be heavier and more expensive, and in addition, to install a decorative water mill on a summer cottage, you will need a solid base and support.
Selecting a style match
As a decorative element, a water mill can decorate a garden in any style. Once upon a time, this building became part of not only European culture, but also Russian culture. It is associated with the aroma of freshly baked bread, home comfort and a fairy tale, so it is an excellent find for those looking for a colorful landscape design detail.
The mill is a symbol of comfort and prosperity: where it is, there can be no troubles or surprises, it always smells of fresh bread and fresh milk
Depending on the decisions we make in the process of constructing a water mill, it can look fabulous in the Russian spirit, have a medieval Gothic look, or acquire futuristic features.
This feature of the structure must be taken into account and thought in advance about how to make a water mill so that it meets the general idea of landscape design.
The water mill must fit harmoniously into the overall style of the site and fully comply with its landscape design
A massive wooden mill will be in dissonance with elegant fountains and openwork bridges in the style of classicism. And a fairy-tale gazebo in the Russian style will simply visually crush a neat Japanese mill. Let's think about how we can use this structure for different style solutions.
Country or rustic style
Typical elements of the country style include wooden benches and gazebos, wickerwork, bridges made of logs and houses for children, also made of wood. A mill in the same spirit, equipped with a wooden wheel, can perfectly maintain stylistic unity.
You can learn more about decorating a garden in country style from the following material:
A country-style windmill harmonizes perfectly with its specially aged wheel with other design details: for example, a fence or a bench
The color of the old manor in the Russian style is emphasized by wooden sculptures, a flowerbed cart and a log frame of a well. Plants that fit the theme will complement the picture, so take care of reeds and primroses, sunflowers and daisies. The artificially aged wheel of the structure will complement the picture of patriarchal village life.
Recent Entries
Lilac perennials that are beautiful, compact and do not crowd out other plants Why when buying seedlings you should not take the sellers’ word for it and how to determine the age of the plant using 3 signs Tomato seedlings have turned purple or whitish: why the color has changed and how to save the plants
Noble Japanese style
The main idea of Japanese design is that there should be nothing superfluous in sight. Only stones, water and plants, which are so pleasant to admire. A mill wheel can be an addition to a stone castle with loopholes and towers. Stone benches will give you the opportunity to relax while looking at the water and the measured rotation of the wheel.
The Japanese mill harmonizes perfectly with the given style, in which the eye should not cling to unnecessary unnecessary details
The general atmosphere of peace will fully comply with the canons of Japanese philosophy, in which the melody of a stream is considered more beautiful than the sounds of musical instruments. Arizema, dwarf Japanese maple, low-growing sakura and wonderful Japanese quince can successfully complement the overall feeling.
The rock garden has become an integral part of Japanese style. Read about the rules for creating it:
Symbolism of the Dutch garden
If in other cases a water mill serves as a unique highlight, then when creating a garden in the Dutch style it can become the main element of landscape design, around which compositions of garden roses, daffodils and tulips will unfold.
The Dutch-style mill is colorful and laconic at the same time: daffodils, tulips and roses will wonderfully complement the overall picture
If the decorative structure is a miniature, a kind of model of a working water mill, it can be made in the form of a half-timbered house, typical of Holland and Germany. Garden gnomes, water gnomes or an elegant weather vane are an excellent addition that emphasizes the style of the building.
Creating an Artificial Flow
The main driving force of a water mill is water flow:
- To create a flow, it is necessary to install a pump at the summer cottage, which will drive water through hoses and tubes from the reservoir to the chute of the decorative mill;
- If there is a reservoir with moving water on the site, you should install the mill so that its wheel is immersed in water by 1/3 of its diameter. The water of the reservoir will rotate the wheel in a circle without additional effort.
Another option for a water flow device is to operate the wheel from water pressure from the gutter. The disadvantage of this solution is the impossibility of ensuring continuous operation of the mill, the independent movement of the wheel of which will only occur during rain or melting snow in the garden. In the absence of rain, water for rotation will have to be distilled from the reservoir.
Conditions for installing a hydroelectric power station
Despite the tempting cheapness of the energy generated by a hydro generator, it is important to take into account the characteristics of the water source whose resources you plan to use for your own needs.
After all, not every watercourse is suitable for the operation of a mini-hydroelectric power station, especially year-round, so it does not hurt to have in reserve the possibility of connecting to a centralized main line.
A few pros and cons
The main advantages of an individual hydroelectric power station are obvious: inexpensive equipment that generates cheap electricity, and also does not harm nature (unlike dams that block the flow of a river). Although the system cannot be called absolutely safe, the rotating elements of the turbines can still cause injuries to the inhabitants of the underwater world and even people.
To prevent accidents, the hydroelectric station must be fenced, and if the system is completely hidden by water, a warning sign must be installed on the shore
Advantages of mini-hydroelectric power stations:
- Unlike other “free” energy sources (solar panels, wind generators), hydraulic systems can operate regardless of the time of day and weather. The only thing that can stop them is the freezing of the reservoir.
- To install a hydrogenerator, it is not necessary to have a large river - the same water wheels can be successfully used even in small (but fast!) streams.
- The units do not emit harmful substances, do not pollute water and operate almost silently.
- To install a mini-hydroelectric power station with a capacity of up to 100 kW, you do not need to obtain permits (although everything depends on the local authorities and the type of installation).
- Excess electricity can be sold to neighboring houses.
As for the disadvantages, insufficient current strength can become a serious obstacle to the productive operation of the equipment. In this case, it will be necessary to build auxiliary structures, which entails additional costs.
If the potential energy of a nearby river, based on rough calculations, is not enough to generate electricity in a volume sufficient for practical use, it is worth paying attention to methods for constructing wind generators. A windmill will serve as an effective addition.
Measuring the strength of water flow
The first thing you need to do to think about the type and method of installation of the station is to measure the speed of water flow at your favorite source.
The easiest way is to lower any light object (for example, a tennis ball, a piece of foam plastic, or a fishing float) onto the rapids and use a stopwatch to measure the time it takes for it to swim the distance to some landmark. The standard distance for the “swim” is 10 meters.
If the reservoir is located far from the house, you can build a diversion channel or pipeline, and at the same time take care of height differences
Now you need to divide the distance traveled in meters by the number of seconds - this will be the speed of the current. But if the resulting value is less than 1 m/sec, it will be necessary to erect artificial structures to speed up the flow due to elevation changes.
This can be done with the help of a collapsible dam or a narrow drain pipe. But without a good flow, the idea of a hydroelectric station will have to be abandoned.
Manufacturing stages
The creation of a decorative water mill consists of the phased construction of all its main elements, from assembly and installation to a selected location on the site.
Wheel
The design of the water wheel consists of two parallel rims or round disks made of plywood, between which wide blades made of aluminum profile or plastic are installed. A hole is drilled in the center of the wheel for the mill for a pin, which will become a support and an axis of rotation.
To create a durable connection, you can equip the axle with rolling bearings.
House
The most important thing for design is the construction of the frame of a wooden house. As the base of the hydromill, you can use a concrete foundation, which is poured into a dug trench with wooden formwork. A simpler option is a flat garden area covered with paving slabs next to a pond.
To construct the roof of a building, you can use roofing felt, corrugated sheets or tiles. An excellent option would be to use tiles in the same style as those used in the construction of a country house and other buildings. We fix the tiles securely, and you can decorate the roof with a ridge in the old style.
Impregnation of wooden parts
To preserve the wooden elements, wheels and fastenings of the water mill, they must be covered with several layers of waterproof impregnation or yacht varnish. This procedure should be repeated every 2-3 years . Such impregnation will not only protect the wooden mill house from moisture and fungus, but will also decorate it.
All wooden parts of the building must be varnished before production begins. To ensure that the glossy coating does not lose its decorative properties, the mill parts must dry thoroughly.
To protect metal fasteners and axles from corrosion, use special paints and varnishes.
Installation
After pouring the foundation of the mill, assembling the frame and wheel according to the drawing, establishing the water supply, as well as installing and decorating the gutter for draining it, the main part of the mill - the rotating wheel - is installed.
To attach the wheel to the main structure, you need to drill a hole in the casing into which a pin is inserted, one end resting on a support (preferably with a bearing), and on the other end it is pressed onto the bearing of the impeller. After this, we attach a nut to the free end of the stud and finally fix the wheel on the axle.
The final stage of creating a decorative structure with your own hands will include masking all the unsightly elements of the mill (hoses, tubes, pump) that drive water from the reservoir to the wheel blades. Masking of the pump and hoses is done using living plants, natural stones or other decorative decorations and devices.
When the work is completed, a test run of the mill is carried out to check the operation of the wheel, the absence of water leaks, as well as the stability and reliability of the entire decorative structure.
Principle of operation
Before moving on to the process of constructing such a structure, you should learn how a water mill works. To operate it, they usually use water supplied from a reservoir - a river, pond or reservoir through a pipe through which it is directed to the wheel. At the moment of the collapse of a powerful stream of water, the wheel blades begin to rotate, causing, in turn, the movement of the mill axis.
The design feature of the full-size mill is that it is equipped with sluice gates that control the passage of liquid and prevent flooding. The same principle can be used as the basis for the work of a decorative building. Water from a country pond pours onto the wheel from above, and under the force of the falling liquid the blades begin to rotate.
Water is usually supplied using a hose: for this, one end is placed in a pond, and the other is attached to the roof of the mill. The pump will be able to maintain the circulation of the liquid, causing it to flow in a circle and driving the wheel.
Making a water wheel frame
We start manufacturing the wheel with a frame, which consists of two rings (rim) and diagonals that fasten the fragments of the ring and give rigidity to the entire structure.
We make the rings from boards 30 x 200 mm. Each ring consists of eight arcs (parts), and for two rings we will need to make sixteen such parts. Here is a drawing of the arc with exact dimensions.
The width of the arc is 134 mm, this size was obtained as a result of minimizing the cost of building materials, a board with a width of 200 mm is popular and you can easily find it in any market or store. You can also use a board of a different thickness, if you don’t have 30 mm, feel free to take 25 mm thick, its strength will be enough and will make the construction easier, I was just playing it safe.
To make arcs, make an exact template from cardboard or tin; it’s easier to measure and draw once on the template, and then transfer it to all the workpieces. Use a jigsaw to cut out the arched sides. The end sides must be smooth for the arches to fit snugly against each other, so cut them with a miter saw or circular saw.
After making the arcs, lay them out on a flat surface, you should get a ring, if the joints do not match well, adjust them a little, but this is not so important, the most important thing is that the ring has the correct round shape, and to check this, wherever you measure the diagonal , the diameter size must be the same.
Fasten them with self-tapping screws as shown in the sketch:
But don’t move the ring, there is no rigidity, you need to make and screw the diagonals, now we’ll start making them. We make diagonals from timber 30 x 70 mm. For two rings we will need 4 long pieces of 2 m each and 8 short pieces of 1 meter each (16 m. in total). We make long ones by sawing them to a size of 2000 mm, and then sawing them in the middle to join each other as in the drawing:
We make short ones according to the drawing, 8 pieces:
We join the long ones and twist them together, but away from the middle, where we will then drill a hole with a diameter of 30 mm.
First, we apply the long diagonals to the ring so that the diagonals overlap the joint of the arcs, and the joint of the arcs is in the middle of the diagonal. Don’t rush to screw it on, double-check that everything is even and symmetrical; the correctness of the design depends on this. Screw the long diagonals to the ring with several self-tapping screws, later we will strengthen them with bolts.
We also attach short diagonals and attach them using self-tapping screws.
Then we make four mounting plates that will strengthen the structure. We use metal of at least 2 mm. We cut it to the required size with a grinder and drill holes for the bolts according to the drawing:
Next you need to screw the plates, but to do this we measure all the diagonals again. We apply the plate, the central hole in the plate should be exactly in the center of the circle, we drill holes in the diagonals through the plate one at a time so as not to disturb the alignment, we apply the plate on the other side and screw it together.
After we have twisted the plates, we drill holes for the bolts in the places where the diagonals with rings are attached, two bolts at one end, as in the sketch:
Next, drill a hole in the middle of the diagonals through a metal plate with a diameter of 30 mm.
Everything is the same with the second ring. That's it, the frame is ready, now it can be moved and moved.
To check the correct assembly, put the frame on something and spin it, it should spin smoothly without much wobble.
Homemade mill
The construction of the main structure begins after the completion of the water level difference. The design of the mill is quite simple: you need a house with a pump and a wheel driven by the force of water passing into the lower reservoir from the upper.
If there is a cascade, you can do it without a house - one or several wheels will be enough. The structure can be made of wood, brick, or other suitable material.
The wheel can be made like this:
- From a bicycle wheel.
- Using a cable reel.
- From a circle cut from knocked together boards.
- From a piece of pipe with blades attached to them .
In any case it should be the following:
- Blades.
- In the center of the wheel there is a pipe for mounting the axle around which rotation occurs.
- The parts are attached mechanically.
Two supports are made, onto which the axle is movably attached using bearings. The chute is brought to the top of the wheel. If the blades are made of wood, it is worth opening them with varnish that repels water. It is recommended to paint metal blades to protect them from rust. Channels are being built through which water will flow to the garden or other place.
The supports can be made of rubble or brick: the edges that deteriorate over time will only add originality to the structure. Stone and brick are combined with wood.
The service life of wooden elements will be longer if they are made of hardwood. Metal parts are treated with phosphoric acid: in this case, corrosion will remain superficial, and natural aging will add originality to the look.
Decoration can be done using the following materials:
The place where the stream of water hits can be covered with sea pebbles. Ornamental plants are planted on the sides of the gutter and near the house. The area around the structure can be paved with tiles.
Final finishing
Like any craft made from wood, a mill should have an attractive appearance and a coating that ensures its durability. For this purpose, all wooden parts without exception are impregnated with an antiseptic, which will protect the wood from rot and pests, thereby guaranteeing a long service life.
The finishing touch will be painting. Any wood paint for exterior work is suitable, the color and shade is at the discretion of the master. A mill made of beautiful wood can simply be coated with several layers of varnish.
Site preparation
To build a building, the first thing you need to do is choose a suitable location and prepare it. The area should be cleared and should be planned .
The ideal place to install a water mill is the bank of a stream or river: flowing water creates a constant torque for the wheel.
But since our mill is decorative, it can be built on any garden plot. A small pond is enough for the wheel to function .
If the reservoir is already equipped, then there should be no problems with installing the building. But if you are just going to build a pond and a water mill in it, then the following tips will be useful to you:
- You should not locate a pond with a mill in places with a large concentration of trees and bushes;
- the place should be well ventilated;
- if there are uneven places on the site, then it is better to build a mill on them;
- humidity and wet soil near the water mill
Trellis for climbing plants will decorate your summer cottage and divide it into zones.
What are the capabilities of a water mill?
A summer cottage exists not only to plant a variety of vegetables and fruits. It is also used for recreation. For this reason, the owners are trying to decorate the territory to make it as pleasant as possible. A water mill can be used for this. It will decorate the area, and the murmuring water will give peace. Such a mill becomes an excellent addition to the entire territory of the dacha.
But some people use this design not only for decoration, but also to perform certain functions. But for this there must be a natural water flow. Any body of water that is on the site will generate energy that can be used, for example, for lighting.
It is worth understanding that this is not a powerful source. It is not capable of illuminating the entire house. But small lamps will glow with it at night.
