If you have an unnecessary brake disc lying around in your garage, then do not rush to throw it away or sell it for scrap. There is still a chance to give the item a new life as a beautiful wall clock.
1. Motorcycle brake disc
2. Cheap quartz wall clock
5. 2 long bolts and nuts for them
6. Sponge, towel and rust cleaner
If your disc is rusty, then you should apply a cleaning agent to the sponge and polish the rusty areas.
Dry the disc with a towel.
Step 2: Quartz Watch
Carefully disassemble the prepared wall clock into its component parts. We will need all 3 hands and the rear platform with the main mechanism.
Using a ruler, measure the vertical and horizontal centers of the motorcycle rim.
Based on the picture, glue the platform to the central part of the disk (white arrows mark the gluing points). Mark holes into which numbers can be inserted.
First attach the hour hand, then the minute and second.
The photo shows that the clock is mounted on 2 large bolts, inserted into the “17:00” and “19:00” holes of the clock.
Step 6: Setup
We connect the batteries and adjust the exact time.
Some people can get by with regular quartz watches, but we prefer these homemade “chimes.”
Our section of useful homemade crafts has been replenished with a new master class on making a wall clock from a disc brake with your own hands.
Hi all! It so happened that the car service pleased me with a free disc brake that had outlived its usefulness. The idea had been in my head for a long time and finally materialized. The theme of this story is from the disc brake. I got the brake disc from one of the domestic ones, which almost doesn’t matter. It’s just that on foreign cars they are often bigger and more beautiful)).
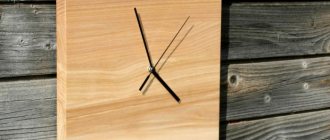
There are many options for similar watches on the Internet, so I turned my idea 180 degrees. The dial is not on the “convex side”, but vice versa. So, everything point by point. First things first, a good wash, cleaning and grinding of the disc. Next, I welded an eyelet to the disk for hanging on the wall.
After that painting. I spray painted it and chose blue.
There are 6 holes on the disva. 4 for the landing bolts on the hub, but we need the remaining two. There I screwed in 2 M8 bolts with countersunk heads.
On the back side of the disc they were flush with the plane, which does not threaten to scratch the wallpaper. The clock mechanism was purchased separately along with the hands. It is glued to the clutch basket element with silicone sealant. You can also use adhesive. This element itself is painted silver.
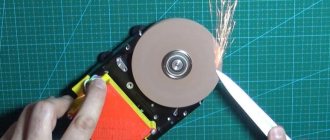
Two neodymium magnets are attached to match the protruding bolts on the brake disc.
They allow you to easily remove this part for replacement without completely removing the watch. The beckons hold above all praise and, by the way, do not affect the accuracy of the watch in any way, it’s been verified! Now all that remains is to do the numbers. I bought it for 67 rubles. a set of wooden numbers, painted them the same color as the clock, and attached them with superglue. I refused metal numbers because they are expensive compared to wood, and besides, after painting they will look the same. We put everything together, insert the battery. That's it, the watch is ready! You can hang it on the wall, relax with it and enjoy the dimensional movement of the clock you made!))
Don’t rush to get rid of an unnecessary brake disc; it may still come in handy. For example, it will make an original wall clock! The main thing is that they are very simple to make, and they look quite interesting.
We will need:
– motorcycle brake disc; – old quartz wall clock; – ruler and superglue; – two long bolts and nuts for them; – towel, sponge, rust remover.
Step 1
If your disc is rusty, apply a cleaning agent to the sponge and thoroughly polish the rusty areas. Then wipe the disc dry with a towel.
Take an old wall clock and carefully disassemble it into its component parts. From them we need three hands and a rear platform, where the main mechanism is located.
Using a ruler, measure the motorcycle rim and mark the center. Based on the photo, glue the platform to the central part of the disk with glue (white arrows mark the gluing points). Next, mark the holes into which you will insert the numbers.
The author first attached the hour hand, then the minute hand and the second hand.
As you can see from the photo, the clock is attached to two large bolts, which are inserted into the following holes: “17:00” of the clock and “19:00”.
Step 6
Insert batteries, adjust the exact time on the clock.
A clock made from an old motorcycle brake disc is ready. Some people like ordinary quartz watches, while others will prefer such original “chimes” made by
Engineer4 › Blog › “Brake disc” watch
There was already a TEASER, now the product itself)))
I got the idea for this design from RINICH79. A clock made from a brake disc. Well, since I didn’t have any problems with perforation, I decided to make my own product))) I found an old, rusty, worn-out disc 2108 in the garage.
I used to want to throw it away, but it was a pity, and it’s good that I didn’t throw it away, it was useful after all. It went through the process of removing the entire rusty layer on metalworking machines and acquired a new look)))
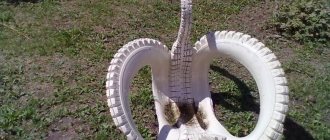
Well, then there was perforation with notches, hourly, and even second-by-second)))
I also milled out the space for the mechanism itself so that it fits tightly and holds itself together without any glue or tape.
I also found a brake pad in the garage, it turned out to be even new, I don’t even know what car it was from. I drilled holes for the bolts and painted the piece of hardware itself.
The candles were from my former VAZ 2112, even the working ones, they also took on a new look.
I found a chain on a robot, they bring us second-hand things for rags, and there was such a chain on one of the things.
When the clock mechanism is installed, it turns out that it is slightly smaller than the central center itself in the disk, and in order to close these gaps, I bought a cuff and cut it a little in thickness so that it would not interfere with the hands. Now the cracks are no longer visible.
The last missing part, or rather the mechanism, arrived just yesterday.
The center and back of the disc were primed and painted and then the whole thing was varnished. Well, now you can evaluate the final result)))
How a brake disc works and why it is better than a drum: let’s figure it out with Ferodo
A little history
The need for brakes appeared almost immediately after the invention of the wheel, but our ancestors a couple of thousand years ago did not rush things and rode chariots for a long time without brakes in our usual sense.
However, by the time carriages appeared, brakes had already matured: these were mechanisms that acted directly on the wheel. The block, pressed by a lever to the outer surface of the wheel, could not effectively stop a horse-drawn carriage, but it was quite capable of helping the horses. But then rubber tires were invented, and the mechanism that pressed the pad to the wheel was retired. At least in road transport: today mechanisms with external pressure work successfully on the railway, although there are plenty of alternatives there too. On ordinary roads, carriages acquired band brakes: the drum on the axle was stopped by a brake band pulled by a lever. However, the effectiveness of such a scheme was also quickly recognized as insufficient, so engineers continued to work on the invention of new mechanisms. The result of this work were two fundamental mechanisms that operate in cars to this day: the drum and disc brakes. They appeared almost simultaneously, at the very beginning of the 20th century, but at first drum mechanisms took the lead. It was not only the authority of Wilhelm Maybach, who installed drum brakes on the car he invented, and Louis Renault, who patented the design with semicircular pads. Drum brakes were simpler, and the development of friction materials helped popularize them. A key step in the development of friction materials was the creation of brake linings based on asbestos and phenol-formaldehyde resins, and this was done in 1902 by Ferodo. In general, the beginning of the century was truly the starting point in the development of braking systems.
However, it took time for disc mechanisms to catch up with drums and become popular. In the early stages they had more problems than advantages: there was no suitable material for the manufacture of discs, in the absence of amplifiers, a mechanical drive system required more force compared to a drum drive, and even a hydraulic drive did not solve the problem due to the lack of normal brake fluid. In general, there were more questions than answers, so at first the use of disc brakes was sporadic. One of the pioneers of their use was William Lanchester, but at that time he was not able to make disk mechanisms a competitive advantage of his machines. For example, on Lanchester cars at the beginning of the 20th century, due to the limited choice of materials, the wheels were bronze, which did not contribute to their wear resistance. However, the patent he received nevertheless stimulated not only himself to continue working on improving disc brakes.
The disk scheme received real development after another 25-30 years. By that time, the hydraulic drive had been worked out, and a vacuum booster was introduced to reduce the pedal effort to an acceptable level. True, in the 30s, the vacuum booster was mainly implemented on American cars with drum brakes, since they were still cheaper and easier to manufacture. However, the coming transition from drums to discs was already tangible and inevitable. True, in the consumer segment it was greatly delayed by the Second World War. In wartime, disc brakes, of course, also received attention, but they were used and improved on tanks and airplanes, and not on passenger cars. Well, after the war, at the turn of the 40s and 50s, such mechanisms began to appear for the first time on production cars.
Of course, the development of disc brakes was accompanied by improvements in design and materials. In addition to vacuum boosters and more efficient brake fluid that did not boil when braking, an important step was the transition to cast iron as a material for the manufacture of brake discs. Moreover, gray cast iron has become such an effective solution that it is still used today in the vast majority of cars. Cast iron, however, did not completely solve the old problems. If cooling was improved by casting ventilated brake discs, then corrosion, albeit external, remained a faithful companion of disc brakes. However, we will talk about corrosion later - but for now let’s move from ancient history to modern history and remember how the efficiency of disc brakes has increased in recent decades.
What determines the effectiveness of disc brakes?
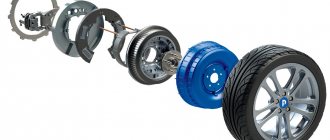
After obtaining an almost ideal recipe of normal cast iron discs, high-quality pads and overheating-resistant brake fluid based on polyethylene glycol and its ethers, the development of disc brake systems went mainly along an extensive path. The transition to ventilated discs took place quickly, as cooling was one of the key objectives for improving brake performance. But then began the search for the ideal balance between the diameter of the brake disc, its design, the material of its manufacture and the design of the brake mechanism. After all, taking into account the fact that the cast iron disk is very durable, holds loads well and dissipates heat well, you can and should put good pressure on it. This is where multi-piston designs came into the picture. Everything here is also simple: if the basic brake mechanism with a floating caliper provides for the presence of only one piston, which presses on the disc and presses the pads against it on both sides, then increasing the number of pistons and, accordingly, the area of the pads allows increasing braking efficiency without significantly increasing the diameter of the pad itself. disk. And this condition is much more important than it might seem: after all, a cast iron disc weighs a lot, so increasing the efficiency of brakes solely by increasing the disc area is practically a dead end due to the unjustified increase in unsprung masses.
In the struggle for unsprung masses, not only multi-piston mechanisms were born, but also composite discs. After all, the brake disc actually consists of two parts: the rotor, on which the pads press, and the central part, which is attached to the hub. In this case, the work of creating braking force falls mainly on the rotor, and it is this that needs to be cooled. But you can and should save a kilogram or two on the material of the central part. This, in fact, is the essence of composite disks, in which the central part is made of a lighter material such as aluminum alloy, and the rotor, attached to it with screws or rivets, is made of traditional cast iron.
The next step here was to replace cast iron with lighter materials such as carbon fiber and ceramics. It would seem that this is a new breakthrough, because carbon-ceramic brakes can be made as large as desired due to their low mass, and their wear resistance and heat resistance only strengthen faith in progress. However, in practice it turned out that carbon composite wheels are good only under extreme loads, when operating temperatures exceed a thousand degrees. In civilian conditions, “cold” brakes work much less efficiently, and it is mainly this dependence of efficiency on temperature that limits their use on mass-produced vehicles.
Thus, the primary material of choice for consumer grade brake rotors remains ductile iron, with the primary focus on workmanship and cooling efficiency. In these conditions, production technologies become important: the quality of raw materials and castings, surface finishing, as well as a well-established bench and practical testing procedure for quality control. All this is available to large manufacturers of brake components with extensive experience and production history, such as Ferodo. It was Ferodo, as we remember, that more than a century ago gave impetus to the development of braking systems with its developments in the field of friction materials. Today, Ferodo products are part of the extensive range offered by Tenneco's DRiV division. The company produces a full line of brake components, including discs, pads, calipers, hydraulic cylinders and hoses, brake fluids and much more.
Now let's go back for a second to the corrosion we talked about above. For cast iron discs, oxidation is not an operational problem, but an aesthetic one: for a cast iron disc to be eaten away by rust, it will take more than a dozen years, but surface corrosion appears on it after just a few months, especially in an aggressive environment such as road chemicals. And Ferodo has a solution to this aesthetic problem: wheels with Coat+ technology, which have a zinc-aluminium galvanic coating to protect the wheel from corrosion. This technology reliably protects not only the hub part of the disc from corrosion, but also the internal cooling channels, ensuring the required efficiency of heat removal during braking. That is, the life of owners of beautiful cars who pay attention to detail and do not like visible external defects becomes a little easier: wheels with Coat+ technology retain their original appearance for many years - subject to proper use and, of course, care.
Conclusion
Finishing the conversation about brakes, they usually talk about their importance, that you cannot save on them, like on tires, and also that brakes are the main condition for safety. Good pads are not just those that don't squeak. Good discs are not just those that came out of the factory smooth and round, but those that are made of high-quality material, have effective cooling and, accordingly, do not deform during active use. Of course, even warped discs can be sharpened in some cases, but miracles usually don’t happen: if they go bad once, they will go bad a second time. We, of course, agree with these truisms, and therefore we talk not only about the theory, but also about the choice of quality products - such as Ferodo. If this brand is more than 120 years old and Ferodo specialists developed and produced brake system parts for carriages back in 1897, and are doing this now for modern cars, then they clearly understand brakes.
Recommendations
Comments 21
And I collected these and hung them in the bathroom above the washbasin mirror - they go perfectly with the chrome faucets on the plumbing. The mechanism is from a wall clock that accidentally fell and broke, and the base is a decorative element that covers the attachment of the chandelier to the ceiling. There were all the holes in it, including the central one, which even matched perfectly in diameter.
How did you mark the hours? 12,3,6,9 is clear, but what about the intermediate ones?
Each point (hole) is a coordinate, x, y. X=cos of the angle multiplied by RY=sin of the angle multiplied by R. And so each coordinate (hole) is calculated and then it is drilled on a coordinate machine.
Yes, with a brake pad (or better yet, with a caliper), the second meaning appears:
I can sell these, I made myself another one. If anyone is interested, write in a personal message.
Source: www.drive2.com
DIY disc brake wall clock
- Sasha Novikov March 19, 2016
- Homemade crafts
Our section of useful homemade crafts has been replenished with a new master class on making a wall clock from a disc brake with your own hands.
Hi all! It so happened that the car service pleased me with a free disc brake that had outlived its usefulness. The idea had been in my head for a long time and finally materialized. The theme of this story is a disc brake clock. I got the brake disc from one of the domestic cars, which is almost irrelevant. It’s just that on foreign cars they are often bigger and more beautiful)).
There are many options for similar watches on the Internet, so I turned my idea 180 degrees. The dial is not on the “convex side”, but vice versa. So, everything point by point. First things first, a good wash, cleaning and grinding of the disc. Next, I welded an eyelet to the disk for hanging on the wall. After that painting. I spray painted it and chose blue. There are 6 holes on the disva. 4 for the landing bolts on the hub, but we need the remaining two. There I screwed in 2 M8 bolts with countersunk heads. On the back side of the disc they were flush with the plane, which does not threaten to scratch the wallpaper. The clock mechanism was purchased separately along with the hands. It is glued to the clutch basket element with silicone sealant. You can also use a glue gun. This element itself is painted silver. Two neodymium magnets from a computer hard drive are attached to align with the protruding bolts on the brake rotor. They allow you to easily remove this part to replace the batteries without completely removing the watch. The beckons hold above all praise and, by the way, do not affect the accuracy of the watch in any way, it’s been verified! Now all that remains is to do the numbers. I bought it for 67 rubles. a set of wooden numbers, painted them the same color as the clock, and attached them with superglue. I refused metal numbers because they are expensive compared to wood, and besides, after painting they will look the same. We put everything together, insert the battery. That's it, the watch is ready! You can hang it on the wall, relax with a cup of tea and enjoy the dimensional movement of your handmade clock!))
HIV in Russia is an epidemic that people don’t talk about / vDud
Pokazuvati elementi keruvannya progravachem
- Published 11 LUT 2020
- Among the many problems that exist in Russia, we want to study those that they either don’t want to talk about or are embarrassed to talk about. For example, the HIV and AIDS epidemic. Some activists talk about it, but certainly not everyone around. Many thought that this disease remained somewhere in the 90s and certainly did not reach the era of high-speed Internet. But this is not so. More than 1 million people live with HIV in Russia. In Russia, 37,000 people died from AIDS last year alone, an average of 100 people a day. In terms of the number of new HIV infections, Russia is comparable—and this is really hard to believe—with many African countries. When we took on this issue, we had a simple motive: to tell people - especially young people - about how not to end up in these statistics. But having already immersed ourselves in the topic, we realized that in addition to the terrible numbers, there was another problem. People living with HIV in Russia are constantly discriminated against, they are embarrassed, they are avoided, they are disdained. In Nizhny Novgorod there is a place that in the summer of 2019 became a symbol of this discrimination. Several dozen children with positive HIV status were supposed to come to this camp site for vacation. The camp site employees, having learned about this, refused to serve them; I had to rest elsewhere.
There was a loud scandal, people were even outraged on TV, the prosecutor's office got involved in checking the camp site, and its employees were subject to maximum public condemnation. We absolutely do not want to provoke this condemnation again; we understand perfectly well that this refusal is not due to the fact that these people have trash cans instead of hearts. That refusal is due to ignorance. The release you are about to see was made to reduce this ignorance. How can you get HIV? Can people with HIV give birth to healthy children? Is it possible to have HIV and live a full life until old age? Why is Russia fighting HIV so ineffectively? Why are sex education classes necessary in schools? In general, educational program for those who are not in the know. Forward! Important sites about HIV: spid.center pereboi.ru evanetwork.ru takiedela.ru/tag/vich
COMMENTS • 69 160
Some of the insides: 00:14 Why we took on this issue 04:27 “A ticket to the pool cost 50 rubles, a hanka stick cost 25 rubles” 5:51 A guy’s reaction when a girl has HIV 6:59 Why did Krasovsky admit, that he has HIV 8:32 Is there an epidemic in Russia? 10:04 Dud takes an HIV test 13:37 “I have HIV” - “Well, okay. It happens” 15:34 How is HIV different from AIDS? 16:30 Is it possible to get pregnant if you don’t cum inside? 23:29 Where to go if you are diagnosed with HIV? 26:54 Romance in Siberian style 28:56 Is it normal to date a guy with HIV and give birth to him? 32:18 What is therapy? 35:10 Where to get pills? 38:05 “If we give pills to all people with HIV, we will stop the epidemic” 42:04 What happens when HIV turns into AIDS? 43:16 How did you get AIDS? 48:41 Seryoga got off drugs. How did it happen? 51:46 Why Katya couldn’t 57:41 VERY IMPORTANT FOR TEENAGERS 59:04 Seryoga has his own rock band. His sidekick also has HIV 1:00:27 “If you infect him, I’ll shoot you” 1:02:08 What do Rita’s parents think about Seryoga’s diagnosis? 1:03:13 “The first people to shy away from us are doctors” 1:06:29 How is HIV transmitted? 1:13:33 If Freddie Mercury got sick now, would he survive? 1:16:13 Great monologue about condoms 1:20:25 Sexual education - why isn’t it in Russia? 1:25:16 What to do if you really want to go without a condom? 1:27:36 Is HIV a CIA conspiracy? 1:28:55 “My dream is to live longer” 1:35:26 Why doesn’t the government respond to the epidemic? 1:37:29 Replacement therapy - what is it? 1:45:25 Dud found out the test results 1:46:43 The whole episode - in TWO MINUTES
No. Country % of HIV-infected 1 Swaziland 27.20 2 Lesotho 25.00 3 Botswana 21.90 4 South Africa 18.90 5 Namibia 13.80 6 Zimbabwe 13.50 7 Zambia 12.40 8 Mozambique 12.30 9 Malawi 9.20 10 Uganda 6.50 11 E quatorial Guinea 6.20 12 Kenya 5.40 13 Tanzania 4.70 14 Central African Republic 4.00 15 Cameroon 3.80 16 Gabon 3.60 17 Bahamas 3.30 18 Rwanda 3.10 19 Congo 3.10 20 Guinea-Bissau 3.10 21 Nigeria 2.90 22 Ivory Coast 2.70 23 South Sudan 2.70 24 Haiti 2.10 25 Togo 2 .10 26 Angola 1.90 27 Belize 1.80 28 Sierra -Leone 1.70 29 Gambia 1.70 30 Jamaica 1.70 31 Liberia 1.60 32 Guyana 1.60 33 Ghana 1.60 34 Guinea 1.50 35 Suriname 1.40 36 Barbados 1.30 37 Estonia 1.30 38 Djibouti 1.30 39 Chad 1.30 40 Trinidad and Tobago 1.20 41 Thailand 1.10 42 Ethiopia 1.10 43 Burundi 1.10 44 Benin 1.00 45 Russia 1.00 46 Mali 1.00
DIY wall clock made from a brake disc
Wall clocks serve several different functions. They show the time. They add a unique twist to the overall picture of the interior. But buying a simple watch is somehow not Mozgochin’s style. A watch should demonstrate the inner world of its owner. And what could better emphasize the spirit of the “homemade motorcycle enthusiast” than a watch made with your own hands from a brake disc from a motorcycle.
Author: Sergey Ivanov
SteelWood channel : not to impose “what and how to do”, but only to present an idea that everyone can play with to their own taste and vision. To show that nothing is impossible, and everyone is capable of much, the main thing is to try.
Materials:
- copper wire;
- plexiglass;
- hot glue;
- brake disk;
- clockwork;
- gear from a bicycle.
Tools:
> Buy as a gift or order a unique item
- More about the author
- 15 recent entries
About alexlevchenko
- DIY homemade refrigerator alarm – 04/03/2020
- DIY bicycle stand – 04/01/2020
- DIY garden lamp – 03/30/2020
- Do-it-yourself mini sauna in your backyard – 03/28/2020
- DIY dollhouse – 03/24/2020
- DIY “Alien Abduction” Lamp – 03/23/2020
- Emergency stock of non-perishable products – 03/22/2020
- How to make a bicycle trailer without welding with your own hands – 03/22/2020
- DIY waterproof fire starter – 03/21/2020
- DIY children's washing machine – 03/20/2020
- DIY board game “Dodgeball” – 03/18/2020
- DIY camp cutlery set – 03/15/2020
- Kalimba - a musical instrument made from garbage with your own hands - 03/14/2020
- DIY decorative arched tunnel – 03/13/2020
- Assembling a first aid kit with your own hands – 03/11/2020
Add a comment Cancel reply
Materials for production:
- Brake disk.
- Clock mechanism (can be purchased at a store or removed from an old watch).
- Bicycle sprocket.
- CD disk.
- Hot melt adhesive.
- Chain.
- Spark plugs (2 pcs).
- Dye.
The process of making homemade products is as follows:
We take the brake disc and thoroughly clean it of rust; this can be done using sandpaper; if possible, it can be sandblasted.
We paint the central part of the disk with black paint.
Now let's make a dial; the circumference of the disk needs to be divided into twelve even parts.
Let's drill these holes.
We also paint the brake pad and attach it to the disc.
In the central part of the disk on the reverse side, install the clock mechanism and glue it with hot glue.
To hide the clock mechanism from the front side, take a CD, paint it black and glue it in the center of the disk, and glue a bicycle star on top.
Then we attach the chains and spark plugs to the bottom of the disk.
The result is a homemade wall clock made with your own hands.
In this video, the author shows in detail how to make a clock from a brake disc.
Source: samodelki-n.ru
Independent work
If desired, you can do the grooving of the brake discs yourself. As indicated in the manual for domestic models, it is necessary to remove the disk and carefully process any defects that appear with a file.
Again, it is important not to overdo it and constantly monitor the thickness with a caliper
If you don’t have time for such long work, you can do it easier. Raise the car on a jack and remove the wheel. Now start the car and put it in fifth gear.
As soon as the disk begins to rotate, you can use the same file to clean it. Often, experienced car enthusiasts use a special emery disc with a large “grain”.
Upon completion of work, it is necessary to clean the disk and degrease it with a solvent.
This grinding method is one of the best for all front wheel drive vehicles. In this case, the work can be done in 1-2 hours.