The ability to navigate time is a useful skill for both adults and children. Having decided that it is time to teach your child to tell time using a clock, you need to choose the right method for explaining the basic principles. In the process of learning about clocks and time, difficulties often arise because children do not understand what their parents want to say. And the latter cannot always clearly explain the principle of operation of the clock and the concept of time. Children's educational paper clocks help many people with this. The learning process using visual aids is noticeably faster. And due to the fact that the child gets the opportunity to independently move the arrows, the activity turns into a game.
It’s best to start making watches together with your child. Before this, the parent should figure out how to make a craft, how to attach the hands to a cardboard clock, and what will be needed for this.
Why do you need to make crafts?
Most people think, is there any point in making crafts for children with their own hands? After all, it’s still unknown what can turn out beautifully, and even the first time. In addition, it will be a pity for the wasted time, wasted material and ruined mood.
And here the most important thing is to think about your children. After all, they are the ones who need crafts, especially in kindergarten or school. Therefore, your children should not be upset that you may not succeed in the craft and will be laughed at in the group. Allow your children to feel proud of themselves and of you, and also bask in the glory*.
A little secret: for everything to work out, follow the instructions strictly.
What are the benefits of needlework?
The main advantage of handmade creations is that you don’t have to worry about manufacturing standards, which can lead to defects.
The most important thing here is you, consisting of creativity and imagination. You are a master and creator. Any craft you make will give people joy and beauty.
But before you start creating, you need to understand the basic ideas of making crafts. More on this in the next heading.
Ideas for making crafts
In truth, for a modern person, no matter what age, the wrapper is extremely important. For example, candy. It will seem tastier if it is packed in a candy wrapper with your favorite movie character, rather than in plain paper. The same thing applies to making crafts together.
Therefore, to ensure that the creative process proceeds without any problems, use material that your child likes. These could be Lego men, cars, stickers, prints with superheroes. In a word, everything he doesn’t go to bed without.
Making crafts together contains not only a creative, but also an educational process for the child. Since it is essential to teach a child how to use a watch from an early age, this activity is ideal for children. After all, with the help of a watch, a child will learn to tell the time and learn numbers.
The topic of ideas for making such crafts deserves special attention. There are a sufficient number of them. The main thing is to choose an idea that will be understandable and interesting to the baby, and which you yourself can explain to him in simple and accessible language.
Clock crafts are one of the main homework topics for kids. In order not to put it off for too long, let’s start creating it!
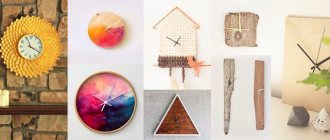
Craft clock with hands
In order to make a craft clock with hands with your own hands, we will need the following materials:
- Colored paper;
- Glue;
- Scissors;
- Hole puncher;
- Small button;
- Threads with a needle;
- Templates in the shape of a circle made of paper.
- The first template is a regular circle, and the second template is 2-3 centimeters larger in diameter and has a border.
Now let’s begin the creative process of making crafts:
- Place the colored paper face down and trace the second template on the inside;
- Draw a circle on a white sheet;
- Cut out both options;
- Glue two templates by placing them on top of each other
- You will need 12 circles to indicate numbers. To do this, fold a strip of paper into an accordion and draw a circle on the base.
- We cut it out and what we need appears before our eyes;
- Glue and draw numbers;
- Cut out the arrows;
- Thanks to the buttons we will fix them.
The product is ready and can be pleasing to the eye!
Find Us on Facebook
The hands are secured to the dial using a bolt and nut. At the top and bottom of each arrow, washers cut from thin tin or sheet brass are placed on the bolt - circles with holes in the center. A stand for the dial is cut out of plywood - a rectangle measuring 55x30 centimeters. The dial for personal use of schoolchildren is made of cardboard. You can not paste the circle with the clock markings, but draw it directly on the cardboard square if you paste the cardboard on both sides with paper.
You can secure the hands to the dial with wire and place washers. The pointer is made from a pine strip about 80 centimeters long and with a cross-section of 2×2 centimeters. Large demonstration models of a cube and a parallelepiped are glued together from cardboard. Small models can be made from thick paper. Having cut out the development, make light cuts along the dotted lines with a knife along a ruler and then bend the cardboard in the opposite direction. If the development is cut out of paper, then the folds are smoothed with a smoothing iron or a pencil eraser.
Lever scales, in turn, can be manual or tabletop. Manual lever scales do this. A rocker arm is cut out of plywood or a thin strip - a strip 20 centimeters long and 2 centimeters wide. The finished scales are finally balanced by gluing strips of paper or foil to one of the cups from below. Tabletop lever scales are made mainly of wood. A rectangular base and a stand are cut out of a piece of board, and a rocker is cut out of plywood.
At one of its sides, in a hollowed out hole, a square section stand is secured with glue. The arrow is made of copper or iron wire. One end of the arrow is flattened with a hammer into the shape of a spatula and sharpened with a file.
You can make a dial for mastering the concept of time with your own hands from thick paper, cardboard, or paper glued to cardboard. Pieces of a circle cut out of paper at 45, 90 and 135 degrees will also help. We offer a simple clock layout for learning time with your child. Thank you! For older children, as an option, you can make a dial with small numbers under large numbers - under 1 hour 5 minutes, under 2 - 10, under 3 - 15, etc.
How can you make a craft from cardboard?
Kids cannot immediately learn to navigate by a clock, so this themed craft will help your child fill the gap in this matter.
The main material we need to make such a craft is a cardboard box. Next, we draw on it all the elements we need and cut them out with a stationery knife.
Additional materials:
- The numbers are made independently in any shape;
- We make an alarm clock. For this we need horns.
- We paint them yellow. Apply paint using a protective layer so as not to stain the table;
- The heart of the watch is the CD;
- Glue the numbers;
- For convenience, we paint the arrows in different colors;
- We fasten the arrows with disks on both sides
Everything is ready, watch and enjoy!
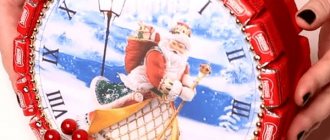
New Year's clock in 10 minutes from a disposable plate and beads
Now I want to share with you the simplest craft creation. It's done quickly, literally in 10 minutes.
Needed:
- disposable plate,
- beads for the Christmas tree,
- double sided tape,
- batteries and clockwork,
- scissors and awl.
It is better to take beads with glass beads of the same size, then the watch will turn out neater.
It is better to use a paper plate; it does not rustle like a plastic one. Make a hole in the center with an awl.
Then we turn it with the convex side towards us. And cover the entire side with double-sided tape. Without tearing off the protective film, unfold the plate and cut off the unnecessary edges of the tape.
Now we tear off the protective layer.
We insert the clock mechanism.
We take the beads and begin to glue them from the mechanism, twisting them into a spiral.
This is how it all works out.
We attach arrows.
In the light of the garland, the beads will begin to shimmer and play with reflections.
It turned out very festive.
How to make a craft for the New Year?
To make a craft for the New Year, we will need the following materials:
- Box;
- Colored paper;
- Glue;
- Tinsel;
- Decorative elements: Christmas tree toys, snowflakes, stickers, rhinestones, etc.
The materials have been prepared, then we will proceed to the manufacturing process.
- First, cut out numbers and divisions from colored paper;
- We stick them on the lid of the box;
- Next, fill the box with tinsel and close it;
- Then we use glue to fix the box more tightly;
- We decorate the dial with decorative elements and hang Christmas tree decorations from below.
That's all, the New Year's craft is made in the best possible way!
New Year's clock from a tin of cookies or tea
You may have previously purchased tin boxes with tea or cookies inside. Manufacturers often release them before the holidays as gifts. This is the packaging we’ll use as the basis for such a beautiful New Year’s watch.
Let's take:
- cookie tin,
- tinsel,
- 2 wine corks,
- printout of the dial,
- glue sticks and heat gun,
- decor
First, let's measure the diameter of the box so that we can print the design in the size we need.
Cut out the picture and try it on the front of the can.
Cut out two arrows from green cardboard. They can be decorated with beads.
Using glue sticks and a heat gun, we fix two plugs at the bottom of the box. Our watch will be on it. And also glue the dial pattern.
We decorate the sides with tinsel.
All that remains is to make the decor.
You can glue pine cones onto the tinsel.
That's all, also a quick craft for your piggy bank.
How to make a craft from scrap materials?
The craft is prepared on the basis of cardboard using various improvised means. These are materials of natural (cones, leaves, acorns) and household value (cereals, pasta). This is one of the best options for making such crafts for your baby.
It is relevant mainly for preschool children. It is usually prepared for the autumn holiday, or for the New Year.
With a high probability, creative activities will appeal to you and will open up new horizons for you. Since the creative process takes over quickly, it will lead you to more complex and professional work.
As a result, making crafts can become an additional source of income or your main profession.
The only important thing is that you will combine business with pleasure: do what you love and receive monetary rewards and gratitude from clients for it.
Several other options
How to make a craft clock using a different material?
Each season gives us its gifts, from which we can create extraordinary things.
In the summer we can collect shells or pebbles, in the fall we can collect colorful foliage, pine cones, chestnuts and acorns. There are many ideas using natural elements.