Advantages and disadvantages of products
Twine is widely available and could always be purchased at any hardware department or store. Currently, high-quality fiber is produced, softer and more manageable in work, in different colors. All new items are available in craft stores.
The advantages of crafts made from jute twine are as follows:
- Durability; a high-quality product retains its shape and color well; the natural straw shade does not fade or fade over time;
- Environmental friendliness; twine does not emit harmful fumes;
- Ease of processing;
- Low cost; jute threads and fabric cost much less than linen and cotton.
This natural material also has disadvantages:
- With active use of fibers, tiny fibers fall off, which can provoke or aggravate allergies;
- Perfectly collects dust and odors, requires ventilation and cleaning;
- Quickly absorbs moisture, after which it dries for a long time; When wet, it accumulates bacteria and mold spores;
- The fiber is quite stiff, so it can rub your hands during the weaving process; for the same reason, it is not recommended to make hat ties, bag handles, and beads from twine.
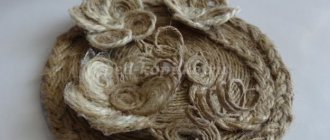
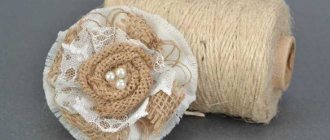
Openwork flowers
Crafts made from twine can complement compositions made from third-party materials, and openwork flowers are among such decorations. Also, such curls, which have an unusual design and are light in weight, can become the basis for a pendant, earrings, or brooches.
Flowers are made according to the following algorithm:
- The threads are cut into strips of equal length.
- If necessary, the twine is painted with stain.
- The strips are cut into segments of seven centimeters.
- Each piece is leveled and one end is left curled.
- Assemble a flower using wire with beads at the end as stamens.
There is another option: twist five circles of the same diameter in a tight spiral, place them on top of each other and secure with glue. Use a contrasting thread (white paper twine) to decorate the edges of each petal and mark the core.
Simple curtain tiebacks
Tiebacks made from twine work well with linen or cotton curtains. They are easy to make, and you can start working with this material with them.
For grabs you will need:
- Two CDs or thick corrugated cardboard;
- A ball of twine;
- Two wooden or plastic skewers.
The ends of the thread must be fixed with hot glue or “Moment”.
Step-by-step instructions for beginner needlewomen:
- Draw a circle with a diameter of 7 cm on the disks, carefully cut them out so that you get a solid “donut”.
- Unwind a few meters of twine and cut it off.
- Glue the tip of the twine to the disk and wrap it tightly around the workpiece.
- When the thread runs out, take the next piece. Wind without gaps or gaps, in several layers.
- When the entire disk is wrapped, hide the tip of the thread inside and secure with glue.
- Wrap wooden skewers at the blunt end with twine.
- If desired, you can decorate the tiebacks with curls or other elements of jute filigree.
The hooks are ready. The curtain is looped through the tie hole and secured with a skewer. Just like from a disk, the pick-up is made from cardboard.
What glue to use for twine
As a rule, the type of glue depends on the process of creating the work from twine. Experienced craftsmen recommend using a special glue gun and transparent colored sticks for it.
When working with it, you need to be careful not to get burned, watch the strength of the glue flow, do not squeeze out a large amount, so that excess glue does not crawl out and form threads.
Titan and Master glues are also very suitable - they are quickly absorbed, and excess residues from some surfaces are very easily removed.
For beginners or small craftsmen, it is best to create their first work with PVA glue, and then get acquainted with other types.
Decorative vases and bottles
Decorative vases can be made from fancy-shaped bottles. You just need to wind the twine tightly and secure its ends with glue.
Tall narrow bottles and bottles with handles look great with jute. This way you can breathe a second life into an old (cracked and glued) jug or teapot.
As a rule, decor is not limited to simple wrapping. You can add decoration:
- Bouquets of dried branches and herbs;
- Shiny beads and glass aquarium pebbles;
- White lace or macrame elements;
- Contrasting bright threads and ribbons.
Or you can lighten some of the fibers and wind the jute in fancy stripes.
Basket for all kinds of small things
The wrapping technique does not end with the methods of making any container or container using twine. With the right skills and a little patience, anyone can create a complete storage basket for small items. To make such a container, you just need to select any plastic container of the size you need for the box. You will also need standard tools for a craftsman's work: reliable glue, scissors and a hook. Production will take place in the following stages:
- In addition, twine is wound in vertical strips at the bottom of the container. If necessary, you can use a hook to wrap like this.
- In the upper part of the selected plastic container, it is necessary to make cuts located at the same distance from each other.
- Let the glue dry and remove the container. The container is ready!
- You will need to wind the twine vertically through the drilled holes.
- At the end of the wrapping process, the twine is cut and the end is sealed so that it is not visible.
- To complete the work, you need to turn the container upside down and secure its bottom with glue.
Bottle animals
It’s easy to make a series of animals using a bottle wrapped in twine. Most often they create cats and cats, and owls are created from wide egg pods. The technology for making rope crafts is the same, you just need to make another head and decorate it accordingly.
For the base of the head, it is good to use a foam ball of suitable diameter. If you don’t have this at hand, you can make a base from wet paper and PVA glue using the papier-mâché technique. Soft paper is best - toilet paper, newspaper.
Jute filigree - arts and crafts
In relation to this type of needlework, the word “art” can be applied. The complexity of the patterns and the spectacularity of the final result do not allow us to call paintings, panels or caskets crafts made of jute.
It’s possible to make such beauty with your own hands, but you will need a lot of patience and the following materials:
- Twine (natural color and dyed);
- Template (drawing) on paper;
- Film, package or file;
- Needle (you can take an awl, a short knitting needle or a toothpick);
- PVA glue or transparent;
- Stationery knife.
If the product is flat, then a press is used to level the surface. Transparent acrylic varnish is used to secure finished products.
Numerous decorative elements - beads, rhinestones, stones, ribbons, lace, coffee beans - are selected for a specific job.
Fabric souvenirs
Burlap is woven from jute fiber. You can also make a lot of interesting things from this fabric:
- Souvenir bags for storing fragrant herbs and spices;
- Flowers (often roses);
- Rustic style dolls;
- Bags and clutches;
- Curtains and organizers;
- Tablecloths and capes;
- Pillowcases for sofa decorative pillows;
- Lampshades.
Crafts made from burlap look best in Provence, chalet and country style interiors.
Amulet for the home - DIY burlap doll in half an hour
Many modern handmade works inherit the customs and traditions of folk crafts and arts. Products made from natural materials, in particular burlap, become irreplaceable home amulets created in this style.
These can be bags with medicinal herbs, grain mice and various toys. You can learn how to create a folk-style burlap doll yourself by reading the contents of this master class with step-by-step photographs. The designer's amulet will attract good luck to your home and will serve as a good gift for the New Year or other holiday. Take a little time to enjoy the process and the result!
Preparation stage - what is needed for MK
Take to work only in a good mood to charge the amulet with positive energy! To make a doll from burlap with your own hands, you will need a little time and a small set of materials:
- a piece of burlap 30x50 cm (you can use a bag of natural coffee beans);
- scissors with curly teeth (this model of scissors will prevent cutting and shedding of the burlap);
- half-liter plastic bottle for the base of the product;
- threads in the color of burlap;
- cord made of coarse threads, twine;
- cotton wool or other type of filler.
Step-by-step technique of the magical process
At the first stage, the doll's head is made. For this purpose, cut out a 10x10 cm square of burlap.
It is stitched with thread along the entire diameter of the cut flap, rounding the corners. Place cotton wool or other selected filler inside and tighten the thread, giving the toy element the shape of a ball.
The resulting ends of the material are tightly inserted into the neck of the plastic bottle. If desired, you can secure the material inserted inside with silicone glue by applying a thin layer to the inner edge of the neck.
The next detail of the doll is the hands. To make them, you need to cut a strip of burlap, join it along the long edge with a seam and turn it outward. Symmetrical cuts are made on the sides of the bottle, into which a manufactured part is passed, imitating the hands of a burlap doll. Using fragments of lace, the sleeves are pulled together at the wrists. The lace is tightened tightly. At the next stage, the body of the amulet is decorated. To do this, cut out a piece of burlap, the length of which corresponds to the height of the bottle without a neck, and the width to its diameter. In the flap, sewn lengthwise and turned outward, cuts are also made for the arms and the doll is “dressed.”
Using a thin strip of base material, the neck of the toy is decorated. All that remains is the matter of the apron. To make it, you should prepare a square of burlap measuring 15x15 cm and a cord. The square is stitched on three sides or stitched, first turning each edge half a centimeter. At a distance of a centimeter from the top edge of the apron, you need to pass the lace.
The upper edge of the part is folded inward above the threaded lace. The apron is put on the doll directly under the arms and, after slightly pulling the lace, it is tightly tied on the figurine. This one-of-a-kind exclusive amulet toy will be an excellent gift for family and friends. You can make it and present it for housewarming or Christmas, making it a kind of talisman for a family that welcomes folk traditions and passes them on to their descendants.
If this is your first time taking up this handicraft, then read more about burlap crafts in another article in our magazine “Women’s Hobbies”.
Author of the master class: Olga Shakhovskaya