Today, everything unusual, natural and handmade is in fashion. Not everyone can afford designer items, which do not always bring joy. A DIY craft will help you relax when making it and will be pleasing to the eye in the future. Twine weaving for beginners will not cause any difficulties if you carefully read our article.
Before mastering twine weaving, it makes sense to understand the concept of twine. Each of us has string in our household, which is also called twine. Twine is a thin, strong rope that looks aesthetically pleasing and neat.
There are such types of twine: textile, polypropylene, jute, flax-hemp, polished flax. All these types of twine are intended for various types of products. For example, textile twine is used for stitching and packaging products. It is made from yarn fibers, thin strips of paper, and films.
Products made from this material are unusual, practical, original and last quite a long time. All crafts will bring you a lot of positive emotions. Once you try making things, accessories and many other nice little things from twine with your own hands, you will understand how exciting it is! Here's an inspiring photo:
Polypropylene twine is a thread that can withstand very high temperatures: up to 50 degrees Celsius. This material is very reliable; neither acid, nor alkali, nor moisture will spoil it. This material is usually called cord.
Decorative vase - the basis of creativity
Making a basic model is very simple. You will need a bottle with a wide neck, hot glue and the twine itself. It would be good if the bottle had an unusual shape.
You need to cover the bottle with twine, starting from the bottom. Place the thread on the glue in a spiral, tightly, so that no gaps form. And then, on the basis obtained, you can give free rein to your imagination.
The photo gallery of twine crafts reflects some popular decoration ideas:
- snow-white lace, ribbon bows;
- beads, decorative stones;
- pattern woven from twine using macrame technique;
- coffee beans;
- shells;
- compositions of natural spices and aromatic herbs.
Blood Knot
The Blood Knot allows you to tie braided line to braided line together. It can also be used to tie monofilament to monofilament, but they should not differ from each other in diameter by more than twice. The bloody knot retains up to 75% of the strength of the fishing line and passes well through the guides of the rod. The knot got its name because it was used to make a thick knob at the end of a whip, which was used to punish guilty sailors in the navy. Also known as Snake Knot.
To tie two lines together using a Bloody Knot, follow these steps:
- Place two lines parallel to each other
- Wrap one end of the line around the other line 2-3 times
- Wrap the end of the fishing line back and pass between the two fishing lines until the turns
- Make 2-3 turns around the first line with the end of the other line.
- Pass the end of the fishing line through the middle loop, in the opposite direction from the end of the singing line
- Wet both lines, tighten the knot, cut off the excess ends of the line
When tying two monofilaments, the number of turns should be doubled, to 4-6.
Coloring
Many needlewomen value jute precisely for its natural straw color. This gives products made from it a cozy, rustic look. But besides decoration, crafts made from jute twine can be painted.
Playing with color is appropriate in things that are simple in form and execution. There are two options: change the color of the thread before work or color the finished souvenir.
Who invented the lasso?
We know, they say, that you, Pecos Bill, are the most famous among us, that you invented the lasso and learned the language of coyotes. They were dressed in guanaco or nutria skins and armed with spears twenty feet long, knives, slings, bola and lasso.
Interesting materials:
How to find out the LG TV number? How to find out the color number in Paint? How to find out a number in Mercury? How to find out the number in Mgts? How can I find out my Wildberry order number? How to find out whether a number is registered or not? How to find out Zheu's number by address? How to find out the number of the golden crown? How to find out numbers on the blacklist? How to find out the balance on a Tinkoff Bank loan by agreement number?
At the preparation stage
Jute can be lightened before work. To do this, the thread must be soaked in any chlorine-containing bleach, for example, “Belizna”. The output will be light beige or milky colored twine.
Bleached thread can be dyed:
- special dyes for cotton fabrics;
- onion peel (color range from yellow to brown);
- pharmaceutical green;
- iodine
Food dyes do not provide long-lasting coloring and stain your hands while working, so they are not used for twine.
Scope of application
The easiest way to illustrate the operation of swing doors is using the example of cowboy salons. They say that cowboys used to ride into a bar directly on a horse, but, as you understand, the horse, as you understand, cannot open the door for itself. That's why they came up with structures that move freely around an axis in any direction.
Now the scope of application of pendulum loops has become mainly places with high traffic volumes of people - retail premises, train stations, subways. They are also convenient in cases where it is difficult for a person to open the door towards themselves. For example, if his hands are full, or he is a wheelchair user.
Therefore, double-sided door hinges are often used in medical institutions, catering establishments, warehouses, as well as in apartments where elderly or disabled people live.
But such structures do not always perform only a utilitarian function. They fit very organically into some interior styles. For example, the last picture shows a decorative wooden gate, stylized as the entrance to a cowboy saloon.
Twine cat
To make it you will need:
- regular and lightened twine;
- Glass bottle;
- wire 15-20 cm;
- foam ball for the head (large);
- foam ball for nose (small);
- hot glue;
- 2 black beads for eyes;
- black paint or marker;
- scissors, pencil.
Steps
Part 1 of 2:
Tying a knot
- 1
Make a loop so that the working end is on top.
By the working end of the rope we mean the end at which you will tie the knot. The other end (the longer one that you'll hold onto when, say, throwing a lasso) is called the root end. To begin tying a running knot, wrap the working end over the main knot to create a 10-15cm loop. X Information source
The process will be similar for any material - rope, twine, cord or fishing line.
- 2
Place the long end of the rope over the center of the loop.
Hold where the working and main ends intersect to prevent the rope from straightening out. Then bend part of the root end and place it on top of the already made loop in its center. X Source of information
- The size of the first and second loops should be approximately the same.
The resulting figure will somewhat resemble a pretzel.
- 3
Pull the root end through the center of the loop.
Move your hand under the first loop you made and grab the root end, which is on top. With your non-dominant hand, hold the point where the ends meet and pull the root end away from the loop. X Source of information
Part 2 of 2:
Tie a loop
1
Pull the root end down to create a bend. Continue pulling the root end through the loop to create a bend—the opening of the knot. The bend is the part that will be wrapped around the object tied with the loop. As you pull the end through, the two loops will tighten and shrink. X Source of information
2
If desired, pull the loops forming the knot down to reduce the bend. Like a slip knot called a slip bowline, your knot will tighten as you pull on the bend
Before you finally tighten the knot, you can make the loop smaller by carefully loosening the tight loops that form it. X Source of information
3
Pull the loop and working end away from the other end to complete the knot. To finally tie the knot, take the loop in one hand and the tip of the working end that sticks out of the knot in the other.
Pull both parts in opposite directions to fully tighten the knot. Once the knot is securely tightened, you're done! X Source of information
- Using a lingering noose to kill animals or to hang stuffed animals or dolls resembling people (especially political figures and other controversial figures) is a crime in some countries and is subject to criminal prosecution. X Source of information
- In some countries, a snare is considered a weapon and you can be arrested for possessing one.
- If suicidal thoughts occur to you, stop and get help
. If you need urgent help, call the single emergency number 112 or the hotline: Psychological Help Line of the Ministry of Emergency Situations of Russia, 8 (495) 989-50-50 (toll-free in Moscow) - Crisis helpline (free in Russia)
- Helpline for children, teenagers and their parents: 8 (800) 200-01-22 X Source of information
- There is a section with hotline numbers in different countries on the International Association for Suicide Prevention website (found here), as well as on the Befrienders Worldwide website (here).
How to make a cat
The design, based on the same bottle as in a decorative vase, is a little more complicated. A step-by-step guide will show you how to make a cat-shaped craft from twine.
- Wrap the bottle with twine, as for the vase. This will be the body of the cat.
- Also wrap a large foam ball - the future head.
- Glue the head to the body.
- Wind the twine around the wire to create a tail.
- Cut a small foam ball in half and paint one half with black paint - this will be the nose.
- Twist 8 circles from lightened twine in a spiral, fastening the working thread with glue. The diameter of each circle is about 2 cm.
- Using regular twine, make four circles of 6-7 cm in diameter, also laying the thread in a spiral. These are the cheeks and paws.
- For the ears you need to make triangular blanks, lined with twine in a spiral. If for the first time it is difficult to lay out the thread, respecting the corners, you can use a paper backing. The length of the side of the triangle is 4-5 cm.
Lassoknoten – Wikipedia
From Wikipedia, the free encyclopedia
With Lasso knot
different nodes are called, but usually also have other names. The knot described here does not correspond to the running bow in sailing.
statement
The lasso knot is used by cowboys to lasso cattle and horses. It is used to create a fixed eye (= loop) at one end of the rope. A rope, usually made of rawhide, is passed through this loop, forming a lasso loop
It is very important that the loop is as round as possible so that the rope can pass through it easily and the loop can be easily pulled. The diameter of the loop is equal to the size of the ring made from the index finger and thumb
When thrown, the loop has a diameter of about 1.5 m.
Knot
First, a peephole is installed.
You then slide the free end into the eyelet as follows: if the fixed end is at the bottom, you move the free end at the top into the small eye (if the standing end is at the top, you move the free end at the bottom into the small one eye).
This creates the real eye of the node. Then you drive around free
end (i.e. the one that forms the actual loop) and pass back through the eyelet so that the two ends come out of the eyelet parallel and can be pulled together.
- Production
Similar looking bowlin
The lasso knot should not be confused with the bowline. Although it is similar to this one, it is a different knot and is tied differently.
Cat assembly
- At the bottom of the bottle at the front, glue two large circles (legs). Glue three small white circles onto each paw. Glue the tail to the back and bend it arbitrarily.
- Glue the remaining two large circles (cheeks) onto the head, with a dark nose between them. Above it are the last two white circles. These will be the eyes. Glue black beads in the center of the eyes.
- Glue the ears on the top of the head, bend them if necessary.
- The cat is ready.
Additionally, you can decorate the animal with a bow on its neck, place it in a decorative basket or slippers.
Kitty
The body of an elegant cat is a bottle wrapped in a cord. Round head made of polystyrene foam, also decorated with twine. The parts are connected and a wire tail is attached. You can depict rounded paws with claws. The ears are triangles, the eyes are beads. The final touch is to tie a bow around your neck.
Craftsmen experiment, striving for realism, adding convex cheeks, mustaches and other details.
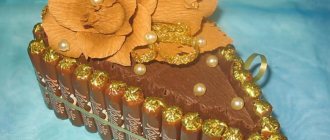
How to make a couple of candy bowls
- Inflate the balloon and tie it tightly.
- Wrap the ball with twine to your taste. The fewer turns of thread you make, the more delicate the product will be. As the number of threads increases, the reliability of operation also increases.
- Dilute PVA glue with a small amount of water.
- It is good to saturate the workpiece with glue on all sides.
- Let dry.
- Pop the balloon.
- Cut the twine piece in half with scissors. You can cut straight, wavy or zigzag.
- Weave a braid from twine threads and paste it over the edge of the candy bowls inside and out.
- The candy bowls are ready. If desired, they can be additionally painted with acrylic spray paint.
Manila
Manila is a type of natural rope once made from Manila hemp. Nowadays it is made from the abaca plant. It is very durable compared to other natural ropes and is more resistant to moisture and rot. It also provides excellent abrasion resistance and very low elongation.
Because manila rope is very durable and rot-resistant, it can be used in many applications. Ancient fishermen used manila rope to make fishing nets, while common use today applies to any outdoor or marine environment - ideal for rope swings. This rope is flexible and easy to tie, but will shrink when exposed to water, which will likely make any tight knots even tighter.
Suitable for: outdoor, decoration, fishing nets, marine applications.
Twine filigree
Jute filigree is no longer just crafts made from twine and ropes, but a whole art. The algorithm of work is the same as with precious metals. The pattern is laid out step by step with threads, only these threads are not gold, but jute.
Decorative stones, shiny rhinestones, and iridescent beads look harmonious in the curls and petals of the ornament.
Story
Cowboy doors were two-way bar doors found in saloons. Today they can be found in cafes, bars, restaurants and other establishments, the interior of which is stylized as the Wild West. However, the history of the origin of unusual structures is unknown. There are several versions of why swing designs became so popular in cowboy saloons.
Saloons were indoor spaces where cowboys gathered to relax and drink whiskey and other alcoholic beverages. There was such thick tobacco smoke inside that the doors, which covered only part of the opening, were the only air conditioning system providing air circulation.
The design was also convenient for tipsy cowboys who entered and exited the saloon. In the evenings there were so many visitors that a simple door leaf could not withstand constant opening and closing. It was not uncommon for cowboys to enter the saloon on horseback, making it difficult to open and close the door manually.
Since there were often bandits among the cowboys, swing doors helped to notice in time who had come into the saloon: a client, a notorious thug or a sheriff. Such designs also prevented the appearance of angry wives, whose husbands spent all their money in saloons and had fun with prostitutes.
What you need for work
In addition to the twine itself, you need to prepare:
- pattern template, printed or drawn on paper;
- file or transparent film;
- PVA glue;
- a knitting needle or toothpicks (for laying out threads and removing excess glue);
- press (for flat work);
- sharp scissors.
Options/Settings Panel
All three tools have the same options bar settings. The only exception is Magnetic - several more have been added.
Magnetic lasso also has the following additional settings:
Click to enlarge
Width
Determines how close to the edge of an object the mouse pointer must be for the object to be selected. This field is initially set to 10 pixels, but you can enter a number between 1 and 256.
Use a lower number when trying to select an edge that has many turns and corners, and a higher number when trying to select an area with fairly smooth edges.
You can also set the width value directly to 1 (unit) by pressing Shift+.
Contrast
Controls how strong the color difference between adjacent pixels must be for an edge to be recognized. You can try to increase the percentage if you want to select an edge that is not very visible.
Frequency
Determines how many anchor points the tool sets. If you're selecting an area with a lot of detail, you'll need more anchor points than for smooth areas.
Setting this field to 0 allows you to add just a few points, and setting it to 100 allows you to add many. The initially set value is 57, this is the optimal value.
How to lay out a pattern
These twine crafts are easy to make with your own hands if you have patience and free time. The sequence of actions is as follows:
- Place the patterned paper in a file or wrap it in film.
- Apply glue to the main lines of the pattern and lay out successively with twine.
- Lay out small elements of the pattern one by one (curls, loops, petals). There is no need to cut small pieces from the twine in advance; it is better to lay out the whole thread. And cut off at an angle when the element is laid out and glued.
- Allow the product to dry completely. It is better to put flat work under a press, after covering it with another layer of film.
- After drying, carefully separate the product from the film and cut off any remaining glue.
- Painting, varnishing, decorating – the final touches.
Where do you get slime from?
This material can be obtained from special mobs - slugs. Their habitat is deep caves (below the fortieth level) and open canyons. Large individuals identify themselves with characteristic slapping sounds, by which they are easy to find. After the game was updated to version 1.4.2, slugs began to appear in swamp areas at night. You should be careful when hunting these mobs - the “giants” cause serious damage, and before death they are capable of dividing into several smaller individuals. Baby slugs are completely harmless and can be easily killed with just one blow. The only thing to be wary of is that they could cause the player to end up in lava.
One mob can drop from zero to two units of mucus. Using this material, you can create not only rope - you can also craft a sticky plunger and lava cream. A good solution would be to build a farm in the place where the most slugs appear.
Photos of twine crafts
Personal organizer
This device is very useful for storing and conveniently using office supplies.
To make it, in addition to the materials listed above, you need to prepare cardboard boxes of various sizes and decorative details: beautiful ribbons, sequins, beads, rhinestones, etc.
Event plan:
- You need to find it on the Internet or draw a sketch of the future product yourself. In this case, you should indicate the location of the design parts and their decoration.
- A layer of glue is applied to the boxes in small strips, and then rope is wound around them. For convenience, the rug with the craft rotates, and the spool of twine remains stationary. Each next turn is slightly pressed against the previous one. With strong pressure, a soft row of glue-impregnated twine may lose its intended shape and become deformed.
- The bottom is covered with rope from the periphery to the center in a similar way.
- While the first part is drying, you can start wrapping the next elements of the craft with rope. Then you need to wait for the design blanks to dry completely.
- Glue the elements into a single structure according to the sketch and decorate with available decorations.
- After drying, the craft is varnished.
Such an organizer does not require large financial expenditures, and its uniqueness is guaranteed, since it is made by hand. Such leisure often becomes a family activity, and time spent with children will benefit them by developing their teamwork skills and the ability to finely coordinate the work of their hands and fingers.
Crochet
This knitting method allows you to make a rug, a stand for dishes, a napkin, a cover for a chair, a vase, or a flower pot from twine.
Help in mastering the necessary skills can be provided by photo and video master classes posted on the world wide web.
The jute fibers from which the rope is made are environmentally friendly, and in addition, they can easily withstand washing and do not lose their original elasticity after washing.
Furniture handles
Various little things give the interior a finished look. As such, they use original and at the same time practical handles on dresser drawers or cabinet doors. To make them convenient to use, they are not pulled, leaving some gap between the surface of the furniture and the hinge.
For greater originality, the rope is tied in the form of a bow, a knot, and threaded through real river pebbles.
hanging bed
Nowadays in bedroom interior design they use the not new, but still relevant idea of a hanging bed. Thanks to the fastening features of this design, the effect of its lightness is created, it seems that the room has become more spacious.
The main task during installation is to correctly calculate the load, make sure that the anchors where the ropes or cables will be attached are not attached to a decorative ceiling beam, and that the structure can withstand the weight of the bed itself, bedding and sleeping people.
Some people will like the opportunity to swing on the bed. For those who are not interested in the process, you can hang the bed so that one of its ends rests against the wall.
Wooden hanging beds look good in eco-style bedrooms, where they are in harmony with natural finishing materials. A flying bed looks natural in a room decorated in a high-tech, industrial style. It is convenient to make a partially hanging bed in a children's room as a second tier. Then a combination of rope and rigid fastenings is used with the surfaces of the floor and ceiling, with a vertical wall.
Shelves
One of the simplest things to make is a shelf made from one or more boards. Ropes are threaded through holes made along the edges and secured with knots. The structure is installed near a desk or in the bathroom; many necessary items are placed on it.