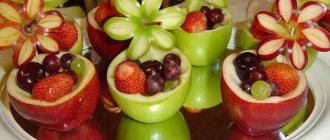
Autumn is the best time to go... to the market. How many wonderful and amazing things you can find there! Fat-bellied pumpkins, bunches of shaggy parsley, scatterings of nuts, the most fragrant pears, glossy eggplants, huge potato tubers, soft lime heads of cabbage. In general, everywhere you look there is luxury, admire and enjoy. You can also get inspired! Pay attention to the rows of apples - Semirenka and Golden, Richard and Mackintosh are lined up in beautiful rows, the apples are one to one, infinitely beautiful and unrealistically perfect! Is it possible not to rejoice at this picture, not to enjoy its colors, shapes, diversity? Well, and, of course, be so inspired that when you come home, you will certainly make your own apple - in one form or another, a craft or a full-fledged handicraft project. Autumn is the time to eat apples, admire apples, and make apples with your own hands!
How to make an apple with your own hands - 5 master classes:
How to choose apples
We select fruits without visible damage. The choice of color and size depends on the idea of the craft. The colors of apples go well in any combination, but for a snowman it is better to take light-colored fruits, and for a caterpillar to choose fruits of the same color.
The size and shape of the fruit can give you ideas for crafts. You can use small and large fruits. If you are planning a figurine with a head, use a larger apple. There are no strict rules here, give free rein to your imagination.
Important! Before starting work, wash the fruit thoroughly and dry it with a towel.
Mosaic applique "Apple"
This kind of work is also done in the younger group. In preparation for starting work, the teacher cuts out a sheet of paper in the shape of an apple with a leaf and a stick. The outlines of the parts are outlined with a marker to make it easier for the child to determine the boundaries of each individual part. Next, cut out squares of three colors are placed on three different plastic plates for the children. These are green for the leaf, brown for the stick and red for the apple itself.
To make it more interesting for children, you can add a small worm with a funny face. The kids will have to spread glue on each square and stick everything in the right places. They should be located close to one another so that there is as little empty space as possible.
Which knife to use
To make work enjoyable, you need good tools. Choose a small knife that fits comfortably in your hand and has a sharp edge. If you want to make beautiful cuts on the peel, a special carving knife will come in handy, but such work requires skill.
Important! Do not allow children to use the knife independently. This may cause injury.
Physical properties of apple wood
- At 12% humidity (after drying), the density ranges from 650 to 700-730 kg/m3. Wild apple tree species reach a density of 750 m3.
- Apple tree wood is dense and heavy
- Requires long drying. If it goes fast, it cracks and warps.
- Has high abrasion resistance
- Biostability is average. Requires protection of products from external influences
- Easy to glue, can be painted with mordants and stains
Apple tree cuts
Natural and decorative materials
Using additional material, you can create not just a craft, but also an entire composition.
Cardboard will be needed for a stand for the craft. If you are planning a large craft, you can use a shoe box lid for the stand. First you need to decorate it: paint it with acrylic paints or gouache, cover it with paper.
Cones, leaves, twigs must be clean and dry. Wash the coniferous branches and dry them with a paper towel. The leaves can be dried by placing them between the pages of a book or ironed between paper sheets. Fresh leaves and ornamental grasses will quickly wither and the craft will look ugly.
Plasticine will help to create and attach paws, eyes, and other additional elements of the figure to the apple. Bows and beads will decorate the apple hero and help create cheerful images.
To create small details, colored paper is useful. Hats, ties, feathers, eyes, and noses are made from it.
If creating decorative elements is difficult, use colored markers to create an image of the craft. You can buy ready-made eyes, umbrellas, bows and decorations that are used to decorate cocktails.
Important! Applying any non-natural materials to an apple: glue, plasticine, markers, paints makes the craft inedible.
Types of applications
Different materials are used in the work. These include napkins, crumpled into lumps, and simple colored paper, cardboard, newspapers, cut out pages of glossy magazines. They make patterns from torn paper or cut out strips.
Now I have an interesting hobby. Pictures are made by twisting strips of paper using the quilling technique. Often the teacher uses several types of visual arts. For example, to an apple appliqué you can add a drawing of a leaf made by dipping your hand painted with gouache.
What crafts can be made from apples?
Making crafts is an interesting and creative activity. Invite your child to it, it will bring him a lot of joy. Trust him with some of the work. Connecting parts and decorating crafts is quite within the capabilities of even a child.
Note! Apple cuts darken quickly. This occurs from the interaction of the iron contained in the fruit with air. In order for the craft to retain its attractive appearance longer, you need to sprinkle the cuts with lemon juice.
Garland for decorating a group in autumn
You can also make large and small apples to decorate the group in the autumn. The 3D applique is made from identical circles and two small leaves. This kind of work can be done with older children.
Using the template, children cut out identical circles or an apple shape with a notch in the middle. Next you need to bend the parts in half and smooth the edge with your finger. The result is circles bent at an angle. Next comes the most important part of the work. You will need to glue all the parts together, applying glue to only one half. It is important that the child understands that the parts need to be glued together clearly, otherwise the back sides of the applique will show through. The apple will then be sloppy. After all the circles are glued together, the last semicircle is joined to the first.
Lastly, a leaf or two is glued onto the voluminous apple. A garland of apples of different colors or sizes will look beautiful.
Making an owl
Remember with your child what an owl looks like.
To make it you will need 3 apples of the same color and size, 2 grapes or raisins, and toothpicks.
Body and wings of an owl
Place the apple with the wide part down. Cut off a small round part of the apple. The result is a body - an apple with a flat part that looks like a tummy. Cut the same part from another apple. We attach both remaining elements to the apple from different sides, with the peel facing out, using toothpicks. We deepen the toothpicks so that they are not visible on the wings. You get wings.
Head
- For the head we take a new apple. We make the cut the same as for the tummy. Turn the apple a little and cut off the same part. On one side there will be a connection of slices, on the other there will be a whole part.
- Another variant. Two large circles are cut out next to each other in an apple. When determining the location of the cutout, imagine that these are the eyes.
- We make ears on the same head. To do this, make cuts in the peel and bend them upward. The cuts should capture some of the pulp.
- Eyes. Using part of a toothpick, secure small grapes or raisins in the center of the cut out circles.
- We connect the head and body using toothpicks. For strength, make the connection using 2 toothpicks.
Now you can start decorating. You can make a wise owl with glasses and a book, or you can collect a whole family of owls and owlets by selecting fruits of different sizes.
Volumetric apples
The “Apple with a leaf” applique can be made in the middle group. You can decorate the interior of a group with such voluminous apples by hanging them on strings on a branch.
Children are given sheets of thick colored double-sided printer paper. The required colors are selected. It can be a red, light green, yellow, orange, pink apple. For the twig you will need either green paper or brown paper. The leaf, naturally, will only be green.
First of all, the children use scissors to cut out a strip of paper along the line drawn by the teacher. Next you need to properly glue the ends to each other. You only need to smear one edge, and simply apply the other as the teacher showed. At the moment of gluing, you need to immediately insert a brown strip between the ends. In order for the parts to stick well, you need to hold them pressed together for a while. When both edges are firmly glued, all that remains is to add a leaf to the top edge of the stick.
Cheerful caterpillar
The number of apples depends on how long the caterpillar is. You can take 6 pieces of the same size or 8 - 10 and make a caterpillar with a bend. You will get a beautiful caterpillar if you select the fruits according to the principle from large to small, starting with a large apple and ending with a small apple.
Additionally
- carrots 1 pc.;
- grapes 8-10 pcs.;
- toothpicks;
- decor for decoration.
For crafts, it is better to take round varieties. Your imagination will tell you the color. Before starting work, you need to remove the stalks.
The largest apple is the caterpillar's head. We attach it vertically to another apple. Next, secure the apples horizontally one after another using toothpicks. You will get a chain.
For stability we make legs
- We cut the carrots into equal circles, up to 1 cm thick. We count the number of legs by apples, 2 legs are needed for each.
- We attach the legs to the caterpillar. We stick half a toothpick into the carrot circles, closer to the edge. We strengthen the entire structure into an apple. You may have to look for a place to attach the leg for greater stability.
We make antennae on the head. We attach 2 toothpicks and string grapes on them along the entire length.
The eyes and mouth can be drawn with a marker or glued on. Now we decorate the caterpillar. You can make hair, hats, bows. Hang beads and there will be a lady caterpillar. Make a cylinder out of plasticine and secure it between the mustaches, glue a paper bow tie or tie - you get a gallant gentleman.
If you place the craft on a beautiful stand and add natural materials, you will get a great exhibit for an exhibition in a kindergarten or school.
Beautiful gifs with congratulations on Apple Day. Congratulations in verse
Source
Hello friends! When you make toys and other interesting things out of cardboard, there are always scraps left that are no longer suitable for creating something as large-scale, but which are also a pity to throw away. We have accumulated enough scraps to fill a carload and a small cart, and we are already looking with alarm at this wealth, which we definitely need to do something with.