What can you make from an apple? Perhaps the reader will list a list of favorite dishes that will include this fruit.
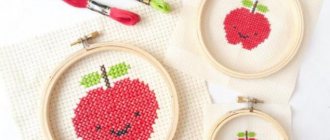
However, did he name the “recipe” for the edible craft? After all, an apple can serve as a source of inspiration not only for preparing delicious delicacies, but also for creating amazing items that can please its owner.
What kind of craft can be made from apples at minimal cost? The list of products is quite large, especially if you use your imagination, be patient, and arm yourself with instructions.
In addition, given the plasticity and softness of the fruit, any person will find the work uncomplicated and digging for a child will also not be boring.
When creating a craft with a “representative” of the younger generation, do not forget about basic safety precautions: all complex actions that involve using a knife must be performed exclusively by adults.
It is worth remembering that apples are a natural material that can quickly lose their appearance, so before starting work it is recommended to thoroughly wash and dry the fruit, and then sprinkle it with citric acid.
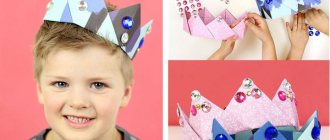
Applique caterpillar made of colored paper: how to make it in kindergarten
It is best to start introductory classes with children by appliquing a caterpillar from circles. For
Caterpillar appliques can be made from circles as a blank if a small child cannot do this process smoothly and accurately.
Circles can be of different sizes and colors. You can play with the application according to your imagination and capabilities.
Materials:
- Colored paper
- Pencil
- Glue
- Leaf for background
Draw a future applique picture on a piece of paper to use it later as a template.
Transfer the leaf onto green paper, and the circles of the caterpillar’s body onto yellow paper.
Make three more red paper circles and yellow feet.
Let’s make a composition on a white sheet of paper and glue all the details
You can create a template for the caterpillar applique yourself or print it out.
Natural and decorative materials
Using additional material, you can create not just a craft, but also an entire composition.
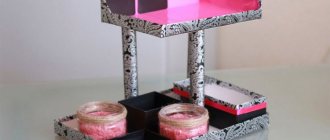
Cardboard will be needed for a stand for the craft. If you are planning a large craft, you can use a shoe box lid for the stand. First you need to decorate it: paint it with acrylic paints or gouache, cover it with paper.
Cones, leaves, twigs must be clean and dry. Wash the coniferous branches and dry them with a paper towel. The leaves can be dried by placing them between the pages of a book or ironed between paper sheets. Fresh leaves and ornamental grasses will quickly wither and the craft will look ugly.
Plasticine will help to create and attach paws, eyes, and other additional elements of the figure to the apple. Bows and beads will decorate the apple hero and help create cheerful images.
To create small details, colored paper is useful. Hats, ties, feathers, eyes, and noses are made from it.
If creating decorative elements is difficult, use colored markers to create an image of the craft. You can buy ready-made eyes, umbrellas, bows and decorations that are used to decorate cocktails.
Important! Applying any non-natural materials to an apple: glue, plasticine, markers, paints makes the craft inedible.
Paper caterpillar for children: how to make it yourself
You can make a beautiful caterpillar from colored double-sided paper. Cut part of a green sheet of paper into strips. Let's attach each strip
A paper caterpillar template can be drawn or printed.
Assemble the caterpillar by attaching the head on both sides.
DIY sock caterpillar: step-by-step instructions
Making a new toy for a child is not at all difficult and does not require much effort or complex skills. A toy made from a caterpillar sock is simple to make, and a schoolchild can make it himself, and a mother will try for a baby. Don't throw away mismatched socks if one gets lost, because it can be used to create a toy.
A sock with toes will look funny. You will also need a filler (holofiber or padding polyester)
Materials:
- 1 sock
- Filler
- Hair ties
- Needle and thread
- Satin ribbon
- Yarn
- Beads
- Felt
- Scissors
First stuff each finger and a little trace to create the head. Tie with thread.
To hide the thread, tie a hair tie.
Tighten the last part with thread and secure. We close the seam with felt.
Sew beads instead of eyes and embroider a mouth.
A satin ribbon from which you can make a bow around the neck will give the sock caterpillar craft a funny look.
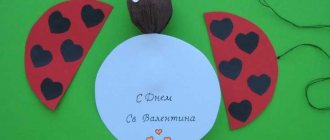
Ladybug
For this wonderful craft you will need a red apple, several dark berries, and grapes.
Before starting work, you need to cut the apple into pieces, remove the seeds and stem. Next, you should remove one half; it will not be needed in the future.
After this, on the remaining part we make a cut in the middle, on each side of which we make several indentations for the berries, previously cut in half.
We cut off the top part of the grape and apply it to the insect’s body.
The craft is done! A bright ladybug will be a good decoration on the holiday table.
Plasticine caterpillar for children: step-by-step modeling of crafts
Children begin to play with plasticine from an early age, since all mothers know that they need to develop fine motor skills. Kids are interested in creating some objects or animals with their own hands. One of the simplest topics for working with plasticine can be called a caterpillar craft.
Materials:
- Plasticine: green, red, yellow
- Toothpick
- Two black beads
First you need to make several balls of different sizes from green plasticine.
Connect all the balls together, with the largest one being the head. Make antennas with red plasticine balls at the ends from pieces of toothpick.
Attach beads for the eyes to the caterpillar's head, and a red ball of plasticine will make a nose.
Use yellow plasticine to make spots on the caterpillar's body.
Colored balls will make the caterpillar even brighter and funnier
Conclusion
Children can make a variety of crafts themselves, but always under the supervision of their parents. Such needlework involves the use of various sharp objects: pins, needles, scissors, toothpicks, knives.
The result of joint work will be a wonderful craft and a good mood for both parents and children.
Make a caterpillar with your own hands for kindergarten
Kids love all kinds of performances, so you can make a caterpillar that moves.
Materials:
- Green paper
- White napkin
- Green cocktail straw
- Scissors
- Hot glue
- Toothpick
- Skewer
- Black felt-tip pen
- Glue
We make a green leaf from a piece of green paper. Place a wooden skewer in the bottom center and press down on the paper.
Roll the napkin onto the tube and glue it. Pinch the napkin towards the center and pull out the tube. Cut a 2 cm piece of tube to attach to the leaf
We put a piece of green tube on a skewer. Attach part of the caterpillar to one edge of the skewer. Attach the second part to the green tube. Using a black felt-tip pen, draw dots along the body. Glue a piece of green tube to the leaf.
It will move due to the fact that you pull the wooden skewer.
DIY felt caterpillar: master class
Felt is a suitable material for making a caterpillar educational toy with your own hands. Made from felt, it will be soft and easy to use. Thanks to the bright colors of this material, the caterpillar will turn out colorful.
Materials:
- Felt
- Sintepon
- Velcro
In order to get a caterpillar, 2 circles for each part of the caterpillar - that's 9 parts. The front and back will be the same color.
You also need to cut out flowers, eyes, legs - 18 legs and horns.
You need to make 18 paws - smaller circles. The legs will be inserted into the middle of the circle, the circle needs to be folded and the edges sewn.
Small parts need to be sewn to the workpiece
This is how we make caterpillar legs
Glue two large circles of the same color together. Between them there will be a round padding polyester.
Fasten all the parts with a pin, and put the legs inside.
Attach each leg with a pin
Attach Velcro to each part of the caterpillar with hot glue.
Every child will want to spend time with such a funny caterpillar.
Which knife to use
To make work enjoyable, you need good tools. Choose a small knife that fits comfortably in your hand and has a sharp edge. If you want to make beautiful cuts on the peel, a special carving knife will come in handy, but such work requires skill.
Important! Do not allow children to use the knife independently. This may cause injury.
DIY children's craft caterpillar made from cotton pads
A variety of applications can be made from cotton pads. First of all, a snowman comes to mind, but this is far from the most interesting thing that can be made from cotton pads. A cute caterpillar may be missing from your spring craft project.
You don’t even need to tell me how to make a caterpillar from cotton pads, because it’s so simple. The discs can be pre-painted in any colors you wish. On one circle we depict the face of a caterpillar - we draw eyes and a mouth.
You can leave the cotton pads undyed.
The application made from cotton pads can be diversified with decorative elements - cut out the sun from paper, or grass.
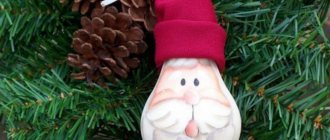
Apple Snowman
The “White Fill” variety is well suited for a snowman because of its light shade of skin. But you can take any other color combinations.
Additionally
- peppercorns;
- carrot;
- toothpicks.
The craft can be made from 2 or 3 apples, the main thing is to choose the size in descending order.
A smaller apple is attached to the largest apple. For stability, you can cut off the base of the first one.
Cut the carrots into pieces 5 mm wide. Use the tip of a knife to cut out the shape of the mittens. Attach to a toothpick and secure into an apple. Leave some space between the mitten and the apple.
We decorate the snowman with peppercorns. We use them to lay out the buttons on the apples, eyes and mouth. The nose is a triangle cut out of a carrot.
You can place a piece of apple on your head, in the form of a semicircular cap, or a cylinder of carrots. You can leave the tail of the stalk, it will give the snowman a perky look.
Salt dough caterpillar: how to make one with a child
It is best to start working with dough with simple crafts, and this could be a caterpillar dough craft. There is nothing complicated in its manufacture, because the caterpillar consists of balls of different sizes.
To make the dough for sculpting a caterpillar we will need:
- Flour
- Salt Extra
- Water
- Gouache
- Toothpick
- Brush
Mix flour and salt in equal proportions and add a little water. Knead the dough and cool slightly. Roll into a large ball and flatten it a little. From this piece of dough we will make a leaf using a toothpick.
We’ll put a ball on the leaf that will play the role of the caterpillar’s head. We make horns from two toothpicks.
Attach small dough balls to the ends of the toothpicks. Place eyes on a large ball. Place other balls behind the head - the body of the caterpillar. Place the dough piece in the oven at 100 degrees for two hours.
After the craft has cooled, you can paint it.
Funny bear
You will need several apples, grapes, berries, toothpicks:
- To begin with, you should outline the eyes on one apple, making two circles, but without cutting them out. After this, you need to peel the apple skin around the marked circles. The result should be “panda eyes”.
- Next, you should carefully cut out the bear's paws from another apple.
- After the blanks are ready, attach the legs and head to a large apple using toothpicks.
- We finish the work by decorating the bear's head with eyes, nose and mouth. To do this, also using toothpicks, insert grapes into the prepared base for the eyes, and make a small mouth and nose out of it.
- If possible, you can make a barrel of honey from the remaining materials.
The funny bear is ready!
Accordion paper caterpillar with tube
You can make a fun caterpillar toy from cocktail straws.
For this you will need:
- Piece of corrugated cardboard
- Cocktail straw hot glue
- Scissors
We cut out leaves from cardboard and paint them green.
In the tube you need to cut out the part below the accordion and bite out a small piece on top
The part with the accordion on the tube needs to be processed with scissors - make cuts along the accordion and cut out the middle.
Decorate the caterpillar with a felt-tip pen
We insert the narrow part of the tube into the uncut part and attach it to a cardboard piece.
Decoration in a pot with apples
Apples can be strung on wooden sticks and used as a tasty and aromatic decoration.
Decoration in a pot with apples
And this fruit bouquet uses apples, tangerines, grapes, lemon and herbs. It turns out very tasty and festive.
Bouquet of fruits
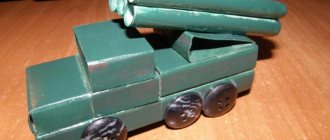
How to make a caterpillar from plastic caps
There are plastic bottles in any home, because we all love to drink juices, milk and other drinks. You don’t have to throw away the lids, but use them for creativity. The caterpillar is interesting as an educational toy because you can make moving parts.
If you attach several beads between the two covers, the caterpillar will be movable.
You can make holes in the center of each cover and stretch a rope, then the caterpillar’s body will also move
Depending on the availability of house covers, each caterpillar may turn out to be original