Walnut is one of the healthiest foods. The kernel is rich in vitamins, essential amino acids and minerals for the human body.
The so-called nut partitions are also useful, the tincture of which has healing properties. But nut shells serve as an excellent material for children's crafts.
Craft selection
There are many photos of shell crafts on the Internet. You can get some inspiration from these photos before you start making your own shell crafts. A creative approach and the presence of ideas will guarantee a bright result.
Most crafts made from shells are quite simple, but have an attractive appearance. Even children can make crafts that adults admire with pleasure.
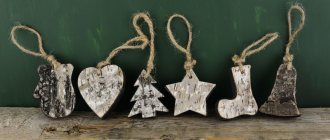
Most often, nuts are used to make animals, insects, boats, Christmas trees and flowers, boxes and vases, Christmas tree decorations, wreaths and topiaries. And that's not all.
Creative Tips
Topiary can be a unique gift for friends and family, and the fact that it is made with your own hands and with soul will add a special charm to the surprise. When creating a decorative item, craftswomen want to make it exclusive, but for this you need to use a little imagination.
How to decorate a chestnut tree of happiness:
- The tree can be given a special function, such as a flavoring agent. For this purpose, natural elements with aroma are used. This could be tea, coffee beans, dried citrus zest (mandarin, orange, estuary), cinnamon umbrellas.
- As a tree trunk, you can use a soft toy, which seems to be holding a ball with the gifts of autumn in its paws. A hedgehog or a squirrel will look impressive.
- Small animal figures can be glued to individual elements to give the impression that a squirrel or hedgehog is holding a nut or acorn in its paws. Using the same principle, you can place figures of insects and birds on the ball.
- The shape of the “crown” does not fundamentally have to be round. If you change the usual shape, you can achieve the effect of uniqueness. For example, a topiary can have a cylinder, cone, pyramid, heart or other figure as its base.
Nut Beasts
The simplest crafts made from walnut shells are animals and insects, which require one or two shells to make.
To create such a craft you will need a minimum of materials. There should be shells, acrylic paints, white putty (stroke) and brushes on the table.
Symbol of wisdom
Symbol of the game of intellectuals “What? Where? When?" very easy to make. Even a small child can be entrusted with such work; you just need to watch him.
The two halves of the nut shell are fastened together using plasticine or glue.
If you don’t have the necessary dye in the house or the child has lost the desire to tinker with paints and a brush, you can simply cover the “body” of the owl with plasticine of the appropriate color, draw on eyes and a beak (alternatively, you can use multi-colored plasticine).
Wings for a wise bird can be cut out of cardboard or pieces of fabric. The owl is ready to “listen” to the questions of the “host” and the answers of the “experts”!
Ladybug
Ladybug - paint the shell with red paint, draw a black stripe running along the shell. Use black paint to paint the muzzle and black spots on the back. White eyes can be made using putty.
Christmas decorations
Everything is simple here - we cover the shell with translucent shiny paint or varnish with the effect of gold or silver.
Let's make loops for attaching future decorations to the branches.
- We fix each loop with a knot, which we put into one half of the shell.
- Apply glue to its edge and press the second part on top.
Additional decorations can include beads, bows, stars and anything your imagination tells you.
Bee
Bee - paint the shell yellow, draw black stripes and a face.
Hedgehog
A hedgehog can be made by adding plasticine and buckwheat to the materials used. Brown or black plasticine should be applied to the shell. Form a nose from plasticine. You need to stick buckwheat grains around the entire perimeter. These will be the hedgehog's spines.
You can stick a ball of black plasticine, a black bead or a seed on the tip of your nose. Don't forget to blind the eyes or glue the eyes.
Bug
You can make two different bugs from one nut.
- Step No. 1. Separate parts of the insect are made from plasticine - head, eyes, shell, legs.
- Step No. 2. We make wings from white or blue plasticine, and on top of them we attach two parts of the shell (made of green material) to the half of the shell. The wings should be slightly visible - as if the beetle is just about to fly away about its business.
- Step No. 3. Attach a black head with yellow or white eyes to the “body” of the beetle.
- Step No. 4. We fill the free space of the shell with black or brown plasticine, thus forming the abdomen of the insect.
- Step No. 5. Attach the beetle's legs to the abdomen.
In combination with other insects, a beetle planted on a leaf or twig will look very impressive.
Birds
More complex crafts made from nut shells require more careful preparation.
Materials and tools:
- PVA glue;
- Plasticine;
- Paints;
- Beads;
- Whole walnut or 2 walnut halves glued together;
- Feathers.
We paint the nut white, wait for it to dry and paint it with the color we chose for the bird. This is the body of our bird.
You need to mold the legs from plasticine. To make them more stable, it is better to make them with membranes. A small piece of plasticine is attached to the back, to which the feathers are attached. The beak is made from plasticine at the front. Glue on the beady eyes. You can make a crest from the remains of feathers.
Pros of shells
It is unlikely that you will be able to create something functional from a nut shell, but it is quite possible to make:
- costume jewelry;
- Christmas decorations;
- funny little animals;
- various toys;
- original souvenirs.
Walnut shells have a number of qualities that are so necessary when making crafts:
- very durable;
- not afraid of water;
- does not dry out over time;
- beautifully painted;
- has a very elegant texture;
- goes well with other available materials.
Home decor
The shells are suitable not only for making creative projects with children, but also for interior decoration.
The shells are turned into a stand for scented candles, made into hot coasters, and used to decorate flower pots and vases.
Wreath
Wreaths made from natural materials not only look great, but also spread a pleasant forest smell throughout the house.
As a basis, you can take cardboard, cut in the shape of a steering wheel, wrapped with waxed cord. Natural materials are glued onto this cord - walnuts, acorns, peanuts, pine cones, dry ears of corn, various twigs and white beads.
The finished wreath can be painted golden. The composition will look more advantageous if you place nuts and cones not chaotically, but sequentially. You can decorate the wreath with a ribbon.
Collection and preparation of autumn material for topiary
You can start collecting material for seasonal crafts from mid-summer. During this period, most fruit trees produce a harvest, fruits appear on chestnuts, oaks and spruces. You can get a sufficient number of seeds, seeds, and shells by simply wandering through a forest plantation, a park, or in your own garden.
To create a topiary, only whole materials that are not affected by pests and rot are suitable. In order for the collected components to deteriorate as slowly as possible, they must be prepared before use. Each type of natural element has its own rules:
- Chestnuts. After collection, they should lie for at least 3 weeks in a cool place. Drying is necessary so that they do not puff up and lie flat on the base. During this time, their top layer will strengthen and the shape will become flattened.
- Fruit seeds. The material must be washed well and cleared of any remaining pulp. If necessary, boil cherry or plum pits for 5 minutes. Then they need to be fried in a frying pan, in the oven, or left in the sun for the whole day.
- Acorns. Single-seeded oak fruits must be washed and dirt, leaves, and larvae removed with a brush. Then they are thrown on a towel, allowed to absorb water and fried in the oven over low heat for 1 hour.
- Walnuts. Half shells are suitable for topiary. To split the nut into even pieces, you need to insert a knife between the halves and lightly hit it with a hammer. We remove the core, clean the inner sides of the shells from the veins, and leave to dry for several hours.
- Cones. To prevent unopened coniferous fruits from changing their appearance after drying and starting to open, they must be treated with wood glue. The material is dipped into the mixture several times, the glue is allowed to drain and laid out on oilcloth to dry.
Pistachio shell
Crafts made from pistachio shells are fascinating. Glued pistachio shells form an unusual pattern that is difficult to look away from. Even necklaces, earrings and bracelets are made from this natural material.
Note!
- Crafts from toilet rolls: step-by-step instructions for creating crafts. Master classes with simple work schemes (140 photos)
- Crafts from corrugated paper - step-by-step master classes on how to create crafts from corrugated paper with your own hands + photo diagrams
- DIY crafts made from cereals: photo reviews of the best works made from cereals. Step-by-step instructions and diagrams for creating DIY crafts
These shells are used to decorate photo frames and paintings, and they are used to make Christmas trees, topiaries, and money trees.
Caterpillar and Butterfly Crafts
Disclosure: This post contains affiliate links.
One of our favorite books is The Very Hungry Caterpillar. There is something about this book that kids will love! The story is educational, the pictures are beautiful, and it's just fun to read!
This week we are learning about caterpillars and butterflies, so this book is perfect for this unit. In fact, Eric Carle (the author) celebrates his birthday this week, June 25th, so it's a great week to learn about them!
