Topiary is an art that became popular in the mid-20th century. Cute trees decorate holiday tables or simply use them as interior decoration.
The materials you can use are artificial flowers, plastic, napkins, as well as natural plants. Size, shape, style, color - all this is left to the imagination of the master who has to do the work. Below you can find a detailed master class.
Materials and tools for creating topiary
Before you start work, you need to collect all the material and tools. Beginners should definitely have on hand:
- You can use a simple foam ball as a base. This is a classic option where the barrel and other components will be attached.
- Sticks, clean brush.
- Paints - gouache.
- Glue.
- Varnish.
- The basis for the trunk can be petals from cones.
Before you start making topiary for the holidays, it is advisable to study all the nuances and details. Many craftsmen have professional tools - brushes, paints, various fasteners and pliers for parts.
An artificial grass topiary will be a great addition to any area.
Let's start making a frame for the tree.
We take a thick, hard-to-bend wire and bend it into the desired shape.
We bend the ends around the stone.
We screw the beaded branches to our frame.
To thicken the trunk, we wind more wires, and wrap them with masking tape on top
Paint the trunk with brown acrylic paint.
Using a glue gun we add “roots” for beauty. We also wrap them with tape and paint them brown.
While the trunk dries, let's start making pendants with photographs.
I found these wooden slices from birch at a craft store.
Prepared photographs in Photoshop.
You need to drill holes on the cuts - my husband helped me with this.
We glue the photo to the front side of the cut and paint it with gold glitter along the edge, and paint it with acrylic bronze paint on the back side. Let it all dry.
We will insert a wire into the holes - on it our workpieces will be attached to the tree.
We paint the trunk and roots with bronze acrylic paint.
After everything has dried, we paint the beaded tree trunk with acrylic varnish.
After thinking a little, I decided that our tree lacked “wealth”, I found decorative coins and attached them to the branches with wire. Also, for wealth and as a symbol for the future golden wedding, I sprinkled gold sand (by varnishing the trunk and stone).
Let's add some more decor. We glue pearl beads, doves, swans, self-adhesive rhinestones and anything else with a glue gun.
Our Pearl Family Tree is ready.
We admire it.
When we give the tree as a gift, we will ask our parents to tie ribbons on this tree and make a wish, and from that moment on it will also be a Wish Tree
.
The most touching thing when giving this tree is the text, which will anticipate our hand-made gift, and this can make the gift more valuable.
Base for topiary
Finding a large foam ball is not so easy, so the craftsmen found other options that will allow them to get the job done quickly and accurately. Here are several options for a topiary ball:
- Make a base from paper, water and glue. The technique is called papier mache. You can find instructions in the public domain.
- A small cardboard box can also replace it.
- A ball of thread stuffed with padding polyester.
- Polyurethane foam ball.
- Knitted threads pre-impregnated with glue.
There are a lot of ways to make a base; all that remains is to choose the most suitable option.
Topiary made from napkins
Making crafts from scrap materials is fun and easy. You can include children in the activity, since the creation uses safe devices that cannot harm the baby. Brief instructions for topiary made from napkins:
- First you need to take care of the foundation. How and from what it can be made was described above.
- Next, you need to find wooden skewers or sticks on which the finished flowers will be glued.
- Napkins - it is advisable to choose plain, bright and different colors.
- Glue, brush, tape may also come in handy.
The manufacturing method is simple; you need to make a large number of flowers from napkins. One option: fold each sheet into a triangle and roll it up. You will get roses, the ends of the paper are glued and dried. Next, each part is attached to a skewer, which is stuck into the base.
Sea topiary
Topiary is a tree of happiness; it can be made from different materials.
Topiary made from natural material looks more beautiful, similar to a real tree. It will fit into the design of every room and will remind you of the beauty of nature. For example, a topiary made of shells will refresh every person’s memory of the sea, the sun and warm days spent on the beach.
Materials for work:
- Newspaper sheets.
- Various shells.
- Glue.
- Chopsticks for eating food.
- Gypsum.
- A crumb of stone.
- A glass.
- Twine.
How to make a sea topiary with your own hands, instructions:
- First you should start making a tree trunk . You need to use a strong dry twig or chopsticks for this. We recommend tying them tightly together with regular thread. The resulting trunk must be wrapped tightly and tightly with twine.
- It is recommended to make a ball for topiary with your own hands from polystyrene foam. It is convenient to attach additional elements to it.
- In a prepared glass, mix gypsum with a small amount of water. You need to insert the trunk of the tree of happiness into the resulting mass. Leave for several hours to harden.
- The barrel should be positioned exactly in the center, otherwise the whole tree will tilt in one direction.
- After drying it is required attach the crown to the top of the stick. To do this, you need to make a small hole in the foam ball and lubricate the tip of the stick with glue.
- Styrofoam can be covered with blue paper. Next, you will need to attach shells and beads to it.
- You can also use shells or blue satin ribbons to decorate the cup .
get topiary from pasta using the same method. To create such an accessory, it is recommended to use several types of pasta. Before gluing, they need to be painted in different colors. This is labor-intensive work that requires perseverance and desire from the author to create a unique tree of happiness.
Video master class on DIY topiary made from shells:
Making TOPIARY from shells with your own hands / master class
Advice: when creating a topiary from shells, it is recommended to paste over the foam plastic not in blue, but in beige.
Topiary made of satin ribbons
Atlas is regularly used for crafts; it is an excellent material that is accessible to everyone. The process of making topiary, in this case, will be similar to the quilling technique. What should be done:
- The barrel is made from a clean and neat stick.
- Small details are created using the quilling technique. Each ribbon is carefully twisted into a flower; it is better to use double-sided tape to secure it.
- The parts are attached with glue to a stick, which is inserted into the base.
At the end, add other decorations if desired.
Tools
Before you start making crafts, you need to think about what colors the roses themselves will be. Recommended for use from 1 to 3 colors. Having decided this main issue, they begin to prepare all the tools.
To work you will need:
- corrugated paper in large quantities;
- PVA glue;
- a simple pencil;
- ruler;
- paper scissors;
- green adhesive tape for wrapping a tree trunk (can be replaced with corrugated paper);
- thin wire or strong thread;
Materials for topiary with flowers - alabaster or foam;
- simple flower pot;
- a stick for making a trunk, you can use Chinese sushi chopsticks;
- newspaper or strong paper;
- any strong woolen thread or twine;
- beads, stones or any other materials that can then be laid out on the “created soil”.
You can use additional materials in the form of half beads, pearls, satin ribbons and other decorations.
DIY tree of happiness, video:
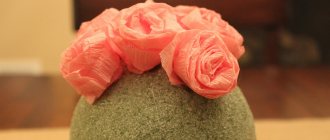
Corrugated paper topiary
Bouquets of flowers are often wrapped in similar paper. Therefore, after the holiday, it is recommended not to throw it away, but to use it for creative purposes. Instructions:
- Take a foam ball - this is the upper base.
- You need to prepare the pot in advance.
- Next, neat roses are made from paper and placed on the base using hot glue.
A wooden skewer or stick is used as support. Its characteristics will depend on the weight of the upper structure.
New topiary ideas 2022 made from money and artificial grass
Let's look a little more at what types of topiary there are. Maybe you will now get excited about the idea and run to create. I propose to pay attention once again to the so-called “money trees”. Just look at how many options for crafts you can come up with on this topic!
You don't have to use banknotes - coins are fine too. Or you can combine both in one topiary.
As soon as you add up the money differently, the tree takes on a completely different look.
We looked at how to make such flowers. It turns out very tender, doesn’t it?
If you have time and desire, create a composition from several topiaries. They will attract twice as much money.
Sisal is perfect for decoration, as well as figurines of birds, insects, beads, etc. In general, everything you like.
This is where the bird took refuge.
You don’t have to cover the entire base with money flowers, but use them only as an additional element, as in the work below.
In general, as you can see, you can do anything. Creativity is wonderful because no one limits the flow of your imagination. What you succeed depends only on yourself. Be sure to write in the comments under this article whether you liked my selection, and which of the ones discussed above you would like to implement. Good luck to everyone and have a nice day!
Candy topiary
This is a great way to surprise a work colleague or relative. Such a bouquet will definitely be remembered for a long time and will appear on all social networks of the birthday boy. Make the craft according to the following instructions:
- It is necessary to take any of the bases proposed above.
- Be especially careful when choosing a treat; regular long caramels are not suitable. It is necessary to take chocolate ones, decorated in a bright wrapper, preferably triangular in shape.
- Next, each candy is coated with hot glue on the bottom and placed on the base.
A beautiful pot is also used as a structure holder. Candy is heavy, so you need to fill the pot with something heavy, such as stones or sand, in advance.
Wedding topiary
The craft is in demand among future newlyweds. This is an ideal option for decorating holiday tables. Candies and napkins are not suitable in this case.
Experts recommend using high-quality artificial flowers to make your work look neat and expensive. For production you will need:
- Several reasons - it depends on the client’s request; they definitely use foam balls, they are more stable.
- Artificial flowers - purchased from a good supplier.
- Identical pots.
The manufacturing process is similar to the previous ones. To ensure that the flowers stick and can withstand the holiday, a hot glue gun is used.
It is advisable to do the work a day before the event.
What is topiary
In general, topiar is one of the types of garden art. Specifically, the art of giving shrubs and trees decorative forms. But growing a bush or tree takes years. That’s probably why artificial trees in pots appeared to decorate the interior. They are made from natural materials (leaves, cones, coffee beans, nuts, acorns, seeds, grains, etc.), paper, artificial flowers, Christmas balls, ribbons, beads, candies... In general, from everything...
You can make your own topiary from literally anything.
Consciously or not, the name has been slightly changed. Such crafts are called “topiary”. They have been very popular in recent years. The secret is simple. They have a decorative appearance and serve as an excellent decoration for both holiday decoration and interior decoration. The best part is that they are easy to make yourself. The technique for making topiary is simple, so even beginners will find it easy. Mastering the techniques is a matter of one, maximum two days. And then, changing the material, we get a different look, style, theme.
Topiary “Money Tree”
A pleasant activity for those who want to add a little symbolism to the interior of their home or give an unusual gift. You can use both real and counterfeit money, which can be purchased at any joke store. Master class on making a money tree:
- Take a base - you can quickly make it from polyurethane foam.
- Next, each bill is twisted into a flower or tube.
- Double-sided tape is used for fastening, especially if the money is real. If glued, a person will not be able to use them in the future.
The design is placed on a small pot, which is stylishly decorated with additional elements or simply a wish.
Master class on how to make topiary from banknotes
Topiaries are often made not only to attract happiness or luck into the house, but also money. The materials used to make such trees are appropriate - coins and artificial banknotes. Let's see what this looks like in practice.
To make flowers we will need souvenir 100 dollar bills.
We again skip the process of creating a base for wood, since here you can use the options proposed in the ones we discussed earlier in the article.
Such wood is usually painted gold and green, like banknotes.
In order to make a flower, take a square of paper (consider an example on a regular piece of paper) and fold it in half diagonally.
Raise one end of it to the upper (obtuse) corner.
And so does the second one.
We unfold our workpiece and bend each of the corners again along the resulting line.
We straighten out what we got and make these diamonds:
They fold easily along the resulting fold lines.
And we bend the corners extending beyond the edge of the workpiece.
And now we fold the resulting triangles on the sides towards the inside.
We fold the resulting blank in half and secure it with glue. The first petal is ready.
Each flower requires five of these petals. Now we do the same thing, only from banknotes.
We combine every 5 petals into a flower and then plant it on our base using a glue gun.
We do this until we fill the entire ball. Glue a coin into the center of each flower.
The tree is ready. The dollar at the trunk can be made from wire wrapped with masking tape and twine on top. Everything is covered in gold paint.
Well, as always, we can’t do without examples of what else can be done.
A bit similar to our version.
Well, I already showed you something like this.
And such a tree, by the way, can be made if you want to give someone real money.
Suitable instead of bills and coins.
Topiary made of pine cones
After a walk in the forest, many people bring home a large number of real Christmas tree decorations. Children's competitions are often limited to ordinary crafts that everyone gets bored with. There is a solution, you can learn how to make topiary from cones. Instructions:
- For work, it is better to collect small cones of the same size.
- For the base, take a dense foam ball.
- Next, each cone is glued using PVA glue.
The teacher and judges will definitely like this hedgehog.
We weave trees within frames
I love to weave: from beads, cords, threads. I found some frames in the bins without glass and a back wall and wanted to find a useful use for them, and at the same time weave them.
You will need:
- wooden frame;
- linen (jute, paper) twine or knitting threads;
- beads;
- PVA glue.
Tree with bare branches
Cut 15-20 threads from the twine (their number depends on the width of the frame). The length of each thread should be 4 frame heights.
1. Fold all the threads in half and hang them with a “lock” on the top crossbar of the frame (several threads can be hung on top of the side crossbars). Now on some threads you can put wooden beads that imitate fruits or leaves.
2. From all the threads up to half the height of the frame, braid braids - small branches of our tree. In this case, it is better to take the threads not in a row, but skipping 3-4 at a time, as if weaving chaotically.
3. Divide all the braids into three parts (again, not in a row, but letting them through 1-2) and braid thick tree branches from each part of the braid.
4. From three parts of threads, weave one braid - a tree trunk and temporarily tie all the bundles to the crossbars, leveling the composition by tensioning the threads.
5. Then, when all the bundles are secured, tie each bundle sequentially in this way: divide the threads in half, pass one part above the frame, and the other under the frame. Tie the paired threads with two knots on the wrong side, and secure the knot with PVA glue. At the bottom beam, cut the ends of the threads to a length of 3-5 cm, simulating roots, and at the side beams, cut off the excess ends.
Tree with crown
From the twine, cut an even number of threads, the folded length of which is 10 cm greater than the height of the frame. For example, for a frame measuring 15x21, the length of the thread is: 2x25 cm + 10 cm = 60 cm. In addition, you will need another thread, which should be three times longer than the previous ones.
1. Fold all the threads in half and hang them with a “lock” on the top crossbar of the frame. Hang the longest thread in the center, short ones on the sides (several threads can be hung on top of the side bars).
2. Gather all the short threads into a bundle and tie it with a piece of twine.
3. Lower this dressing down to the crossbar, pulling all the branch threads, and tie the bundle to the base.
4. Gather all the threads together slightly below the center of the frame and tie them with a long central thread.
5. Use the same thread to make a trunk, wrapping the bundle in tight turns, and fasten the trunk several times crosswise to the cross.
6. All that remains is to arrange the crown. To do this, weave different ribbons (you can knitting threads, strips of fabric, cords) between the branches in a checkerboard pattern, imagining their size, color and texture. Now you can decorate the tree as you wish (with beads, flowers).
So the frames came in handy, and we got pleasure from creativity! You can decorate the walls of your home with such impromptu paintings, and they will look perfect in your dacha. And if at school each student fantasizes his own tree, then the result will be a fairy-tale forest!
Autumn topiary
Everyone at least once in childhood collected a bouquet of autumn leaves. Variegated colors filled the houses and pages of books. Now there is another way to brighten up an autumn evening and fill your apartment with a pleasant smell. Master Class:
- The leaves and autumn flowers are quite light, so you can take any option suggested above as a basis.
- It is better to collect different leaves so that the bouquet looks bright and unusual.
- Each branch is carefully stuck into a round base.
There is a drawback, such a craft will not last long. However, this option can be used as a holiday table decoration. How to make a frame for a topiary - use plaster or sand.
Making an apple tree using beading technique with diagrams
We will need:
- Wire;
- Pink beads - 50 g;
- Green beads - 15 g;
- Thread for winding;
- Plaster or alabaster;
- PVA;
- Brown paint;
- Pot.
Mix all the pink and green beads. On a wire 70 cm long, mark with a loop a distance of 15 cm from the edge. Let's collect beads, twist loops of 5 beads half a centimeter from each other, twist the petioles. Let's reach the mark and complete the weaving. Twist the workpiece and fold it in half. Let's give the loops a shape. For our sakura we will weave another 53 pieces. Let's distribute them into nine different groups of six blanks. Let's twist it. Let's make the main branch by twisting three large pieces. Three side branches (each with two blanks). Sequentially screw the side branches to the main one. Wrap the branches and trunk with thread (you can use masking tape or floral tape). We pour plaster into the flowerpot and secure the tree, initially making a loop at the end of the trunk. Fill the soil with the remaining beads (coated with glue). Let's paint the trunk and branches. Our blooming apple tree is ready!
Felt topiary
A large number of toys and useful household items are made from this material. Therefore, if there is some free felt left in the house, you can make a cute gift in a pot. Peculiarities:
- Flowers play a key role. Making them is not so easy, since the felt is not so voluminous. The equipment can be found in the public domain.
- Each flower should be attached to a round base using hot glue. The tape will not support the weight of the material.
To make the decor item look neat and unusual, you should add a little greenery. Leaves are also cut using scissors.
Other options
There are a huge number of materials for creating a tree of happiness. Felt topiary looks beautiful . You can cut beautiful flowers and petals from it. Felt goes well with beads and satin ribbons, so it looks gentle and attractive.
By the way, look at the previous article. There is a lot of useful information for you - How to make a bird feeder with your own hands?
Such a wedding topiary will not go unnoticed during the celebration. It will attract the attention of guests and catch the gaze of others.
It is difficult to make topiary from flowers . This requires a long time to prepare the material. Find suitable flowers, dry them correctly and only then use them to decorate the tree of happiness.
Please take a look at the following article. It contains more useful information - How to make a birdhouse with your own hands?
These flowers can be attached with regular glue. A special protective varnish will help them maintain their shape.
It is much easier to make topiary from organza . For this, squares of this material are usually prepared. Their length and width should not exceed 7 cm.
Difficulties will be encountered when processing the edges, so it is recommended to purchase floral organza, ideal for creating a tree.
We recommend placing organza topiary in an empty flower pot.
Shell topiary
A similar technique was used in ancient Rome, only instead of improvised objects and materials, it was used to maintain areas of palaces.
Gardeners did this, cutting various shapes from bushes. Therefore, topiary is not just a round decoration, but a whole art where there are no boundaries. Manufacturing Features:
- You won't be able to find shells that are the same size. Therefore, for the base you need to make a foam plastic figure of any shape.
- To make the process easier, small shells are taken from which patterns can be made.
- Many craftsmen use squares and triangles onto which elements are glued.
It is not recommended to work with children, as shell fragments can injure their hands.
What's good about topiary?
The good thing about topiary is that, unlike ordinary plants, it does not wither and does not require watering or special daily care. In a sense, this is an excellent solution for those who live with pets. Many people know the genuine interest of cats in any pot with a flower. In this case, you do not risk anything, and the usual set of which any such thing consists will not be of interest to them.
Generally, topiary is easy to make. Despite the large number of complex models, more simplified options (like ours) also look great. At least none of the visitors to your home will say that the work was not done by a professional.
You can put this “tree” in your work, home, hallway, kitchen, and any other place that requires the energy of the plant. Even in this form.
Coffee topiary
This option will definitely appeal to coffee lovers. The peculiarity is a pleasant smell throughout the room. It is unlikely that it will be possible to make coffee from such beans in the future, but the master will definitely receive positive emotions from the process. How to make topiary from coffee beans with your own hands:
- It is better to make an original table decoration on a foam base. In this case, the coffee ball will look beautiful from an aesthetic point of view.
- Each grain is glued using PVA glue.
- Next, the ball is placed on a skewer and into the pot.
The weight of the product is large, so the pot must first be filled with a putty solution.
How to make a topiary Tree of Happiness (step-by-step instructions for beginners)
Topiary is always very beautiful. Properly made, it can be both a wonderful addition to a gift and the main present. And considering that the second name of topiary is “tree of happiness,” the hero of the occasion will definitely be pleased to receive it.
Necessary materials:
- Threads;
- Scissors;
- Super glue;
- A wooden stick, branch or something else for the trunk (pencils are used here);
- Sheets of newspaper or paper;
- Crepe paper;
- Flower pots;
- Sand or small stones;
- Styrofoam;
- A piece of fabric;
- Decor according to your taste.
Subsequence:
We start by creating the base for the topiary. We make a small ball from a sheet of paper or newspaper and wrap it with thread so that it holds its shape firmly.
We take two simple pencils and connect them to each other with glue. This is the future trunk.
We cover it with a piece of paper, as shown below.
We attach our ball to the trunk, having first made a hole in the first one with scissors.
We pour a weighting agent into the pots: in this case, sand is used.
And put a piece of foam on top.
We insert our barrel into the foam. Check that the structure is strong.
We decorate the tree leg with translucent mesh fabric.
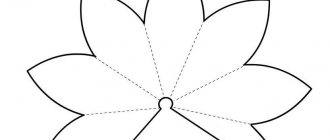
Now let's start forming the flowers. We twist small neat roses from corrugated paper according to the pattern presented below:
We will need a lot of such blanks to cover the entire surface of the crown of our tree.
When everything is ready, we begin to decorate the ball. We tear the tails obtained from the flowers when twisting them in half:
We grease each half with glue and, slightly spreading the ends of the base of the rose, plant it on our topiary. We repeat this until the entire surface of the ball is covered with flowers.
We make leaves from green corrugated paper. To do this, cut out 2x2 cm squares and wrap them around the blunt end of a stick. And then, dipping a stick with a piece of paper in glue, we plant our resulting leaf on the tree in the gaps between the flowers. This technique is called trimming.
We repeat the same at the base of the trunk. The tree of happiness is almost ready. We decorate the craft with decor to your liking. It turns out very beautiful. How do you like it?
Look what beauty can be made using the same principle.
You need to have a great sense of taste to make something like this.
New Year's topiary
This work is done with children, there are no dangerous elements. Instructions:
- You need to find fir cones.
- You can complement the composition with balloons or candies.
- A ball of polyurethane foam is used as a base. Usually, this material remains after repairs and is not difficult to find.
Next, each branch is carefully stuck into the base. After which, it is placed on a strong stick and placed in a pot filled with a heavy solution. Fasteners are definitely needed, as it will harden for about a day. Next, the work is decorated with Christmas tree decorations.
Pot as a separate decorative element
When creating fruit topiaries, you should remember that any detail in the tree of happiness must harmoniously correspond to the overall design of the composition. You can buy a simple brightly colored flower pot and leave it at that, but this will be a significant detriment to the overall design.
The pot needs the same careful design as the piece of artificial fruit itself. It can be decorated with colored foil, layers of wound twine, followed by gluing on beads or beads and painting with acrylic paints. You can decorate with a layer of small artificial fruits, smaller in diameter than those used in the main color scheme.
Depending on the size of the ball and the number of fruits, you may need a gypsum solution or foam with wire spacers to keep the composition in balance. They fill the pot, using it as an additional decorative element, and then level or trim it for neatness.