how to make a hedgehog from pine cones
It's time for autumn children's crafts. Here you will find two dozen examples of how to make a hedgehog from cones ; this is the most popular craft in this topic. There are different ways, depending on your imagination. The simplest one is to make a hedgehog from cones and plasticine . If you want a more thorough craft, make a hedgehog from cones and a plastic bottle . For step-by-step instructions, see this article. You can use anything – cardboard, felt, felt, even your mother’s tights.
Just don’t show your child “how to do it right”, let them use their imagination, do as they want, you will only help with technical issues. And of course, do everything together, for children this is an experience, for you an opportunity to spend more time with your child.
How to make a hedgehog from pine cones
A simple and quick children's craft, a do-it-yourself hedgehog made from pine cones . Prepare felt, a small pom-pom, eyes (you can buy them, but they don’t sell anything right now), glue and scissors.
- Cut out triangular faces from felt
- Glue your eyes
- Glue the pompom (nose)
- Attach the felt with the image of a face to the cone part of the pine cone
- The hedgehog from the pine cone is ready
Remember, when you do crafts with little ones, they will have an experience they will never forget.
Photo source: www.annmariejohn.com/2015/10/pinecone-hedgehogs-craft.html
Step-by-step instructions for two plasticine crafts for kindergarten
Now let's make two small crafts. We only need a couple of cones and plasticine. This option can be offered to a preschooler. I think he will be very interested.
I propose to make two animals: one will stand and the other will lie down.
So, the first master class.
Let's take the cone. We cut off its sharp part and try to make the bump stand up.
Then, using sharp nippers, cut off the scales on one side vertically from bottom to top.
We take yellow or white plasticine. And we twist it into a sausage. Glue it to a place where there are no scales.
Forming a nose. We make eyes, a nose and a mouth from black plasticine.
And also for stability we need paws made of plasticine of the same color.
Well, so that the hedgehog isn’t so sad, let’s make a mushroom for him.
This craft reminds me of the character from the cartoon “Shake!” Hello,” remember there the Hedgehog sang: “One is a daisy, two is a daisy.”
Now the second master class, where the hedgehog lies or stands on 4 legs.
Take a cone and plasticine. We make a cone from plasticine and glue it to the blunt side of the cone. For the face, mix pink or flesh colors.
Attach eyes and nose.
If desired, you can insert Christmas tree needles into the cone or attach a bunch of rowan berries.
And this is how he stands on his paws.
I also found video instructions on how to make such funny friends.
In this video, the entire creative process is given in great detail. At the very end there are photos of the works that the children made according to this description.
Tools and techniques for work
A hedgehog can be made in different ways and techniques. For crafts they take all kinds of materials, namely:
- cones;
- plastic bottles;
- salty dough;
- plasticine;
- cardboard;
- colored paper;
- sunflower seeds;
- candies;
- yarn;
- toothpicks;
- fir branches;
- autumn leaves.
Also for work you need to prepare:
- PVA glue;
- scissors;
- paints;
- pencil.
Turtle
You can make a turtle from zucchini and pumpkin or cabbage. It is worth considering that this craft will turn out to be quite large. You will need:
- two long zucchini;
- cabbage or pumpkin
- toothpicks;
- knife.
For a turtle shell, cabbage or a small round pumpkin is suitable. Cut the selected vegetable in half to form a hemisphere. If you choose a pumpkin, remove the seeds from it.
One zucchini must be cut crosswise into 6 pieces. The outermost parts will be the head and tail, and the remaining 4 parts will be the paws. Cut the second zucchini into slices and secure over the entire surface of the shell with toothpicks. The head, paws and tail are attached in the same way.
Autumn craft
To create the “Hedgehog” autumn craft, you will need tree leaves, pine or fir cones, foil, waste newspaper or paper, a glue gun, a plastic eggplant lid, acorns, a sprig of rowan, chestnuts and other natural materials, plastic fruit, 1 sheet of cardboard.
Leaves from trees can be pre-dried between the pages of books. If the leaves have just been collected, they need to be ironed through a sheet of paper with an iron at medium power. The leaves will become smooth and will not wrinkle when dry.
Newspaper or unnecessary paper needs to be crumpled and formed into a lump in the form of a drop. Wrap this form well in foil so that it does not unfold. The result is the body of a hedgehog - the basis for the craft. Using a glue gun, glue the lid of the eggplant onto the thin edge of the base - this is the spout. Make eyes from acorn caps or cut out 4 paper circles: 2 larger white ones, 2 smaller black ones.
Let's start putting together the composition. Glue tree leaves onto the cardboard so that the outer edges of the leaves face outward and cover all the edges of the cardboard. If the leaf petioles are long, they need to be trimmed. Glue the hedgehog's body into the middle using a glue gun, lubricating the bottom well with glue. It's the turn of the cones.
Glue must be applied to the blunt end of the cone and pressed well to the base. You should start from the hedgehog’s forehead and gradually fill the entire back so that there are no gaps. So, where there are gaps, add acorns, chestnuts, maple seeds, other natural material, plastic fruits. Decorate the top of the hedgehog with a sprig of rowan.
Making little men
The fantasy doesn't end there. You can create other figures, each of which will become a real masterpiece. To make a cute little man, you also need to bring a handful of dry grass from the forest. You will also need a neat onion. The cone will act as the base, the body. And your hero’s head will be an onion. Now you need to think about how to glue the bump. It can be any thick glue or plasticine.
We collect the person and begin to design the face. To do this, you can draw eyes and a mouth on the shiny, orange skin with a black marker. Make hair from dry grass. And now, the little man is ready to take his place on the shelf.
Let's play farm
You can make a huge number of little animals from pine cones. A popular option is the funny cow. To do this you will need:
- Pine and spruce cone.
- Plasticine.
- Matches.
- A little imagination.
First of all, design the torso. This means that you will have to solve the question of how to glue the pine cones for crafts. There is a simple and original option that will help out if you run out of plasticine. Prepare a piece of salt dough. To do this, simply mix half a teaspoon of fine salt and 15 g of flour. Add a little water to make a thick dough. Now you can start assembling. When it dries, the craft will hold up just fine.
So the little pine cone is the head. Now you need to decorate it with the missing details. Make horns, a muzzle, and an udder from plasticine. You can continue creating with salt dough. Make legs from four matches, and don’t forget about the hooves. They also come out great in the dough. In this case, all parts can be painted after drying. The plasticine is already colored, which is its advantage.
Combine with other animals
In case too much material was collected in the forest, squirrels, bears and other inhabitants of the forest will dilute the company of needle-like animals from cones and acorns. The principle is the same: you can exploit everything, the main thing is your imagination. Beads, garlands and wreaths will complement the interior of the house and add a special autumn atmosphere with their appearance and light forest aroma. Natural “building materials” will lie in the jar for a long time and will serve as a good addition to the arsenal of a young creator.
Crafts from a bottle, cup and natural materials for school
A large hedgehog can be created by using a bowl, saucepan or plate as the body.
Of course, we won’t take mom’s new dishes, but we’ll look for some old ones. Such bowls are usually not thrown away by our grandmothers, but are carefully taken out into the yard. They contain food for birds, chickens or cats. In general, you understand what we need.
Let's take:
- plastic bottle 1.5 l,
- cup,
- paint,
- cones,
- hot glue,
- scissors.
Let's start making the base. To do this, cut off the narrow part of the bottle, where the neck is. Then we make small cuts along the diameter (about 1 cm), we will glue them to the plate for better fixation.
We turn the bowl itself upside down and glue this plastic blank.
Or this.
If there is a primer, it is better to prime the entire part. This is done for uniformity and uniformity of coloring. However, you can immediately spray paint over the bowl.
Then we cover the entire bowl with cones.
Glue the spout and paint the cap black. We glue the eyes and think about the decor.
You can use dry leaves, rowan, roll up a rose from leaves, beads and ribbons.
Master Class
To successfully solve the problem, you only need free time and a little imagination.
- We choose a cone. For this craft you will need a large copy, without broken edges. Examine it, it is best if the cone is not too mature and the scales are still tightly adjacent to each other.
- In order to make a muzzle, you need to attach light-colored plasticine to the side of the pine cone that was facing the tree. You can simply pull it out with your hands.
- To make a nose and eyes for a hedgehog, it is enough to roll several balls from plasticine mass and place them in their places. Ears won't hurt either.
- Now the paws. In this case, you don’t have to think about how to glue the pine cones together for crafts, because even if you plan to house a whole family, it will consist of individual figures. They are made from plasticine of the main color. To do this, glue the hedgehog to the base.
- Make an apple, a mushroom or a leaf and place it on the prickly back.
Volumetric applications
Such works look very impressive and will undoubtedly delight the young creator, his parents, and teachers. They are more labor-intensive and require a certain skill. The basis is the same.
The main part on which (or under which) three-dimensional elements are glued is the body of the hedgehog.
The prickly back with triangular needles is cut from a sheet of colored paper and glued to the base only with the central part so that the “needles” are free. The body part is glued on top and shaped.
The triangles are slightly bent from the sheet, creating volume. You can bend each of the triangles in half vertically - this will look even more interesting.
Glue the body onto the base. Glue triangle needles (or their combinations on a strip) in rows from the tail, overlapping. In this case, apply glue only to the base of the triangles, leaving the tops not glued.
After the application has dried, ruffle the needles a little, creating volume. This option allows the use of different shapes as needles: narrow strips, semicircle or semi-oval, leaves. Color is at the discretion of the creator or manager.
This method is similar, but a little more complicated. Needles are narrow strips of paper, the ends of which are glued together to form a loop. The loops are glued onto or under the base, forming a semi-volume image. You can also glue origami modules.
Cut several strips of fringe and glue them one by one to the body, applying glue only to a flat surface.
The fringe of each subsequent strip should hide the place of the previous gluing. At the end of the work, the hedgehog needs to be slightly fluffed up.
Airplane
An airplane is an easy-to-make and original zucchini craft idea for school. You don't need many components. You only need:
- two zucchini;
- carrot;
- skewers;
- knife.
Vegetables should be approximately the same size. Cut one zucchini in half lengthwise. These will be the wings. On the second zucchini, cut out two rectangles from the top and bottom where the wings are attached.
Place the wings into the resulting recesses and fasten them with skewers. Make an airplane tail from rectangular scraps. Make wheels and a propeller from carrots.
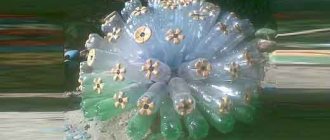
Decorative vase
It is perfect for placing dry sprigs of grass or autumn leaves in it. It's simple to do, but looks original and bright. You will need a plastic bottle and a bag of pine cones. Any paint and universal glue. You can buy it at a hardware store. You can try to make do with improvised means. If you are thinking about how to glue pine cones onto a bottle, then it’s probably too late to run to the store.
No big deal, just take a frying pan and heat it up well. Now place the cones on the side that should be attached to the bottle and let it heat up well. After this, carefully take them one at a time and quickly press them to the desired place. We do the same with all the other cones. They can be arranged in a chaotic order or the design can be thought out in advance. Now cover them with gold or silver spray paint. The vase is ready for use.
Ideas for a summer residence
Those who are interested in country house design may like ideas on how to make a hedgehog to decorate the landscape, spending a minimum of money.
A hedgehog made from plastic bottles will decorate any garden and fit harmoniously into any landscape design.
Useful tips
It’s great if you can get dried flowers, this is a wonderful decoration for your creation. A craft made from pine cones will look especially advantageous in a clearing of flowers and leaves.
Interesting fact: all hedgehog needles are hollow and filled with air inside, and regularly fall out. The animal spends about a year growing a new needle. The spiny nocturnal inhabitants eat not only berries, mushrooms and fruits, but are omnivores and feast on insects and sleeping reptiles.
Before you start making a hedgehog from pine cones, it would be a good idea to tell your children about the creatures. This will open up more space for creativity for little craftsmen. The fact that young pink hedgehogs have quills will inspire the creation of babies, which hedgehogs carry for only 49 days. And in winter they hibernate, preparing a winter mink bed can be a winning solution when it comes to competition.