Hello everyone, dear friends, today I will show you a wonderful idea on how to make a car from a plastic bottle with a rubber motor. This type of machine is not difficult to make and it will take a couple of minutes of your time to create. And besides, the material can be obtained in every home.
Required materials: - plastic bottle 2 pcs. - barbecue stick - lids - glue - rubber band - paper clip
Step 1: First of all, take a plastic bottle of any shape, it is better to take a square one. And using a marker we draw the shape of a car. And cut out the blank.
How to make a car from a plastic bottle
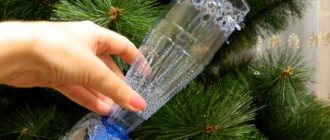
Hello dear homemade people! Today we will make a car (see also Origami Racing Car) from an ordinary plastic bottle . At the same time, it will travel with the help of a jet engine, for which we will install an ordinary balloon (read AirplaneBall).
to construct the machine , so for those who like quick results, this craft is just for you.
Materials for creating a machine
Materials for creating a car from a plastic bottle
In order to make a machine , we need a 1 liter plastic bottle, four large buttons (wheels), it will be nice if you have four wheels with axles from an old machine, of a suitable size. You will also need: a balloon, 15 cm of plastic tube, thread, a sharp knife, scissors.
We construct a car from a bottle
Car made from a plastic bottle
First, we cut four holes for the wheels in the plastic bottle; the holes should be cut so that the axes of the wheels are parallel. Then insert the wheels as shown in the picture and check if they rotate easily. After this, we cut two holes on the top of the bottle and in its bottom for a plastic tube. Having inserted it into these holes, we put a balloon on the top edge and tie it tightly.
Since the car made from a plastic bottle is ready, all that remains is to check its driving performance. To do this, we inflate a balloon and, placing the machine on the floor, release it. The jet stream of air will begin to push the car, and it will pick up a speed quite decent for an apartment. If desired, you can make certain tuning of the car: paint it, make a spoiler, etc. It all depends on your creativity.
And now we invite you to see how a car made from a plastic bottle drives.
Source
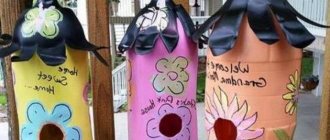
Funny pig made from bottles
The pig will look great anywhere in the garden. To make it you will need:
- 5 liter bottle;
- four bottle necks for making legs;
- one top part from a bottle, which is cut into two parts to make ears;
- wire for tail;
- two beads for eyes;
- glue;
- pink paint.
The parts are connected and secured with glue. The finished product needs to be painted. You can use oil or spray paint. To prevent the piglet from being blown away by the wind, you need to pour sand into it.
In addition to its decorative function, the structure can serve as a flower bed. To do this, the top is cut off, filled with soil and flowers are planted.
Crafts made from plastic bottles for the garden can serve as flower beds, borders or paths. To make a path, bottles are inserted into the ground with their necks.
Both whole and cut plastic are used. It is important to fill the bottles with soil so that they do not become deformed when they are walked on.
Bird dispenser made from a plastic bottle
You will need:
- 1 liter plastic bottle.
- Knife.
- 2 wooden spoons.
- Screw.
- Rope.
1.
Draw a hole with a radius of 1 cm at a distance of 10 cm from the bottom.
2.
Rotate the bottle 90 degrees and draw another hole with a radius of 2 cm, opposite the first one.
3.
The same process must be repeated at a distance of 5 cm from the bottom.
4.
Then carefully cut out all the drawn holes with a knife.
5.
Now you can insert the spoons.
6.
To hang a bottle, you need to screw a screw or screw to the cap of the bottle and hang it on a rope.
7.
Finally, you can fill your tank with birdseed.
Paper crafts
Paper cars are not as durable as cardboard ones. But the creative process of creating them is very exciting.
Ready-made diagrams and patterns of such machines can be found on the Internet or children's magazines. They can be copied or printed. Then color, cut and carefully glue according to the instructions.
This kind of activity is interesting and can give impetus to the development of your own creative ideas.
Application made of cereals and colored paper
This picture will decorate any room, not just a children's room. Making a car out of paper and cereals will appeal to children of any age.
For this we need: a rectangle made of cardboard, any color will do. Colored paper or typewriter printed. Silicate or PVA glue, brush and various cereals.
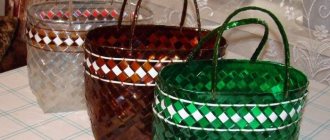
Craft a pencil case from a plastic bottle
Unnecessary plastic bottles can be used for a necessary and convenient pencil case. The proposed item can be improved, it all depends on your imagination.
You will need:
- Empty, washed and dried plastic bottles (in this case 6 pieces).
- Knife.
- Scissors.
- Old newspapers.
- Bolon paint.
- Paper clips.
- Glue (it is necessary that it glues the plastic well, but does not corrode it).
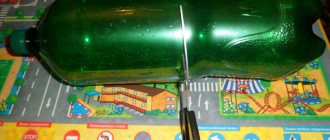
1.
Lay the bottle on its side and carefully insert the knife blade at the base. Cut it along the bottom contour.
2.
Repeat the procedure with the remaining bottles.
3.
Place all the resulting products on an old newspaper with the bottom facing up.
4.
Spray paint on the outside of the products in several layers.
5.
Once the bottles are dry, it's time to line the cut edges with felt. The felt strips should be slightly longer than the circumference of the bottle. Glue the material evenly and thoroughly to each section of the bottle.
6.
Wait 15-20 minutes for the glue to dry. It’s better not to touch the extra, remaining felt for now.
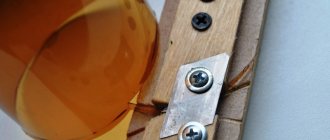
7.
Secure the felt with paper clips for better adhesion. Wait another hour and then trim off the rest.
8.
Decide exactly where the entire structure will stand, and use glue to attach all the bottles to each other from the felt side along the edges. For good strength of the entire pencil case, do not skimp on glue.
9.
The glue must dry completely. You can fill out your pencil case. All is ready!
Use of bottles on the farm
Bottles are used not only for decoration. These can be used to make a dustpan, washbasin, or pest trap.
Undoubtedly, everyone needs a container for storing some items. To make it, just cut off the neck.
The washbasin is also very easy to make with your own hands. The bottom of the bottle is cut off and holes are made through which the rope is threaded. The structure is hung in the desired place and water is poured. To wash your face, just unscrew the cap a little.
To make a trap, you need to cut the container in half. To catch insects, some kind of bait is placed at the bottom. For example, sugar syrup with yeast is suitable for this.
You will need hot water in which the sugar and yeast will dissolve. The cooled liquid must be poured into the trap. Not only flies and wasps, but also mosquitoes will flock to this delicacy.
Note!
Even a child can make a scoop. First you need to outline its shape and then cut it out.
Plastic can be used to make flower pots, greenhouses or containers for seedlings. Descriptions of such crafts made from plastic bottles can be found in large quantities on the Internet, but to create something unique, you need to show your imagination.
It is fashionable to build a self-watering device from plastic containers. To do this, cut the bottle, make holes on the sides and insert the hose into the neck. With the help of such a device, the plants will be perfectly hydrated.
For plants that do not like surface watering, make the following device. The bottom of plastic containers is not completely cut off. A trench is opened on the side of the plant where stones are placed. The bottle is buried upside down.
Then the required amount of water is poured to carry out irrigation. You can place the bottles upside down, but in this case you will need to make holes in the container.
Plastic containers are also used to heat plants. To do this, bottles are filled with warm water and placed around the plant.
Note!
For inspiration, you can look at various photos of crafts made from plastic bottles. You don’t need to put in a lot of effort to make an original decoration or useful item for your garden that will last for many years.
Hello everyone, dear friends, today I will show you a wonderful idea on how to make a car from a plastic bottle with a rubber motor. This type of machine is not difficult to make and it will take a couple of minutes of your time to create. And besides, the material can be obtained in every home.
Required materials: - plastic bottle 2 pcs. - barbecue stick - lids - glue - rubber band - paper clip
Step 1: First of all, take a plastic bottle of any shape, it is better to take a square one. And using a marker we draw the shape of a car. And cut out the blank.
Crafts cars made of cardboard
For more complex car models, you will need to cut out all the elements from cardboard and then glue them together. Such crafts are more labor-intensive, require a lot of time and skill, but they also look original.
A cardboard machine can be painted with bright colors, covered with colored paper, and decorated with stickers.
When making such a machine, you can use wheels and an inertial mechanism from an unnecessary toy to get an excellent toy for a child.
Instructions for making crafts from cardboard can be found online or you can create your own.
Interesting options for crafts made from thick packaging cardboard will make a child’s dream of owning any car come true.
What types of crafts are there?
Any materials can be used for the work. Based on the age and gender of the child, you can choose the right product.
Children up to 3-5 years old love to ride in the car, feeling protected from all sides. At the age of 5-7 years, it is interesting to play with crafts, inventing the course of events and various adventures. Older children want to create something bright and unusual for decoration or a gift.
Crafts can be divided into three types:
- Volumetric;
- Flat;
- Edible.
Volume cars
Volumetric designs are suitable for girls and boys of different ages. Cars can be large for riding or small for playing and decorating. They are made from: cardboard box, toy box, toilet paper roll, notebook sheet, stationery cardboard, pasta, beads and other accessories, fabric, foam rubber, plastic bottle, plasticine, matches, wooden blocks, pine cones.
Flat
Most often, flat machines are made in the form of a painting or applique. Very little children work with colored paper, older children can use: cereals, beads, plasticine, leaves of various trees and bushes.
Edible
The most exciting process is to prepare a delicious craft. Children enjoy playing cook and look forward to the results. For such crafts, everything that is in the refrigerator is used, you just need to give free rein to your imagination. A car baked in the oven with banana wheels looks not only beautiful, but also appetizing. A cucumber convertible or a pear bus, to accustom your child to vegetables and fruits.
Photos of crafts made from plastic bottles
Note!
June 15th, 2017
Plastic products are used everywhere because they require less investment to create than products made from other materials. However, discarded plastic can take hundreds or even thousands of years to decompose, so it is important to recycle it or avoid plastic altogether.
The second option is very difficult to implement today, so recycling comes to the fore. Plastic can be sent to special factories for recycling it, or you can make useful things out of it. In this collection you will learn how to make various useful things for your home and garden from plastic bottles.
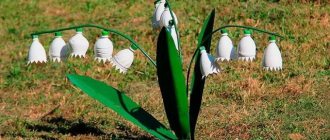
Bottle palm
To make a palm tree you need to create a frame. Its length should be equal to the height of the tree.
Take bottles of the same size, cut off their bottoms and place them on top of each other. Then the leaves are cut out. They are attached to the top of the created structure. When everything is ready, the palm tree is painted green.
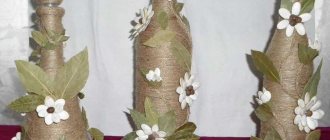
Vase for sweets: master class on crafts from plastic bottles
You will need:
Plate, round plastic or thick cardboard
6 two-liter plastic bottles
Wooden or plastic rod (you can use a straight branch of suitable diameter and length)
Super glue
Spray paint and glitter (optional)
1. Making the base for the craft. To do this you need a plate, ceramic or glass plate. In the middle of the plate you need to enlarge the hole to 10 mm using a drill.
2. You will also need to use a drill to make holes in the center of the three plastic bottle pieces you will be using. It's easier to drill from the inside out.
3. Cut off the bottom of each of the 6 plastic bottles. Place 3 parts on the rod and secure with glue. Glue the remaining parts to the base (plate) around the rod. If you wish, you can spray paint everything.
It is worth noting that the rod is held on the base thanks to a plastic part that is glued to the plate, as well as to the rod itself.
4. If you wish, you can decorate your vase.
Convertible from a roll
Quickly and easily, turn a cardboard toilet paper roll into a convertible for a toy man. This craft can be fun to play with or put up as a figurine.
To do this you need: an empty roll, scissors, markers or paints, glue. In the middle part, cut an oval with scissors, leaving a few centimeters short on one side. Bend the resulting part inward, in the shape of a seat. On a white sheet of cardboard, draw five circles, 2-3 centimeters in diameter, these are the wheels and steering wheel, decorate and cut them out.
To make the wheels and steering wheel rotate, you can use toothpicks as a connection; be sure to break off the sharp ends and cover them with plasticine. Before assembly, decorate the frame and glue small parts, for example: headlights, door handles, exhaust pipe. All these little things are pre-cut from plain or colored paper.
Model of a car made from a plastic bottle with a propeller
Plastic bottles are an ideal material for various kinds of crafts. They are free, there are many of them, you can just stamp whatever you want. So in this video, the author made a children's model of a car that moves under the influence of a motor and a propeller.
Necessary parts and blanks.
Motor from CD or DVD drive
Cocktail straws
Model creation process
We take a plastic bottle and cut off the top part with the neck and cap. We make a propeller from it using scissors. Heat it with a burner or lighter and bend the blades. The propeller is ready.
Now we take a flat plastic bottle, cut off 2 pieces of tubes of the required length and glue them to it using a heat gun. From corks and wooden sushi sticks we make 2 car axles with wheels. We push them through the tubes on the body of the car model.
We disassemble the CD drive and remove the engine from it. Glue the propeller to the engine axis using hot glue. We glue the motor itself with the same glue to the top of the machine in its rear part.
Using scissors and cardboard, we create a seat with a chair inside the car. We insert the battery into the trunk; it will be pressed against a plastic protrusion cut from the body of the bottle and protruding from it.
The car will rush, driven by the wind accelerated by the propeller.
A more serious model of the machine is in another article.
Car made from a cardboard box
Every home has a cardboard box used for appliances. If you have a choice, then choose the most durable one of the right size.
Suitable materials and tools include: scissors, tape, paints, colored paper, hot gun. First you need to cut off the three upper blades, secure the fourth one motionless with tape, parallel to the floor. Reinforce the bottom of the case with tape, this will extend the life of the toy. Cut out five identical circles from the pieces; these are the wheels and steering wheel. Two squares, approximately 5 by 5 centimeters, will serve as the connecting part of the steering wheel and the body. If there is cardboard left, you can make tuning, for example: volumetric door handles, mirrors, bumpers. Paint all parts or cover with colored paper. Draw a dashboard with multi-colored buttons. After all the manipulations, proceed to assembly. All parts are attached using a hot gun: wheels, steering wheel, door handles. The car is ready!
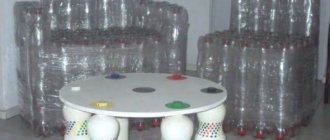
Modular boxes: description of crafts made from plastic bottles
You will need:
Several large plastic bottles or canisters
Stationery knife
Scissors
Marker or pencil
Strong thread.
1. Cut a suitable hole from a bottle or canister using a utility knife and/or scissors. It should not be too small for everything to fit, or too large for the plastic structure to fall apart.
2. Start connecting the bottles with a strong thread. Start with two, then add two more already connected to them, and so on. Tie strong knots. You can also try using hot glue or superglue (Moment glue).
3. Assemble a design that is convenient for you. You decide how many rows and “floors” to make. However, it is worth knowing that the higher the structure, the less stable it is. You may need to secure the entire structure with rope again.
4. It's time to put scattered things on the shelf.
Transport from the future
Modern children are passionate about computer games, and racing and science fiction are thriving there. The car of the future craft is perfect for bonding with kids. It will allow you to interest your child and work with him to make a toy that looks like his favorite character.
There are many such options, you just have to show your own interest and devote the necessary time to it.
Cutting out the stabilizers
In order for the rocket to fly smoothly, it must be installed correctly. The easiest way is to make a stabilizer (legs) from another plastic bottle. To do this, the bottle is cut in half and straightened. Then, on this flat surface, draw the contour of the stabilizer, provide a backlog for attaching to the rocket body. Now cut out the stabilizer along the contour and glue it to the rocket with tape.
The picture also shows a weighted rocket body; this author used a cut-off part of another bottle with a weight-bolt in the cap. In fact, there is complete scope for imagination and experimentation; you can accurately determine the optimal load in the head of your rocket only after several launches. The shape of the legs can also be different, for example, you can use the top of a plastic bottle, attach plastic legs to it, and place the rocket itself inside:
As for the launch pad, you can get creative here too. Some prepare complex structures with a guide axis, others cut special devices out of wood, and others simply fix the rocket on a flat surface using improvised means. In principle, the simplest water rocket after the described steps is already ready. You just need to take with you more water, a pump and an assistant: he will hold the rocket with the plug down and press the valve with his hands while you pump the air with the pump. It is recommended to pump 3-6 atmospheres into a 1.5 liter bottle (in this sense, a car pump is more convenient), then disconnect the hose and release the cap on the count of “three or four”. The rocket has been launched! It flies quite high and impressively, and most importantly, the whole process is not life-threatening. True, the assistant usually has to take a forced shower of “fuel”
If you liked this idea and want to experiment further, we recommend reading, for example, here, there are more complex missiles, with real launchers. Here is a picture with step-by-step instructions, albeit in English, but everything is drawn quite easily. Well, if you liked the video and wanted to repeat something similar, welcome to the rocket modeling club: serious guys use several bottles of compressed air during launch, and only one contains water.
Possible examples
The variety of vehicles on our roads is off the charts; even more images of them are on the Internet. Any of these options can be used as a prototype of your product.
By going to specialized websites, you can find many photos of car crafts, where the entire creative process is described in detail. It is important to follow the step-by-step instructions. Without much difficulty you can reproduce the option you are interested in.
You can also show your own imagination and make an exclusive product, share your “instructions” on how you did it.