Statues, fountains and mesmerizing waterfalls in the landscape design of the site are the lot of the elite. What should the majority of ordinary summer residents do, how to decorate their plot? Plastic bottles have been and remain a popular option for decorating an area without major financial investments.
Every household has an abundance of this material, so there is room for imagination. All kinds of flowers are of interest to most craftsmen. Bells from plastic bottles form very quickly. We will tell you in detail how to do this correctly.
Bells in landscape design
To make bells, you will need very few materials:
- For adherents of classic compositions, it is advisable to choose plastic bottles in appropriate colors: white, blue and green. Lack of containers of the required shade is not a problem. In the future, the bells can be covered with a layer of suitable paint.
- Depending on the size of future flowers, a metal rod is selected to serve as a stem.
- Strong wire.
- Marker, scissors and awl.
- Acrylic paint intended for use in open spaces.
So, how to make a bell from a plastic bottle:
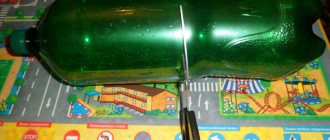
- The container is first cleared of labels and the bottle is cut in half.
- The upper cone-shaped part will play the role of a bell. The petals are marked on it with a marker. Then the unnecessary parts are cut out with scissors.
- To give flowers from plastic bottles a natural look, the petals are bent outward with scissors. Bright hearts will add attraction. They are made from various materials, for example, polystyrene foam, and are painted bright yellow.
- Having prepared the bells, you can start working on the stem and leaves. First, leaves of the desired shape appear on a cut green plastic bottle. The edges of the finished template can be slightly cut and processed over fire. This action achieves two goals at once: it eliminates the risk of cutting on a sharp edge and gives the most natural shape.
- The bell stem also needs decoration. Here again a green plastic bottle, from which a narrow strip is cut, will come in handy. Gradually wrapping it around the rod, the metal rod is carefully brought to a small flame. This promotes tight crimping and high-quality fixation of the finish. In the process of winding the metal rod, bell leaves are attached at intervals.
- Plastic flowers are fixed on the stem using a wire fastening; for this, a pair of holes are made in the cork with a hot awl. At the same stage, the finished core is installed.
- When all the elements are ready, flowers from plastic bottles are attached to the rod.
Useful design tips
Do-it-yourself bells made from plastic bottles do not have to be hung on a metal rod; PVC pipes are suitable for these purposes. The fundamental difference between products made from plastic bottles is as follows:
- In the flower lids, instead of holes for fastening with wire, holes are prepared for self-tapping screws.
- Similar holes are formed in pipes.
- Plastic pipes are painted green. The optimal length of the rod when forming bells from liter bottles is 1 m.
- When the paint has dried, you can use self-tapping screws to attach flowers and leaves, which are also cut from a green plastic bottle.
- The pipes bend a little and become driven into the ground. To strengthen the future composition of bells, they can be tied together with wire, and a heavy object can be placed inside.
And finally, some advice for novice craftsmen who love plastic bottles in their work:
- Smooth plastic parts can be given different shapes if you preheat the workpiece over a flame.
- It is better to perform work with a constant flow of fresh air.
- It is recommended to hold small parts with tweezers to avoid getting burned.
- If it is not possible to give the bottle blank the desired shape, the softened plastic can be easily transformed with the help of your fingers.
- Not having bottles of the right shade is not a problem at all. The use of acrylic paints will make the composition even brighter and more natural. For efficiency, all plastic parts are painted in two layers to avoid transparency in bright sun.
Decorating an area using plastic containers is extremely practical. The material is durable and withstands all precipitation and temperature changes. Even if something doesn’t work out the first time, it costs nothing to try again, because large quantities of bottles are always at hand. Happy experiments and new original ideas!
Discuss the article on the forum
Source: https://bouw.ru/article/kolokolychiki-iz-plastikovih-butilok-svoimi-rukami
Garden decoration
A master class will help you make a bell from a plastic bottle. Let's look at a simple method.
To create flowers you will need clean plastic bottles, scissors, a pen or marker. For the stem, a branch or twigs. Flexible wire and an awl are used to make the attachment of the flower to the stem.
Cut the bottle. Select the length of the workpiece according to the location of the flower on the stem. The larger ones are located closer to the base, and the smaller ones are located closer to the end of the stem.
On the top of the bottle you need to outline the future petals. Their shape can be whatever you like best. Then cut out the petals along the outlined outline.
Next we attach the flowers. Using an awl, we make two holes in the lid and thread the wire through them. At the same stage, the core is attached, if it is intended. Screw on the lid. Now we attach the finished flower to the stem. If you make the stems from pipes or hoses, then it is better to attach the flowers with self-tapping screws.
Bell leaves can be made from green plastic bottles, a piece of old linoleum painted green, or other suitable materials at hand.
Craft bell - 115 real photos and videos instructions for making crafts
Preparing for the New Year is a rather painstaking but entertaining process. Beautiful decorations allow you to create a fabulous and cozy atmosphere in the interior space.
Modern decor is very monotonous. It can be found in every room. Surely many of us have thought about creating exclusive things that we can do with our own hands.
Handicraft is quite an entertaining and interesting process. Here you need to show a little imagination and choose beautiful finishing materials.
In specialized departments there is a large number of different little things that will appeal to every consumer.
We present to you interesting master classes on creating crafts of New Year's bells with your own hands. These methods are suitable for joint creativity with children.
Crafts from a plastic bottle
How to make a DIY bell craft from a plastic bottle. To create a Christmas tree decoration you will need the following components.
These include:
- plastic bottle 1 pc.;
- sharp knife;
- scissors;
- beads;
- small beads;
- glitter;
- glue;
- satin ribbons;
- glare;
- acrylic paints.
- Creating a craft bell from a bottle takes place in several stages:
- Cut off the top of the plastic bottle;
- We make a through hole in the lid;
- We thread a satin ribbon with a large bead here and make a knot that will allow you to fix the product on the Christmas tree;
- Let's start decorating the base. To do this, we cover the entire surface of our bell with white acrylic paint;
- Now with a simple pencil we draw circles and smooth lines;
- We cover them with a small amount of adhesive;
- While the glue is still wet, sprinkle the bell with glitter and leave until completely dry. On average, this will take up to 30 minutes;
- Remove any remaining glitter with a dry brush;
- Next, glue large beads around the entire perimeter of the bell;
- We fill the voids with small beads;
- The final stage will be drawing thin lines that will help define the boundaries of the bright decor. The photo of the bell craft shows the finished product.
Bell made of paper or cardboard
How to make a bell craft from scrap materials? We present another idea that will help you make an unusual Christmas tree accessory.
For this you will need:
- thick paper in yellow, red and green shades. You can also use thin cardboard;
- glue;
- old DVD discs 8 pcs.;
- acrylic paints;
- a simple pencil;
- paper bell template;
- decorative bead;
- satin ribbons;
- compass;
- beads.
How to make a paper bell craft? The manufacturing process takes place in several stages. They include:
- Using a compass on paper, draw a circle with a diameter of 10 cm;
- Along the edges of the part we draw jagged elements measuring 1 cm x 1 cm;
- Carefully cut out the resulting part;
- Now we roll the base into a cone. We coat the edges with a small amount of glue and glue the upper borders of the product;
- On green paper we draw small leaves to decorate the top border;
- We cut out the resulting blanks;
- Glue them at the upper borders;
- Now let's start decorating our bell. To do this, use a thin brush to draw thin lines of glue. Sprinkle them with bright sparkles and leave the product to dry;
- When it is completely dry, you can begin to fix the bead on the inside.
Materials and tools
1. Preparing the mold for the toy
From any plastic bottle (carbonated drink, milk, etc.) we cut off the top part about 14-15 cm long with scissors.
2. Preparing the surface for decoupage.
It is better to degrease the surface of the bottle before starting work. Simply wipe with a cloth or napkin, sprinkling the surface with any alcohol-containing substance (both vodka and glass washing liquid are suitable). After this, apply acrylic primer in two layers. After applying each layer, dry thoroughly. You can speed up this process with a hair dryer.
The first layer of primer can be applied with a wide flat brush, and the second with tamping movements with a regular dishwashing sponge. After drying, the primer can be sanded with sandpaper, after which another layer of primer can be applied, so we will achieve greater smoothness.
3.Coloring with background color.
After the primer has dried, we cover our form with acrylic paint of the background color (our color is blue). Apply two layers, allowing each layer to dry.
4.Preparing napkins.
We cut out the desired motifs from decoupage napkins. Separate the excess layers of paper.
New Year's toys for the Christmas tree from a plastic bottle
admin 23 – August – 2017
Before the New Year holidays, children's institutions often require crafts, and many are also asked to bring inexpensive decorations to work. If you don’t want to spend money or just want to please others with a handmade product, you should turn your attention to a good old plastic bottle. From one such container we will make a bell, a ball and a snowflake.
A plastic bottle of almost any size will work. The main thing is that it is round in cross-section. This master class uses a bottle with a volume of 0.33 liters.
Required materials and tools:
- plastic bottle;
- scissors;
- tinsel;
- large needle or awl;
- foil;
- glue;
- braid or ribbon;
- nail polish in white and red (you can also use gouache and acrylic paints).
How to make Christmas tree toys from a plastic bottle
Let's start by dividing a clean plastic bottle into three parts, separating the top part (this is the future bell) and the bottom (the basis for the snowflake). A Christmas tree ball will be constructed from the central part.
New Year's bell
1. Make a bell tongue. It will also serve as a hanging loop. Roll a ball out of foil and stretch the ribbon folded in half through it. Tie a knot at the end to prevent the ball from slipping off. The tongue can also be made from a bright large bead or button. As a last resort, you can use plasticine or a circle cut out of thick cardboard.
2. Using an awl or needle, make a hole in the cork and thread a loop of braid through it. Screw the plug into place. The bottle chosen for the master class already had a factory drinking hole in the cork.
3. Wrap the top part with the cork in foil.
4. Glue a piece of ribbon to the edge of the bell.
5. Disguise the cork with tinsel, wrapping it around the cork, securing it in place with glue or tape if necessary. The bell is ready!
Christmas ball from a plastic bottle
1. Cut the middle part of the bottle into 5 - 6 rings of equal width (1 - 2 cm).
2. Using an awl or needle, make one hole in each ring. Align the rings and holes. Thread thread or ribbon through the holes. Secure with knots.
3. Spread the rings so that a ball is formed. Decorate the top of the ball with a ribbon bow.
4. Use paint or nail polish to color the ball.
Snowflake for Christmas tree from a plastic bottle
1. Color the bottom of the bottle as follows. Paint the concave part with white varnish or paint. Let dry.
2. Turn the bottom over and paint a snowflake on the convex part with bright paint or varnish.
3. Make a hole at the edge of the bottom with an awl. Make a loop from the braid.
Here we tell you how to make each decoration separately, although the work can be organized in other ways. First, cut the bottle, then make holes on all the parts, prepare braid pendants for all three toys, and paint the ball and the snowflake at the same time. By the way, the bell can also be made transparent without wrapping it in foil. In this case, the bell can be painted.
These simple toys can decorate your home, school classroom, or Christmas tree in the yard. They can be collected into a garland. They cost practically nothing and, unlike expensive glass toys, will never break or injure you and your family members.
Jewelry options from the Internet
bells, snowflakes and Christmas balls
Video Master class “Transparent Christmas tree toy”
Source: https://bebiklad.ru/podelki/novogodnie-podelki-iz-plastikovyih-butyilok-kolokolchik-snezhinka-sharik
Beautiful symbol of the New Year
The custom of decorating a home with bells came to us from Europe. There was a superstition that their ringing could scare away
evil spirits.
To prevent dark forces from interfering with New Year's celebrations, bells were hung on the Christmas tree along with other toys. This tradition has taken root well all over the world. And today even people who are far from superstitions decorate their houses with bells for the New Year and Christmas. Because this is a very beautiful
holiday souvenir.
In those distant times, people made huge bells from bronze. They were used not only as a talisman
, but also as a signaling tool.
The bell notified the population about various events or called for a meeting. Nowadays this signal is used in educational institutions. Every September 1st the first bell rings, and before the summer holidays we hear the last school bell. So you can safely consider the bell as a symbol
of the beginning of another year.
Bells made from plastic bottles for the garden: master class with photos
Everyone who has a summer cottage or yard tries to decorate the territory with all kinds of decorative figures, statues, ponds, fountains, and alpine slides.
They build beautiful fences, benches, create fancy paths and install lanterns along them. Many of these options are suitable for making the landscape picturesque.
One of the simple and affordable ways to decorate a site is with bright and beautiful bells made from plastic bottles.
Such flowers will transform an ordinary garden, attract attention, and delight with their beauty. Bells are also perfect for decorating the areas of kindergartens and playgrounds; they can beautify the area near entrances.
A huge plus is that the materials used for manufacturing are strong and durable. They are not afraid of temperature changes, rain, snow. Such beauty will delight you for a very long time.
Variety of shapes
The size of bells made from plastic bottles should be selected depending on the location of the flowers. If they will be located over a large area and will occupy a central place on it, then large bottles will be great. Such a large structure will look very attractive.
If the flowers are located in a small area, among plants, then it needs to be made more compact. Such flowers are located along the paths. In this case, bells from small bottles on thin, not too spreading stems will look beautiful.
Plastic flower bushes will not only decorate your garden, but will also bring benefits.
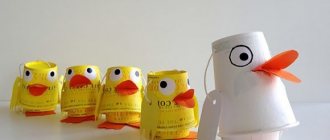
Attach cores to the center of each flower, for example, from yellow-painted disposable cups or plastic yellow cases from children's chocolate eggs. Or attach leaves along the entire stem in addition to flowers.
Such flowers will make noise. Place these bells near fruit trees. Their benefit is that they will scare away birds, which often spoil the harvest.
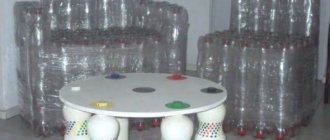
A flower bed can be made from old car tires. A small, neat decorative fence around flowers looks great. You can lay out large cobblestones, wild stones, or decorate the flowerbed with plastic bottles painted in bright colors.
Materials for stems
The stems are made from durable rods or thin plastic pipes. The pipes can be left equal or bent in an arc. To give the pipes a green color, you will need to paint them or wrap them with green insulating tape.
An excellent replacement for pipes would be a rigid garden hose. Watering hoses that match the color are available for sale, as in the photo below. They are ideal for making stems for bells. To make the structure stronger, before digging the hoses into the ground, it is worth placing thin reinforcement or a metal rod inside.
On a note! It does not have to be the same as the stem; half its length will be enough.
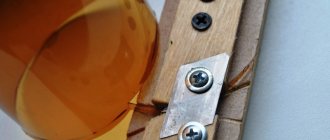
Also suitable for the stem is a wooden strip, to which bottle caps are screwed using screws. It is better to make such a structure tall and place it in the garden, among lush bushes.
- Another material for creating stems is metal rods or very stiff wire.
Thin strips are cut from a green plastic bottle. Then, heating the plastic over a fire, the strips are twisted in a spiral around the rod.
Bells attached to a spreading branch that has been pre-painted look interesting and original.
For stability, the bells need to be dug deeper into the ground. If the stems are made from reinforcement or rods, then their bases can be welded to a heavy metal platform.
Shapes and colors
To give the flower a natural look, it is better to reduce the size of the bells closer to the tip of the stem. This can be done by reducing the length of the flower itself or using smaller bottles.
You can make the shape of the flowers the way you like. The edges are cut rounded or sharp. Bend it outward and twist it a little, or leave it in its original form. Depending on the shape of the bottle, the bells will have a different appearance.
Bells made from transparent bottles will be inconspicuous and will not show all their beauty. Therefore they need to be painted. It is better to paint flowers from the inside, since then the paint will last longer. This is quite easy to do.
You need to pour a small amount of paint into the cut-out workpiece and rotate the workpiece so that the paint covers the entire inner surface. The edges can be painted with a brush or sponge.
If the bell is white, then white plastic bottles will do; you won’t have to paint them.
The color of bells in nature can be white and all shades from blue to blue. You can get creative and paint them in unusual colors or make shade transitions. Using your imagination, you can create magnificent and unique bells with your own hands.
Garden decoration
A master class will help you make a bell from a plastic bottle. Let's look at a simple method.
To create flowers you will need clean plastic bottles, scissors, a pen or marker. For the stem, a branch or twigs. Flexible wire and an awl are used to make the attachment of the flower to the stem.
Cut the bottle. Select the length of the workpiece according to the location of the flower on the stem. The larger ones are located closer to the base, and the smaller ones are located closer to the end of the stem.
On the top of the bottle you need to outline the future petals. Their shape can be whatever you like best. Then cut out the petals along the outlined outline.
Next we attach the flowers. Using an awl, we make two holes in the lid and thread the wire through them. At the same stage, the core is attached, if it is intended. Screw on the lid. Now we attach the finished flower to the stem. If you make the stems from pipes or hoses, then it is better to attach the flowers with self-tapping screws.
Bell leaves can be made from green plastic bottles, a piece of old linoleum painted green, or other suitable materials at hand.
Video on the topic of the article
- In this video selection you can see different ways of making a bell.
Source: https://DekorMyHome.ru/rukodelie/kolokolchiki-iz-plastikovyh-bytylok-dlia-sada-master-klass-s-foto.html
Variety of shapes
The size of bells made from plastic bottles should be selected depending on the location of the flowers. If they will be located over a large area and will occupy a central place on it, then large bottles will be great. Such a large structure will look very attractive.
If the flowers are located in a small area, among plants, then it needs to be made more compact. Such flowers are located along the paths. In this case, bells from small bottles on thin, not too spreading stems will look beautiful.
Plastic flower bushes will not only decorate your garden, but will also bring benefits. Attach cores to the center of each flower, for example, from yellow-painted disposable cups or plastic yellow cases from children's chocolate eggs. Or attach leaves along the entire stem in addition to flowers. Such flowers will make noise. Place these bells near fruit trees. Their benefit is that they will scare away birds, which often spoil the harvest.
A flower bed can be made from old car tires. A small, neat decorative fence around flowers looks great. You can lay out large cobblestones, wild stones, or decorate the flowerbed with plastic bottles painted in bright colors.
A modest bell made from a plastic bottle
From plastic bottles you can create not only large products (palm trees, peacocks, piglets) or massive structures (fences, greenhouses, gazebos). A small bell made from a plastic bottle can also make its contribution to decorating the local area or garden.
Master class: bell from a plastic bottle
Option 1. Wildflower
Necessary materials and tools: metal rods or very thick wire, thin wire, several dozen plastic bottles of different shades, acrylic paint of blue, violet, blue, white, scissors, awl, candle.
First you need to calculate how many plastic containers of the same size you will need to create one bluebell bush. After this, the prepared bottles must be washed and cleared of labels and traces of glue.
The top third of the bottle will be used for work, so you can immediately cut off this part, leaving the rest for other crafts made from plastic bottles. The choice of container color depends on your preferences. You can find photos of white, pale blue, and velvety lavender bells, just choose the desired shade of acrylic paint.
You can also set aside a few green bottles to cut out sepals and thin strips that can be used to wrap around the stems.
[aaa1]
So, you already have blanks from which the flowers themselves are cut out. To do this, you just need to give the lower part the appearance of petals, and then walk along the contours with a candle flame so as not to cut yourself on the sharp edges. As you can see, the work requires minimal effort, because the shape of the bottle neck is ideal for creating flowers such as lilies of the valley, snowdrops, tulips, and bells.
Now you need to hold the workpiece over the candle for a while so that the plastic becomes soft. Next, you need to slightly turn the petals outward so that the bells are more voluminous and look like real ones.
In all the lids you need to make two holes with a hot awl, and then thread a thin wire through them, which you need to tie the lids to metal rods, previously painted and dug into the ground. Now all that remains is to screw the flower into the “cartridge” and admire the swaying of the delicate flowers.
Option 2 Christmas tree toy or decorative element
It's a homonym for the humble wildflower, but a bell is made just as quickly as its namesake. The top part of a 1.5-liter bottle is cut off, after which a double hole is made in the lid through which the thread is threaded. It is better to hold the cuts over a candle flame so that the edges become non-sharp.
[aaa2]
Next, we paint the bell with acrylic paints and, if necessary, decorate with beads, lace, and sparkles. You can make a drawing or pattern on the side surface. This way you can make Christmas door bells or free Christmas tree decorations outside.
You can make a small, modest bell from a plastic bottle with your child, and then develop creative talents with more complex plastic crafts.
[aaa5]
Source: https://vdomax.ru/skromnyj-kolokolchik-iz-plastikovoj-butylki/
Souvenirs made from eggshells and trays
To prevent egg shells and trays from going to waste, make colorful New Year's toys out of them. Shortly before the New Year, start collecting the necessary materials at hand. Try to break raw eggs not in the middle, but from the edge. We should have complete molds for the bells.
For the craft, take eggshells, gauze (bandage), thick thread, PVA, paints and a brush. For decoration, you can add semolina, beads or putty.
There are two ways to make a Christmas tree toy from a shell.
Manufacturing method No. 1:
- Cut the gauze fabric into pieces. We glue them on the outside of the shell. This procedure is needed to strengthen the fragile material.
- After the glue has dried, cut out sharp petals on the shell. Cover the surface with white paint.
- Use an awl to poke a hole for the lace.
- We glue a mosaic of husks onto the shell and paint it.
Manufacturing method No. 2:
- We glue the shell with gauze from the inside. To quickly dry the glue, you can place the workpiece on the battery.
- Paint the outside with white.
- Use scissors to cut the shell evenly.
- Let's do the decor. Apply putty to the shell to create relief patterns, then paint the dried surface. You can smear the craft with glue and sprinkle it with beads or semolina. Use your imagination to create a bright design for the toy.
- Make a hole at the top and insert a loop.
For a MK with a cardboard tray for eggs, you need to take colored paper, glue, scissors, and string.
- Cut out cells from a cardboard tray.
- We cover the cells with paper of different colors.
- We pierce the top to attach the lace. You can also hang a large bead on it.
If you start collecting colorful candy wrappers from foil in advance, you can replace colored paper with them. You will get very beautiful shiny bells.
Bells made from plastic bottles: DIY master class
Plastic bottles can be classified as commonly available and simple materials, and their use in arts and crafts allows you to make a wide variety of designs and crafts. Bells made from plastic bottles are the most common and popular crafts that fit very organically into the natural landscape.
The popularity and demand for bells made from polyurethane bottles is explained by their ease of execution. Such crafts can serve as excellent decoration for your backyard or garden.
Detailed master class on making bells for your garden plot with your own hands
We offer you a detailed master class on how to create a bell with your own hands from such an unusual material as plastic bottles.
Take multi-colored plastic bottles for yogurt, kefir, milk, juices and the like. A composition of bottles of different sizes and unusual shapes will look very interesting.
Cut the plastic container in half, the upper neck part will transform into a flower bell. Then cut out the plastic figuratively, and some of the zigzags should be bent outward, and the other part should be left as is.
This little trick will allow you to achieve a three-dimensional effect in bell flowers.
For the convenience of volumetric manipulations and the proper scope of the petals, you can heat the plastic over the flame of a gas stove, that is, the whole plastic.
The most convenient way to attach ready-made bell flowers to the stem from a metal rod is through the lid. To do this, pierce it with the same rod and bend it on the back side of the composition.
The stem itself will look alien if it retains its metallic appearance. So you can either paint it green or wrap it in green plastic cut into ribbons. The last step is more difficult, but the appearance will be more organic.
If desired, the bell-shaped design is complemented by leaves, various plexuses of stems, multi-level inflorescences, and so on. Just do not forget that the frame must have a margin of safety, otherwise your bells will fall like flowers in the wind - and without any wind, but due to gravity.
Start painting your plastic composition. Since natural bells come in blue and white, the color of the source material should be chosen accordingly. If you want to make plastic flora with your own hands, but bottles don’t suit the color scheme, quick-drying spray paint will give you the desired shade almost instantly.
DIY plastic composition: decorative bells
In order to make an unusual and interesting flower arrangement from plastic bells, it is enough to perform several simple sequential manipulations:
- Empty, clean, white and blue plastic bottles should be carefully cut in half. The basis of the flowers will be the cone-shaped narrow part of the bottles with lids.
- On the part used in the work, use a colored marker to mark the markings according to which you will cut out the petals. All petals must be bent outward using scissors, which will give the flowers a more natural and attractive appearance.
- For attachment to stems, a pair of holes are made in the cork for a wire connection.
- Using strong wire, all manufactured plastic flowers must be secured to stems, which are used as metal rods.
- Cut out the petals and bend them using sharp scissors
- To imitate the center of your bell flower, you can use any simple materials you have on hand, including sawed foam circles, which you can then paint with latex yellow paint.
- Metal stems should be wrapped in spiral tape, which must be cut from a green plastic bottle.
- At the final stage, cut out several leaves from green plastic that will alternate with a green spiral on the stems
Even children can be trusted to make basic flower arrangements from plastic material, but the use of dangerous tools is only possible under the supervision and assistance of adults.
A selection of videos on the topic of the article
All the videos we have selected will help you learn how to make bells from plastic bottles with your own hands. Watch the videos and learn even more new techniques and secrets, as well as ideas for creating extraordinary compositions.
Source: https://potta.ru/iz-butylok/kolokolchiki-iz-plastikovyx-butylok-master-klass-svoimi-rukami-2
Tips and tricks
Despite the fact that making bells from plastic bottles with your own hands is quite simple, there are several secrets that help achieve maximum resemblance to real flowers:
To bend the plastic on the petals and stem more easily, you need to heat the plastic
- if it is not possible to use colored plastic, then you can make a composition of bells based on transparent plastic bottles, followed by applying two layers of latex paint of a suitable color;
- The most impressive look is not a single, but a group mount of bell flowers on each stem;
- to speed up and facilitate petal bending, the plastic must be slightly heated;
- Bell flowers made from small plastic bottles with a volume of 0.5 or 0.33 liters look more elegant and attractive.
Even children can be trusted to make simple flower arrangements, but the use of a dangerous tool requires supervision and assistance from adults.
Flowers from plastic bottles: bells
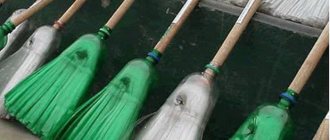
Bells made from plastic bottles are simple but very elegant crafts for the garden. To make them, you will need white or blue bottles: these shades are most often found in bells.
The easiest way to use milk bottles (for white bells), but if there are no bottles of a suitable color, you can paint them with acrylic paint. Everything is clear with the sizes: large bells - large bottles, small flowers - small bottles.
To make bell-shaped flowers from plastic bottles, the bottles need to be cut crosswise. The upper part (with the cork) will represent a bell. All that remains is to cut out the petals and bend them to make them look more voluminous. If you want more elegance, you can shape the already cut petals by slightly heating the flower blank over the fire.
Flowers from plastic bottles: attached to a cork
You need to make holes in the corks, and then stretch a wire through them, which you will use to tie the flower itself to the branch. The easiest way to make a plant bush is from metal rods. To “ennoble” such a rod, you need to cut a spiral ribbon from a green plastic bottle, wrap it around the rod and move it over the fire. The plastic will melt and the branch will be ready - you can hang bells.
Using the same technology, you can make other crafts for the garden - flowers, for example, tulips. And if you insert several blanks into each other, you can make double flowers from plastic bottles.
- How to paint crafts from plastic bottles
- Lotuses from plastic bottles: 2 optionsClematis from plastic bottles
- Interesting flower bed “Flower Fan”
- Beautiful flower beds made from tires
- Hyacinths from plastic bottles or spoons. 2 options
- Garden crafts made from plastic bottles: friendly elephant
- Home zoo made from plastic bottles
- DIY garden figurines: flamingos
- Crafts for the garden: swans made from plastic bottles
- Funny flower beds made from plastic bottles: “Hedgehog” and “Piglets”
- Crafts for the garden: bees made from plastic bottles
- Crafts for the garden: butterflies from plastic bottles
- Spectacular flower plantation made from plastic bottles Unexpected daisy made from plastic bottles
- Decorative tree made from plastic bottles
- Flowers from plastic bottles for a flower bed: sunflowers and chrysanthemums
- Large flowers from plastic bottles
- Kitchen chandelier made from plastic bottles
Source: https://www.domstoy.ru/publ/landshaft/idei_dlja_sada/cvety_iz_plastikovykh_butylok_kolokolchiki/70-1-0-205
Shapes and colors
To give the flower a natural look, it is better to reduce the size of the bells closer to the tip of the stem. This can be done by reducing the length of the flower itself or using smaller bottles.
You can make the shape of the flowers the way you like. The edges are cut rounded or sharp. Bend it outward and twist it a little, or leave it in its original form. Depending on the shape of the bottle, the bells will have a different appearance.
Bells made from transparent bottles will be inconspicuous and will not show all their beauty. Therefore they need to be painted. It is better to paint flowers from the inside, as then the paint will last longer. This is quite easy to do. You need to pour a small amount of paint into the cut-out workpiece and rotate the workpiece so that the paint covers the entire inner surface. The edges can be painted with a brush or sponge. If the bell is white, then white plastic bottles will do; you won’t have to paint them.
The color of bells in nature can be white and all shades from blue to blue. You can get creative and paint them in unusual colors or make shade transitions. Using your imagination, you can create magnificent and unique bells with your own hands.
Ideas for making New Year's bells
You can make a bell for the New Year from a variety of materials, for example:
- plastic bottle;
- cup;
- flower pot;
- cone (pine, spruce);
- eggshell;
- egg trays.
Colored paper, cardboard, and foamiran are also suitable for making a bell. Decorative elements include tinsel, beads, sparkles, acrylic paint and others. Creation ideas for the New Year can be very different, but in any case, the bell should have three elements:
- Dome.
- Tongue.
- The pendant is a loop for fixing it on the Christmas tree.